11 Managing SOA Composite Application Business Flow Instances
This chapter includes the following sections:
Initiating a Test Instance of a Business Flow
This section describes how to initiate a test instance of a deployed SOA composite application.
To initiate a SOA composite application test instance:
-
Access this page through one of the following options:
From the SOA Infrastructure Menu... From the SOA Folder in the Navigator... From the Composite Menu... -
Select Home.
-
Select the Deployed Composites tab.
-
In the Composite table, select a specific SOA composite application.
-
At the top of the composite home page, click Test.
-
Under soa-infra, expand the partition.
-
Select a specific SOA composite application.
-
At the top of the composite home page, click Test.
-
Select Test Service > client_name.
Note:
The Test button is disabled in the following situations:
-
The SOA composite application revision is stopped or retired.
-
There are no web services available for the application. Only composites having services with web service bindings can be tested from this page.
-
-
If the composite includes multiple services, the Test button has a drop-down list to select the service to test.
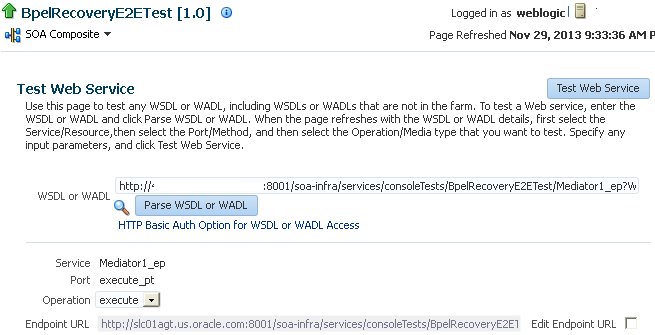
The Test Web Service page for initiating an instance appears.
This page provides many options for initiating an instance. At a minimum, you must specify the XML payload data to use in the Input Arguments section at the bottom of the page. For more information about the fields on this page, select Help > Help for This Page from the weblogic menu in the upper right corner.
For additional details about using the Test Web Service page, see Administering Web Services.
The WSDL file and endpoint URL are populated automatically based on the service you selected to test. The endpoint URL is derived from the WSDL and can be overridden to invoke that service at a different location. If the service selected has multiple ports, a drop-down list is displayed. Otherwise, the port of the current service is displayed.
Field Description Parse WSDL or WADL
If you change the WSDL or Web Application Description Language (WADL) file, click this link to reload the file.
WADL files are used with REST operations. For more information, see Chapter "Integrating REST Operations in SOA Composite Applications" of Developing SOA Applications with Oracle SOA Suite.
If the WSDL URL does not contain the revision number, it is processed by the default composite application. For example, if there are two revisions of a composite application named
HelloWorld, then the following endpoints are exposed by them:-
http://host:port/soa-infra/services/default/HelloWorld!1.0/client -
http://host:port/soa-infra/services/default/HelloWorld!2.0/client
However, if the WSDL specified for web service invocation does not contain the revision details (for example,
http://host:port/soa-infra/services/default/HelloWorld/client), it is processed by the composite revision that is set as default.HTTP Basic Auth Option for WSDL or WADL Access
Click to insert the username and password credentials in the HTTP transport header. Both the Username and Password fields are required.
Operation
Select the operation that you want to test from the Operation menu. The available operations are determined from the WSDL.
To test a REST service, select the GET or POST service port operation.
Edit Endpoint URL
Click to edit the endpoint URL.
-
-
Accept the default values for these fields or provide values appropriate to your test environment.
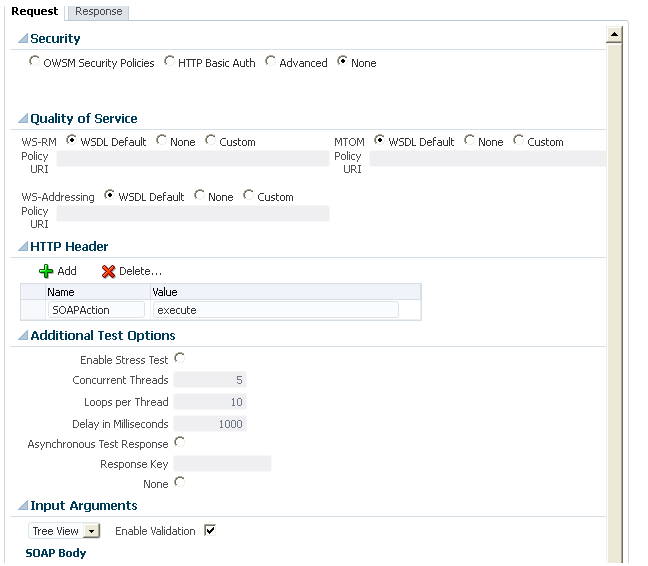
The lower part of the Test Web Service page consists of the Request tab. This tab enables you to specify security, quality of service, HTTP transport, stress testing options, and XML input arguments:
The Security section enables you to test web services security. This section includes the following fields for passing security properties with messages:
Field Description OWSM Security Policies
Inserts a WS-Security SOAP header. The Username field is required, and the Password field is optional. When you select this option, the page is refreshed to display security policies for selection.
HTTP Basic Auth
Inserts the username and password credentials in the HTTP transport header. Both the Username and Password fields are required.
Advanced
Uses a custom policy to authenticate the user (specifies the URI for the custom policy). The Username and Password fields are optional.
None
Select to not specify security credentials. This is the default selection.
When testing REST services, the SOAP protocol is not used. The only security options are HTTP Basic Auth or None.
-
Accept the default values for these fields or provide values appropriate to your test environment.
The Quality of Service section enables you to test Reliable Messaging (WS-RM), Message Transmission Optimization Mechanism (MTOM), or WS-Addressing. This section is not available when testing REST services. This section includes the following fields:
Field Description WS-RM
Select one of the following options for testing WS-Reliable Messaging protocol policies. Reliable messaging policies support this protocol, which guarantees the end-to-end delivery of messages.
-
WSDL Default: Executes the default behavior of the WSDL. For example, if the WSDL contains a reference to a WS-RM policy, then the policy is enforced. If the WSDL does not contain a reference to a WS-RM policy, then reliable messaging is not tested.
-
None: No policy for WS-RM is tested even if the WSDL contains a reference to a policy.
-
Custom: Enforces a custom policy. Specify the URI of the custom policy in the Policy URI field. If a WS-RM policy is referenced in the WSDL, it is ignored, and the policy specified in the Policy URI field is used instead.
MTOM
Select one of the following options for testing MTOM policies. MTOM policies ensure that attachments are in MTOM format, a format for efficiently sending binary data to and from web services.
-
WSDL Default: Executes the default behavior of the WSDL. For example, if the WSDL contains a reference to an MTOM policy, then the policy is enforced. If the WSDL does not contain a reference to an MTOM policy, then MTOM is not tested.
-
None: No policy for MTOM is tested, even if the WSDL contains a reference to a policy.
-
Custom: Enforces a custom policy. Specify the URI of the custom policy in the Policy URI field. If an MTOM policy is referenced in the WSDL, it is ignored, and the policy specified in the Policy URI field is used instead.
WS-Addressing
Select one of the following options for testing WS-Addressing policies. WS-Addressing policies verify that SOAP messages include WS-Addressing headers in conformance with the WS-Addressing specification.
-
WSDL Default: Executes the default behavior of the WSDL. For example, if the WSDL contains a reference to a WS-Addressing policy, then the policy is enforced. If the WSDL does not contain a reference to a WS-Addressing policy, then WS-Addressing is not tested.
-
None: No policy for WS-Addressing is tested even if the WSDL contains a reference to a policy.
-
Custom: Enforces a custom policy. Specify the URI of the custom policy in the Policy URI field. If a WS-Addressing policy is referenced in the WSDL, it is ignored, and the policy specified in the Policy URI field is used instead.
-
-
Accept the default values for these fields or provide values appropriate to your test environment.
The HTTP Header section enables you to add, modify, or delete HTTP headers to pass request information to a web service. This section is not available when testing REST services. This section includes the following fields:
Field Description Add
Click to add a new row for an HTTP header, and then enter the appropriate information in the Name and Value fields.
Delete
Place this curser in either the Name or Value field and click to remove the selected HTTP header row.
-
Accept the default values for these fields or provide values appropriate to your test environment.
The Additional Test Options section includes the following fields. This section provides a simple stress test that simultaneously invokes multiple instances.
Note:
This is not a real stress test tool. Therefore, do not enter huge values for both concurrent threads and the number of times to invoke the operation. Doing so can result in errors.
Field Description Enable Stress Test
Click Enable to create a simple stress test. With this enabled, no conversation ID is displayed.
Concurrent Threads
Enter the number of concurrent threads on which to send the invocations. The default is
5threads.Loops per Thread
Enter the number of times to invoke the operation. The default is
10times.Delay in Milliseconds
Specify the delay of milliseconds to wait between operation invocations. The default is
1000milliseconds (1second).Asynchronous Test Response
When testing an asynchronous web service, this specifies whether to request an asynchronous response upon running the test.
-
Resource Key: When testing an asynchronous web service, enter a value (for example,
testkey) that correlates with the asynchronous response. Each response key must be unique. The asynchronous response can also be tracked later on the Asynchronous Test Response page by specifying the associated response key. -
None: Select if you do not want to specify a resource key.
-
-
Accept the default values for these fields or provide values appropriate to your test environment.
The Input Arguments section includes the following fields for entering XML payload data.
Field Description Tree View
Displays a graphical interface of text fields in which to enter information. This field automatically generates the required headers and XML structure.
XML View
Displays the XML file format for inserting values. You can paste the raw XML payload of your message into this field.
Enable Validation
Select to enable validation of the input arguments.
-
Click Test Web Service.
The test results appear in the Response tab upon completion.
Note:
The Response tab does not display payload data if you are performing a stress test or are testing an asynchronous service.
-
Click Launch Flow Trace to access the flow trace of the instance. The ID of the new flow instance is displayed in the top right corner of the Flow Trace page.
-
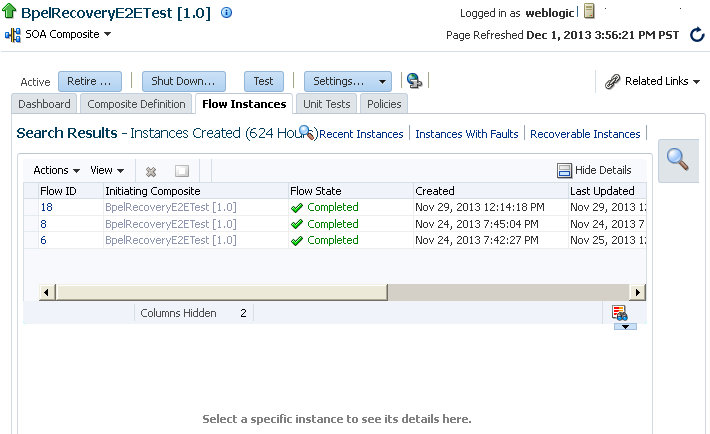
To return to the composite home page, click the name of the composite that appears at the top of the page or select Home from the composite target menu. On the composite home page, click Flow Instances and then click Recent Instances. The new test instance is displayed at the top of the instances table.
For more information, see the following sections:
-
Introduction to Business Flow Instances for conceptual details about instances
-
Introduction to Policies for an overview of policies
-
Administering Web Services for specific details about policies and testing web services from the Test Web Service page
Specifying RPC/Literal-Style WSDL Files on the Test Web Service Page
If you are specifying an RPC/literal-style WSDL file with a message defined by "element=" in the Test Web Service page in Oracle Enterprise Manager Fusion Middleware Control, use the XML View option of the Input Arguments section to modify the SOAP message. The SOAP body should look like the following:
<soap:Body>
    <ns:initiate>
        <payload>
          <value xmlns="...">3</value>
        </payload>
    </ns:initiate>
</soap:Body>
where initiate is the operation name, payload is the part name, and value is the element defined in the WSDL message/part.
Tracking Business Flow Instances at the SOA Composite Application Level
In addition to tracking business flow instances in the SOA Infrastructure and in an individual partition, you also can track instances on the Flow Instances page of a specific SOA composite application. A business flow instance corresponds to an end-to-end business transaction. Business flows consist of a single SOA composite application or multiple SOA composite applications connected together to fulfill a specific business process.
-
Access this page through one of the following options:
From the SOA Infrastructure Menu... From the SOA Folder in the Navigator... -
Select Home.
-
Select the Deployed Composites tab.
-
In the Composite section, select a specific SOA composite application.
-
Under soa-infra, expand the partition.
-
Select a specific SOA composite application.
-
-
Click Flow Instances.
The Flow Instances page displays the following details:
-
A utility for specifying and saving comprehensive instance and fault search criteria and executing Search.
Note:
When you initially access the Flow Instances page, the Search Results table is empty. You must click Search to populate this table with business flow instance details.
-
A Search Results table that displays the flow trace ID that uniquely identifies a business flow, the composite initiating the business flow (business flows can span multiple composites), the state of the flow instance (for example, completed successfully, running, failed, recovery required, and so on), the instance start time, the last update to the instance, the partition in which this flow was initiated, the flow instance name (if set during design time in a BPEL process or Oracle Mediator service component), and a link to the log files. To display additional columns in the table, select View > Columns.
Note:
The Flow Instances page of the individual SOA composite application does not include a link to the Error Hospital page. To access that functionality, go to the Flow Instances page of the SOA Infrastructure or individual partition and search with similar criteria, restricting your search to the appropriate SOA composite application.
You can perform the following business flow instance tasks:


