4Inventory Management
Inventory Types
WMS includes two inventory types: Allocatable (Available) and Unallocatable (Unavailable) Inventory.
Available/Allocatable Inventory
Available/Allocatable inventory is any inventory that is located in a reserve or active location that has not been allocated against an outbound order.
Item Master
The Item Master stores information for all the items that are used in the warehouse.
Unit of Measure in WMS
Oracle WMS Cloud supports four units of measure:
- CASE: Cases refer to physical boxes (must define “Standard Case Quantity”).
- PACK: Cases can be further broken down into Packs (must define “Standard Pack Quantity”).
- UNIT: The smallest unit of measure is Units, which represents an ‘each’.
- LPN: LPNs are the largest UOMs in the system, and can have multiple meanings.
If each box is labeled with an LPN, the LPN represents a physical box.
If an entire pallet is labeled with an LPN, the LPN represents a pallet.
The LPN has an attribute called “LPN is Pallet”, which systematically marks the LPN as a physical Pallet. The advantages of using this functionality is that pallets will only require one label (LPN) and can be allocated into Pallet, Cases, Packs or Units.
LPNs can only be set to “LPN is Pallet” during receiving. You must use a receiving RF module (either “Receive LPN Shipment” or “Receive LPN Load”) and configure its “pallet-handling” module parameter to “LPN as Physical Pallet”. With this setting, any LPN received with this Pallet will have the “LPN is Pallet” flag set to true.
LPN as a Pallet
There are two ways to treat the LPN as a Pallet:
- Using “LPN is Pallet” flag: LPNs have an optional flag that mark the containers as pallets.
- Without using the “LPN is Pallet” flag: LPNs do not use the flag, but physically the pallets are labeled with LPNs.
While option two is easier as it does not require special configuration (the user tricks WMS by systematically using LPNs but physically using pallets), it is has limited visibility.
The main difference is that you cannot define the ‘standard pallet quantity’ with option two while this is possible with option one.
Setting up the "LPN is Pallet" flag to true for LPNs
As stated above, using option one requires extra configuration. You can only set the LPN’s “LPN is Pallet” flag to “TRUE” during receiving via a receiving RF module with special parameters configured. To configure this:
- Go to the “Screens Configuration” screen.
- Create a new “Receiving LPN Shipment” or “Receiving LPN Load” RF module.
- Select this record and click on its details.
- Modify the “pallet-handling” flag and set it to “LPN as Physical Pallet”.
- Now, every LPN that is received with this special RF module will have the “LPN is Pallet” flag enabled.
Additionally, you must also define the standard pallet quantity in the Item master. To do so:
- Go to the “Items” screen.
- Select the item record and click on its details.
- Click “Edit” to begin editing.
- Populate the following fields:
- Standard Pack Quantity (optional)
- Standard Case Quantity
- LPNs per Tier
- Tiers per Pallet
- Click Save.
Description of Item fields
- Style: Represents the Item Code.
- Parts A through F: Represents the breakdown of parts in a SKU, if applicable. Example: A small blue polo could be represented as:
- part_a = ‘POLO’
- part_b = ‘BLUE’
- part_c = ‘SMALL’.
- Alternate Item Code: An alternate representation of the SKU, which concatenates parts A through F into a single record.
- Description: Description of the item.
- Barcode: The item’s barcode.
- Putaway Type: Refers to the value used to group similar SKUs together. For example, SKU “LAPTOP” could belong to Putaway Type “ELECTRONICS”. This is a functional field that defines the putaway logic in the “Putaway Priorities” screen.
- Unit cost: The item’s individual cost.
- Unit Length/Width/Height/Weight/Volume: Denotes the unit’s dimensions. This field does not store the values in a particular unit of measure. These fields are required for functional purpose such as cubed waving, putaway, and replenishment.
- Item Line: Not used in WMS.
- VAS Group Code: If there is a VAS Group Code defined in WMS, this field links the item to a particular set of VAS activities.
- Hazardous: Used to define an item as hazardous.
- Pre-Pack Code: For Prepack scenarios, the item also carrys a prepack code, which is a separate record that represents a group of child SKUs. For example, WMS could use a combination of different Polo’s that come in a prepack into a single ‘Prepack’ SKU record.
- Host Aware Item Flag: Used in Prepack scenarios in determining whether or not the Host is aware of the Prepack item.
- Is Parent: Used in Prepack scenarios to determine whether the item is a parent SKU. If it is a parent SKU, it will contain a prepack of multiple child SKUs.
- Dummy SKU Flag: This is a SKU that can be ordered and allocated, but will have unlimited inventory. The SKU will be prompted for during picking. For example, this could be used to grab gift cards to go along with an order
- Cubiscan Mod Timestamp: Updates the timestamp in which the Item was modified by a cubiscan interface.
Additional Fields (Item Details)
- Std Case Qty: Defines the standard Case Quantity of an item.
- Std Case Length/Width/Height/Weight/Volume: Defines the dimensions of a Case.
- Std Pack Qty: Defines the standard Pack Quantity of an item.
- Std Pack Length/Width/Height/Weight/Volume: Defines the dimensions of a Pack.
- Special Code 1 & 2: Informational fields.
- Product Life: The expected lifespan of an item in DAYS.
- % Acceptable: The percentage of remaining life required (according to the product life) at receiving.
- Require Batch Number: Requires an item to have a batch number during receiving.
- Require Serial Number: For future use only in release 6.3.
- Conveyable: Used when MHE systems are enabled. Defines whether or not an item is conveyable.
- Sortable: Used when MHE systems are enabled. Defines whether or not an item is sortable.
- LPNs per tier:
- If the “LPN is Pallet” is FALSE, this field defines how many LPNs are in a tier for a given pallet.
- If the “LPN is Pallet” is TRUE, this field defines how many CASES there are in a pallet tier.
- Tiers per Pallet: This field defines how many tiers there are in a pallet for this SKU.
- If the “LPN is Pallet” is FALSE, the RF only displays a warning message to the you that the maximum number of LPNs has been reached for the pallet (you can override this message).
- If the “LPN is Pallet” is TRUE, these fields are define the standard pallet quantity of a SKU, given that the “Standard Case Quantity” field is also defined.
Creating Items Manually
- Go to the “Items” screen and click the Create button.
- Enter the following information to create a new item:
- Parts A
- Description
- Barcode
- Unit Cost
- Unit Length
- Unit Width
- Unit Height
- Unit Weight
- Unit Volume
- Click “Save”.
Adding Items through Manual Interfaces
Items can also be created through an Oracle WMS Cloud Excel template.
Step 1: Preparing the Input Interface file:
You must follow the rules below in order to correctly use the Oracle WMS Cloud interface:
- The filename must start with the letters “ITM”.
- The columns specified as ‘required’ in the interface specification document must be populated.
Step 2: Uploading the Interface File into WMS
- Go to the “Input Interface” screen.
- Use the drop-down to select the appropriate interface to process:
- Click on “Upload Files” and navigate to the file you wish to upload.
- When the file is displayed in the screen, click “Run Interface”.
- The system will return a message dialog notifying you that the file has been successfully processed.
Item Master Integration into WMS
A third method to interface records into WMS is through a shared SFTP directory.
- Host system drops the “ITM” file into the shared directory (typically an “input” folder).
- When the file is dropped, ORACLE WMS CLOUD will automatically detect the file and process it into WMS.
- If a file fails for some reason, it is automatically moved into the “error” folder.
Alternate Barcodes
The Alternate Item Barcodes screen sets up alternate barcodes for SKUs in the warehouse. This screen enables the ability to configure multiple barcodes for the same Item Code.
Adding Alternate Barcodes from the UI
- To add a new barcode to an existing item, from Item Barcodes, click “Create” (
 ) at the top right and input the Item Code and the new Barcode:
 - When you are populating the Item Code, you can either populate the field or use the magnifying glass to look for the code from the Item Master.
- When you are using the magnifying glass, the system will pop up a new window. To display the records, press the “Search” button.
- Once the Item record is found, double click the record to select it.
- Click "Save".
Adding Alternate Barcodes via Interface
You can also interface alternate barcodes into WMS using the “IXR” (or “IBR”) interface template.
Open the interface with Excel and populate the “item_barcode” with the original barcode and the “vendor_barcode” with the new alternate barcode:
Make sure that the correct company code is populated and that the “action_code” is set to “CREATE”. Save the interface.
- Go to the “Input Interfaces” screen and select the “Item Barcode” from the drop-down menu:After selecting the Item Barcode from the drop-down, upload the file and click “Run Interface” to process the file.
- If successful, the new barcodes should be displayed in the “Alternate Barcodes” screen.
Required Item Fields
You can also make certain Item fields required before it can be received into WMS. This is done through the Required Item Fields screen.
To add a new ‘required field’, click Create. This prompts a new window, where you can select a field from the drop-down:
If the required item field is not populated, the RF displays an error message during receipt:
To populate the required item fields, go to the Items screen, select the item record, and populate the appropriate item field. There are two places in which an Item field can be populated:
- From the Items screen, click Edit:
- From the Items screen, click Details (click Edit and then Save your changes when you are finished):
Once all of the required item fields are populated, you must retry receiving the LPN with the RF receiving option.
RF Print Label
You can print item labels from handheld devices using the RF Print Item Label module.
- Once you select Print Item Label from RF, you are presented with an option to enter the label printer.
- If you tab out of this field without entering a printer, system will check if a default label printer has been configured for the logged in user. If a default label printer is not configured, the system displays a “Required Field” message forcing you to enter a printer.
- If a default printer is configured for the logged in user, the system will ask if you would like to print the label to the default printer.
- If this message is configured as a warning, you can either accept the message (using Ctrl+A) to print to default printer or hit Ctrl+W to go back to the printer field and enter a different label printer.
- If this message is configured as an error, you are forced to go back (using Ctrl+W) and enter printer in the printer field.
Note: If the message is not enabled, this message does not show up at all. The default printer is automatically populated in the printer field when you tab out of the printer field.
- After printer validations, you are prompted to scan the item barcode or vendor barcode.
- Finally you are prompted to enter the number of labels required to be printed for the scanned item. A quantity greater than 0 must be provided.
- If a customized item label that has been designed through label designer is configured, then the customized label will be printed. Else item label(s) will be printed based on base label format.
Item UI
Item labels can also be printed using the Print Label button from the Item UI:
When an item is selected on the Items UI, Print Label button is enabled. This button is not enabled when multiple items are selected. When you click the Print Label button, the following dialog pops up:

You can enter the number of labels required for this item and hit submit. Item labels will be printed to the default label printer configured for the logged in user. Since there is no option to change or enter a printer using this option, it is necessary that the default label printer is configured for the logged in user.
IB Shipment UI
There is also an option to print item labels from the IB Shipment UI. In the IB Shipments view, click on the Nbr Items hyperlink for the desired IB Shipment.

This brings up a view that lists all items on the shipment. There are two buttons available from this view:
- Print Item Labels – This button is only enabled when a single item is selected on this view. Item labels will be printed only for the selected item.
- Print All Item Labels – This button is always enabled and can be used to print labels for all items on the shipment
When you click either button, the following pop-up is displayed. You have the option to print labels based on Shipped Qty OR Received Qty. After choosing that, you need to enter the number of item labels that need to be printed for each unit.
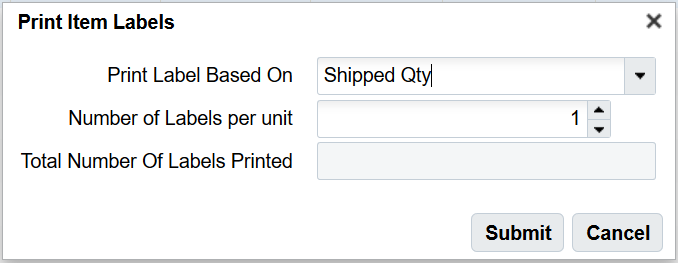
For example, if Shipped Qty is selected (which is 10 in this example) and the number of labels per unit is 5, then 50 item labels will be printed for this item.
Similar to the item UI, since this option does not prompt for printer, you must configure the default label printer for the logged in user.
Creating Locations through the Interface (UI)
Using the Oracle WMS Cloud “LOC” interface file, you can map the warehouse locations into WMS.
Step 1: Fill out the “LOC” excel file
Fill out all the necessary information into the location interface. Column A defines the location type. Refer to the table below:
| Interface Code | Location Type |
|---|---|
| C | Consolidation |
| D | Dock |
| Q | QC |
| V | VAS |
| P | Drop |
| S | Staging Location |
| A | Active |
| H | Pack and Hold |
| Y | Shipping Location |
| R | Reserve |
| K | Packing Station |
| T | Receiving Station |
Step 2: Setting up the parameter for location updates
WMS requires a special parameter to be set before creating location updates in the system (for locations that contain inventory).
- Go to the “Facility Parameters” screen.
- Set the LOCATION_UPDATES_WITH_INVENTORY parameter to “YES”.
Step 3: Uploading the Interface file into WMS
- Go to the “Input Interface” screen.
- Use the drop-down to select the appropriate interface to process:
- Click on “Upload Files” and navigate to the file you wish to upload.
- When the file displays, click “Run Interface”.
- The system will return a message dialog notifying you that the file has been successfully processed.
Reserve Inventory
The ReserveInventory screen provides detailed inventory information filtered by Location Area and Item Code. You can click on the linked LPN number in the “Curr lpns” column and see more information regarding the items in each LPN such as the Shipped Quantity, Current Quantity (by LPN), and Pallet Number.

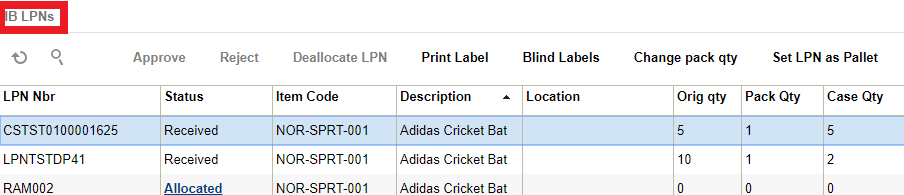
IBLPNs
The IBLPNs screen contains detailed information about all the IBLPNs currently stored in the warehouse. This includes individual LPN information broken down by SKU such as its Status, Quantity, Current Location, Expiry Date, Pack, and Case quantity.
| Action Button | Description |
|---|---|
| Accept | If the LPN is Marked for quality control, you can accept it here. |
| Reject | If the LPN is Marked for quality control, you can reject it here. |
| Deallocate LPN | If the LPN is allocated, you can deallocate here. |
| Print Label | This button prints the LPN label according to the label template set up in Label Template View (label type IB Container) |
| Blind Labels | Allows you to print blind labels by selecting the number of labels, Label type (either IBLPN, OBLPN or Pallet), Destination company, and Destination facility. |
| Change Pack QTY | Allows you to change the pack quantity of the selected IBLPN. |
| Set LPN as Pallet | Allows you to Set LPN as Pallet. |
| Unset LPN as Pallet | Allows you to unset LPN as pallet. |
| Modify Qty | Allows you to modify the LPN quantity, and you must provide a reason code. |
| Locate LPN | Locates the LPN. If the flag capacity check is enable, the system will make sure that the LPN fits the location according to max volume, max units, and max weight. |
| Generate MHE Distribution Msg | It generates the TO_MHE_DISTRIBUTION_INFO message. |
| Generate MHE IB LPN Info Msg | It generates the TO_MHE_IBLPN_INFO message. |
| Mass Update Attributes | Allows you to do a mass update for Inventory attributes A-O and Putaway Type. Updates all the records shown in the page, so it’s a good idea to limit your search. It will first tell you the number of records that will be updated. |
| Print UOM Label | Allows you to print a UOM Casel label or UOM Pack label fo the LPN selected. |
| Update LPN Type | Allows you to update the LPN type of the selected LPN. |
Editing Batch Numbers
Currently, Oracle WMS Cloud provides an option from the IB LPN Inquiry screen to update batch numbers for batch tracking items. Some warehouse managers may want the option to prevent batch number edits for certain users based on screen parameter settings.
The allow_edit_batch_nbr screen parameter in the IB LPN Inquiry screen allows you to prevent editing the batch number of an inventory.
Parameter Choice Behavior
- When the allow_edit_batch_nbr parameter is set to yes, the batch number field in the edit screen in the IBLPN inquiry will be editable and you can edit the batch number and save.
- When the parameter is set to no, you can edit the batch number field in the edit screen in IBLPN inquiry. However, when you Save the edited batch number, the system will throw the error "Cannot change batch number".
| UI Screen Parameter Name | Options | Behavior |
|---|---|---|
| allow_edit_batch_nbr |
|
|
|
|
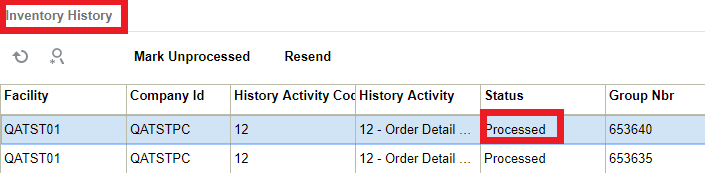
Inventory History
Inventory history records various WMS transactions taking place in the facility for purposes of informing the
ERP or any other external system that may be interested.
For more information about the Iventory History UI fields, see the Interface Specifications document.
Enable/Disable Auto Process
To help customize your view of inventory history records, from the Inventory History Activity Parameters UI you can click the Enable Auto Process or Disable Auto Process buttons.

Once you click the Enable or Disable Auto Process buttons, a dialogue box appears asking for your password. Enter your password and click Submit.
Enable Auto Send of Inventory History
In the past the main way to extract WMS transaction records would be via scheduled jobs at pre-determined intervals. Scheduling too frequently may place unnecessary load on the system and scheduling too infrequently may caused delays in notifying the ERP or other systems of critical WMS updates. You can now automatically send inventory history records as and when they are created.
They are sent via the Output Interface setup just like other outgoing messages. The new fields "enable_auto_send" and "disable_auto_send" are available in the Inventory History Activity Parameter. From the Inventory History Activity Parameter screen, you can select all history activities that are crucial for you to monitor. If the enable_auto_send flag is enabled, then the system will post the relevant IHT records as soon as the records are written to the relevant webservice end point setup in the Output Interface Configuration screen.
To enable Auto-Send of Inventory History, do the following:
- From the Inventory History Activity Parameter screen > Select the IHT Record.
- Click on enable_auto_send.
Set Inventory History Transactions to Not Ready (Un-Processed)
From the Inventory History UI, you can click the “Mark Unprocessed” button to change the IHT status of a record to Un-Processed (Not Ready).
The Mark Unprocessed button allows you to reprocess the IHT records and let the system to pick up inventory again.
Steps:
- Go to the Inventory History UI.
- Select the IHT record. You can select one or more IHT records to process the request at the same time.
Note: The system enables the button only if the selected IHT records is in status “Processed/Processing/Cancelled”.
- Click the Mark Unprocessed button. The system prompts for password.
- Enter your OCWMS password. Click Submit. To discard, click Cancel.
- Upon success, the system displays a confirmation message “Updated 1 record”, and the IHT status for that particular record is changed to “Not Ready”.
Configuring Reason Codes
Reason codes are used as identifiers for performing certain transactions, such as modifying the quantity of an LPN. Reason codes must be added at the Parent company level.
- Go to the “Reason Codes” screen.
- Click the Create button.
- Populate the code and description.
- Click “Save”.
Reason Code Parameters
You may also configure reason codes that are required for certain transactions. These parameters are located in the “Company Parameters” screen.
- CYCLE_COUNT_REASON_CODE: Defines the reason code for performing a cycle count.
- DFLT_BATCH_EXP_ADJ_REASON_CODE: Defines the reason code for modifying a container’s batch expiry date.
- SHORT_REASON_CODE: Defines the reason code for performing a short pick.
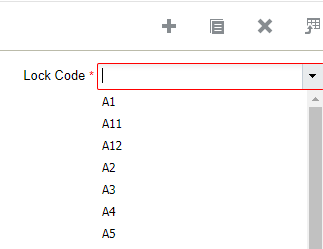
Configuring Lock Codes
Lock Codes must be added at the Parent company level.
- Make sure your current company view is at the Parent company.
- Go to the “Lock Codes” screen.
- Click the Create button.
- Populate the applicable fields/flags.
- Allocatable: If checked, LPNs with this lock code are still eligible for order allocation.
- Unlock on locate to Reserve: If checked, LPNs with this lock code will have this lock code removed whenever it is located to a Reserve location (a location that does not have a lock code).
- Click “Save”.
Adding a Lost Lock Code
Warehouses can have a lock code exclusively for lost items. WMS requires a separate configuration to differentiate a lost lock code from all other lock codes.
- Go to the “Company Parameters” screen.
- Edit the “LOST_LOCK_CODE” parameter. In the “Parameter Value” field, populate the lock code you wish to use as the lock code for lost LPNs.
- Click “Save”.
Adding Lock Codes to LPNs
You can add specific Lock Codes to an IBLPN by clicking the blue number value in the “Nbr Locks” column:
This will prompt a new window, where you can add multiple lock codes to the container:
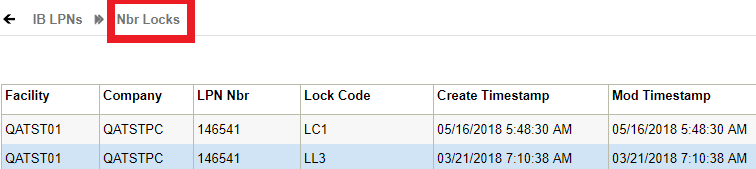
The above figure shows all the Lock Codes currently added to the container. Click Create () and select one of the configured Lock Codes from the drop-down to add lock codes.
Modifying IBLPNs
LPNs can be modified via the RF module Modify IBLPN. Here you can modify either the LPN’s SKU, Quantity, or Putaway Type.
- Enter the RF module Modify IBLPN.
- Scan the IBLPN to modify.
- In the “Qty:” field, enter the new quantity (you must input the current quantity even if the current quantity remains the same).
- To modify the Putaway Type, select option Ctrl-R: Putaway Type. This prompts a list of Putaway Types in the system – select the appropriate Putaway Type to modify.
- Once all the modifications are done, the LPN’s attributes should be displayed in the RF screen. When done, select option Ctrl-N: End Modify.
- In the “Reason Code:” prompt, input the appropriate Reason Code for that transaction.
- A list of configured Reason Codes can be viewed in the Reason Code screen.
RF Create IBLPN
Before you begin to assign an inbound load to an outbound, create an LPN as shown in the following steps:
Steps:
- Login to the WMS RF through your credentials.
- Create an LPN for the order. To do that, select the Create LPN transaction. After invoking, create a new LPN and enter the LPN number. For example: LPN: SKLPN1504M.
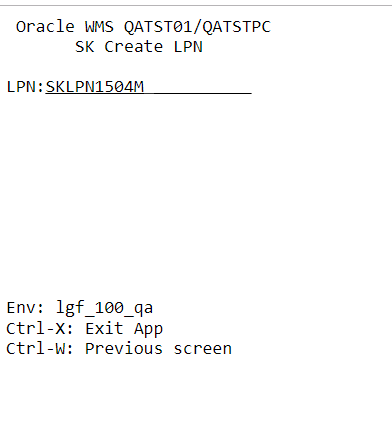
- The RF screen takes you to the next screen where you need to enter following information:
- LPN: Enter the LPN Number.
- Items: Enter the items that you created through the items UI.
- Qty: Enter the quantity.
- You can also check the LPN status in the IBLPN UI. Go to the IBLPN UI > Search for the LPN number > the status displays as “Received” when items are successfully consumed.
- After consuming all the items, press Ctrl-X to exit from the current page.
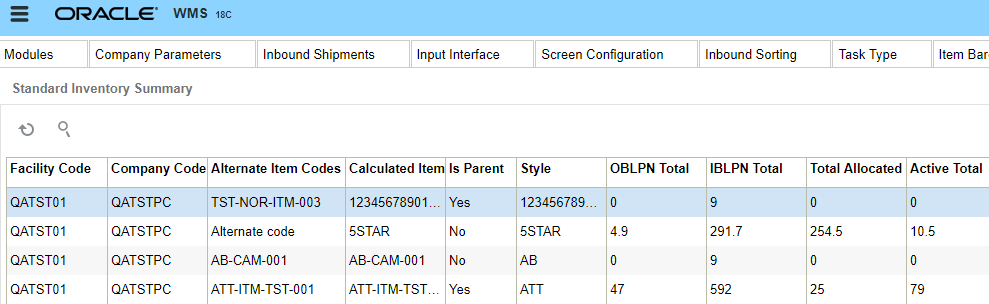
Inventory Summary
The Inventory Summary shows the inventory movement of all items from available quantity to packed quantity. This report can be used as an overview/summary of available inventory and to view how many allocated units are still pending to picked or shipped.
Cycle Count
A cycle count is an inventory auditing procedure, which falls under inventory management, where a small subset of inventory, in a specific location, is counted on a specified day.
In Oracle WMS Cloud, you can run Cycle Counts in three ways:
- Manually execute a Cycle Count in a location (RF)
- WMS automatically triggers a Task (UI)
- Run a Task Template that generates group of Tasks (UI)
How To Check for a flagged Cycle Count Location
The Locations and Reserve Locations screens include a “To be Counted flg” column – if the value is Yes, then it means that the location needs to be cycle counted.
The Tasks screen.
Every location flagged for Cycle Count has a Task tied to it. To view these Tasks, filter the results by setting the Task type to “CC Location Contents” or “CC Location LPN Scan” and the status to “HELD” or “Ready”.
Cycle Count Execution (RF)
There are three ways to run Cycle Counts with the RF, each varied by level of detail:
- Cycle Count Location (By # of LPNs in a location): Prompts you to input the number of LPNs in the scanned location.
- Cycle Count LPN (By LPN count): Prompts you to scan each LPN in the Location. Any IBLPN not scanned in a CC session will be updated as “Lost”.
- Cycle Count LPN Detail
By SKU quantity: Prompts you to scan the LPN, SKU, quantity and its Inventory Attributes (Batch Number, Expiry Date, Serial Number) in the location. Here you input the quantity for each LPN.
By SKU Scan: Prompts you to scan the LPN and SKU in the Location. For the quantity value, you have to scan once for every SKU in the LPN. This option does NOT validate inventory attributes in the LPN.
The following sections describe the steps you would take to execute each CC type.
Cycle Count Location
- Enter RF transaction “Cycle Count Location”.
- Scan the location that will be cycle counted.
- Input the number of LPNs in that location.
- Press Ctrl-E to end the count.
- If the LPN quantity inputted is incorrect, RF prompts you to use the detailed Cycle Count transaction (option 0 - Cycle Count LPN Detail).
Cycle Count LPN
- Enter RF transaction “Cycle Count LPNs”.
- Scan the location to be cycle counted.
- Scan the LPNs in the location.
Note: if you scan an LPN that does not exist in the location, the RF prompts the message “Rescan the same LPN”. When you rescan the same LPN, WMS makes the inventory adjustment to record the new LPN into the location.
- Continue step 3 until all LPNs are scanned.
- When you are done scanning all the LPNs, press Ctrl-E to close the count.
- If WMS thinks there are still LPNs left to be scanned, the RF prompts the message “Remove LPNs from Location?”, followed by a list of LPNs that have not been scanned. Press Ctrl-A to proceed with the inventory changes.
- If the Cycle Count was correct, RF will prompt the message “Count completed for location”.
Cycle Count LPN Detail
- Enter RF transaction “Cycle Count LPN”.
- Scan the location to be cycle counted.
- Scan the first LPN in the location. Scan the SKU and quantity for the current LPN.
- If the LPN has the “LPN is Pallet” flag set to “FALSE”:
- If the LPN has the “LPN is Pallet” flag set to “TRUE”:
- Cases per Tier refers to the “LPNs per Tier” field in the item’s detail in the Item Master.
- Tiers per Plt refers to the “Tiers per Pallet” field in the item’s detail in the Item Master.
- If the quantity is incorrect, the RF will prompt message “Reenter quantity for this item”.
- If you reenter the same LPN, SKU and quantity, the adjustment is made.
- If you are counting a multi-SKU LPN, the RF displays a warning message for SKUs that are not counted.
- If the quantity is correct, the RF screen blinks and you can continue scanning the rest of the LPNs in the location.
- When all the LPNs have been counted, press Ctrl-E to end the count.
- If there are LPNs that have not been counted, the RF prompts a message “Remove LPNs from Location?” to ensure this change. When you accept with Ctrl-A, the uncounted LPNs are set to “Lost” status and the inventory adjustment is made.
- If all the LPNs are counted, the RF prompts the message “Count completed for location.”
Note: LPNs in “Allocated” status cannot be “Lost”.
Cycle Count Caveats
- WMS always validates the LPN’s Inventory Attributes (Batch Number, Expiry Date and Serial Number), if the SKU requires it.
- LPNs that are allocated to a wave cannot be “Lost” during a Cycle Count transaction.
- LPNs in “allocated” or “partially allocated” statuses cannot be Cycle Counted.
Cycle Count Task Creation
In addition to manually Cycle Counting locations, you can also create Cycle Count Tasks and execute them later. There are two ways to create CC Tasks:
- Through user-configured Triggers.
- Through user-executed Task Template
Cycle Count Trigger Management
Oracle WMS Cloud contains a list of possible triggers for cycle counts that you can choose to enable. When enabled, the system automatically generates Cycle Count Tasks for its location.
The Cycle CountTrigger Management screen contains the following parameters:
- Facility/Company: Defines which Facility and Company this trigger applies to (an asterisk * means it applies to all facilities/companies – must be at PARENT company level).
- CC Trigger: A description of the trigger. This is the action that will trigger the CC Task.
- Enabled: “Yes” means the trigger is enabled.
- Priority: The priority given to the Task when created.
- Task Type:
- CC Location LPN Scan: Creates a Cycle Count Task that prompts you to scan the LPNs in the location.
See Cycle Count Execution (RF) for details.
- CC Location Content: Creates a Cycle Count Task that prompts you to scan the LPNs, SKUs and quantities in the location.
See section Cycle Count Execution (RF) for details.
Description of Cycle Count Triggers
| Trigger | Definition/Expected behavior |
|---|---|
| Alternate location for Putaway | - You scan a location different than the one directed by the system during directed putaway: - System generates a CC task for the location directed by the system. - Trigger module: ‘rf.inbound.cwrfputaway’ with mode = ‘Directed Putaway Pallet’ or ‘Directed Putaway LPN’. |
| Short pick | - You short pick an LPN or units from an LPN: - System generates a CC task for the location where the LPN was shorted. - Trigger modules are: ‘rf.outbound.cwrfpacklpn’,‘rf.inbound.cwrfmovelpn’, ‘rf.inbound.cwrfpickiblpnreplen’, ‘rf.outbound.cwrfpickcart’, ‘rf.outbound.cwrfpackncactiveorder’, ‘rf.outbound.cwrfpickiblpn’ |
| Short pick active | - You short pick the remaining quantity of a SKU in an active location: - System generates a CC task for the location where the quantity was shorted. - Trigger modules are: ‘rf.inbound.cwrfpickiblpnreplen’, ‘rf.outbound.cwrfpickcart’, ‘rf.outbound.cwrfpackncactiveorder’, ‘‘rf.outbound.cwrfpickiblpn’ |
| Cancel OBLPN in ‘OB Created’ status | - You cancel an OBLPN in ‘Outbound Created’ status from the UI: - System generates a CC task for the location(s) where the inventory in this OBLPN was allocated from. - Trigger module: ‘ObContainerView’ - Note that this trigger should only work when an OBLPN in ‘Outbound Created’ status is cancelled manually from the UI. If an OBLPN in ‘Outbound created’ status is cancelled by ‘Undo Wave’, the system should not create corresponding CC tasks even if this trigger is enabled. |
| De-allocate IBLPN from UI | - You de-allocate an IBLPN from UI: - System generates a CC task for the location where the IBLPN was de-allocated. - Trigger module: ‘IbContainerView’ |
| De-allocate Active Inventory from UI | - You de-allocate a SKU from active inventory in the UI. - System generates a CC task for the location where the SKU was de-allocated. -Trigger module: ‘ActiveInventoryView’ |
| Set Location ‘To be counted’ from Location screen | - You set the “To be counted” flag equal to ‘Yes’ in the UI. - System generates a CC task for the location where the flag was set to ‘Yes’. -Trigger module: ‘LocationViewFW’ |
| Recount Location | - You reject an inventory adjustment record with ‘Loc Dtl Count’ = No and with ‘Creation Type’ = Manual (Recount triggers are only applicable for Cycle Counts done manually). - System generates a CC task for the location with rejected inventory adjustment record. -Trigger module: ‘Inventory Adjustment Management’ |
| Recount Location Detail | - You reject an inventory adjustment record with ‘Loc Dtl Count’ = Yes and with ‘Creation Type’ = ‘Manual’ (Recount triggers are only applicable for Cycle Counts done manually). - System generates a CC task for the location with rejected inventory adjustment record. - Trigger module: ‘Inventory Adjustment Management’ |
| Approve ‘Location Mismatch’ record | - You approve an inventory adjustment record that moves an LPN from another location to the cycle counted location (inventory adjustment record has warning ‘Location Mismatch’). - System generates a CC task for the location where the LPN was located BEFORE the cycle count adjustment (LPN’s ‘Expected Location’). Ex. If LPN was systematically in location A. However, during the cycle count that generated the inventory adjustment record, same LPN was counted in location B. Upon approval of this record, the CC task must be generated for location A. -Trigger module: ‘Inventory Adjustment Management’ |
| Substitute LPN from different location | - You scan an LPN that is in a location different from the allocated LPN during Full-LPN or Reserve NC Picking (LPN substitution from different location). - System generates a CC task for the location where the LPN was allocatedoriginally. - Trigger modules are: ‘rf.inbound.cwrfmovelpn’, ‘rf.inbound.cwrfpickiblpnreplen’, ‘rf.outbound.cwrfpickcart’, ‘rf.outbound.cwrfpackncactiveorder’, ‘rf.outbound.cwrfpickiblpn’, ‘rf.outbound.cwrfrepackoblpn’ |
| Alternate location for Split LPN into active | - You scan a location different than the one directed by the system during RF_Directed putaway with parameter ‘multi-sku-lpn-mode’ = ‘Split into active locations’. - System generates a CC task for the location directed by the system - Trigger module: ‘rf.inbound.cwrfputaway’ with mode = ‘Directed Putaway Pallet’ or ‘Directed Putaway LPN’ AND ‘multi-sku-lpn-mode’ = ‘Split into active locations’. |
Configuring Cycle Count Triggers
- Go to the Trigger Management screen - this displays a list of Cycle Count Triggers.
- Select the record and click Edit () to customize the trigger.
- Tick the “Enabled” checkbox to enable/disable the trigger.
- Set a number for the priority. This is the priority of the Task generated from the trigger.
- Select the Task Type. This defines the task type for the task created under this trigger (CC Location LPN Scan or CC Location Detali Count).
- Click "Save" to save the changes.
Creating Cycle Count Tasks with Task Creation Templates
Optional: Configuration for Task Rules
Ordering Criteria in CC Task Templates are used to configure the order in which CC Tasks are displayed in the RF task list.
- Go to the Task Template screen, select the template and click on ‘Details’.
- Select the Task Type record and click “Ordering Criteria”.
- This takes you to a new window with all the ‘ordering’ rules for the task type. Click Create to add a new record.
- Input the necessary info for the ordering criteria record:

-
Sequence Nbr: The sequence number for the ordering criteria record.
-
Order by column: The criteria used for ordering the tasks.
-
Break by count: Leave this field blank (only applicable for non-CC Tasks).
-
- Press “Save” to create the record.
Executing Cycle Count Task Templates
Once the Cycle Count Task templates are set up, the next step is to run them.
- Go to the Task Template screen and select the template.
- Click on ‘Run Template’. The message “Tasks created” displays. Press OK.
- To view a list of all the CC Templates that were executed, go to the CC Run Inquiry screen. This is similar to the Wave Inquiry screen for running waves.
Configuring a Cycle Count Approval Rule
The Cycle Count Adjustment Approval Rule screen allows you to configure a rule for cycle count approval and set tolerance levels for groups of items (using selection criteria.)
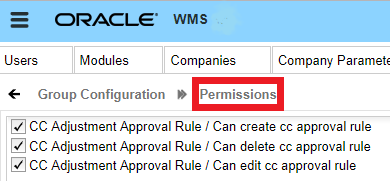
Permissions
From the Group Configuration UI, click Permissions to view the available permissions for Cycle Count Adjustment Rule and to set group permissions.
Cycle Count - Approval Settings
From the Cycle Count Adjustment Approval Rule detail screen, you can set "Approval Settings". Approval settings allow you to configure the mode for approval for each item(s)/ group of item(s) specified in the selection criteria.
You can configure different Approval Settings based on your preferences for different items.
Let’s say you want to set item(s) belonging to velocity V1 so that they always go for approval when there is a variance. You set item(s) belonging to velocity V2 so that they never go for approval when there is a variance, and item(s) belonging to velocity V3 should go for approval depending on a certain threshold in the variance.
Approval Rule Options
When your Approval rule is configured with Approval Settings = "Apply Tolerance Settings", and you are cycle counting the particular item that falls under this rule, the system will apply the tolerance settings. You can populate each rule detail with different tolerance settings.
From the Cycle Count Adjustment Approval Rule screen, you can click on a rule’s Details to further refine the items that the Approval rule checks.
The following table shows what each of the Approval Rule options are and what they check:
| Approval Rule Option | Description |
|---|---|
| Priority | Priority for the Approval Rule. |
| Approval choice | You can specify your rule for Manual Approval or to Auto Approve Based on Tolerance. |
| Approval based on | You can apply Tolerance Settings based on "Quantity" or "Total Adjusted Cost". When the UOM selected is Quantity, you can set the tolerance check in terms of Absolute value or percentage. When UOM selected is Cost, then the tolerance check will be based on Adjusted Cost. When UOM selected is Cost, you can set tolerance check in terms of Absolute value only. So when "Value" is selected, you can specify the tolerance value in the Tolerance Value field. The system then checks for the value set in the Tolerance check by field. |
| Value or percentage | You can specify your rule to check for either value or percentage for approval. |
| Min tolerance % | Minimum quantity tolerance percentage that is applied on the Total 'Current Qty'. |
| Max tolerance % | Maximum quantity tolerance percentage that is applied on the Total 'Current Qty'. |
| Tolerance value | Is Tolerance value always 0? |
| Tolerance check by | Tolerance Check By can be populated with Inventory or SKU. This allows you to configure whether the CC approval process should be triggered when there is a variance in the count in Inventory or in SKU. When Tolerance Check By = Inventory, if there is a variance for one of the inventory in the location/IBLPN that goes beyond the tolerance threshold, the system will trigger a manual approval flow. If Tolerance check by is populated as "SKU", then the tolerance check is at the SKU level in the Active/Reserve Location (if RF CC Location is selected). If you specify RF CC IBLPN, then the tolerance check will be at the SKU level in each IBLPN. |
Selection Criteria Button
From the Cycle Count Adjustment Approval Rule screen, click Details (), and then click the Selection button to view and configure the Selection Criteria.
Cycle Count Exception Scenarios
Cancelling a Cycle Count Process
If you wish to exit and cancel the Cycle Count process for a given location, you must press “Ctrl-W” until the RF returns to the main menu.
LPN is in "Consumed or "Shipped Status
- When you scan an LPN in “Consumed” or “Shipped” status in the Cycle Count operation, the system gives you an error message that the LPN is in invalid status.
- Finding “Consumed” and “Shipped” status LPNs in the reserve reflects poor inventory management.
- For the “Consumed” and “Shipped” LPN inventory, you must create a new LPN, using Create LPN RF option for the physical inventory in the location. DO NOT FORGET TO PUTAWAY.
LPN is in an Invalid Status
- When you scan an LPN in “Packed” status in the Cycle Count operation, the system gives you an error message that the LPN is in invalid status.
Cycle Count Inventory Updates
Deferred vs Immediate Mode
Oracle WMS Cloud allows you to approve/reject inventory adjustments before any real changes are made to warehouse inventory. This process, called the “Deferred Mode”, is enabled at both the Facility and Company levels.
Refer to the following diagram for a high-level process flow of the Deferred Mode:
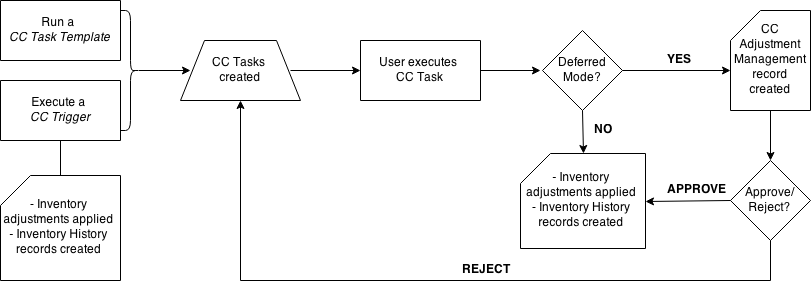
To enable Deferred Mode for your facility, set the Facility and Company parameters “INVN_ADJUSTMENT_APPROVAL_REQUIRED” to “YES”. If this parameter is set to “NO” at either the facility or company level, the “Immediate Mode” (default) will be enabled – in this mode, Cycle Count inventory adjustments are applied immediately. Note that in 3PL environments, this parameter must be set to “YES” at the child company level. Below are the possible configurations:
| PARAMETER CONFIGURATION | RESULTING BEHAVIOR | ||
| Facility Parameter ‘INVN_ADJUSTMENT_APPROVAL_REQUIRED’ | Company Parameter‘INVN_ADJUSTMENT_APPROVAL_REQUIRED’ | Write record in ‘Inventory Adjustments Management’ screen? | Inventory Adjustments Mode |
| NO | NO | NO | Immediate |
| NO | YES | NO | Immediate |
| YES | NO | NO | Immediate |
| YES | YES | YES | Deferred |
In the Deferred Mode, WMS keeps track of all Cycle Counts in the Cycle Count Adjustment screen.
This UI screen displays detailed information about the Cycle Count record.
- Group Number (group_nbr): Must be equal to the ‘Inventory History’ group number. In Deferred Mode, inventory adjustments need to get posted with the same group number in the ‘Inventory History’ table. The group number must be the same for all adjustments done in a specific location (when CC is done at the location level) or to a specific LPN (when CC is done at the LPN level) in one transaction. Note: Transaction is defined here as:
- For RF CC_Location modules: Time between Location scan until ‘Ctrl-E- End Location Count’ is entered.
- For RF_CC LPN module: Time between LPN is scanned until ‘Ctrl-P’ is entered to finish the LPN count.
- Company (company_code): Company where the transaction is performed. Note that parent level users are able to cycle count inventory at the child level, so child company code should be displayed here for this scenario.
- Facility (facility_code): Facility where user performing the count has logged in.
- Status (status): Current status of the adjustment record.
- RF screen name: Name of the RF transaction used to perform the Cycle Count.
- Total Expected Qty: Sum of current_qty (in units) of all the inventory in the location (CC at the Location level) or LPN (CC at the LPN level) before cycle count is performed.
- Total Count Qty: Sum of counted quantity (in units) during the execution of cycle count transaction for the location (CC at the Location level) or LPN (CC at the LPN level).
- Total Adjusted Qty: Total Count Qty – Total Exp Qty
- Location (location): Location where the CC transaction was executed. For CC at the LPN level, this field should be equal to the Location where the LPN was located at the time the count was performed.
Creation Type
Action that trigged the creation of this inventory adjustment record. The same ‘Creation Type’ values needs to be added to the ‘Task’ screen with the exception of ‘Manual’ so both screens may reference the same table. Valid Creation types are:
| Creation Type | Definition |
|---|---|
|
Trigger |
Adjustment was done while executing a task that was created with a trigger. |
| CC Rules | Adjustment was done while executing a task that was created by running a ‘CC Task Template’. |
| Recount | Adjustment was done while executing a task that was created by generating a recount (rejecting an inventory adjustment record in ‘Pending’ status) |
| Manual | Adjustment was done manually with RF_CC Location or RF_CC LPN (no task is executed). |
- Recount Reference: Used to keep track of counts that are done to the same location by generating a recount (rejecting a particular inventory adjustment). The first time a user rejects a record in ‘Pending’ status, the system must set the Recount Reference number equal to the Group Nbr of that record. This rejection will automatically trigger a CC task for the same location. Once this CC task is executed, the corresponding inventory adjustment record must be created with the Recount Reference of the first rejection (first Group Number)’.
- Task: TheTask number that was executed to create the corresponding inventory adjustment. Value should be blank if the count was performed manually with RF_CC Location or RF_CC LPN.
- Task Type: The Task Type that was created to create the inventory adjustment. Value should be blank if the count was performed manually with RF_CC Location or RF_CC LPN.
- Cost Adjustment: Sum of (item.unit_cost*adjusted_qty) for all the items in the location.
- Loc Dtl Count: ‘Yes/No’ value that indicates whether or not a particular non-active location count was done at the detail level.
- Warnings: Displays the number of warnings for a specific inventory adjustment record at the location (RF_CC Location) or LPN levels (RF_CC LPN) as a hyperlink. Click the hyperlink display a list of all the warnings for that specific inventory adjustment record.
| Warning | Scenario |
|---|---|
| Attribute Discrepancy | - You enter a different batch and/or expiration date or serial number during Cycle Count. - Warning should only be displayed for the detail record(s) for which different attribute was entered. |
| Inventory Expired | - You enter a passed expiration date during Cycle Count. - Warning should only be displayed for the detail record(s) for which an expired expiration date was entered. |
| Mixed batches in restricted Locn | - You scan multiple batches in a location with ‘Restrict Batch’ flag enabled during Cycle Count. - Warning should be displayed for ALL records in the location. - Inv. Adjustment records with this warning cannot be approved. |
| Mixed SKUs in Single-SKU Locn | - You scan multiple items in a location with ‘Allow Multi SKU’ flag disabled during Cycle Count. - Warning should be displayed for ALL detail records in the location. - Inv. Adjustment records with this warning cannot be approved. |
| Permanent SKU mismatch | - You scan an item different than the item assigned to a location with ‘Item Assignment Type’ = ‘Permanent’ during Cycle Count. - Warning should be displayed for ALL detail records in the location. - Inv. Adjustment records with this warning cannot be approved. |
| Location Mismatch | - You scan an LPN that is systematically in a different location, i.e. LPN’s Expected location <> Cycle counted location. - Warning should be displayed for all the details of the LPN that is scanned in a different location. |
- Reason Code: Display the value configured in Company Parameter ‘CYCLE_COUNT_REASON_CODE’.
- Create User: User who creates the inventory adjustment record.
- Create Timestamp: Time at which inventory adjustment was completed. For the CC_Location scenario, time at which ‘Ctrl-E: End Location count’ is entered to finish the count. For the CC_LPN scenario, time at which ‘Ctrl-P’ is entered to finish the LPN count.
- Mod User: User who modifies the record. Set equal to Create User when record is created. Set equal to user who Rejects, Accepts or Cancels the record.
- Mod Timestamp: Time at which the record is modified. Set equal to Create Timestamp when record is created. Update timestamp when user Rejects, Accepts or Cancels the record.
Approving and Rejecting Adjustments in Deferred Mode
The Deferred Mode allows supervisors to approve/reject inventory adjustments made by users who have previously Cycle Counted locations.

To approve/reject records, make sure it is in “Pending” status and click the “Approve” or “Reject/Recount” buttons.
Approving a record applies the inventory adjustments by adding/subtracting inventory from the locations as well as posting records in the Inventory History screen (referenced by the Group Number).
Rejecting a record will cancel the inventory adjustment and trigger a new CC task so that the location is re-counted.
Deferred Approval Mode set up in RF Cycle Count Transactions
Previously, when performing a Cycle Count with RF Cycle Count Location or RF Cycle Count IBLPN, you would use the screen parameter “auto-approve-mode (update 18C).” This screen parameter is now called “deferred-approval-mode.”
The deferred_approval_mode parameter makes it easy for you to distinguish the approval modes available while you are performing cycle counting operations.
From Modules, select Cycle Count Location or Cycle Count IBLPN, then Screens, and Screen Parameters to view and select your module parameter choice.
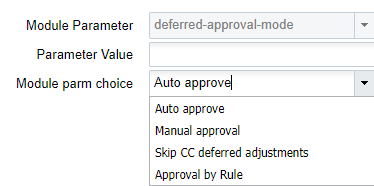
The available settings for the Deferred-Approval-Mode screen parameter are defined in the following table:
| Mode | Definition |
|---|---|
| Manual Approve | When "deferred-approval-mode" is set with Manual Approve, "RF Cycle Count Locn/IBLPN" writes the count information in the CC Deferred Adjustment UI and will leave the information for the supervisor to approve or cancel the count if supervisor is logged in with company and facility combination and mode is configured with deferred mode. |
| Auto Approve | When "deferred-approval-mode" is set with Auto Approve, RF Cycle Count Locn/IBLPN" writes the count information in the CC Deferred Adjustment UI and will get Auto Approved after passing through all the validations if user is logged in with a company and facility combination and mode is configured with deferred mode. |
| Skip CC Deferred Adjustment |
|
| Approval by Rule |
|
Lot Management
Lot (batch) information is captured in receiving and maintained up until shipping. The LPN’s Batch Number is set up during receipt. The item master maintains a flag (‘require batch number’) that will be used to determine if a lot (batch) number will be captured.
Defining Lot (batch) Number Requirement
Each item is configured if it requires WMS to capture the lot (batch) number during receiving.
- Navigate to the ‘Items’ UI screen.
- Using the ‘Search’ button, search for the item that requires expiration date setup.
- Select the item record, and click on the ‘Details’ button.
- Click the ‘Edit’ button, and scroll down until you see ‘require batch number’.
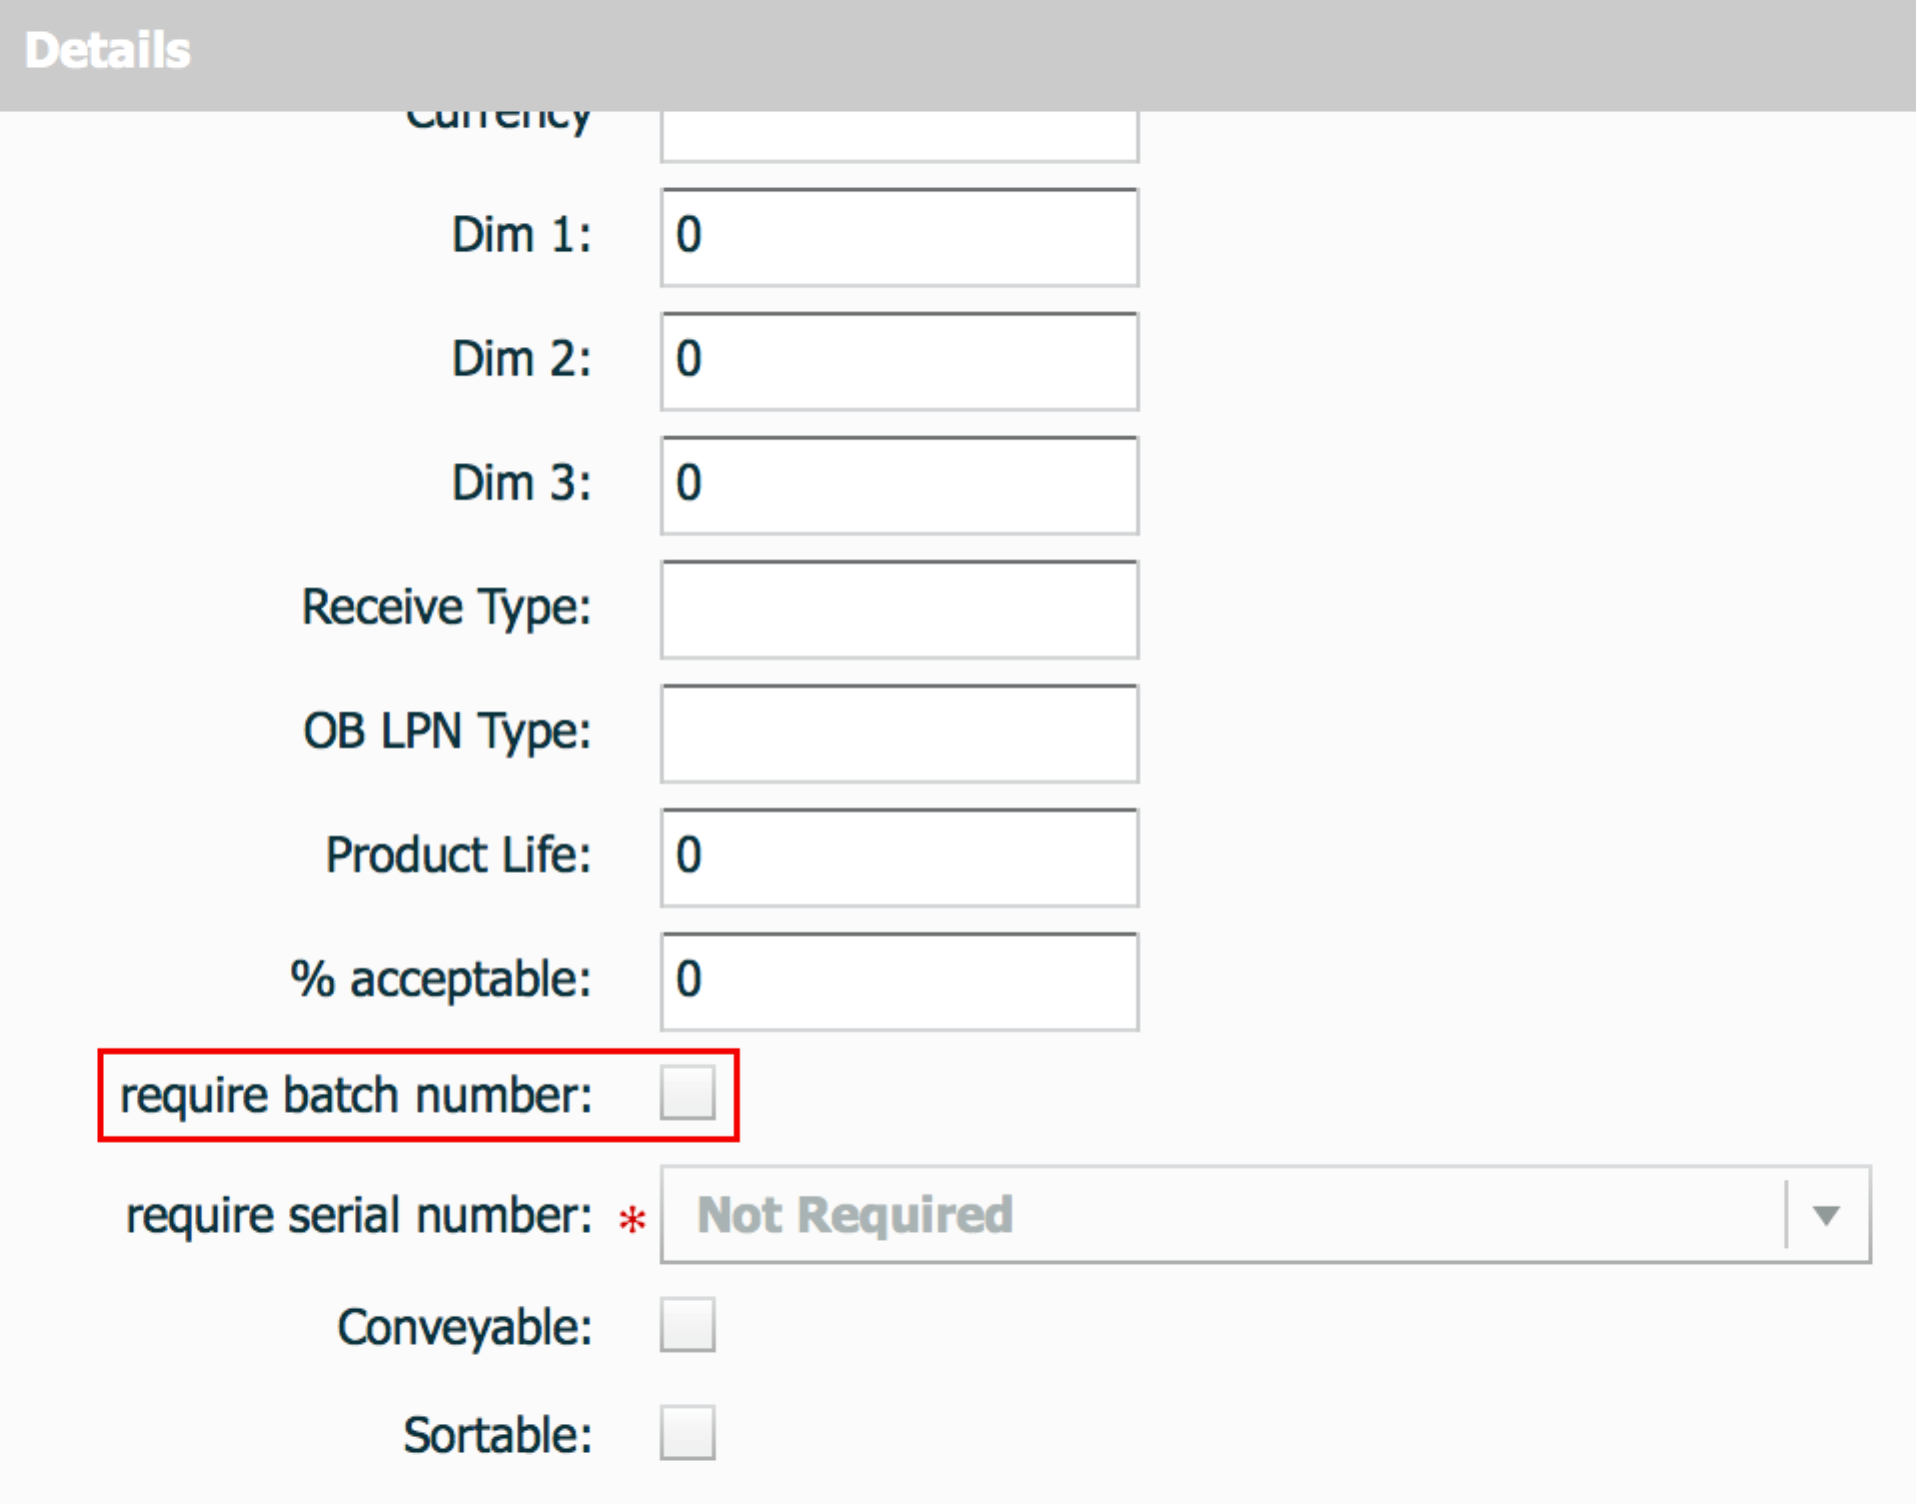
- Click the checkbox, and then click the 'Save' button to save the changes made.
View Lot (batch) Numbers
Lot (batch) numbers are maintained at the LPN level therefore, LPN screens are used to view the lot (batch) number.
- To view lot (batch) number associated with IB LPNs navigate to the ‘IB LPN’ UI screen.
- Using the 'Search' button, you can filter by a specific lot (batch) number in order to find all IB LPNs that are associated to the lot (batch) number.
- To view the lot (batch) number associated with the OB LPNs navigate to the ‘OB LPN’ UI screen.
- Using the ‘Search’ button, you can filter by a specific lot (batch) number in order to find all OB LPNs that are associated to the lot (batch) number.
Expiration Dates
Expiration dates are defined during receiving, either via ASN interface or user input, and they are tracked from receiving to wave allocation. Expiration dates are defined at the item level:
- Product Life: Is defined as the expected lifetime of the item.
- % Acceptable: Percentage of remaining life required at receiving (defined in %).
Defining Expiration Dates
Expiration dates are maintained at the item level. Each item needs to be defined with the ‘Product Life’ and ‘% Acceptable’. The two values are defined in the ‘Items’ UI screen.
- Navigate to the Item UI screen.
- Using the ‘Search’ button, search for the item that requires expiration date setup.
- Select the item record, and click Details ().
- Click Edit, and scroll down until you see ‘Product Life’, and ‘% acceptable’.
- Update these two fields and click “Save” when complete.
Product Life: 30 days
% Acceptable: 60%
This converts to 30 * 0.6 = 18 days acceptable. In this case, the item has to have at least 19 days left until it expires for it to be accepted into the facility.
So if today’s date was 11/24/2014, the system will only allow receipt if the item has an expiration date of at least 12/13/2014 (19 days later).
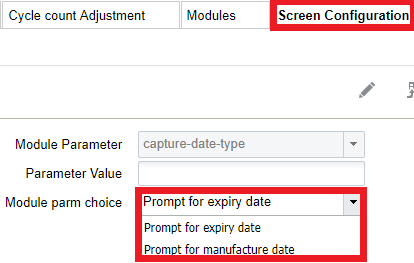
Configuration for Expiry Date Receiving
In order to receive items with expiry dates, the receiving RF module must have the Expiry Date validation enabled.
- Go to the “Screen Configurations” screen.
- Select the receiving RF module that will have expiry date tracking enabled.
- Click on Details to access its parameters.
- Modify the “capture-date-type” parameter to “Prompt for expiry date.”
 Note: if using manufacture dates, and if the item has the product life field defined, WMS automatically calculates the expiry date as well).
 - You can also define two parameters related to expiry dates: “allow-inv-exp-override” and “allow-rem-exp-override”.
- allow-inv-exp-override: By default, the RF displays an exception message when the scanned expiry date is older (i.e. will expire sooner) than all the expiry dates in the current inventory. If this parameter is enabled, it allows you to override this message.
- allow-rem-exp-override: By default, the RF will display an exception message when the scanned expiry date is below the item’s acceptable % of remaining life. If this parameter is enabled, allows you to override this message.
Receiving Expiry Date Items in the RF
During receiving, if the item has a product life value populated, the RF prompts you to input the LPN’s expiry date. When populating the expiry date, note that the input must be in the MMDDYYYY format.
Example: December 11, 2014 becomes “12112014”.
Recall Control
WMS supports the ability to lock a lot (batch) number in the event that a recall has been initiated.
- To apply a lock to a lot (batch) number, go to the ‘Batch Management’ screen.
- Using the search button, filter for the lot (batch) that requires a lock.
- Select the applicable record, and click the ‘Edit’ button.
- Select the applicable lock code from the drop-down menu, and click the ‘Save’ button.
Serial Number Tracking
Oracle WMS Cloud users that manage costly electronic merchandise may need to track items individually through the use of Serial Numbers. In WMS, Serial Numbers are unique codes that identify a single unit.
Important Caveats
Before enabling WMS to track Serial Numbers, here are some important caveats to be aware of:
- Serial Numbers are unique per item. In other words, you cannot have duplicate serial numbers within the same SKU and facility.
- The system allows duplicate serial numbers for different SKUs. In other words, Serial Number records are unique by Serial Number and SKU code combination.
- Oracle WMS Cloud supports up to 25 alphanumeric characters for Serial Numbers.
- If enabled, you will have to perform a scan for each Serial Number in a transaction[1].
- Clients need to be cautioned for changing the serial number tracking level configuration. If we change the serial number tracking levels then there can be situations where inventory in WMS and Serial Numbers will not be in sync.
- Enabling a SKU for Serial Number tracking enables it for all facilities that use that SKU.
- You cannot receive with Serial Numbers when the receiving mode is “receive LPN as Pallet” or if the receiving unit of measure is not Units.
- The system prompts for Serial Numbers when the OBLPN is packed using the Full Case or Cross Dock, given that Serial Numbers for the respective IBLPN are known.
- If the Serial Number tracking option is enabled from ”Packing Only” ordering for a Specific Serial Number is not possible.
- Serial number functionality is not applicable for Pre-Packs. It’s advised not to enable Serial Number tracking for Parent and Child item.
- The Sort and Receive transaction does not support the Serial Number prompt.
- The system assumes that you will scan every serial number in a pack or case.
Refer to Serial Number Transactions for a list of all transactions that have Serial Number validation.
Enabling Serial Number Tracking
To enable Serial Number tracking in WMS, you have to configure the following:
- Enable tracking for the SKU in the Item Master
- Enable tracking for the Company in the Company Parameters
- Create a Barcode Type record for Serial Numbers
Item Master Configuration
The item can have two types of Serial Number configurations:
| Item Master Serial Number Configuration | |
|---|---|
| Selection | Description |
| Not Required. | Item does not track Serial Numbers. |
| Required, don’t validate. | The receiving RF transaction will NOT prompt for serial numbers when host has interfaced serial numbers to the system. |
| Required, validate and allow user override. | The receiving RF transaction will prompt for serial numbers regardless of whether or not the serial numbers are interfaced in the system. |
To enable Serial Number tracking, complete the following steps:
- Select the SKU and click Details.
- In the window, click Edit to begin modifying the SKU’s properties.
- Scroll down to the ‘require serial number’ field and select and option to enable Serial Number Tracking.
- Click Save.
Company Parameter Configuration
All companies within the environment that plan on tracking serial numbers must have the company parameter set.
| SERIAL_NUMBER_TRACKING_LEVEL | |
|---|---|
| Value | Description |
| 0 | Company does not track serial numbers, even if items are configured to do so. |
| 1 | From packing: - Prompt Serial Numbers at packing - Track Serial Numbers that are shipped - Serial Number is tied to inventory from Packing |
| 2 | End to End: - Track Serial Numbers at all stages, from receiving to shipping - All inbound to outbound transactions prompt for Serial Numbers (if the item is tracking it) |
Barcode Type Configuration
Once the item and company parameters are configured, the last step is to make sure that the barcode type for the Serial Number is created. This step configures the barcode length validation for Serial Numbers.
This step is important because without this configuration Serial Number records cannot be created in the company view.
- Go to the Barcode Type screen.
- Click Create. Select ‘Serial Number’ under the Barcode Type field.
- Populate the remaining fields. Length refers to the barcode length required for Serial Numbers.
- Click Save.
Serial Number Management (UI)
Serial Number Repository View
This screen displays all Serial Numbers for all items in the current facility.

You can also drill down to the serial number record’s details () to view the inventory associated to it:

If the serial number is associated to inventory, the detailed view indicates the LPN’s status (Located, Allocated, Packed, and so on).
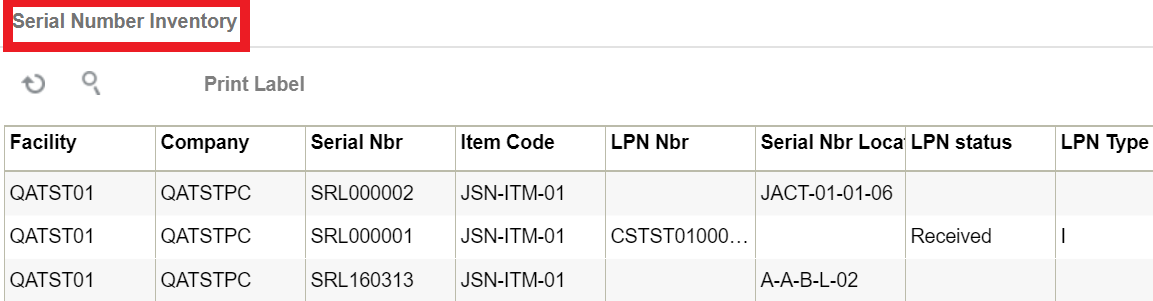
Serial Number Inventory View
This screen displays a ‘flattened’ view of Serial Numbers and their associated inventory records (ex. LPNs) in a single record.
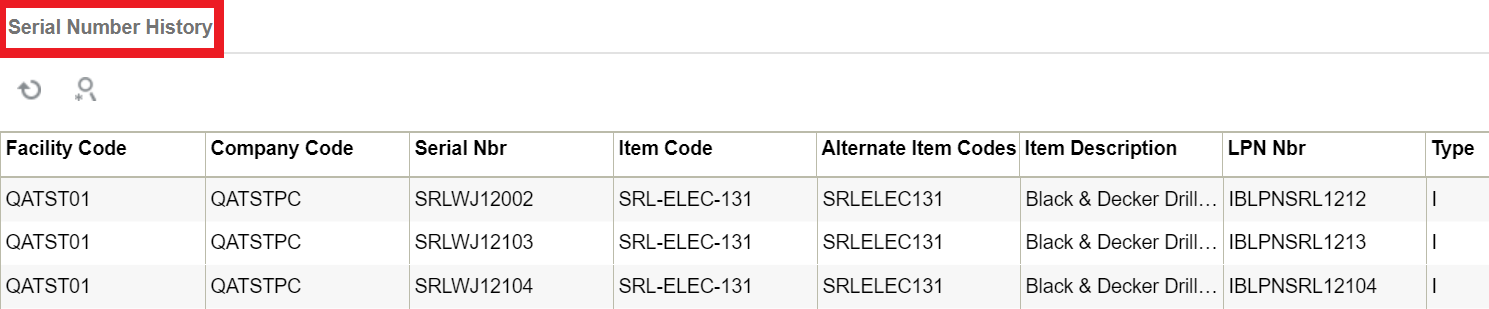
Serial Number History View
This screen displays all the “serial number – inventory” association changes in the system. For example, there can be a serial number record for an LPN of type “I” (Inbound) and another for LPN of type “O” (Outbound).
Creating Serial Number records in WMS
You can add Serial Number records in the system in two ways: through the UI and through interfaces.
Through the UI
- Go to the Serial Number Repository screen.
- Click Create () and populate the Item and Serial Number.
- Click “Save” to save your changes.
Through Interfaces
You can also interface Serial Numbers into Oracle WMS Cloud through the “ISN” interface. This is essentially an excel file with a set of columns that are populated to link LPNs with Serial Numbers.
Here is a list of things you need to check before attempting to interface an ISN file:
- The SKU in question must have the Serial Number activated.
- The Company Parameter SERIAL_NUMBER_TRACKING_LEVEL is set to either 1 or 2.
- The ASN (Shipment Number) must already be in the system.
- The ASN (Shipment Number) must have cartonized inventory (the ASN details must have the LPN populated).
Once you verify that all necessary information is in the system, follow these steps to upload your serial numbers:
- Go to the Input Interfaces screen.
- Select IB Shipment Serial Nbr from the drop-down, upload the interface file, and click “Run Interface”.

- If everything was done correctly, the system prompts the message “Status: Interface Completed”. From the the Serial Number Repository screen, click OK and verify that the serial numbers were successfully uploaded.
Replenishment
Some objectives of integrating Replenishment into WMS include:
- You can replenish inventory for locations if the inventory goes below a defined level.
- Replenishment can be based on requirements such as satisfying orders for stores.
- In this case, certain dedicated replenishment locations can be configured to consolidated orders for a store.
- Replenishment is performed in Active Locations and also allows you to perform Reserve to Reserve replenishment.
Oracle WMS Cloud supports four replenishment modes:
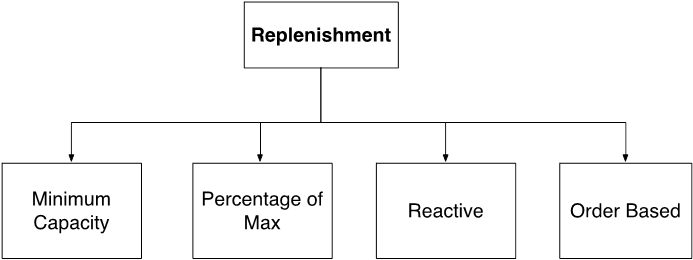
Each replenishment type has different criteria for when the replenishment wave is triggered:
- Minimum Capacity: Triggered when a location’s current quantity goes below the required minimum quantity.
- Percentage of Max: Triggered when the volume of items in the location goes below the location’s pre-configured percentage of maximum volume.
- Reactive: Triggered when you manually scan a location to be replenished.
- Order Based: Triggered when an order’s SKU needs to be replenished in the picking locations.
Required Configuration for Replenishment
Configuring a Replenishment Wave requires the following steps:
- Setting up locations for replenishment
- Setting up replenishment rules
- Setting up task templates
- Creating a Replenishment Template
Step 1: Setting up Replenishment and Allocation Zones
Replenishment requires two types of locations: replenishment and allocation zones. Replenishment zones are locations that you replenish to, while allocation zones are locations that you pick from for replenishment.
To Configure the Replenishment Zone:
- Go to the “Replenishment Zone” screen.
- Define the different replenishment zones for the warehouse using the Create () button.
- Once the replenishment zones are created, go to the “Locations” screen.
- Choose a location to replenish to by assigning it a replenishment zone. To do this, select the location and click Edit.
- Scroll down to the “Replenishment Zone” field and select the appropriate zone from the drop-down.
- Locations with replenishment zones also require item assignments. Item assignments tell the system what item this location is replenished with. To do so, change the location’s “Item Assignment Type” to “Permanent” and populate the SKU code in the “Item” field.
- Click “Save”.
Configuring the Allocation Zone:
- Go to the “Locations” screen.
- Select the location that you will replenish from and click Edit.
- Scroll down to the “Alloc zone” field and populate an allocation zone. This value is used in the replenishment template for defining which allocation zone will provide the replenishment.
- Click “Save”.
Step 2: Create the Replenishment Template
Next, you need to create the Replenishment template and define the parameter:
- Go to the “Replenishment Template” screen.
- Click Create () to create a new template.
- Fill in the desired parameters.
- Click Save.
Description of Fields
- Area: Configures WMS to exclusively look at the populated area to replenish to.
- Template Name: Enter the template name.
- Replenishment Zone: Determines which replenishment zones the template searches for.
- Replenishment Rule: Allows you to select which rule to use for the current template.
- Task Creation Template: Allows you to select which task template to use for the current template.
- Replenishment Trigger Mode: Determines the trigger mode (see replenishment modes described in section 5.1).
- Wave Search - Wave Search Templates are used as filters for selecting specific Orders during a wave. Each search template has a set of fields that are configurable.
- Percentage of Max: Triggered when the volume of items in the location goes below the location’s pre-configured percentage of maximum volume. Additional configurations:
- Locations with Replenishment Zones need the Length, Width, and Height fields populated.
- Locations with Replenishment Zones require Min/Max Volumes populated.
- You should populate the “Percentage of Max” field in the replenishment template. This percentage value is used as criteria for triggering a location based on the location’s maximum volume.
- For example, say that Location A’s Max Volume = 100 and Percentage of Max = 20%. If the location’s total volume goes below 20 (100*0.2 = 20), the location is triggered for replenishment.
- Locations with Replenishment Zones need the Length, Width, and Height fields populated.
- Allow Expired Inventory: If the flag is enabled, the system allows you to replenish inventory that exceeds the expiry date.
Step 3: Setting up Task Templates
- Go to the “Task Creation Template” screen.
- Click “Create” () to create a new Task Template.
- Select this template and click on Details () to view its details.
- Click “Create” () to create the appropriate task types and their ordering/selection criteria.
- For LPN replenishment, select “Full LPN Replenishment”.
- For Cases replenishment, select “Cases Replenishment”.
- For Units replenishment, select “Consolidate Replenish”.
- Click Save
Step 4: Setting up Replenishment Rules
Much like the Wave Template’s “Allocation Mode”, the Replenishment Template uses Replenishment Rules to define the types of allocations that are used for replenishment.
- Go to the “Replenishment Template” screen.
- Click on the “Replenishment Rule” button to access the rules.
- Click Create to create a new rule. To access its details, select it and click Details.
- To create a new allocation UOM, from the Replenishment Rule Sequence screen click Create and populate the appropriate fields.
- Click Save
Description of Fields
- Replenishment Rule: allows you to select which rule to use for the current template.
- Sequence Nbr: Sequence for creating task types, if there are more than one within the template.
- Location Type: Locations in WMS represent storage locations in the warehouse. Locations have different types depending on how they are used within the warehouse.
- Restrict area: populating this field tells WMS to exclusively look at the populated area to replenish from.
- Restrict alloc zone: populating this field tells WMS to exclusively look at the populated allocation zone (which was defined earlier) to replenish from.
- Allocation Method: defines the order in which LPNs are selected for replenishment.
- Replenishment UOM: defines the UOM that is allocated for replenishment.
-
Note: Units replenishment only works for Active locations.
-
- Consolidate and Distribute Replen: if this flag is checked, WMS allocates replenishment from multiple locations. This flag only works with Unit and Cases replenishment.
-
Note: Units replenishment only works for Active locations.
-
- Consolidate and Distribute Replen: if this flag is checked, WMS allocates replenishment from multiple locations. This flag only works with Unit and Cases replenishment.
- Round Up One Uom: The Round Up One UOM flag allows you to replenish beyond the need by one extra UOM (LPNs/cases/packs) for all of the eligible locations. When the Round Up One UOM flag is configured in the Replenishment Rule Header, the system replenishes by one extra UOM compared to the outstanding need of the location (see example below). When the Round Up one UOM flag is combined with the Ignore Capacity for Last Permanent Location Flag, the required need is replenished to the destination location when the replenishment UOM is LPNs/cases/packs. If the Ignore Capacity for Last Permanent Location Flag is set to no and the Round Up one UOM flag is enabled, then the destination location is replenished by one extra UOM when the need is not an integral multiple of the LPN/case/pack quantity.
Step 5: Wave Inquiry
The Wave Group Inquirty screen will show the status of the Wave run. Choose the Allocation View in this screen. Once Allocation completes, the wave will generate a Task. It will also create an internal order.
Executing Replenishment Waves
- Go to the “Replenishment Template” screen.
- Select a template and click “Run Template”.
- WMS returns a message displaying the wave number. This creates a new replenishment Task.
- Go to the “Execute Task” RF module and select/type in the desired replenishment task.
- To search for pending Replenishment tasks in the “Tasks” UI screen, click the magnifying glass and filter by the replenishment task type.
Note: You can also search via the Run Number on the Wave Inquiry screen.
- To filter by replenishment tasks in the RF, press Ctrl-T and select the Task Type.
- To search for pending Replenishment tasks in the “Tasks” UI screen, click the magnifying glass and filter by the replenishment task type.
- To verify if the replenish to the location is successful, go to the Active inventory Screen and check the current quantity.
Replenishment Scenarios
From here, depending on the Replenishment Task Type, the order of RF screens is different. The following section outlines the different replenishment scenarios:
- Scenario 1: Cases replenishment, no distribution
- Scenario 2: Full LPN replenishment, no distribution
- Scenario 3: Cases replenishment, consolidate and distribute (reserve to active)
- Scenario 4: Units replenishment, consolidate and distribute (active to active)
Scenario 1: Cases Replenishment, no distribution
For this scenario, you must make sure that both the Task Template and the Replenishment Rule have cases configured.
Once you enter the task, the RF prompts you for pallet and LPN numbers. This pallet is the intermediate pallet that transports the merchandise into the final replenishment location.
If there is no more room for more LPNs in the pallet, you can “End” the pallet by pressing Ctrl-E. Ending a pallet with pending picks causes the system to create a new replenishment Task for the remaining picks.
- Once all the LPNs from the picking location are moved to the pallet, the RF prompts the destination location (the location to replenish to). You must scan the location barcode when they arrive to the location:
- Once the location barcode is scanned, the RF will ask you to scan the “To LPN” (the destination pallet). This is the LPN that is replenished. In the “Qty:” field, you must enter the amount of cases being moved.
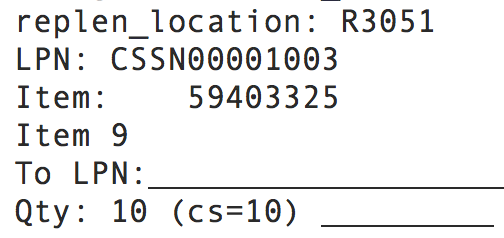 Note: for the “Qty: 10 (cs=10)”, the first 10 represents the number of cases to move, while the second “10” value (“cs=10”) represents the standard case quantity of the item.
 - Once the contents are moved, the remaining contents in the LPN must be returned to a reserve location. The following is an example of the reserve location field.
- If there are no LPNs remaining, the task ends and the RF returns to the Task List.
Scenario 2: Full LPN Replenishment, No Distribution
For this scenario, the you must make sure that both the Task Template and the Replenishment Rule have cases configured.
- Once you enter the task, the RF prompts for pallet and LPN numbers. This pallet is the intermediate pallet that transports the merchandise into the final replenishment location.
Note: If there are multiple LPNs to be picked, the RF prompts for another LPN. If there is no more room for more LPNs in the pallet, you can “End” the pallet by pressing Ctrl-E. Ending a pallet with pending picks will cause the system to create a new replenishment Task for the remaining picks.
- Once all the LPNs from the picking location are moved to the pallet, the RF prompts the destination location (the location to replenish to). You must scan the location barcode when the pallet arrives to the location.
- Once the location barcode is scanned, the RF will ask you to scan the LPNs in the pallet to replenish with. The “Qty:” field denotes how many LPNs there are to replenish.
- If there are no LPNs remaining, the RF displays a message saying “No more tasks”. Press Ctrl-A to proceed.
Cases Replenishment, Consolidate and Distribute (reserve to active)
Consolidate and distribute is the type of replenishment where the user is prompted to batch pick from multiple locations. During this batch pick, the user is to create a ‘dummy’ IBLPN that is used to carry the picked cases. In this sense, the ‘dummy’ LPN is an intermediate LPN use for transporting cases from the picking to replenishment location.
For this scenario, the you must make sure that both the Task Template and the Replenishment Rule have cases configured.
- Upon entering the task, the RF prompts you to “open” an IBLPN. This is the ‘dummy’ LPN that is used to carry the picks.
Note: at any point in time you may choose to close the current dummy LPN by pressing Ctrl-E. This will allows you to open another LPN (if the first LPN gets physically full) and continue with the pick. When you press Ctrl-E, the system will suppress the capacity check (units/weight/volume).
- After scanning the dummy LPN, the RF directs you to the first picking location. Scan the location barcode to confirm that the user is at the location.
- The RF will now ask you to begin picking cases from the first picking location, prompting you to scan the Item code and quantity.
- If there are more cases to pick, the RF will direct you to the next pick location, and repeat the picking process. When you finish all the picks, the RF displays the message “Nothing left to pick”:
- Once all the picks are complete, the RF then directs you to the replenishment location. Scan the location barcode to confirm that the user is at the location.
- The RF then prompts you to move the picked units into the replenishment location. Since you are replenishing to an active location, you should only enter the quantity being replenished.
- When all locations in the task have been replenished, the RF will return to the Task list.
Scenario 4: Units Replenishment, Consolidate and Distribute
Consolidate and distribute is the type of replenishment where you are prompted to batch pick from multiple locations. During this batch pick, you are to create a ‘dummy’ IBLPN that carries the picked cases. In this sense, the ‘dummy’ LPN is an intermediate LPN that transports cases from the picking to the replenishment location.
For this scenario, you must make sure that both the Task Template and the Replenishment Rule have cases configured.
- Upon entering the task, the RF prompts you to “open” an IBLPN. This is the ‘dummy’ LPN that is used to carry the picks.
Note: at any point in time you may choose to close the current dummy LPN by pressing Ctrl-E. This allows you to open another LPN (if the first LPN gets physically full) and continue with the pick.
- After scanning the dummy LPN, the RF directs you to the first picking location. Scan the location barcode to confirm that the user is at the location.
- The RF now asks you to begin picking units from the first picking location, prompting you to scan the Item code and quantity.
- If there are more units to pick, the RF directs you to the next pick location, and repeat the picking process. When you finish all the picks the RF displays the message “Nothing left to pick”.
- Once all the picks are complete, the RF directs you to the replenishment location. Scan the location barcode to confirm that the user is at the location.
- The RF then prompts you to move the picked units into the replenishment location. Since you are replenishing to an active location, you should only enter the quantity being replenished.
- When all locations in the task have been replenished, the RF will return to the Task list.
Reactive Replenishment – Weight Capacity Check
When replenishment of items happens in a location via RF reactive replenishment, Oracle WMS Cloud allows you to do a weight based capacity check along with the current volume and unit. This will help optimize replenishment for a targeted location.
To enable weight based capacity check, make sure that your Replenishment Rule has the Capacity Check Method set as "Weight, Fall Back to Units."
In the Capacity Check Method drop-down, you can also specify the capacity check as Units, Volume, Fall Back to Units, or Volume, Weight, Fall Back to Units.
The following table provides definitions for the Capacity Check Method drop-down options:
| Capacity Check Method Option | Definition |
|---|---|
| Units | Replenishment rule will check capacity in terms units. |
| Volume, Fall Back to Units | Replenishment rule will first check capacity in terms of volume and if volume is 0, the system will check capacity in terms of units. |
| Weight, Fall Back to Units | Replenishment rule will first check capacity in terms of weight and if weight is 0, the system will check capacity in terms of units. |
| Volume, Weight, Fall Back to Units | Replenishment rule will first check capacity in terms of both volume and weight, and if volume or weight is 0, the system will check capacity in terms of units. |
Executing Reactive (Emergency) Replenishment
In emergency situations that require quick replenishment, you can use the reactive replenishment functionality to instantly allocate a location for replenishment. This scenario uses a stand-alone RF module called “Reactive Replenishment”. Here, you simply scan the location that needs to be replenished with the RF and WMS creates a replenishment task. Depending on the RF’s parameter setting, you may or may not execute that replenishment on the spot.
- Go to the “Reactive Replenishment” RF module.
- In the “Locn:” field, scan the location to replenish. The RF displays the message “Replenishment submitted for location [area]”. This basically runs a replenishment wave for the scanned location.
- If a replenishment task is generated, depending on the RF’s parameters, you may execute the replenishment on the spot. To do so, press Ctrl-A to proceed.
- Perform the replenishment as described in previous sections.
Workflow of MLR
Multi-Level Replenishment allows users to keep destination locations (final destination location /pick face) constantly stocked with products, so that pickers can efficiently fulfil orders without waiting for the system to replenish inventory when available.
The following describes a high-level pictorial representation of the Multi-Level Replenishment workflow with a reserve location, drop location, and final destination (active location).
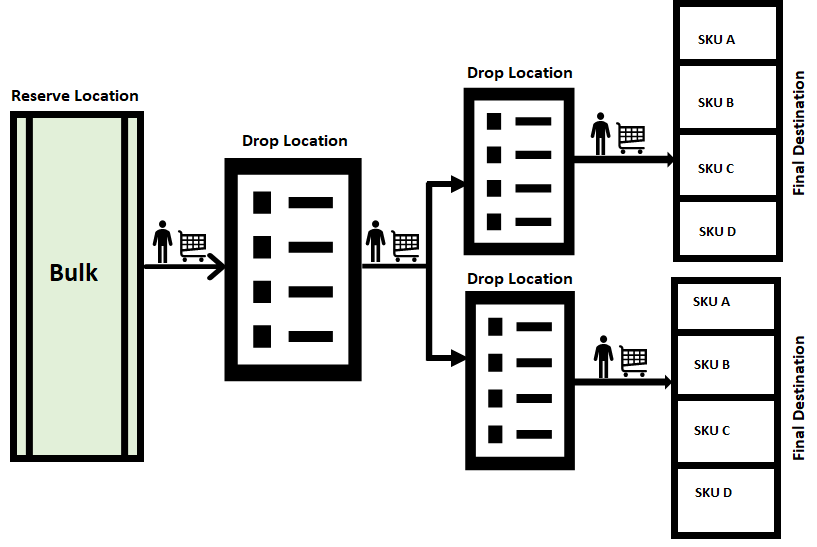
- An order is said to be satisfied when there is sufficient inventory available in the Active location. However, when there is not enough inventory available in the Active location to satisfy the order, the system runs a wave for an Order and checks for inventory in the Permanent Active location or Reserve location to meet the need. This is the phase where the Replenishment takes place.
- During these transactions, there may be scenarios involved with multiple drop locations where you are required to pick inventory and drop to another location and then to the final destination. In such cases, inventory needs to hop through multiple drop locations to reach the final destination. That is, inventory needs to pass through multiple Task Zones to reach the final destination. This process of moving inventory from one task zone to another is accomplished using Multi-Level Replenishment.
- Once you run the wave, the system creates a Replenishment task where required inventory is pushed from the Reserve location to the drop location for the next hop/Task Zone (drop location).
Note: This is configured under the Task Zone Movement screen for that Task Type.
- In order to move inventory from the first Task Zone to the next Task Zone, you need to configure the path under Task Zone Movement for the Task Type “CONSOL_DISTRIBUTE”.
- Use the RF screen "Multistep Replenishment", to scan the Task Type (CONSOLIDATE and REPLENISH) along with the current location.
- The system will determine which destination location needs to be replenished. After logical calculation, the system will prompt you to scan the relevant LPNs to replenish.
- The system picks inventory based on the task type and when picking of inventory is complete (or when you manually end the LPN), the system will prompt you to scan a drop location for the next Hop/Task Zone.
- Repeat the process for replenishing inventory from one drop to the next until the inventory reaches the final destination.
- When the inventory arrives at the last drop location, the final replenishment module is invoked through the RF and inventory gets replenished to the final destination.
Configuration Process
Before you begin, you should understand the following check-points and then start with the configuration setup:
- Replenishment beyond maximum location is applicable only for Permanent Active locations and is not applicable for dynamic location.
- This enhancement is applicable for wave-based replenishment only and not for stand-alone replenishment.
Setup
- Location (permanent active location) should be defined. The destination location can be active.
- Task zones are created for each location. (i.e., locations that are created in the replenishment path (source, drop, and final destination locations) should have Task zone values populated.
Note: You must create a task zone for this functionality to perform as expected.
- Task zones are created for each location. (i.e., locations that are created in the replenishment path (source, drop, and final destination locations) should have Task zone values populated.
- You must first create a Wave Template. These wave templates should have a Replenishment Rule defined.
- Configure the relevant Task Type for replenishment
- Configure the Task Zone Movement and define the movement of inventory from one location to another. Define the Task Zone Movement Rule.
- A new RF Screen Module must be configured to invoke the multi-level replenishment from drop locations.
- Wave Group configuration is required to be configured only if there are multiple orders required for different pick lanes. When you create a wave group, you can combine multiple tasks using the Task Creation Template.
Wave Template
The Wave Template consists of many parameters to be set for a wave to run. In multi-level replenishment, you need to create wave templates to pick orders from a source location to a final destination location. Create a wave template from a Reserve Location (Bulk) to a common Drop Location and then to the next hop.
- Create a wave template from the source location to the first drop location and then to the final destination.
- Associate the replenishment rule for the order to be replenished from one location to another in the wave template.
Note: If the location needs to be enabled beyond max capacity, you need to enable the “Ignore capacity for the last permanent location” check box.
Replenishment Rule
Configuring a replenishment rule is one of the most important configurations. Replenishment Rule allows you to replenish beyond max capacity by enabling a new flag “Ignore Capacity for Last Permanent Location” check box.
Task Zone Movement
- Source to Final Destination – one task zone movement is created with * baring the end zone.
- Drop zones to Final Destination – Distinct task zone movement should be created with the relevant path.
Task Zone Movement Rule
Define the task zone rule for every task zone movement by entering the mandatory information in the field as shown in the screen below:

Wave Group
Wave group helps to distribute loads across different pick lanes. For example, suppose there are two pick lanes from one reserve location, then you can create a replenishment task from the wave group level.
Once you configure a task template at the wave group level, you can combine multiple tasks from different waves. To create a wave group, you need to define the Task Creation Template and Task Type.
Task Creation Template
Task Creation Template is a set of instructions given to the user to perform tasks to satisfy the need. The task creation template is defined by configuring the following parameter:
- Create a Task Creation template. Define template. For example, Type > Select Regular.
- Define the Sequence Number.
- Define the Task Type in the Task Creation template.
Task Type
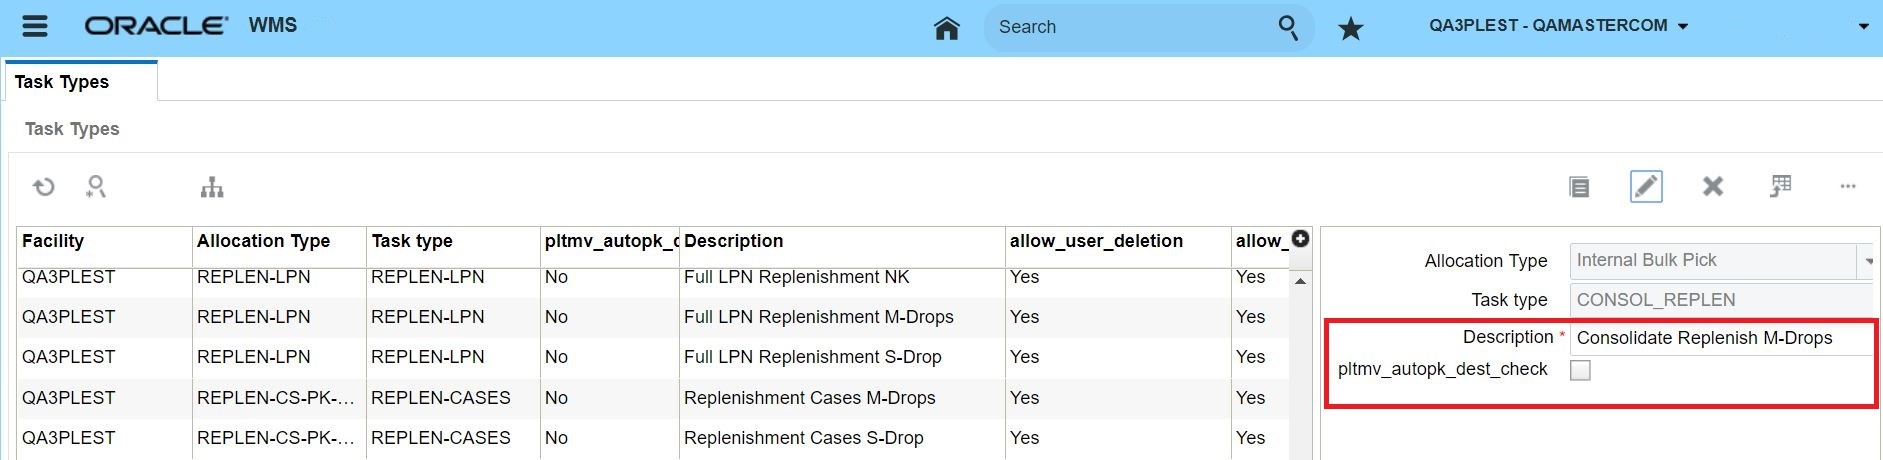
RF Screen Module
A new RF module, "rf.inbound.cwrfmultistepreplen" allows you to move inventory from one drop location to another and then to a final destination location.
The following diagram describes how this new RF module is used:

The following are some of the characteristics of the new RF Module:
- Scan the inventory from the source location and the system inferred the task zone.
- Determine the final destination zone of the inventory by scanning the task type that defines the unique task zone.
Note: Task type can be inferred from screen parameter or user can manually enter into the system.
- On obtaining the source and destination zone, the system determines the following:
- If the source location has inventory to satisfy the need/demand of supply in destination location.
- Once inventory is available in the source destination location, the system prioritizes which location to replenish first based on the following filter:
- If the filter criteria is set to current quantity <= minimum, then system considers inventory from the source location which are destined to pick locations having current inventory less than or equal to locations configured minimum. If multiple locations are found, the system will order the locations in ascending order of putaway sequence.
- After determining the source and destination, the system prompts you to pick the relevant quantity of inventory in the temporary tote and deliver to intermediate drop locations and then to final destinations.
RF Configuration Setup
The following are the set of RF configurations that you need to configure before executing the Multi-Level Replenishment flow:
- Go to the RF Screen UI.
- Set the following RF screen parameters:
| Parameters | Description |
|---|---|
| determine-src-inv-by | Determines the source inventory by Location or task Zone. By Default, the value is set to location. |
| task-type-description | Enter description that corresponding to valid task type:CONSOL-REPLEN. By default, the field is set to blank. |
| qty-uom | Set the quantity of inventory in unit of measure of units, packs, and cases. By default, the value is set to Units. |
| pick-for-single-destination-locn | System prompts only one destination location for which the inventory should be picked from the source location. By default, the value is set to no. |
| dest-locn-inclusion-criteria | System to determine via the destination location to replenish through the filter criteria. When the flag is set, system considers only locations whose current inventory is <=configured locations minimum when the value is "current<=locn minimum". |
Kitting
Kitting is the process of assembling child items to create a parent item or a kit. The ratio of child items required to create a parent item is called pre-pack ratio and pre-defined in WMS. De-Kitting is the process of dis-assembling parent items or kits into child items. In order to assemble or dis-assemble parent items, Work Orders are required. The assembly or dis-assembly of parent items takes place in assembly locations.
There are two types of kitting flows in WMS - Make To Stock and Make To Order.
Make to Stock – The main objective of Make to Stock flow is that, the parent items or kits are assembled beforehand and putaway to stock in anticipation of future Outbound Order for the parent items. In this flow, a Work Order is either interfaced into WMS or created from Work Order view. After parent items are assembled using this Work Order, WMS prompts you to pack the parent items into Inbound LPNs. The Inbound LPNs are then putaway to stock (reserve locations). These parent items can be picked later against outbound orders, packed, loaded and shipped out like any regular item.
Make to Order – The main objective of Make to Order flow is for the parent items or kits to be shipped out based on the Outbound Order sent to the facility. In this flow, a Work Order is automatically created in WMS when an Outbound Order with a specific Order Type is interfaced into WMS. The Work Order has a reference to the Outbound Order. So when the parent items are assembled using this Work Order, Oracle WMS Cloud prompts you to pack the assembled parent items directly into Outbound LPNs against the Outbound Order. The OBLPNs can then be loaded and shipped out like any other OBLPN.
- Parent Items are also called Kit Items
- Child Items are also called Component Items
- Ratio of child items required to create a parent item is called pre-pack ratio
Make to Stock Flow
In the Make to Stock Flow, Work Orders are either directly interfaced into WMS OR or they can be created manually using Work Order view.
Work Order Creation
The Work Order Type described in Configure Kitting Process is used on the Work Order. This automatically sets the Activity Type to Assembly on the Work Order. The Work Order is initially in a Created status.
This Work Order has been interfaced (or created) to assemble three units for parent item P1.

Work Order Wave Template
Create a Work Order Wave Template. This template will define rules to pull child items from reserve/active locations and replenish to an assembly location.

The Work Order Template Search needs to have the right criteria to select the required Work Order.
WMS offers multiple replenishment options. In this example, the rule is defined to pull full LPNs (with child items) from reserve locations.

…and a corresponding Task Template to create Full LPN Replenishment tasks.
Inventory
Ensure that there are LPNs in reserve locations with enough child units.
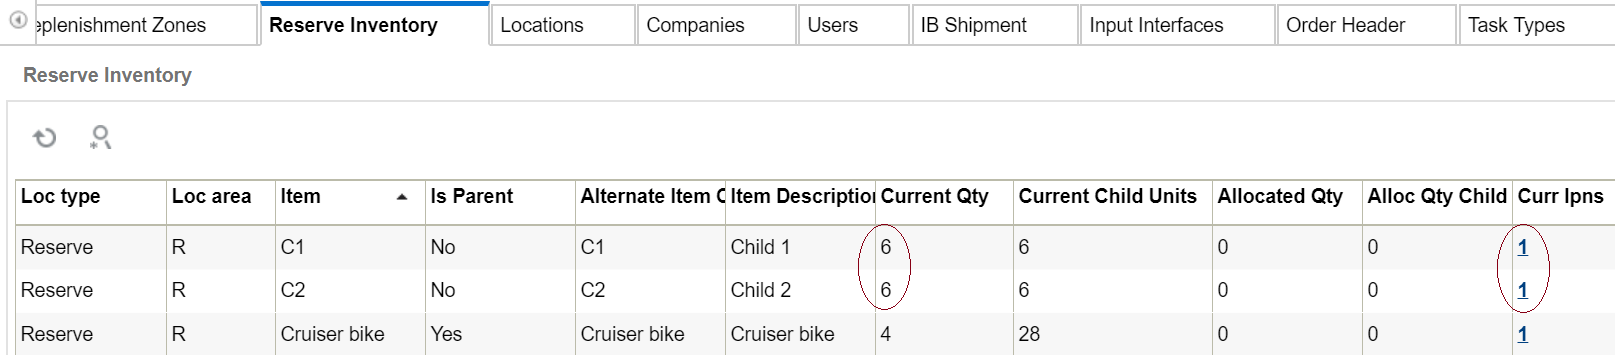
Wave Run
Run the wave from the Work Order Wave Template View screen.
From the Work Order Inquiry View screen, the Work Order displays in Allocated status.

Tasks are created to replenish child items from a reserve location to an assembly location.
Task Execution
Execute the tasks in order to replenish the assembly location with child units from reserve locations.
- Pick IBLPNs containing child items from reserve locations and place on a pallet.
- Move and Replenish contents of the LPNs to the assembly location
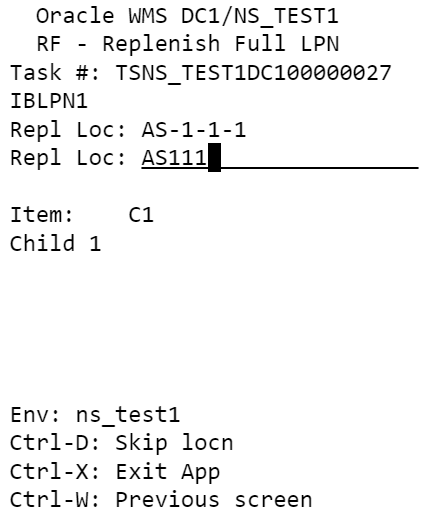
The assembly location now has enough units of child items (C1 and C2) to build 3 units of parent item (P1). From the Work Order Inquiry View UI, the Work Order is now in Picked status:
Kit Assembly
Now that the child items are in the assembly location, assembly of parent items can start using RF Work Order Kit Processing. All units of the assembled parent items can be placed in one IBLPN or multiple IBLPNs. In this example, all three units have been placed in one IBLPN.
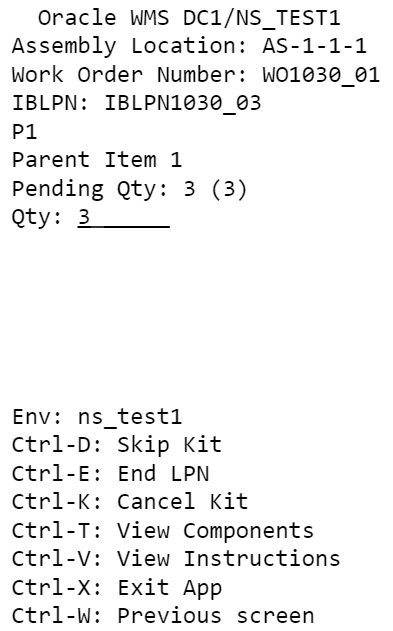
RF Work Order Kit Process offers other Ctrl options for processing Work Orders. For example you can use Ctrl-V to view extra instructions if there are any available for the kit being handled. You can use Ctrl-T to view the ratio of the child items that are required to assemble the parent items.
From the IBLPN screen, the Inbound LPN with the assembled parent items displays in Received status, and can be putaway to a reserve location. You will see in the Work Order Inquiry View, that the work order is completed.
From the Inventory History screen, you can see the Inventory History for the work order.
Make to Order Flow
In the Make to Order Flow, a Work Order is automatically created in WMS when an Outbound Order with a specific Order Type is interfaced into WMS.
Work Order Creation
Create an Order Type for the Outbound Order. This Order Type needs to have the Work Order Type populated which is described in step 7 in the Configure Kitting Process section.
When an Outbound Order with such an Order Type is interfaced into WMS, a Work Order is automatically created behind the scenes.
Interfaced Order Header and Detail
Interfaced Work Order Detail
The Work Order Type on the Work Order is set based on the Work Order Type which is on the Order Type of the Outbound Order.

The Work Order Kit has a reference to the original Outbound Order Nbr.

Wave Run and Task Execution
The same Wave Template that was described under Make to Stock flow can be used, ensuring that the Wave Search criteria is modified to pull the new Work Order. The wave is run and tasks executed as shown under Make to Stock flow. Executing the tasks will replenish child items to the assembly location.
Kit Assembly
Kit processing is similar to Make to Stock flow, however in the Make to Order flow, the system prompts for an Outbound LPN to place the assembled units. This Outbound LPN is tied to the Outbound Order that is on the Work Order Detail.
All units of the parent item can be placed in a single OBLPN or multiple OBLPN. In this example, all four units have been placed in one OBLPN.
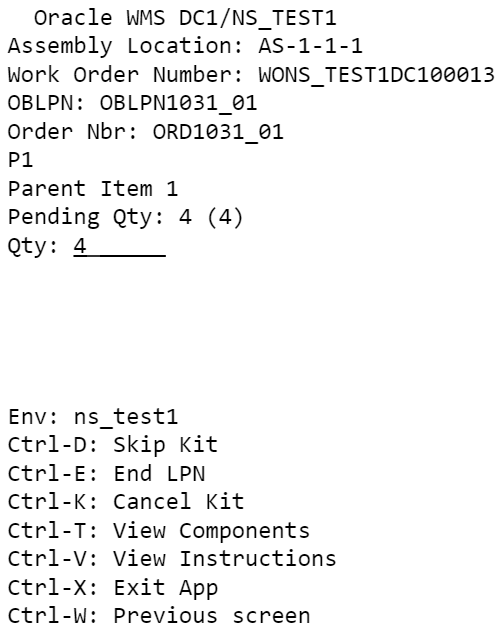
From the Work Order Inquiry View, the Work Order is completed.
Next, the Outbound Order is packed. The Outbound LPN with parent items is packed and can later be loaded and shipped out of the facility.
The following screen shows you the inventory history for the Work Order:

De-Kitting
De-Kitting is performed to dis-assemble parent items into individual child items and put away child items into reserve/active locations. The child items can be later picked, packed, and shipped individually against outbound orders. This flow is typically performed if there is a need to ship individual child items from the facility and there are not enough child items to fulfil the need immediately.
Work Order Creation
Create a Work Order Type with Activity Type as Dis-Assembly.
Interface a Work Order into WMS with the above Work Order Type on the Work Order. You can also create the Work Order from Work Order Inquiry view.
This Work Order has been interfaced to dis-assemble three units of parent item P1.

Since the pre-pack ratio for P1 is defined as two units of C1 and two units of C2 for one unit of P1, dis-assembling three units of P1 will result in six units of child item C1 and six units of child item C2.
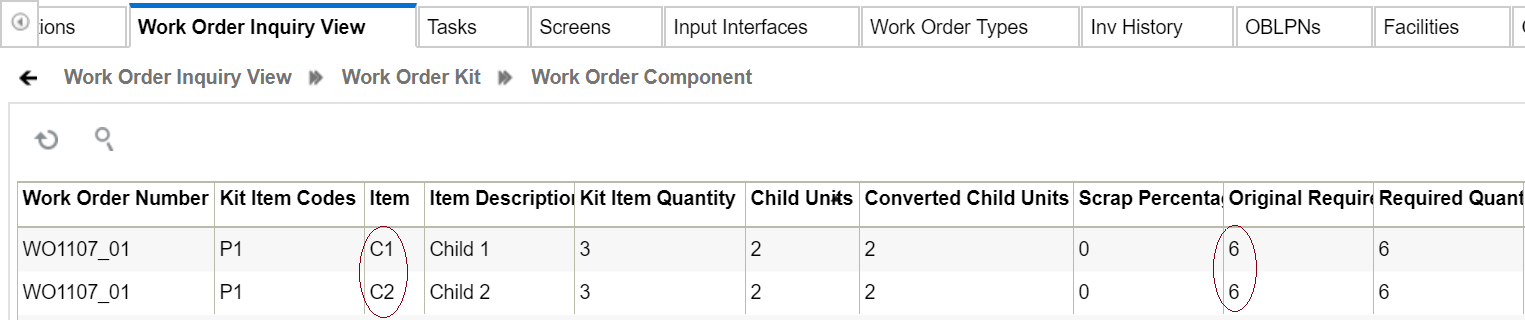
Wave Run and Task Execution
Ensure that there is enough inventory for parent P1 in the facility. In this example, there is one LPN in a reserve location with three units of P1.
The same Wave Template that was described under Make to Stock flow can be used, ensuring that the Wave Search criteria is modified to pull the new Work Order. When the wave is run, it allocates one LPN from reserve which has three units of P1.
A task is created to move the LPN from a reserve location to an assembly location.
Task Execution
Execute the task to replenish the assembly location with parent units from the reserve location.
- Pick IBLPN containing parent items from reserve location and place on a pallet.
- Move and Replenish contents of the IBLPN to the assembly location.

The assembly location now has three units of parent item P1.

From the Work Order Inquiry View screen, you will see that the Work Order is in Picked status.
Dis-Assembling the Kit
Now that the parent items are in the assembly location, dis-assembly of parent items can start using RF Work Order Kit Processing. After dis-assembling, child units for all parent items can be placed in a single IBLPN or placed separately in different IBLPNs. In this example, all three units of C1 and all three units of C2 have been placed in a single IBLPN.
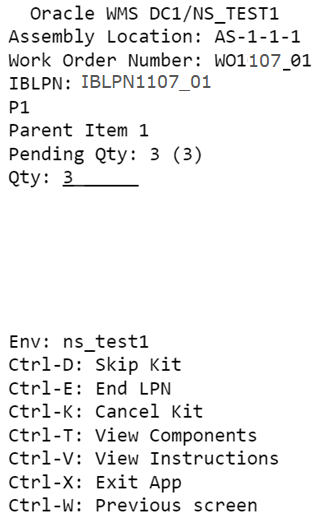
The Inbound LPNs with child items C1 and C2 are in Received status and can later be putaway to a reserve location or items replenished to an active location.