Designing Exception Paths
An exception is a mechanism used to interrupt or stop an order, or to redirect it to a task in the process to a different process. The choices are defined by the system administrator and identified by the exception statuses. Exceptions may be used to cancel an in-flight order, to add supplemental information to an order and redirect the order to an earlier task in the process, or to take other actions defined in the original process.
Exception statuses are user-defined statuses used to alter a process flow from anywhere in the process. The exceptions can be defined with restrictions that allow only specified workgroups, activities, or order type/sources (or combinations of these) to raise the exception.
Note:
If you have previously defined a process exception in the OSM Administrator, and intend to import it into Design Studio, you must ensure that:-
You define (in the OSM Administrator Process Exception Definition tab) the status used in the process exception in any task that can initiate the exception.
-
You create a process exception restriction (in the OSM Administrator Process Exception Restriction tab) that specifies the tasks can raise the exception.
Exception paths are used in conjunction with the Redirect and End activities to define process exceptions:
-
The End activity stops the work order from continuing.
-
The Redirect activity redirects the work order to another task in the same process or to a different process.
Note:
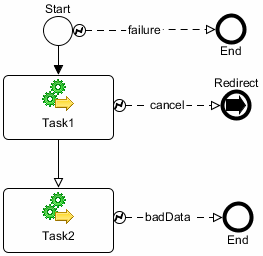
End and Redirect activities cannot be defined as the source end of a path.The following diagram illustrates how you might design some process exceptions in the Process editor:

In the Process editor, visual cues enable you to distinguish flow transitions from exception paths: exception paths are represented by an exception path source marker (lightning bolt icon) and a dashed line.
Note:
You can only configure two or more exception paths with the same status in the same process if the following conditions are met:-
All the exception paths must start from a task, a rule, or a subprocess.
-
All the exception paths terminate on the same redirect or end.
-
In the properties of the path, the Reporting Status, Role Restriction, and Order Restriction must be the same.
To model exception paths in the Process editor
-
To model a Stop exception, draw an exception path from an activity to an End activity.
Linking the path from the Start activity applies the exception to the entire process; linking from a task within the process applies the exception to that task.
-
To model a Redirect exception, draw an exception path from an activity to a Redirect activity. The Redirect activity supports both process-level and activity-level redirection.
Working with Event Notifications
Configuring Automation Plug-In Properties
Exception Path Properties General Tab
Exception Path Properties Restrictions Tab
Redirect Properties General Tab
Creating Task Status-Based Event Notifications
Exception Path Properties General Tab
Use the Exception Path Properties General tab to define the reporting status that will display in the Task web client and the task completion status that initiates the exception.
| Field | Use |
|---|---|
| Reporting Status | Enter the reporting status that you want to display in the Process Exception section of the Task web client. This status is tracked in the client's History. The Reporting Status Value field is an open text field. In the Value field enter a status name to indicate how the exception should be reported. |
| Status | Specify the task completion status that initiates the exception. If the exception is thrown from the Start activity, the values available include all of the statuses defined within the process. If the exception is thrown from a specific activity, the values available include only those statuses defined for that specific activity. |
Exception Path Properties Restrictions Tab
Use the Exception Path Properties Restrictions tab to restrict exceptions to specific roles.
| Field | Use |
|---|---|
| Role Restriction | To restrict the ability to throw an exception to specific roles, select Allow Restricted Roles, then select those roles from the Available list and move them into the Selected list using the arrow buttons. |
| Available, Selected | Move roles between the Available and Selected fields by highlighting one or multiple roles and clicking the appropriate arrow button. To move all roles from one column to the other, use the double arrow buttons. |
Redirect Properties General Tab
Use the Redirect Properties General tab define to which process and to which task within that process you want the order redirected.
| Field | Use |
|---|---|
| Reference | Select the process to which you want the order redirected. To select the process, click inside the Value field to access the ellipsis button. Click the ellipsis button and select a process from the entity list.
Note: After you define the Reference process, you can double-click the Redirect entity to open the process in the Process editor. |
| Reference Task | Select the task to which you want the order redirected. When you specify a process in the Reference field, you can also redirect to a specific starting point within that process. The process will run to completion from the task that you select here. If you select no task here, the process will start with the first task. |
| X, Y coordinates | These coordinates indicate where on the Process editor canvas the Redirect activity exists. |