2 UIM User Interface Overview
This chapter provides an overview of the Oracle Communications Unified Inventory Management (UIM) user interface. For complete information about the user interface and the tasks you can complete with it, see the UIM Help.
Opening the UIM User Interface
To open the UIM user interface, you need to obtain the following from a system administrator:
-
User ID
-
Password
-
The UIM URL, including the server and port
Your user ID will be associated with access permissions that determine which parts of the application you can see and which actions you can take. All of the pages and actions described in this guide may not be available to you.
To open UIM:
-
In a supported browser, go to the URL supplied by the system administrator. The URL is similar to the following:
https://ServerName:Port/inventory
-
Enter your user ID and password.
The UIM main window appears.
The UIM Main Window
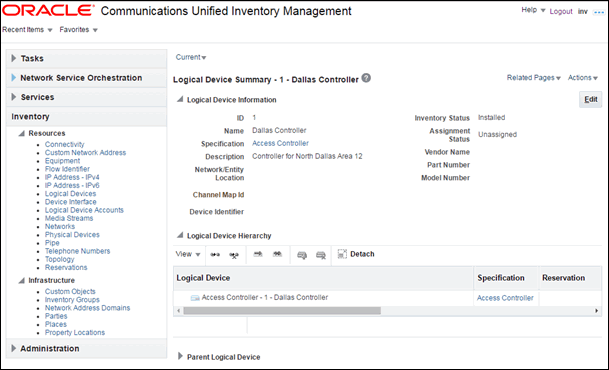
When you open UIM, you see the main window. The main window has a navigation section on the left that you use for navigation. Entity pages appear on the area to the right when you click links in the navigation section. The main window also includes menus and a toolbar.
After a successful login, the initial landing page display has an area to the right that is populated with additional functional links to navigate to various areas of the application.
Figure 2-1 shows the main UIM window with a Logical Device Summary page displayed.
Navigation Section
The left side of the main window is called the navigation section. It displays a list of links that enable you to find entities and other information in UIM. These links are divided into the following groups:
-
The Tasks group is divided into two sub-groups:
-
The My Tasks sub-group contains links that enable you to view information about activities assigned to you or to your work group.
-
The Tasks sub-group contains links that enable you to search for projects, engineering work orders, and business interactions.
-
-
The Network Service Orchestration group contains links to support the orchestration functionality. See Network Service Orchestration Implementation Guide for information on this topic.
-
The Service group contains links to service entities.
-
The Inventory group is divided into two sub-groups:
-
The Resources sub-group contains links that enable you to search for resource entities, such as connectivities, logical devices, telephone numbers, IP addresses, networks, and more.
-
The Infrastructure sub-group contains links to property locations, custom objects, inventory groups, parties, and places.
-
-
The Administration group contains for administrative functions such as rebuilding topology and executing rule sets. It also contains links that enable you to search for rulesets, sequence specifications, characteristics, and entity specifications.
To make more room in the main window, you can adjust the size of the navigation section sliding its border with the main window.
Pages
When you click on a link in the navigation section, the right side of the main window is displays a page. In most cases, the pages that you open directly from the navigation section enable you to search for entities. In other cases, clicking a link opens a page for completing a task, such as importing inventory.
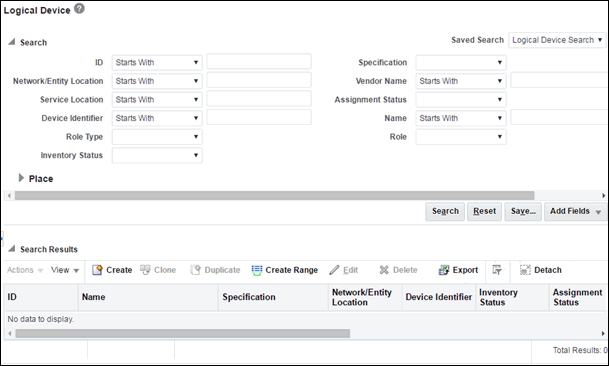
Figure 2-2 shows the Logical Device page, which you open by clicking the Logical Device link in the Resources group. You use this page to search for logical devices. You enter search criteria in the Search section in the upper part of the page and see the results in the Search Results section in the lower part. See the UIM Help for more information about searching.
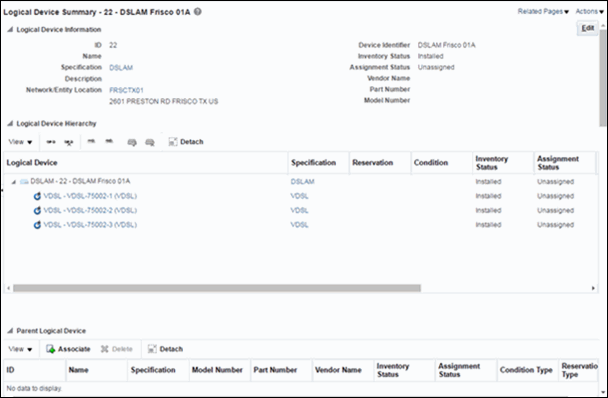
Other kinds of pages appear as you work with entities in UIM. For example, if you search for a particular logical device and then open it, you see its Summary page. Figure 2-3 shows a Logical Device Summary page.
Additional pages enable you to perform other tasks. For example, you use the Logical Device Information page to edit the identifying information about logical devices.
Pages are often divided into sections that contain specific kinds of information. For example, in the Logical Device Summary page shown in Figure 2-3, there are Logical Device Information, Logical Device Hierarchy, and Parent Logical Device sections, among others.
You can save space in a page by collapsing a section. Click the triangle icon in the upper left corner of the section's title bar to collapse it. Click the icon again to expand the section.
Working with Tables
Much of the information shown in pages is displayed in tables. These tables all have the same basic functionality, although not all features are available in all tables.
You can choose which columns are displayed and the order in which they appear. You can also filter and sort table contents so that only the most relevant information is displayed. When there are more rows of data than can be displayed in a section, you can scroll the table to see the additional rows.
See the UIM Help for detailed instructions about working with tables.
Menus
The toolbar above the navigation section and pages includes several different menus
-
Recent Items. Lists the 10 most recently used pages.
-
Favorites. Displays pages that you have designated as favorites. See the UIM Help for complete instructions.
-
Help. Select from three different commands:
-
Link to Page. Displays the URL of the current UIM page. You can copy the URL.
-
Help Portal. Opens the UIM Help.
UIM includes a Help system that you can access while using the application. See "Using the UIM Help" for more information.
-
About. Displays the release number of the application and its copyright statement.
-
Using the UIM Help
UIM includes a Help system that you use to get step-by-step instructions. You can find the information you need by searching or by navigating through the table of contents.
This section includes information about opening the Help system and finding information. See the Help system contents for detailed information about all of its features.
To open Help:
-
From the Help menu, select Help Portal.
The Help Portal window appears.
To open Help for the current page:
-
Click the question-mark icon in the title bar of a page.
The Help Portal window appears, displaying a reference topic for the current page.
To browse for information:
-
In the navigation area on the left of the Help Portal window, click Contents.
An expanding table of contents appears in the navigation area.
-
Do one of the following:
-
Click a heading in the table of contents to display the introductory topic about the corresponding section in the reading area.
-
Click the triangle next to a heading to expand it to show subheadings and topics.
-
To search for information:
-
In the navigation area on the left of the Help Portal window, click Search.
A search area appears in the navigation area.
-
Enter a word or phrase to search for.
-
Select search options:
-
To search for an entire phrase, select All words.
-
To search for any of the words you entered, select Any words.
-
To include Boolean expressions such as AND or OR, select Boolean expression.
-
To match the capitalization of your search terms, select Case Sensitive.
-
-
Click Search.
Results are displayed below the search area. The total number matches appears above the list of matching topics, which are ordered by the number of matches they contain.


