6 Unified Inventory Management Post-Installation Tasks
This chapter provides instructions for Oracle Communications Unified Inventory Management (UIM) post-installation tasks.
Configuring a Trusted Certificate for UIM
Oracle WebLogic Server provides a default certificate that automatically configures the Secure Sockets Layer (SSL) settings in your Web browser. To use another certificate, you must manually reconfigure SSL.
Note:
UIM uses a default certificate provided by Oracle WebLogic Server. As a result, when you connect to the UIM UI for the first time, the Web browser displays a warning page with a message indicating that the security certificate presented is not issued by a trusted certificate authority.This is expected behavior. Accept this untrusted certificate to continue to connect to the UIM UI.
For information about configuring SSL for UIM, see UIM System Administrator's Guide.
Deploying UIM Cartridges
Oracle recommends that you deploy all of the base cartridges into UIM. Base cartridges are located in the UIM_Home/cartridges/base directory. For information on base cartridges, see UIM Cartridge Guide.
Important:
The ora_uim_mds_cartproj.zip and ora_uim_model_cartproj.zip cartridges are located in this same directory, but these two cartridges should not be deployed into UIM.You can deploy cartridges interactively from Oracle Communications Design Studio. You can automate cartridge deployment by using the Design Studio Cartridge Management Tool. Or, you can deploy cartridges using the UIM Cartridge Deployer Tool.
See the UIM Cartridge Guide for information about deploying cartridges and cartridge packs.
Note:
When working in a Development Environment, with several cartridge deployments, you might see NullPointerException and ORA-01653 errors. See Knowledge Article 1506444.1 - NullPointerException and 'ORA-01653: unable to extend table DEV_MDS.MDS_COMPONENTS' Errors When Deploying UIM Cartridges to resolve the errors.Connecting the UIM Web Service Interface to a Remote Application
Oracle recommends that you create a SAF agent between the UIM WebLogic server and a remote application server. Oracle recommends this SAF agent for the Web Service interfaces to ensure reliable communication.
Figure 6-1 illustrates an example SAF configuration between the Web Service interface on UIM and a Web Service client on a remote application, in this case, the Oracle Order Service and Management (OSM) application.
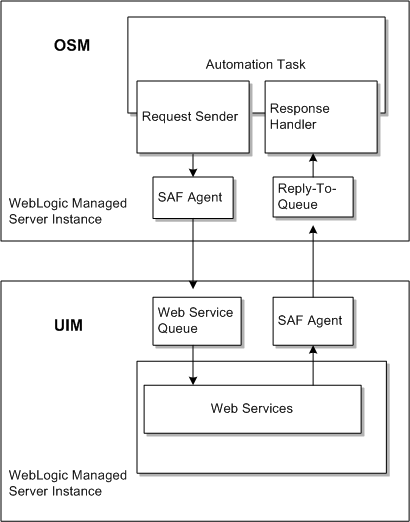
In this example, an OSM SAF agent sends requests to the UIM request queue, and UIM returns responses through the UIM SAF agent to the OSM reply-to queue.
For detailed instructions for creating SAF queues and topics between UIM and OSM, see Knowledge Article 1431235.1 - Configuring WebLogic Resources for OSM Integration With ASAP And UIM On Different Domains on the My Oracle Support website:
This article is applicable to any remote application that uses a WebLogic JMS server to send and receive Web Service messages.
Configuring Ehcache for the Cluster
UIM uses Ehcache as a caching mechanism. Ehcache boosts performance by caching:
-
Specification entities
-
Compiled version of Drools and Groovy rules
-
Transition states
This section provides instructions for configuring the ehcache.xml file for the clustered server.
The configuration tasks include:
Enabling Ehcache for the Cluster
To enable ehcache for the cluster, do the following:
-
Ensure you are logged in to the shared disk storage through a command window.
-
Make a backup copy of the ehcache.xml file and rename it to ehcache.xml.cluster.
-
Open the ehcache.xml.cluster file in a text editor.
-
Scroll down to the cacheManagerPeerProviderFactory entry.
-
Change the value of the port entry to any unused port number.
-
Save and close the file.
Enabling Ehcache Manual Discovery
Use the following checklist to verify that manual discovery is the correct setting to use, for peer discovery:
-
By default, the peer discovery setting for ehcache is automatic (which employs multi-casting). Multi-cast is known to be unreliable, has bandwidth overload issues and is unsecure. If you feel multi-casting is not the right setting for your environment, perform the steps to enable the ehcache manual discovery setting for the cluster.
-
The cacheManagerPeerListenerFactory port defined in the ehcache.xml file shouldn't conflict with any other process running on the same port. Use the netstat command or lsof command to find out which ports are available.
-
When the ehcache manual discovery setting is enabled, instead of automatic discovery, the port numbers in the rmi URLS setting should be same as the cacheManagerPeerListenerFactory port defined in the ehcache.xml file.
-
In case of single node cluster (i.e different managed servers on the same node), before starting each managed server the cacheManagerPeerListenerFactory port should be modified so that each managed server gets started with a unique cacheManagerPeerListenerFactory port to listen to and avoiding any port binding exceptions.
To enable the ehcache manual discovery setting, do the following:
-
Ensure you are logged in to the shared disk storage through a command window.
-
Open the ehcache.xml file in a text editor.
-
Scroll down to the cacheManagerPeerProviderFactory entry.
-
Comment out the cacheManagerPeerProviderFactory entry.
Example of automatic discovery entry:
<cacheManagerPeerProviderFactory
class="net.sf.ehcache.distribution.RMICacheManagerPeerProviderFactory"
properties="peerDiscovery=automatic, multicastGroupAddress=230.0.0.1,
multicastGroupPort=4446"/>
-
Add the following entry to the file:
Example of manual discovery entry:
<cacheManagerPeerProviderFactory
class="net.sf.ehcache.distribution.RMICacheManagerPeerProviderFactory"
properties="peerDiscovery=manual,
 rmiUrls=//server1:40000/sampleCache1|//server2:40000/sampleCache1|//server1:40000/sampleCache2|//server2:40000/sampleCache2"/>
Note:
Use the netstat command or lsof command to find an available port. -
Change the value of the port entry to any unused port number.
-
Save and close the file.
Enabling Ehcache for JGroups
JGroups is a group communication toolkit and has a flexible protocol stack. JGroups extends unicast messaging to provide reliability. If you use JGroups as a replication mechanism, you must download the JGroups related JAR files and make the library additions to the UIM classpath.
To enable the Ehcache for JGroups (UDP + Unicasting), do the following:
-
Ensure you are logged in to the shared disk storage through a command window.
-
Open the ehcache.xml file in a text editor.
-
Scroll down to the cacheManagerPeerProviderFactory entry.
-
Comment out the cacheManagerPeerProviderFactory entry which uses the ”RMICacheManagerPeerProviderFactory”, which by default makes the transport mechanism as multicast.
Example of automatic discovery entry:
<!-- <cacheManagerPeerProviderFactory
class="net.sf.ehcache.distribution.RMICacheManagerPeerProviderFactory"
properties="peerDiscovery=automatic, multicastGroupAddress=230.0.0.1,
multicastGroupPort=4446"/> -->
-
Add the following entry to the file:
Example of manual discovery entry:
<cacheManagerPeerProviderFactory
class="net.sf.ehcache.distribution.jgroups.
JGroupsCacheManagerPeerProviderFactory"
properties="connect=UDP(ip_mcast=false;mcast_addr=224.0.0.35;
mcast_port=45566;ip_ttl=32;mcast_send_buf_size=150000;
mcast_recv_buf_size=80000):PING(gossip_host=adminserverhost;gossip_port=5555;
gossip_refresh=15000;timeout=2000;num_initial_members=3):MERGE2:FD_SOCK:
VERIFY_SUSPECT:pbcast.NAKACK:UNICAST:pbcast.STABLE:FRAG:pbcast.GMS"
propertySeparator="::" />
Note:
The protocol stack with UDP and PING as the bottom protocols uses IP multicasting by default to send messages to all members (UDP) and for discovery of the initial members (PING). However, if multicasting cannot be used, the UDP and PING protocols can be configured to send multiple unicast messages instead of one multicast message (UDP) and to access a well-known server (GossipRouter) for initial membership information (PING).To configure UDP to use multiple unicast messages to send a group message instead of using IP multicasting, the ip_mcast property has to be set to false.To configure PING to access a GossipRouter instead of using IP multicast the following properties have to be set:-
gossip_host: The name of the host on which GossipRouter is started.
-
gossip_port: The port on which GossipRouter is listening.
-
gossip_refresh: The number of milliseconds to wait before refreshing the address entry of the GossipRouter.
Before any members are started, the GossipRouter has to be started and the administration server is the ideal candidate to be the Gossip Router.
-
-
Save and close the file.
-
Start the Gossip router, by using the following command:
java org.jgroups.stack.GossipRouter -port gossip_port -bindaddress gossip_host
Note:
The GossipRouter is essentially a lookup service for groups and members. It is a process that runs on a well-known host and port and accepts GET (group) and REGISTER(group, member) requests. The REGISTER request registers a member's address and group with the GossipRouter. The GET request retrieves all member addresses given a group name. Each member has to periodically (gossip_refresh) re-register their address with the GossipRouter, otherwise the entry for that member will be removed (accommodating for crashed members).The property ip_mcast is set to false in UDP and the gossip properties in PING define the GossipRouter to be on the local host at port 5555 with a refresh rate of 15 seconds. If PING is parameterized with the GossipRouter's address and port, then gossiping is enabled, otherwise it is disabled. If only one parameter is given, gossiping will be disabled. Make sure to run the GossipRouter before starting any members, otherwise the members will not find each other and each member will form its own group. -
Configure the caches in the ehcache.xml file to use JGroupCacheReplicatorFactory. For example:
<cache
            maxElementsInMemory="10000"
            eternal="true"
            timeToIdleSeconds="0"
            timeToLiveSeconds="0"
            overflowToDisk="false"
            memoryStoreEvictionPolicy="LRU">
            <cacheEventListenerFactory class="net.sf.ehcache.distribution.RMICacheReplicatorFactory"
properties="replicateAsynchronously=false, replicatePuts=true, replicateUpdates=true, replicateUpdatesViaCopy=true, replicateRemovals=true "/>
</cache>
Routing Traffic Between Proxy and Cluster
For more information, see Fusion Middleware Administering Clusters for Oracle WebLogic Server at:
Configuring Mail Sessions
To enable the notification functionality in UIM, you must configure JavaMail for the UIM WebLogic server. For more information about notifications, see UIM Developer's Guide. Refer to Oracle Fusion Middleware Documentation for Administration Console Online Help for configuring the mail session at the website:
https://docs.oracle.com/cd/E57014_01/wls/WLACH/taskhelp/mail/CreateMailSessions.html
Table 6-1 describes the important configuration properties in the mail session.
Table 6-1 Mail Session Properties
| Property | Value description |
|---|---|
|
JNDI Name |
This is the unique JNDI name that modules use to access this mail session. For example, you can set the JNDI name to ”mail/InventoryMailSession.” |
|
JavaMail SSL enable |
Indicate if SSL is enabled. For example, you can set ”mail.smtp.sll.enable=true.” |
|
JavaMail port |
Indicates the port for a specific protocol for the mail session. For example, you can set ”mail.smtp.port=465.” |
|
JavaMail host |
Indicates the mail host for a specific protocol. For example, you can set ”mail.smtp.host=mail.mydom.com.” |
Defining the Map Data Source
To configure MapViewer for UIM, you must define a map data source. See "Defining the Map Data Source" for more information.