3 Installing and Configuring the Oracle Database
This chapter describes the process of installing the Oracle Database and configuring the Oracle database for Oracle Communications Unified Inventory Management (UIM).
Installing Oracle Database
The Oracle Universal Installer checks for a database to connect to during the installation process. Ensure that a database is running before you start installing UIM. If you already have a database running, you must create a tablespace for UIM.
Download and install Oracle Database for this version of UIM. See "Required Software" for the appropriate version of Oracle Database to install.
For information on installing Oracle Database, see the Oracle Database installation documentation.
Note:
UIM uses Oracle Locator, which must be installed prior to the UIM installation. When you install Oracle Database, Oracle MultiMedia is installed; and when Oracle MultiMedia is installed, Oracle Locator is installed.You can also install Oracle MultiMedia manually if necessary. For more information, see Oracle MultiMedia User's Guide at:
Configuring Oracle Database
The Oracle database must be configured for UIM. Specifically, this section covers the following:
Database Connection Information
Table 3-1 lists database connection details that you are required to provide during the Oracle Database installation.
Table 3-1 Database Connection Information
| Information Type | Description | Default Value |
|---|---|---|
|
Hostname |
Host name of the server where you install the Oracle database. |
This option has no default value. |
|
Port number |
The number assigned to this specific port. Port numbers are usually predefined and you can accept the provided default value. |
1521 |
|
User name |
Your database user name. You define the user name when you install the database. |
sys |
|
Password |
The password to connect to the database as the user for which you provided the user name. You define this password along with the user name during database installation. |
This option has no default value. |
|
Service Name |
The name of the database service or instance to remotely connect to the database. |
orcl |
Setting the Database Parameters
If you are installing Oracle Database on a UNIX system, set the following parameters:
-
8-bit ASCII character set
-
NLS_LANG=AMERICAN_AMERICA.WE8ISO8859P1 (for English)
or
NLS_LANG=AL32UTF8 (for any other language)
Setting the Database Time Zone
The Oracle database must have the correct time zone setting because UIM uses the datatype TIMESTAMP WITH LOCAL TIME ZONE in its database schema.
See Oracle Database Globalization Support Guide for information and instructions on setting the time zone.
Note:
After UIM is installed, the database time zone cannot be changed. Ensure the time zone is correctly set before installing UIM.Note:
The Database server and the Application server must be in the same time zone.Creating and Configuring Your Tablespaces
You must set up your tablespaces before installing UIM. For a minimum installation, there are at least two tablespaces, one permanent and one temporary.
The permanent tablespace stores UIM data, and the temporary tablespace is used by Oracle as a workspace while processing UIM commands. For a minimum installation, place the UIM data in one permanent tablespace. Tablespaces should be created by an experienced Oracle DBA. For assistance, contact Oracle.
In a high-throughput system, create each tablespace or set of data files on a different physical disk. Place the Oracle redo log files on a separate physical disk. You should not have any other load on this disk.
In a production system, use a RAID device for physical storage.
This example shows how to create your permanent tablespace:
create tablespace large_data
datafile '/u01/oradata/UIM/data_001M01_01.dbf' size 2200M
extent management local
uniform size 1M;
This example shows how to create your temporary tablespace:
create temporary tablespace large_temp
tempfile '/u01/oradata/UIM/temp_001M01_01.dbf' size 1600M
extent management local
uniform size 1M;
Note:
If you are using Chinese UTF8 characters, the block size for the tablespaces must be configured larger than 2 KB.Creating the Database (MetaData) Schema for UIM
The MetaData schema is an Oracle Fusion Middleware component that is required by UIM. You create the schema using the Oracle Fusion Middleware Repository Creation Utility (RCU). RCU enables you to create and drop database schemas that are required for Fusion Middleware products.
Note:
A new schema must be created for all new UIM installations. Upgrade installations will use the schema created during the installation of that UIM instance.The RCU can run on the Linux (32 bit) and Microsoft Windows platforms. A Linux or Windows system can be used to remotely access and configure the database.
RCU for Linux or Microsoft Windows is available with the Oracle Fusion Middleware Infrastructure distribution.
Note:
For information about how to install this software and obtain RCU, see Oracle Fusion Middleware Installing and Configuring the Oracle Fusion Middleware Infrastructure at:For information on creating the MetaData schema, see the Oracle Fusion Middleware Repository Creation Utility User's Guide.
Schema User Name Information
Table 3-2 lists schema user details that you are required to provide during schema installation.
Table 3-2 Schema User Information
| Information Type | Description | Default Value |
|---|---|---|
|
Schema User Name |
Your schema user name that you will use to access the UIM schema. |
This option has no default value. |
|
Schema User Password |
The password to access the UIM schema for the schema user you defined. |
This option has no default value. |
Caution:
If you attempt to create a common user or role, and the following Oracle Database error message is returned:ORA-65096: invalid common user or role name
refer to "Problem: RCU Creation Fails Due to Invalid Common User or Role Name".
To create the schema for UIM using RCU:
-
Export the environment variables by running one of the following commands:
export JAVA_HOME=$JDK_HOME
or
export ORACLE_HOME=$mw_home
-
Run the following command:
. /MW_Home/oracle_common/bin/rcu
The Welcome screen of the Repository Creation Utility appears.
-
Click Next.
The Create Repository screen appears.
-
Select Create Repository, System Load and Product Load, and click Next.
The Database Connection Details screen appears.
-
Do the following:
-
From the Database Type list, select Oracle Database.
-
In the Host Name field, enter the database system host name or IP address.
-
In the Port field, enter the port number for the system hosting the database.
-
In the Service Name field, enter the service name.
-
In the Username field, enter the user name for the database user.
Note:
This user account must have the following privileges: CATALOG, CONNECT, Create User, Create Session, Grant Any Privilege, Grant Any Role, Select Any Table, Select any Dictionary.Caution:
You must use the same user name and password when providing database user information during UIM installation. -
In the Password field, enter the password for the database user.
-
From the Role list, select SYSDBA.
-
Click Next.
The Checking Global Prerequisites screen appears, displaying the progress of establishing the connection with the specified database.
-
Click OK.
The Select Components screen appears.
-
-
On the Select Components screen, do the following:
-
Select Create new prefix and enter the prefix value.
The prefix is any appropriate name for your schema. RCU adds a suffix to this name.
-
Expand Oracle AS Repository Components.
-
Expand AS Common Schemas and select Metadata Services, Audit Services, Audit Services Append, Audit Services Viewer, and Oracle Platform Security Services.
Note:
The Service Table (prefix_STB and prefix_WLS) schemas are default selections and you cannot change them. You defined the prefix in step 6a. -
Click Next.
The Checking Component Prerequisites screen appears, displaying the progress of the component prerequisites check before the schemas are created.
-
Click OK.
The Schema Passwords screen appears.
-
-
Select Use same password for all schemas.
Caution:
You must use the same user name and password when providing UIM schema user information during UIM installation. -
In the Password field, enter the password for the schema.
-
In the Confirm Password field, enter the password for the schema again and click Next.
The Map Tablespaces screen appears.
-
Review the entries on the Map Tablespaces screen and click Next.
(Optional) To create new tablespaces or modify existing tablespaces, click Manage Tablespaces.
The RCU Confirmation screen appears.
-
Click OK.
The Creating Tablespaces progress screen appears, displaying details of the creation and validation of the tablespaces.
-
Click OK.
The Summary screen appears. Review and verify the information you have provided.
-
Click Create.
The Completion Summary screen appears, displaying details of the newly created repository.
-
Click Close.
-
Tune the authorization properties on the OPSS schema. Set the -Djps.subject.cache.key Java system property to 5.
See Oracle Fusion Middleware Performance and Tuning Guide for more information.
Installing and Configuring Oracle Database Real Application Clusters
If your network data requires multiple databases for storage purposes, Oracle recommends Oracle Real Application Clusters for high availability and scalability. Refer to the Oracle Real Application Clusters documentation on the Oracle Help Center.
Database Connection Information for Real Application Clusters Database
Table 3-3 lists database connection details for an Oracle Real Application Clusters (Oracle RAC) database that you are required to provide during the Oracle RAC installation.
Table 3-3 Database Connection Information for Oracle RAC Database
| Information Type | Description | Default Value |
|---|---|---|
|
RAC Database Connection String |
The information string that is used to connect to the Oracle RAC database. |
This option has no default value. |
|
User name |
Your database user name. You define the user name when you install the database. |
sys |
|
Password |
The password to connect to the database as the user for which you provided the user name. You define this password along with the user name during database installation. |
This option has no default value. |
Tuning the Database
Table 3-4 and Table 3-5 provide recommended database parameters for tuning your database for the UIM installation. These are the minimum requirements for UIM.
Table 3-4 Database Creation Parameters
| Parameter | Recommended Value |
|---|---|
|
SGA+PGA |
At least 4 GB in total. Oracle recommends that you use as much memory as you have available in the system, and also use Automatic Memory Management. |
|
Processes |
2000 |
|
Connection mode |
Dedicated server |
|
Redo log file size |
1024 MB minimum |
Enabling and Configuring Server Affinity
Server affinity is a performance feature that ensures all database operations performed on data on an Oracle RAC cluster are directed to the same Oracle RAC instance. When server affinity is enabled and configured, the target Oracle RAC instance is determined by data. For example, a business interaction ID; in this scenario, server affinity ensures all operations that operate on a business interaction ID are routed to the same Oracle RAC node, reducing global cache transfers.
Server affinity is also known as data affinity.
Note:
By default, UIM uses extended architecture (XA) affinity. Server affinity differs from XA affinity in that XA affinity ensures all database operations performed on an Oracle RAC cluster within the context of a transaction are directed to the same Oracle RAC instance. In XA affinity, the affinity context is established based on the global transaction id, where as in server affinity the affinity context is established based on the data.In UIM, server affinity is based on EclipseLink partitioning. See the EclipseLink documentation for more information on EclipseLink partitioning:
http://wiki.eclipse.org/EclipseLink/Examples/JPA/Partitioning
To enable and configure server affinity:
-
Update the following property value in the UIM_Home/config/affinity-config.properties file to true:
uim.affinity.configuration.enabled=true -
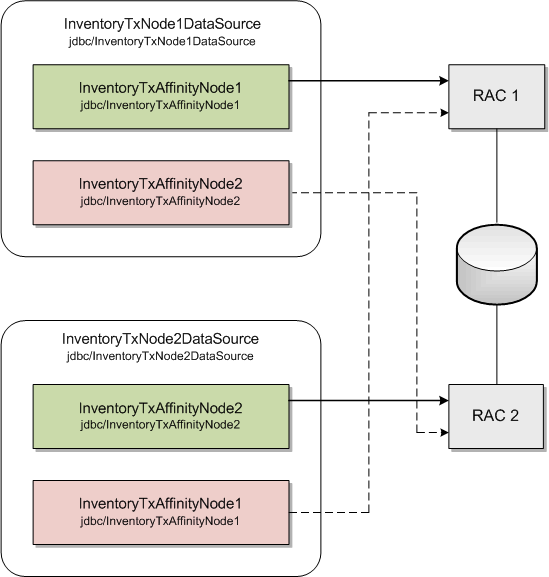
In the WebLogic Server Administration Console, create JDBC Multi Data Sources pointing to each node in the Oracle RAC cluster. For example, if there are two nodes in the Oracle RAC cluster, define two Multi Data Sources by doing the following:
-
Create two generic data sources pointing to both nodes in the Oracle RAC.
For example:
-
InventoryTxAffinityNode1
with JNDI name jdbc/InventoryTxAffinityNode1
-
InventoryTxAffinityNode2
with JNDI name jdbc/InventoryTxAffinityNode2
-
-
Create a Multi Data Source with JNDI name jdbc/InventoryTxNode1DataSource.
-
Add InventoryTxAffinityNode1 to the Multi Data Source, and select the Algorithm Type of Failover.
This defines InventoryTxAffinityNode1 as a data source pointing to Node1 while Node1 is up, and which fails over to Node2 if Node1 is down.
-
Add InventoryTxAffinityNode2 to the Multi Data Source, and select the Algorithm Type of Failover.
This defines InventoryTxAffinityNode2 as a data source pointing to Node2 while Node2 is up, and which fails over to Node1 if Node2 is down.
-
Create a Multi Data Source with JNDI name jdbc/InventoryTxNode2DataSource.
-
Add InventoryTxAffinityNode2 to the Multi Data Source, and select the Algorithm Type of Failover.
This defines InventoryTxAffinityNode2 as a data source pointing to Node2 while Node2 is up, and which fails over to Node1 if Node2 is down.
-
Add InventoryTxAffinityNode1 to the Multi Data Source, and select the Algorithm Type of Failover.
This defines InventoryTxAffinityNode1 as a data source pointing to Node1 while Node1 is up, and which fails over to Node2 if Node1 is down.
Figure 3-1 shows the server affinity example that step 2 describes. In the figure, the solid arrows indicate the primary path, and the dotted arrows indicate the secondary path.
-
-
Repeat step 2 for each node that is available. Ensure that every node in the Oracle RAC has a Multi Data Source that is primary.
-
In the UIM_Home/config/affinity-config.properties file, configure the data sources that you created by specifying the following (provide name and JNDI name):
uim.affinity.connectionpool.name.1           = node1
uim.affinity.connectionpool.node1.datasource = jdbc/InventoryTxNode1DataSource
uim.affinity.connectionpool.name.2           = node2
uim.affinity.connectionpool.node2.datasource = jdbc/InventoryTxNode2DataSource
Note:
If a new node is added, this list must be updated to include the new node, and the WebLogic Server must be restarted. -
The affinity policy that is provided with the UIM installation is based on ID. If this does not meet your requirements, you can define an affinity policy that does meet your requirements in the UIM_Home/config/affinity-config.properties file.
Table 3-6 lists and describes the properties that define an affinity policy.
Table 3-6 Affinity Policy Property Names and Descriptions
Property Name Property Description uim.affinity.policy.name
Name of the affinity policy.
The name of your affinity policy, policyName, is then used in the remaining property names.
uim.affinity.policyName.algorithm
Determines the Java class that implements this algorithm. The default value should be oracle.communications.inventory.api.framework. persistence.affinity.ExtendedHashPartitioningPolicy.
uim.affinity.policyName.key
The context ID, which determines the Oracle RAC node.
uim.affinity.policyName.connectionpools
List of connection pools the affinity policy uses.
uim.affinity.policyName.entity.list
List of entities to which the affinity policy is applied.