NRF ATS Installation Procedure
- Locating and downloading ATS and Simulator Images
- Deploying ATS and Stub Pod in K8s Cluster as per NRF
This installation includes one python based simulator that acts as a NF simulator. It is recommended to deploy NRF, ATS and STUB server in the same namespace. However, it is mandatory to deploy the STUB and NRF in the same namespace.
Locating and Downloading ATS Images
The steps to locate and download ATS Images are as follows:
- The ATS Images are
available on the OHC server. To download the ATS Images from OHC:
- Go to the URL, https://docs.oracle.com
- Navigate to Industries > Communications > Cloud Native Core
- Click the Automated Testing Suite (ATS) Images link to download the zip file.
- Unzip the Images folder to access all the ATS Images
- The
ocats-nrfdirectory has following files:ocats-nrf-pkg-1.0.0.0.0.tgzocats-nrf-pkg-1.0.0.0.0-README.txt
- The
ocats-nrf-pkg-1.0.0.0.0-README.txtfile contains all the information required for the package. - The
ocats-nrf-pkg-1.0.0.0.0.tgzfile has following images and charts packaged as tar files:ocats-nrf-pkg-1.0.0.0.0.tgz | |_ _ _ocats-nrf-pkg-1.0.0.0.0.tgz | |_ _ _ _ _ _ ocats-nrf-1.0.0.tgz (Helm Charts) | |_ _ _ _ _ _ ocats-nrf-images-1.0.0.tar (Docker Images) | |_ _ _ _ _ _ Readme.txt | |_ _ _ocstub-pkg-1.0.0.0.0.tgz |_ _ _ _ _ _ ocstub-1.0.0.tgz (Helm Charts) |_ _ _ _ _ _ ocstub-python-images-1.0.0.tar (Docker Images) |_ _ _ _ _ _ Readme.txt - The user can either copy the tar file, which contains the images to their k8s cluster or upload these images to their central repository.
Deploying ATS in K8s Cluster
The steps to deploy ATS in K8s Cluster are as follows:
- Execute the command given
below to extract tar file content.
tar -xvf
				  ocats-nrf-pkg-1.0.0.0.0.tgz
The output of this command is:
ocats-nrf-pkg-1.0.0.0.0.tgzocstub-pkg-1.0.0.0.0.tgz - Execute the command given
below to extract final helm charts and docker images of ATS.
tar -xvf
				  ocats-nrf-pkg-1.0.0.0.0.tgz
The output of this command is:
ocats-nrf-1.0.0.tgzocats-nrf-images-1.0.0.tarReadme.txt - Execute the command given
below to load the ATS image, 'ocats-nrf-images-1.0.0.tar' in your cluster and
push to your registry.
docker load
				  -i <image_name_to_be_loaded>
docker tag <loaded_image_name> <image_name_to_be_tagged>docker push <image_name_to_be_pushed>For example:
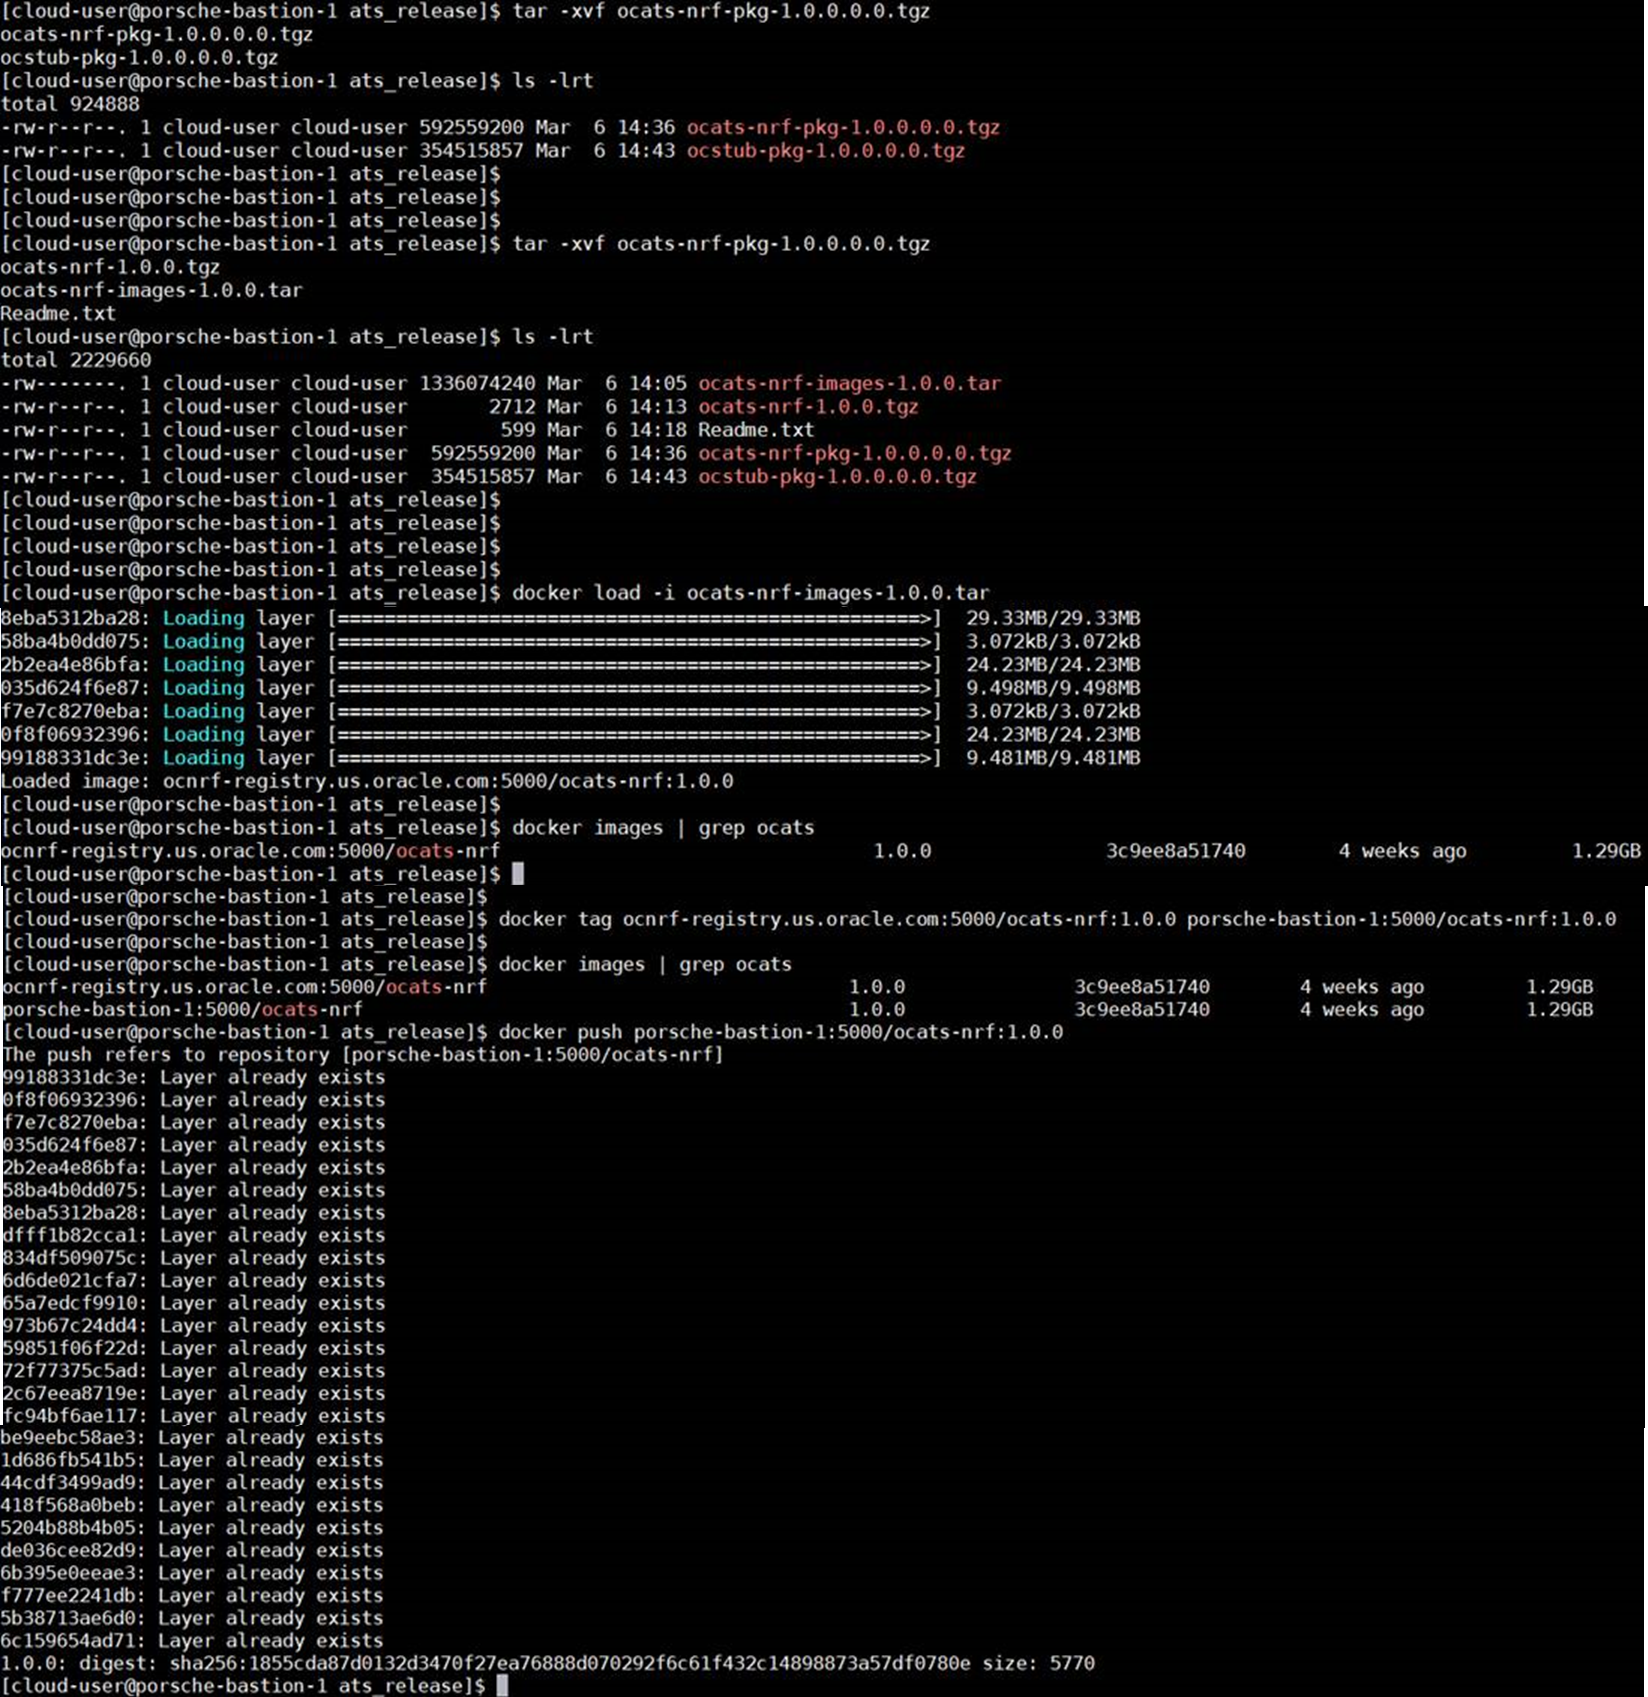
docker
				load -i ocats-nrf-images-1.0.0.tar
docker tag ocnrf-registry.us.oracle.com:5000/ocats-nrf:1.0.0 porsche-bastion-1:5000/ocats-nrf:1.0.0docker push porsche-bastion-1:5000/ocats-nrf:1.0.0Figure 3-1 ATS Docker Load Commands
- Execute the command given
below to untar the helm charts,
ocats-nrf-1.0.0.tgz.tar -xvf ocats-nrf-1.0.0.tgz - Update the image name and
tag in the
ocats-nrf/values.yamlfile as required.For this, you need to open the
values.yamlfile and update the values ofimage.repositoryandimage.tag. - Execute the command given
below to deploy ATS using the updated helm charts after performing
step 5.
helm
				  install <chart_directory> --name <release_name> --namespace
				  <namespace_name> -f <custom_values_filename>
For example:
helm install ocats-nrf --name ocats --namespace ocnrf -f ocats-nrf/values.yaml - Execute the command given
below to verify ATS deployment.
helm status
				  <release_name>
A sample screen showing ATS HELM Release is given below:
Figure 3-2 Sample Screen: Checking ATS HELM Release

Deploying Stub Pod in K8s Cluster
The steps to deploy Stub Pod are as follows:
- Execute the command given
below to extract ocstub tar file content.
tar -xvf
				  ocstub-pkg-1.0.0.0.0.tgz
The output of this command is:
ocstub-1.0.0.tgzocstub-python-images-1.0.0.tarReadme.txt - Execute the command given
below to load the STUB image, '
ocstub-python-images-1.0.0.tar' in your cluster and push to your registry.docker load -i <image_name_to_be_loaded>docker tag <loaded_image_name> <image_name_to_be_tagged>docker push <image_name_to_be_pushed>For example:
 docker
				  load -i ocstub-python-images-1.0.0.tar
docker tag ocnrf-registry.us.oracle.com:5000/ocstub-python:1.0.0 porsche-bastion-1:5000/ocstub-python:1.0.0docker push porsche-bastion-1:5000/ocstub-python:1.0.0 - Execute the command given
below to untar the helm charts,
ocstub-1.0.0.tgz.tar -xvf ocstub-1.0.0.tgz - Execute the command given
below to update the image name and tag in the
ocstub/values.yamlfile as required.Open the values.yaml file and update the values of
image.repositoryandimage.tag - Execute the command given
below to deploy Stub.
helm
				  install <chart_directory> --name <release_name> --namespace
				  <namespace_name> -f <custom_values_filename>
For example:
helm install ocstub --name ocstub --namespace ocnrf -f ocstub/values.yaml - Execute the command given
below to check the Stub deployment.
helm status
				  <release_name>
A sample screen showing how to check Stub HELM Release is given below:
Figure 3-3 Sample Screen: Checking Stub HELM Release


