3 Installing Oracle Data Miner
- Oracle Data Miner Installation Overview
Oracle Data Miner installation refers to installation of the Oracle Data Miner repository in an Oracle Database. The repository serves as application manager and workflow storage manager for Oracle Data Miner. - About Oracle Data Miner Sample Data
Oracle Data Miner contains sample data that includes tables and views. - Downloading SQL Developer
Oracle SQL Developer is available for download free of charge from the Oracle Technology Network. - Installing the Repository Using a Script
You can install the Oracle Data Miner repository by running theinstallodmrscript. - Loading the Sample Data Using a Script
After you install the repository using a script, you can run a second script to load the sample data that is used in Oracle Data Miner tutorials. - Installing the Repository Using SQL Developer GUI
You can install the Oracle Data Miner repository using the SQL Developer graphical user interface. - Installing JSON Parser and Data Guide
JSON query processing is available in Oracle Database 12.1.0.2 and later.
Oracle Data Miner Installation Overview
Oracle Data Miner installation refers to installation of the Oracle Data Miner repository in an Oracle Database. The repository serves as application manager and workflow storage manager for Oracle Data Miner.
To install Oracle Data Miner:
-
Install Oracle Database. If you already have a database, verify that it meets the requirements.
Download SQL Developer.
-
Check the topic Prerequisites for Oracle Data Miner in Oracle Data Miner Release Notes
-
Install the Oracle Data Miner repository. You can use SQL Developer or you can run scripts to perform the installation.
About Oracle Data Miner Sample Data
Oracle Data Miner contains sample data that includes tables and views.
Note:
The SH sample schema is not shipped with Oracle Database 12.2. To install the sample schema, go to DB Sample Schemas.-
MINING_DATA_BUILD_V, MINING_DATA_TEST_V, MINING_DATA_APPLU_V:These are views based on tables in theSHschema. This data is used in Oracle Data Mining sample programs, as described in Oracle Data Mining Application Developer’s Guide and Oracle Data Mining Administrator’s Guide. -
MINING_DATA_TEXT_BUILD_V, MINING_DATA_TEXT_TEST_V, MINING_DATA_TEXT_APPLU_V:These are views based on tables in theSHschema. The views include an additionalCOMMENTScolumn that is used in text mining examples in OBEs and in Data Mining sample programs. -
ODMR_CARS_DATA:This is sample data about US automobiles, for experimenting with the Graph node. -
INSUR_CUST_LVT_SAMPLE:This is sample data used by the Oracle By Example (OBE) tutorials for Data Mining. -
ODMR_SALES_JSON_DATA:This is sample sales data for experimenting with the JSON query node in Oracle Database 12.1.0.2 and later. -
ODMR_MINING_DATA_TEXT, ODMR_SALES_DATA:This is sample data that can be used as a partial replacement, if SH schema is not easily available. It is loaded when Oracle Data Miner demo data is installed, without SH dependencies. -
WIKISAMPLE:This is sample data to demonstrate the Explicit Feature Extraction node.
Related Topics
Downloading SQL Developer
Oracle SQL Developer is available for download free of charge from the Oracle Technology Network.
To install SQL Developer, simply download and unzip it on your system. SQL Developer does not include an installation program.
To download SQL Developer:
-
Go to the Downloads tab of the Oracle SQL Developer home page:
-
Select the documentation links to view the Release Notes, a list of new features, and the SQL Developer Documentation Library.
Note:
The documents in the Documentation Library are available for online viewing or for download in PDF, Mobi (for Kindle), or ePub (for iBook) format. You can bookmark the Documentation Library page for ease of access:
-
Select the installation instructions for your platform and follow the instructions to download and start SQL Developer.
Note:
SQL Developer requires the Java Development Kit (JDK) version 1.7 or later. If the JDK is not included in the SQL Developer software download bundle and you do not have it installed on your system, then you must download and install it separately.
The SQL Developer installation instructions include a link to the JDK download page.
-
The first time you start SQL Developer, you must supply the path to the JDK.
Related Topics
Installing the Repository Using a Script
You can install the Oracle Data Miner repository by running the installodmr script.
Note:
For Oracle Database 11.2.0.4 or later, the default tablespace for the repository must have auto specified for segment space management.
To install the Oracle Data Miner repository:
-
Log in to the database with DBA role.
-
Run the
installodmrscript.installodmr.sql default_tablespace temp_tablespace
For example, if you have set the default search path, then the following statement installs the repository with default tablespace
USERSand temporary tablespaceTEMP:@installodmr USERS TEMP
When the database is remote and the repository is using XML DB object-relational storage, the installation script takes approximately ten minutes to run. When the database is remote and the repository is using binary storage (Oracle Database 11.2.0.4 and later), the installation completes in approximately three minutes.
Note:
After installing the repository, you must enable Oracle Data Miner access for at least one database user.
Loading the Sample Data Using a Script
After you install the repository using a script, you can run a second script to load the sample data that is used in Oracle Data Miner tutorials.
If you install the repository by using the SQL Developer GUI, then you can install the sample data by checking a check box.
The instDemoData script prepares demo data for an Oracle Data Miner user. The script grants access to the data described. If the SH schema is not present in the database, then the script prepares only the demo data that does not depend on SH.
To install the Oracle Data Miner sample data for a user:
-
Log in to the database with DBA role.
-
Verify that the
SHschema is present in the database. -
Run the
instDemoDatascript:instDemoData.sql userFor example, if you have set the default search path, then the following statement installs the sample data for the user
dmuser1:@instDemoData dmuser1
To drop the sample data for a user:
-
Log in to the database with DBA role.
-
Run the
dropDemoDatascript:dropDemoData.sql userFor example, if you have set the default search path, then the following statement drops the sample data for the user
dmuser1:@dropDemoData dmuser1
Installing the Repository Using SQL Developer GUI
You can install the Oracle Data Miner repository using the SQL Developer graphical user interface.
-
In the Connections tab of SQL Developer, select an administrative connection to the target database, or create a new one.
-
Create an Oracle Data Miner user:
-
Drill on the administrative connection.
-
Right click Other Users and choose Create User.
-
Grant the
CONNECTrole to the user, and for Default Tablespace, specify Unlimited Quota.
-
-
In the Connections tab, create a connection for the Oracle Data Miner user.
-
From the View menu, select Data Miner, and then Data Miner Connections.
-
The Data Miner Connections tab appears beneath the SQL Developer Connections tab.
-
Click the plus sign on the Data Miner tab to display the Select Connection dialog box. Choose the Data Miner user from the drop-down list.
-
The new connection appears on the Data Miner tab.
-
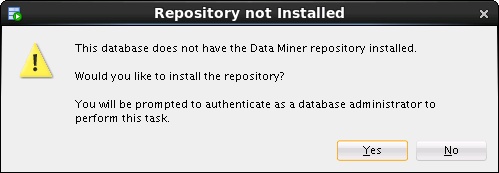
When you attempt to drill on the new connection, this dialog box is displayed:
-
Click Yes to install the repository.
-
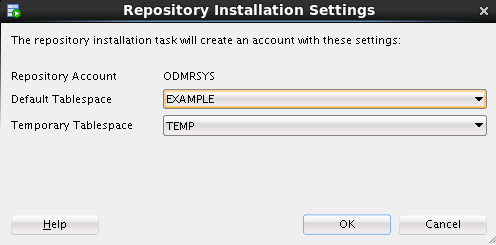
After you provide the password, information about the repository is displayed. For example:
Figure 3-2 Repository Installation Settings

Description of "Figure 3-2 Repository Installation Settings" -
Click OK.
-
The Repository Installation Settings dialog box appears.
Select the Install Demo Data check box to install the sample data in the schema of the user connection. If the
SHschema is present in the database, then all sample data is installed. IfSHis not installed, then onlyODMR_CARS_DATA,INSUR_CUST_LVT_SAMPLE,ODMR_SALES_JSON_DATAODMR_MINING_DATA_TEXT, ODMR_SALES_DATA,andWIKISAMPLE(Database 12.1 only) are installed.Note:
The SH sample schema is not shipped with Oracle Database 12.2. To install the sample schema, go to DB Sample Schemas.Note:
The repository installation automatically grants the database privileges required by Oracle Data Miner.
The privileges required by Oracle Data Miner are different from the privileges required for using the Oracle Data Mining APIs directly.
-
When the installation is complete, click Close.
Installing JSON Parser and Data Guide
JSON query processing is available in Oracle Database 12.1.0.2 and later.
In Oracle Database 12.2 and later, you do not have to install the JSON parser as Oracle Data Miner uses the JSON parser provided by the database.
Note:
If you have installed or migrated the repository using scripts, then separate postinstallation step to enable JSON support in Oracle Data Miner is not required.Note:
You must have JVM installed in the Oracle Database.To verify if Oracle JVM is installed in the Oracle Database, run this query:
select * from registry$ where cid like '%JAVA%'
- About the Scripts for Installing JSON Support
To install JSON parser and the schema generator for Oracle Data Miner, two scripts are available. - Requirements for Running the Scripts to Install JSON Parser
The scriptsloadjsonschemagen.sqlandloadjsonschemagenWithSN.sqlinstall the JSON parser and schema generator for Oracle Data Miner. - Installing JSON Parser in a Remote Database
You can install JSON support in a remote database by running theloadjsonschemagenorloadjsonschemagenWithSNscripts. - Installing JSON Parser Locally on the Database Host
You can install JSON parser locally on a database host by using the scriptsloadjsonschemagen.sql,validateODMRSYS.sql,org.glassfish.javax.json.jar, andJSONSchemaGenerator.jar.
Related Topics
About the Scripts for Installing JSON Support
To install JSON parser and the schema generator for Oracle Data Miner, two scripts are available.
The only difference between the two scripts in their arguments is that one accepts the Oracle SID, the other accepts the Oracle Service Name. You can choose the script that best suits your database installation. If you are using a pluggable database, then the Oracle Service Name is required.
Note:
You must use the SYS account to run these scripts.-
loadjsonschemagen.sqluses the Oracle SID.loadjsonschemagen.sql sysuser syspassword host port SID jar_path
-
loadjsonschemagenWithSN.sqluses the Oracle Service Name.loadjsonschemagenWithSN.sql sysuser syspassword host port service_name jar_path
org.glassfish.javax.json.jar
JSONSchemagenerator.jar
Requirements for Running the Scripts to Install JSON Parser
The scripts loadjsonschemagen.sql and loadjsonschemagenWithSN.sql install the JSON parser and schema generator for Oracle Data Miner.
To run the scripts, ensure the following requirements:
-
The jar_path argument must be a directory that is accessible to the current database system.
-
The Oracle database command-line utilities
loadjavaanddropjavamust be available on the system where the script is run. -
Java must be installed in Oracle Database. To verify JVM installation in the database, run this query:
select * from registry$ where cid like '%JAVA%'
Sample output:
JAVAVM JServer JAVA Virtual Machine 0 0 12.1.0.2.0CATJAVA Oracle Database Java Packages 0 0 12.1.0.2.0
Installing JSON Parser in a Remote Database
You can install JSON support in a remote database by running the loadjsonschemagen or loadjsonschemagenWithSN scripts.

