7 Loading data from an Oracle database into a TimesTen database
SQL Developer allows you to load data using parallel threads from an Oracle database into a TimesTen database without creating a cache group or cache table.
Note:
SQL Developer uses functions from thettLoadFromOracle built-in procedure to load data from an Oracle database into a TimesTen database. For more information about the ttLoadFromOracle utility, see "ttLoadFromOracle" in the Oracle TimesTen In-Memory Database Reference.This chapter provides information about loading Oracle database data into a TimesTen table.
Topics include:
Loading data from Oracle database tables
Before attempting to load data from an Oracle database into a TimesTen database:
-
Ensure that you are using Oracle TimesTen In-Memory Database Release 11.2.2.4 (or later).
-
Ensure that you have specified the Oracle database connection information (Oracle Database Password and Oracle Net Service Name) for your TimesTen SQL developer connection. For more information on defining your TimesTen database connection, see "Defining a TimesTen database named connection".
To load data from an Oracle database into a TimesTen database, ensure that you are on the main SQL Developer page and that your TimesTen connection is expanded.
-
Right-click the Tables option and select Load from Oracle Database Tables.
Figure 7-1 Loading data from Oracle database tables
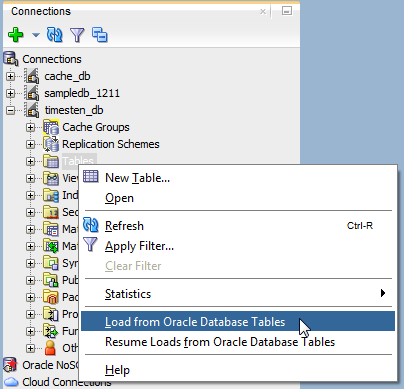
Description of ''Figure 7-1 Loading data from Oracle database tables''
The Load from Oracle Database Tables dialog displays. Locate your Oracle database schema name from the navigation tree on the left of the Load from Oracle Database Tables dialog.
-
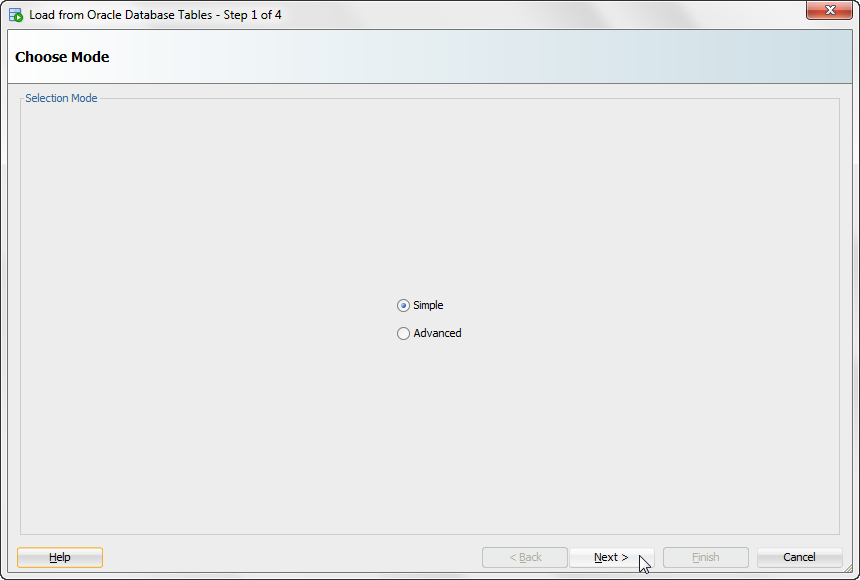
Select a mode:
-
Once you have selected a mode, click Next>.
Depending on the mode that you selected, follow the instructions from "Advanced" or "Simple".
Advanced
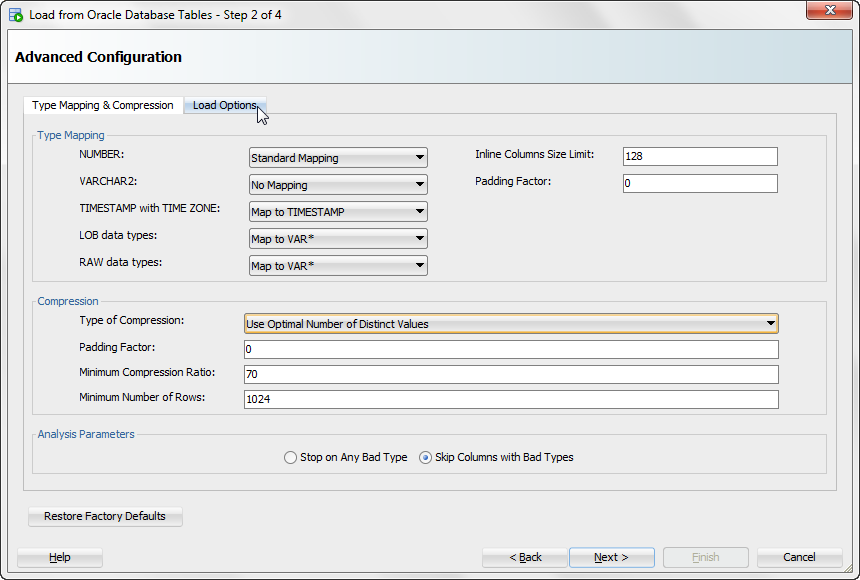
The advanced mode enables you to select the mapping of Oracle database data types to TimesTen data types and get data compression recommendations through compression analysis. Before using the advanced mode, ensure that you have completed all the steps from "Loading data from Oracle database tables".
Note:
The data type mapping and compression settings set in this section are applied to all the tables that you load from the Oracle database.Note:
You can click the Reset Factory Defaults button to set all configuration values to factory defaults.-
In the Type Mapping section of the Type Mapping & Compression tab, choose the data type mapping for the following data types:
-
NUMBER: Data type mapping for the
NUMBERdata type. You can select the following data type mappings:-
No Mapping: Columns of data type
NUMBERare not analyzed and are imported with the same data type as in the Oracle database table. -
Standard Mapping: Columns of data type
NUMBERwith precision zero are mapped to a suitable TimesTen native integer data type. For more information on native integer data types, see "Numeric data types" in the Oracle TimesTen In-Memory Database SQL Reference. -
Aggressive Mapping: All columns of data type
NUMBERare mapped in the TimesTen database as columns of data typeNUMBERwith the maximum precision and scale used in the Oracle database table.
-
-
VARCHAR2: Data type mapping for the
VARCHAR2andNVARCHAR2data type. You can select the following data type mappings:-
No Mapping: Columns of data type
VARCHAR2and NVARCHAR2 are not analyzed and are imported with the same data type as in the Oracle database table. -
Aggressive Mapping: All columns of data type
VARCHAR2and NVARCHAR2 are mapped in the TimesTen database as columns with the maximum precision and scale used in the Oracle database table.
-
-
TIMESTAMP with TIME ZONE: Data type mapping for the
TIMESTAMP WITH TIMEZONEdata type. You can select the following data mapping types:-
Treat as unsupported type: Columns of data type
TIMESTAMP WITH TIMEZONEare treated as an unsupported data type. If you select Stop on Any Bad Type as the Analysis Parameter, the data type mapping analysis stops when it encounters aTIMESTAMP WITH TIMEZONEdata type column. If you select any other option for the Analysis Parameter, the data type mapping analysis continues andTIMESTAMP WITH TIMEZONEdata type columns are ignored during table loading. -
Map to TIMESTAMP: Columns of data type
TIMESTAMP WITH TIMEZONEare mapped in the TimesTen database asTIMESTAMPdata type columns. However, all the timezone information is lost because theTIMESTAMPdata type does not support timezone information.
-
-
LOB data types: Data type mapping for any LOB data type. You can select the following data mapping types:
-
Map to VAR*: This maps columns of LOB data types from the Oracle database to VAR data types in the TimesTen database:
BLOBasVARBINARY(4194304)CLOBasVARCHAR2(4194304)NCLOBasNVARCHAR2(2097152)
-
-
RAW data types: Data type mapping for any RAW data type. You can select the following data mapping types:
-
Treat as unsupported type: Columns of any RAW data type are treated as an unsupported data type. If you select Stop on Any Bad Type as the Analysis Parameter, the data type mapping analysis stops when it encounters any RAW data type column. If you select any other option for the Analysis Parameter, the data type mapping analysis continues and RAW data type columns are ignored during table loading.
-
Map to VAR*: This maps columns of LOB data types from the Oracle database to VAR data types in the TimesTen database:
RAW(n)asVARBINARY(n)wherencan have a maximum value of4194304.LONGasVARCHAR2(4194304)LONG RAWasVARCHAR2(4194304)
-
-
Inline Column Size Limit: The maximum size limit for inline columns. This is an integer value with valid values between
0and32768. -
Padding Factor: The percentage increase of the determined maximum value for precision and length as determined by analysis when Aggressive Mapping is selected for the
NUMBERandVARCHAR2data type mapping. This is an integer value with valid values between0and1000. A padding factor of50indicates an increase of 50%.
Locate the Compression section.
-
-
In the Compression section, set the following compression parameters:
-
Type of Compression: You can select the following types of compression:
-
No Compression: The source Oracle database table is not analyzed for compression. If you select this option, all of the compression parameters are disabled.
-
Use Maximum Number of Distinct Values: The source Oracle database table is analyzed for compression using the maximum dictionary pointer size for every column.
-
Use Optimal Number of Distinct Values: The source Oracle database table is analyzed for compression using a dictionary pointer size that is adjusted based on the actual number of distinct values in the column.
-
-
Padding Factor: The percentage increase of the determined maximum value for distinct values in a table as determined by analysis. This is an integer value with valid values between
0and1000. A padding factor of50indicates an increase of 50% for theMAXVALUESparameter of theCOMPRESSstatement. For more information on theMAXVALUESparameter, see "CREATE TABLE" in the Oracle TimesTen In-Memory Database SQL Reference. -
Minimum Compression Ratio: The minimum compression factor that must be achieved for a column or table to be considered for compression. The value is the percentage ratio between the compressed and uncompressed size of the column or table. Smaller values represent higher compression. This is an integer value with valid values between
1and100. -
Minium Number of Rows: The minimum number of rows for table to be considered for compression. This is an integer value with valid values greater than
0.
Locate the Analysis Parameters section.
-
-
Choose the values for the Analysis Parameters:
-
Select the action to take when an unsupported data type is encountered for a table column. There are two options:
-
Stop on Any Bad Type: The data type mapping analysis stops when it encounters a bad data type. If a bad data type is encountered, you can view the error message in analysis results.
-
Skip Columns with Bad Types: The data type mapping analysis skips columns with bad data types, but the analysis does not stop.
-
Once you have set all the parameters of the Type Mapping & Compression tab, locate the Load Options tab.
-
-
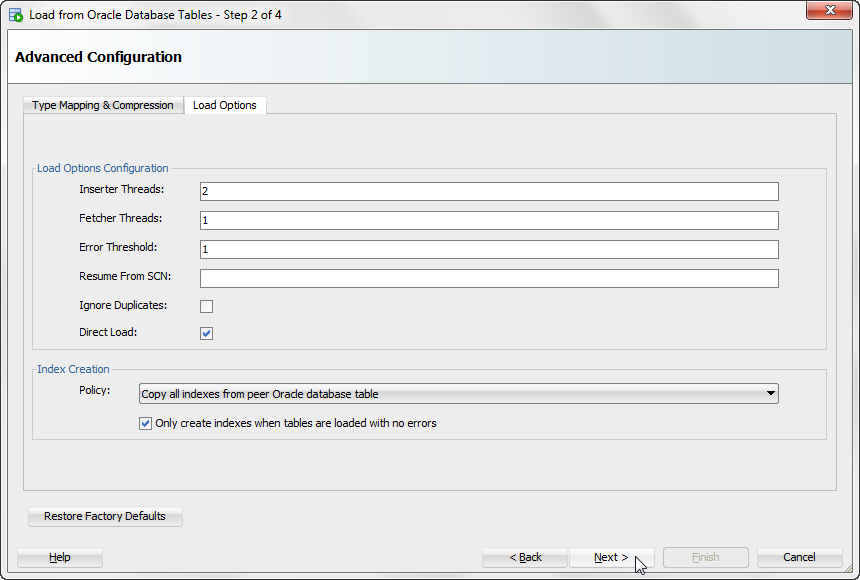
Click the Load Options tab.
The Load Options tab displays. Locate the Complex Data Mapping section.
-
In the Load Options Configuration section of the Load Options tab, specify these options:
Note:
These options are only supported in TimesTen 18.1 or higher.-
Inserter Threads: Number of threads that insert data in the TimesTen table.
-
Fetcher Threads: Number of threads that retrieve data from the Oracle database table.
-
Error Threshold: Threshold for the maximum number of allowed errors.
-
Resume from SCN: The load queries the Oracle database from this SCN. This value is optional and if it is not specified it will use the latest SCN.
-
Ignore Duplicates: This option ignores any duplicate data. It only works if the TimesTen table has a uniqueness constraint on it. All uniqueness constraint violations are ignored.
-
Direct Load: This option loads data directly into the table during commit points, whereas not using direct load loads data with standard
INSERTSQL statements. The direct load has better performance and scalability for large amounts of data.
Locate the Other Parameters section in the Advanced tab.
-
-
In the Index Creation section, specify index creation policies:
-
Policy: Specify one of these index creation policies:
Copy all indexes from peer Oracle database table
Only copy unique indexes from peer Oracle database table
Do not copy indexes from peer Oracle database table
-
Only create indexes when tables are loaded with no errors: This option determines if the indexes are created after tables are loaded without errors.
Locate the Next> button.
-
-
Click Next>.
The Load from Oracle Database Tables: Load Selected Tables dialog displays. You can now follow the steps from "Simple" as from this step forward, the steps are the same for the advanced and simple modes.
Simple
The simple mode enables you to load data from the Oracle database without selecting the mapping of Oracle database data types to TimesTen. However, if you are using advanced mode, you can follow these instructions after specifying the mapping of your data types and compression.
If you are using advanced mode, ensure that you have completed all the steps from "Advanced".
If you are using simple mode, ensure that you have completed all the steps from "Loading data from Oracle database tables".
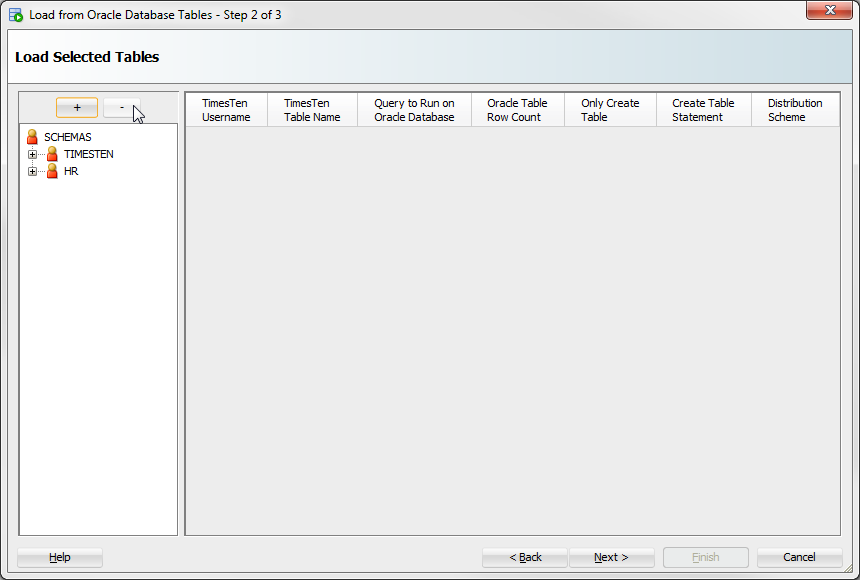
In this dialog you need to select the tables from which you want to load data from the Oracle database. By default, the dialog shows the tables from your Oracle database schema. Optionally, you can perform these operations to help you select tables from other database schemas:
If you do not want to select tables from other database schemas, you can move directly to the procedure for loading tables:
Add an Oracle database schema
To add tables from another Oracle database schema, follow these steps.
-
Click the + located above the Oracle database schema navigation tree.
Figure 7-5 Add an Oracle database schema

Description of ''Figure 7-5 Add an Oracle database schema ''
The Choose Schema dialog displays. Only Oracle database schemas that the connection user has access to display.
-
Select the Oracle database schema from the Schema name drop-down list.
Figure 7-6 Choose an Oracle database schema
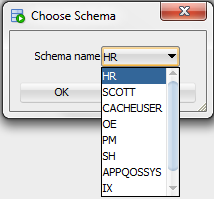
Description of ''Figure 7-6 Choose an Oracle database schema''
You are now ready to add the Oracle database schema.
-
Click OK.
You have successfully added the Oracle database schema. To load data from the tables of the Oracle database schema, see "Select tables to load".
Remove an Oracle database schema
To remove an Oracle database schema, follow these steps. This only removes Oracle database schemas from being available for the Load from Oracle database feature. You cannot remove the Oracle database schema of the connection user.
-
Select the Oracle database schema that you want to remove in the schema navigation tree.
-
Click the - located above the Oracle database schema navigation tree.
Figure 7-7 Remove the Oracle database schema
Description of ''Figure 7-7 Remove the Oracle database schema''
You have successfully removed the Oracle database schema. To load data from the tables of an Oracle database schema, see "Select tables to load".
Apply a filter to Oracle database schema tables
To apply a filter to the Oracle database schema tables, follow these steps.
-
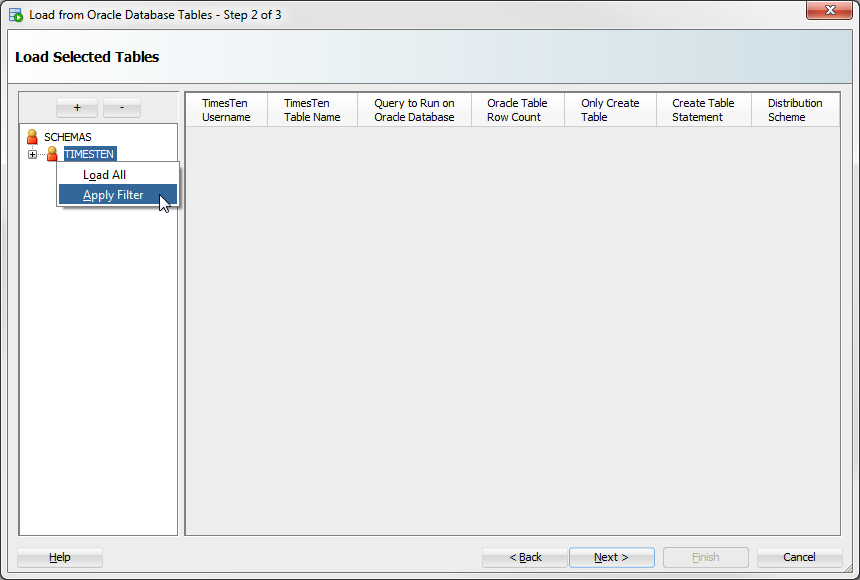
Right-click the name of the Oracle database schema that you want to apply a filter to and select Apply Filter.
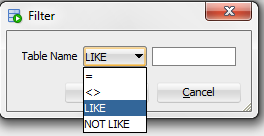
The Filter dialog displays.
-
Select the filter condition from the Table Name drop-down list:
-
=: Returns results that are equal to a specified pattern.
-
<>: Returns results that are not equal to a specified pattern.
-
LIKE: Returns results that match a specified pattern.
-
NOT LIKE: Returns results that do not match a specified pattern.
Locate the text field located next to the Table Name drop-down list.
-
-
Specify a pattern for the filter condition in the text field located next to the Table Name drop-down list. You can use a wildcard for your filter:
-
_: A substitute for exactly one character. For exampleSm_thshows all tables that contain five characters, begin withSm, and end withth. -
%: A substitute for zero or more characters. For exampleEMP%shows all tables that begin with the lettersEMP.
-
-
Click OK.
You have successfully applied a filter to the Oracle database schema tables. To load data from the tables of an Oracle database schema, see "Select tables to load".
Load custom query results
To load custom query results for an Oracle database schema, follow these steps.
-
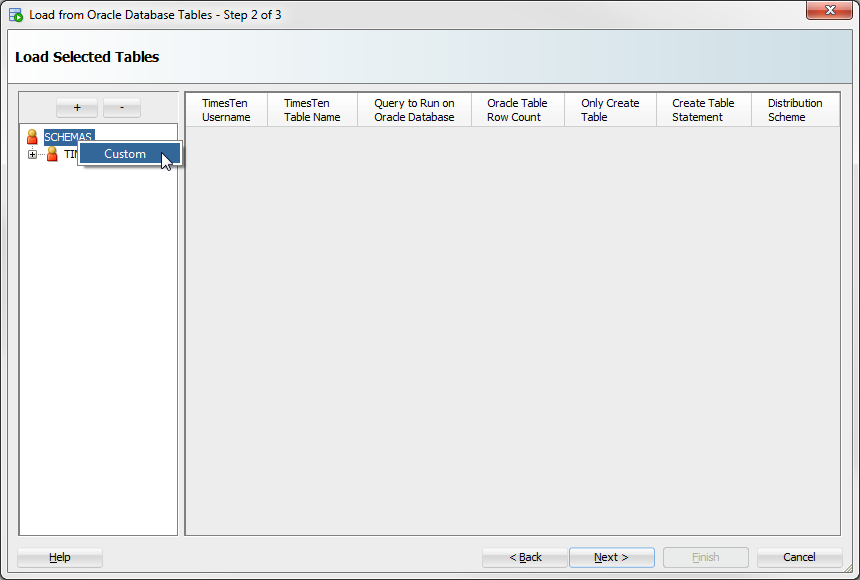
Right-click the Schemas option and select Load custom query results.
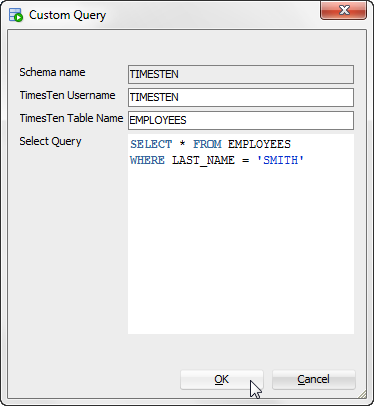
The Custom Query dialog displays. You are now required to enter the information for your custom Oracle query. The first property is the Schema name. You cannot edit this property and the default value is the connection user.
-
In the TimesTen Username text field, enter the owner of the TimesTen table. Ensure that the table owner you specify exists in TimesTen and that the TimesTen connection user has privileges to create a table or insert into an existing table owned by the specified table owner.
-
In the TimesTen Table Name text field, enter the name of the TimesTen table.
-
In the Select Query text field, enter the SQL query that you want to execute on the Oracle database to generate the desired result set. For more information on valid Oracle Database SQL queries, see Oracle Database SQL Language Reference.
-
In the Parallel Thread Count text field, enter the number of parallel threads that will be used to load the Oracle database table into the TimesTen database. TimesTen recommends a value of four.
-
Click OK.
You have successfully loaded a custom Oracle database query. Your custom query is loaded into the right pane of the Load Tables from Oracle dialog. To load data from the tables of an Oracle database schema, see "Select tables to load".
Select tables to load
To select the tables that you want to load from the Oracle database into the Timesten database.
-
Click the + located next to your Oracle database schema name to expand the Oracle database tables list.
Figure 7-12 Expand the Oracle database schema name

Description of ''Figure 7-12 Expand the Oracle database schema name''
Your Oracle database schema expands showing a list of available Oracle database tables. Locate the Oracle database tables you want to load into the TimesTen database.
-
Right-click the name of the Oracle database table that you want to load into the TimesTen database and select Load. You can repeat this step, including for the same Oracle database table, to load multiple Oracle database tables.
If you want to load all of the Oracle database tables, right-click the Oracle database schema name and select Load All. The TimesTen Username dialog displays. Enter the TimesTen user for which you want to create the tables and click OK.
Figure 7-13 Load an Oracle database table
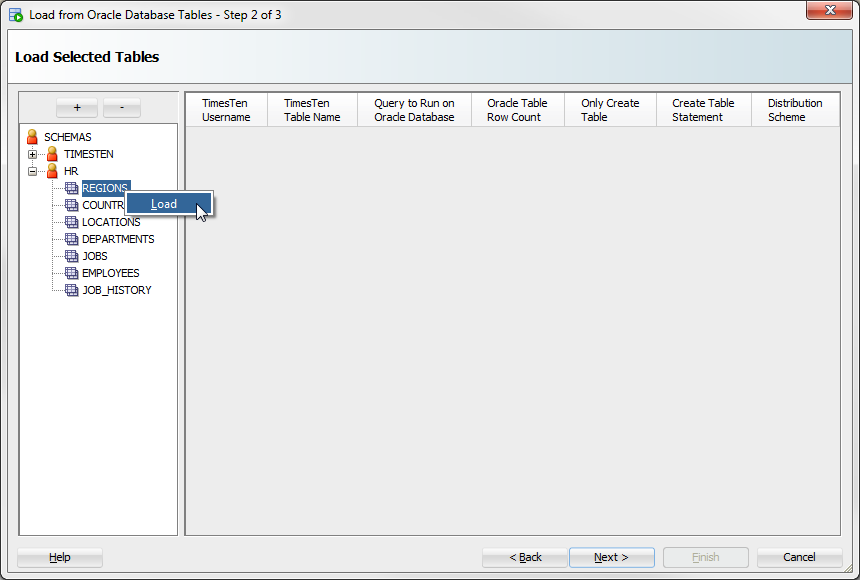
Description of ''Figure 7-13 Load an Oracle database table''
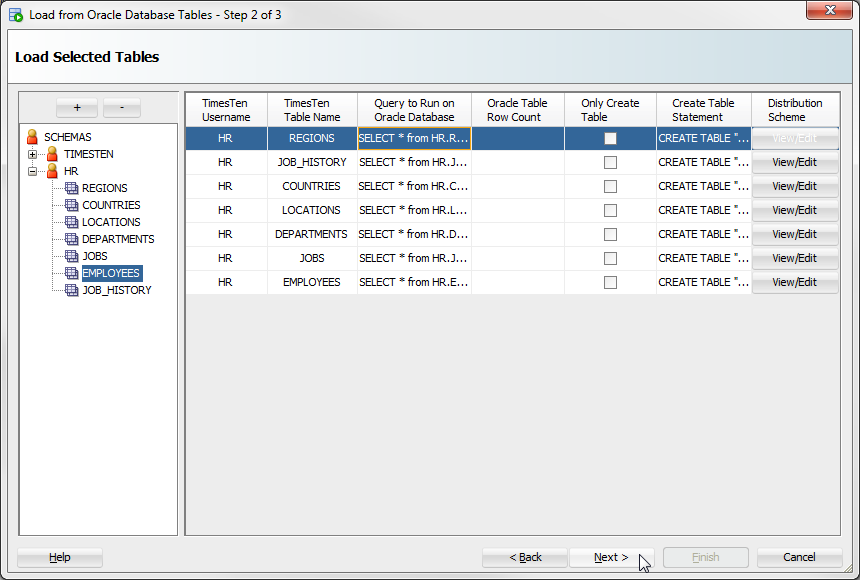
Your selected tables are added to the right pane and are displayed in a table format.
-
Review the selected Oracle database tables and edit any necessary fields. You can edit a field by double clicking it. A description of each column follows:
-
TimesTen Username
The owner of the TimesTen table that you are creating. By default, this is the TimesTen connection user. You can edit this column. An error message is displayed if the specified table owner does not exist or the TimesTen connection user does not have privileges to access the specified table owner.
-
TimesTen Table Name
The name of the TimesTen table that you are creating. By default, this is the same table name as the Oracle database table. You can edit this column.
-
Query to Run on Oracle database
The SQL query executed on the Oracle database to generate the desired result set. By default, this is a
SELECT * FROMoracledb_tblquery, whereoracledb_tblis the Oracle database table from which you are loading data. You can edit this column. For more information on valid Oracle Database SQL queries, see Oracle Database SQL Language Reference. -
Oracle Table Row Count
The number of rows that TimesTen loads from the Oracle database table. This is the row count of the result set from the "Query to Run on the Oracle database" field. By default, this value is not counted.
To populate the Row Count field for a specific Oracle database table, right-click on the Row Count field for your table, then select Count.
To populate the Row Count fields for all the selected Oracle database tables, right-click on a Row Count field of any table, then select Count All. A confirmation dialog displays. Click Yes to continue with the row count of all of your previously selected Oracle database tables.
-
Only Create Table
This option enables you to choose if you want to only create a table and not load it with any data.
-
Create Table Statement
The SQL statement that TimesTen uses to create the table to load your Oracle database data. You cannot edit this column. Review the
CREATE TABLEstatement by double clicking on the Create Table Statement field.If a TimesTen table with the same name already exists in the TimesTen database, the data from the Oracle database table is appended to the existing TimesTen table. TimesTen does not load table constraints from the Oracle database table. An error dialog displays if a TimesTen table with the same name but different table structure already exists in the TimesTen database.
-
Distribution Scheme
This column is only displayed if you are using a TimesTen Scaleout database.
Click the View/Edit button in this column to select a distribution scheme for this table.
From the Distribution method drop-down list, select a distribution method for your table:
Distribute by Hash - Distribution scheme that distributes data based on the hash of the primary key or a set of user-specified columns. For more information, see "Hash" in the Oracle TimesTen In-Memory Database Scaleout User's Guide.
If you select Distribute by Hash, select columns to be part of your distribution column:
To select columns to be part of your distribution column, double click the column name in the Available Columns list.
To remove columns from your distribution column, double click the column name in the Selected Columns list.
Distribute by Reference - Distribution scheme that distributes the data of a child table based on the location of the corresponding parent row of a foreign key constraint. Your table needs at least one foreign key to be able to use this distribution scheme. For more information, see "Reference" in the Oracle TimesTen In-Memory Database Scaleout User's Guide.
If you select Distribute by Reference, from the Foreign Key drop-down list, select the foreign key to distribute the data of your table.
Duplicate - Distribution scheme that distributes full identical copies of the table's data to all the elements of a database. For more information, see "Duplicate" in the Oracle TimesTen In-Memory Database Scaleout User's Guide.
If you select Duplicate, you do not need to specify any additional fields in the Distribution tab of the Create Table dialog.
Once you have edited all of the fields, locate the Next> button at the bottom of the dialog.
-
-
Click Next>.
A Load From Oracle Database Tables progress dialog displays. Once TimesTen finishes loading your tables, the progress dialog closes and the Load Summary results displays. If there are any errors, troubleshoot the errors. Locate the Finish button.
-
Click Finish.
If your load operation had any errors, SQL Developer asks if you want to save the load profile. This load profile for resuming the load operation once you have fixed any errors that might have come up. See "Resume loading data from Oracle database tables" for more information on how to resume the load operation.
The Load Summary dialog closes.
You have successfully loaded data from an Oracle database into a TimesTen database.
Loading data from an Oracle database table into an existing TimesTen table
To load data from an Oracle database table into an existing TimesTen table, follow these steps. Ensure that you are on the main SQL Developer page and that your TimesTen connection is expanded.
-
Click the + located next to Tables to expand the TimesTen tables list.
The TimesTen tables list expands.
-
Right-click the name of the table and select the Table option, then select the Load from Oracle Database Table option.
Figure 7-15 Load data from an Oracle database table
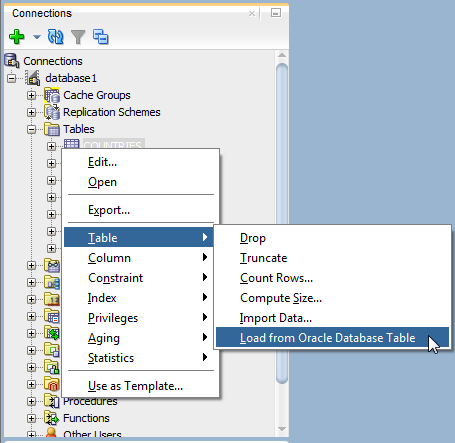
Description of ''Figure 7-15 Load data from an Oracle database table''
The Load from Oracle Database Tables dialog displays. The Schema name, TimesTen Username, and TimesTen Table Name fields are auto-filled and you cannot edit these fields. Prepare to enter the SQL query and the Parallel Thread Count.
-
In the Select Query field, enter the SQL query to execute on the Oracle database. The result of the SQL query is loaded into your TimesTen table. For more information on valid Oracle Database SQL queries, see Oracle Database SQL Language Reference.
-
In the Load Options section, specify these options:
Note:
These options are only supported in TimesTen 18.1 or higher.-
Inserter Threads: Number of threads that insert data in the TimesTen table.
-
Fetcher Threads: Number of threads that retrieve data from the Oracle database table.
-
Error Threshold: Threshold for the maximum number of allowed errors.
-
Resume from SCN: The load queries the Oracle database from this SCN. This value is optional and if it is not specified it will use the latest SCN.
-
Ignore Duplicates: This option ignores any duplicate data. It only works if the TimesTen table has a uniqueness constraint on it. All uniqueness constraint violations are ignored.
-
Direct Load: This option loads data directly into the table during commit points, whereas not using direct load loads data with standard
INSERTSQL statements. The direct load has better performance and scalability for large amounts of data.
Locate the Load button.
-
-
Click Load.
Figure 7-16 Load Tables from the Oracle database
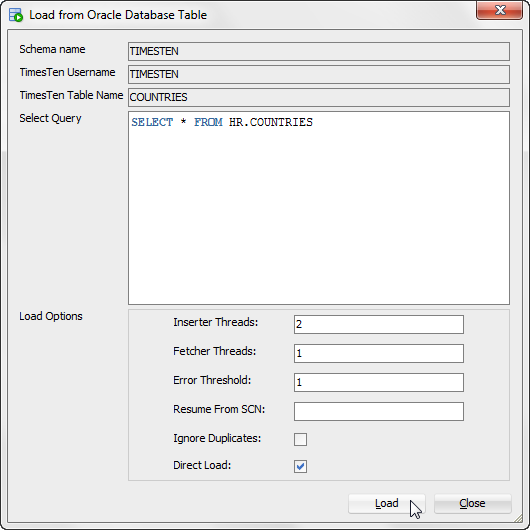
Description of ''Figure 7-16 Load Tables from the Oracle database''
A progress dialog displays. Once TimesTen loads the data from the Oracle database table, the progress dialog closes. If there are any errors, troubleshoot the errors. If you execute the query on a small Oracle database table, the progress dialog may close almost immediately.
Resume loading data from Oracle database tables
In some cases when you attempt to load data from Oracle database tables, you may run into some errors that prevent all data from being loaded from the Oracle database tables. If you saved the load profile after your load operation failed, you can resume the load operation using the load profile.
To resume loading data from an Oracle database table, ensure that you saved the load profile, that you are on the main SQL Developer page, and that your TimesTen connection is expanded.
-
Right-click the Table option and select the Resume Loads from Oracle Database Tables option.
Figure 7-17 Select Resume Loads from Oracle Database Tables

Description of ''Figure 7-17 Select Resume Loads from Oracle Database Tables''
The Resume Loads from Oracle Database Tables dialog displays. Locate the Browse button.
-
Click Browse.
The Open dialog displays. Locate your load profile file.
-
Once you have located your load profile file, click Open.
The Open dialog closes.
Note:
SQL Developer displays a warning message if you are using a different database connection than the one that was used when the load profile was saved. -
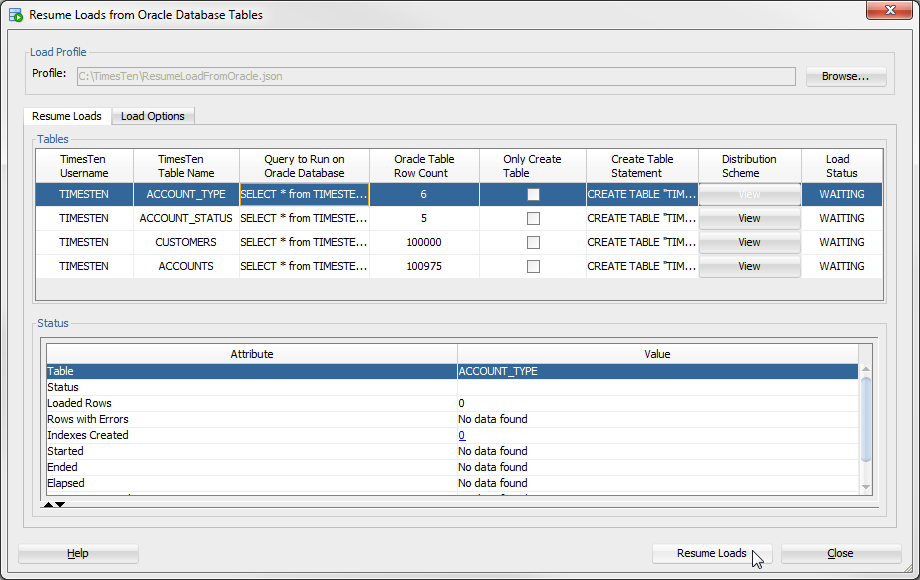
Review the information that is loaded in the Resume Loads and Load Options tabs.
The Resume Loads tab displays information related to which tables can be loaded from the Oracle database tables into TimesTen tables.
The Load Options tab displays information related to the load options that will be used to load the Oracle database tables into TimesTen tables. These options cannot be edited.
-
Once you have reviewed the load information, click Resume Loads.
A progress dialog displays. Once all tables have been loaded, the progress dialog closes. If SQL Developer displays an error message, troubleshoot the error.
Locate the Close button.
-
Click Close.
The Resume Loads from Oracle Database Tables dialog closes.
You have successfully resumed loading data from Oracle Database tables.