5 Managing a Database
This chapter discusses how to create and configure a database in TimesTen Scaleout.
Note:
-
These tasks assume that you have already created and configured a grid. See "Configure your grid" for more information on how to set up a grid and the grid scenario on which the examples in this chapter are based.
-
Run the commands provided in the examples from the active management instance, unless stated otherwise. For more information on how to set the environment variables for the active management instance, see "Creating the initial management instance" or "Environment variables".
Creating a database
The process of creating a database involves these tasks:
Create a database definition
A database definition contains the description of a database. It defines the database name, as well as the attributes of the database. Once a database definition is added to the current version of the model, it can be used to create a database. Each database has one or more connectables associated with it. Connectables specify how applications connect to the database. Connectables are discussed in "Connecting to a database".
Creating a database definition file
To create a database definition, you need a database definition file. The database definition file must use .dbdef as the file name suffix. The name of the database definition derives from the name of the database definition file. For example, a database definition file named database1.dbdef creates a database definition named database1.
Note:
Database definition names have the same restrictions as Data Source Names. See "Specifying Data Source Names to identify TimesTen databases" in the Oracle TimesTen In-Memory Database Operations Guide for more information.In the database definition file, you specify the connection attributes for the database. The types of connection attributes that a database definition supports are:
-
Data store attributes are associated with a database when it is created. They can only be modified by recreating the database.
The most commonly used data store attributes are:
-
DataStore: Defines the full path and file name prefix of the checkpoint files for every element of the database. Required. -
LogDir: Defines the file system directory of the transaction log files for every element of the database. -
DatabaseCharacterSet: Defines the character set to be used by the database. Required. -
Durability:Defines the degree of durability for transactions.Note:
Ensure that you set the appropriate durability setting based on your business needs and data loss tolerance. See "Durability settings" for more information.
-
-
First connection attributes are associated with a database when it is loaded into memory. They can only be modified when the database is unloaded from memory and reloaded with different values for the first connection attributes.
The most commonly used first connection attributes are:
-
PermSize: Defines the allocated size of the permanent memory region of each element of the database. The permanent memory region contains persistent database objects, such as tables. TimesTen Scaleout only writes the contents of the permanent memory region to the file system. -
TempSize: Defines the allocated size of the temporary memory region of each element of the database. The temporary memory region contains the transient data generated when executing a statement.
Note:
Each host must have sufficient main memory to accommodate as many elements of the database as data instances associated with the host. For more details on setting region sizes, see "Determining the value of the PermSize attribute" in this document and "Specifying the memory region sizes of a database" and "Storage provisioning for TimesTen" in the Oracle TimesTen In-Memory Database Operations Guide. -
-
PL/SQL first connection attributes define the behavior of a database regarding PL/SQL operations and are associated with the database when it is loaded into memory. They can only be modified when the database is unloaded from memory and reloaded with different values for the PL/SQL first connection attributes.
-
Server connection attributes define the behavior of the database regarding connections and are associated with the database when it is loaded into memory. They can only be modified when the database is unloaded from memory and reloaded with different values for the server connection attributes.
Note:
TimesTen Scaleout adds any connection attribute in the database definition file that is not a data store, first connection, PL/SQL first connection, or server connection attribute to a connectable that TimesTen Scaleout creates by default. See "Create a connectable" for more information.Create a database definition file as shown in Example 5-1.
Example 5-1 Database definition file
The following example creates a database definition file named database1.dbdef that defines:
-
The full path for the checkpoint files as /
disk1/databases/database1 -
The directory for the log files as
/disk2/logs -
The database character set as
AL32UTF8 -
The durability setting as
0. -
32 GB for the permanent memory region of every element
-
4 GB for the temporary memory region of every element
-
1 GB for the internal transaction log buffer of every element
-
An upper limit of 2048 user-specified concurrent connections to the database
vi /mydir/database1.dbdef

DataStore=/disk1/databases/database1
LogDir=/disk2/logs
DatabaseCharacterSet=AL32UTF8
Durability=0
PermSize=32768
TempSize=4096
LogBufMB=1024
Connections=2048
For a complete description of all the connection attributes, see "Connection Attributes" in the Oracle TimesTen In-Memory Database Reference.
Adding a database definition to the model
The ttGridAdmin dbdefCreate command creates a database definition based on a database definition file. TimesTen Scaleout uses the name of the database definition file to name the database definition.
Create the database1 database definition based on the database1.dbdef file.
% ttGridAdmin dbdefCreate /mydir/database1.dbdef
Database Definition database1 created.
The ttGridAdmin dbdefCreate command also creates a connectable of the same name, which includes any general connection attribute found in the database definition file. Considering that the database1.dbdef file in Example 5-1 includes no general connection attribute, the database1 connectable contains no attributes. This connectable is always set for direct connections only.
Add the database1 database definition to the current version of the model.
% ttGridAdmin modelApply
...
Updating grid state...................................................OK
Pushing new configuration files to each instance......................OK
...
ttGridAdmin modelApply complete
TimesTen Scaleout adds a database1 connectable to the configuration files of every data instance based on the attributes defined in the database1 database definition.
Note:
TimesTen Scaleout overwrites the configuration files every time you apply the changes made to the latest version of the model to the operational grid. For this reason, you must refrain from modifying these files without the assistance of thettGridAdmin utility.For more information on the ttGridAdmin dbdefCreate or ttGridAdmin modelApply command, see "Create a database definition (dbdefCreate)" in the Oracle TimesTen In-Memory Database Reference or "Applying the changes made to the model" in this document, respectively.
Create a database based on the database definition
In TimesTen Scaleout, user data is distributed to a set of elements that form a database. Each data instance in the current version of the model contains one element of every user database in the grid.
You can create a database based on the attributes stored in a database definition. On database creation, every data instance creates an element of the database and loads it into memory.
The process of creating an element of the database on every data instance is asynchronous. The daemon of each data instance performs the operations necessary to create and load the element into memory independently, as soon as it realizes that there is a new database flagged for creation.
The ttGridAdmin dbCreate command creates a database based on a database definition.
Create the database1 database based on the database1 database definition.
% ttGridAdmin dbCreate database1
Database database1 creation started
Wait until all data instances report that they have loaded their element of the database into memory before proceeding with the definition of the distribution map. You can verify the status of the database creation process with the ttGridAdmin dbStatus command as shown in Example 5-2.
Example 5-2 Verifying the status of the database creation process
The example shows a status summary for the database1 database. Notice that the report shows all elements of the database as loaded.
% ttGridAdmin dbStatus database1 -element
Database database1 element level status as of Wed Jan 10 14:34:08 PST 2018

Host  Instance  Elem Status Date/Time of Event  Message
----- --------- ---- ------ ------------------- -------
host3 instance1    1 loaded 2018-01-10 14:33:23
host4 instance1    2 loaded 2018-01-10 14:33:21
host5 instance1    3 loaded 2018-01-10 14:33:23
host6 instance1    4 loaded 2018-01-10 14:33:23
host7 instance1    5 loaded 2018-01-10 14:33:23
host8 instance1    6 loaded 2018-01-10 14:33:23
For more information on the ttGridAdmin dbCreate or ttGridAdmin dbStatus command, see "Create a database (dbCreate)" or "Monitor the status of a database (dbStatus)", respectively, in the Oracle TimesTen In-Memory Database Reference.
Define the distribution map of the database
TimesTen Scaleout allows for elastic scalability. You can increase or reduce the number of elements in your database according to your business needs. When you add new data instances to a grid, TimesTen Scaleout does not automatically re-distribute the data stored in the database across the elements of the new or remaining instances. The way the data is distributed in TimesTen Scaleout is defined by the data space group associated to each host in the grid and the elements of the data instances defined in the distribution map of the database.
Note:
TimesTen Scaleout blocks DDL and DML statements during operations that change the distribution map of the database. Ensure that you make changes to the distribution map while there are no open transactions, such as during a maintenance period or scheduled outage.The ttGridAdmin dbDistribute command with the -add option adds the element of a data instance to the distribution map of a database. Using all as the parameter for the -add option adds the elements of all the available data instances in the grid. The all parameter is typically used for the initial definition of the distribution map of a new database.
Add all the elements of the available data instances in the grid1 grid to the distribution map of the database1 database.
% ttGridAdmin dbDistribute database1 -add all -apply
Distribution map updated
For more information on the ttGridAdmin dbDistribute command, see "Set or modify the distribution scheme of a database (dbDistribute)" in the Oracle TimesTen In-Memory Database Reference.
Open the database for user connections
For an application to be able to connect to a database, the database needs to be open for user connections. As with the database creation process, the process of opening elements is asynchronous. The daemon of every data instance performs the operations necessary to open its element as soon as it realizes that the database is flagged for opening.
Note:
-
The instance administrator can connect to the database without it being open for user connections.
-
Before you open the database to user connections, you may want to create your database users. See "Creating or identifying a database user" in the Oracle TimesTen In-Memory Database Security Guide.
Also, you may want to have the SQL schema defined which includes the distribution scheme of each table, as shown in "Defining table distribution schemes".
The ttGridAdmin dbOpen command opens a database for user connections.
Open the database1 database for user connections.
% ttGridAdmin dbOpen database1
Database database1 open started
You can verify the status of the database opening process with the ttGridAdmin dbStatus command as shown in Example 5-3.
Example 5-3 Verifying the status of the database opening process
The example shows a status summary for the database1 database. Notice that the report shows all elements of the database as open.
% ttGridAdmin dbStatus database1 -element
Database database1 element level status as of Wed Jan 10 14:34:43 PST 2018

Host  Instance  Elem Status Date/Time of Event  Message
----- --------- ---- ------ ------------------- -------
host3 instance1    1 opened 2018-01-10 14:34:43
host4 instance1    2 opened 2018-01-10 14:34:43
host5 instance1    3 opened 2018-01-10 14:34:42
host6 instance1    4 opened 2018-01-10 14:34:42
host7 instance1    5 opened 2018-01-10 14:34:42
host8 instance1    6 opened 2018-01-10 14:34:42
For more information on the ttGridAdmin dbOpen or ttGridAdmin dbStatus command, see "Open a database (dbOpen)" or "Monitor the status of a database (dbStatus)", respectively, in the Oracle TimesTen In-Memory Database Reference.
Connecting to a database
To be able to connect to a database, every element of the database needs to be created, loaded into memory, added to the distribution map, and opened for user connections. All these operations are covered in the previous section, "Creating a database".
A connectable defines a name that applications can use to connect to a database. The connectable may have the same name as the database or may have a different name. There are two types of connectables:
-
Direct connectable: Defines a name by which applications may connect to a database through direct communication.
-
Client/server connectable: Defines a name by which applications may connect to a database through client/server communication.
TimesTen Scaleout enables you to create multiple connectables with different sets of connection attributes defined for a single database.
Connectables support these types of connection attributes:
-
General connection attributes are set by each connection and persist for the duration of that connection.
-
NLS general connection attributes define the connection-specific behavior of the database regarding globalization.
-
PL/SQL general connection attributes define the connection-wise behavior of the database regarding PL/SQL operations.
-
TimesTen Client connection attributes define the connection parameters for client/server connections.
For a complete description of all the connection attributes, see "Connection Attributes" in the Oracle TimesTen In-Memory Database Reference.
Create a connectable
TimesTen Scaleout creates a direct connectable by default for every database definition added to the grid, this connectable enables applications to create direct connections to the database from any data instance in the distribution map of the database. TimesTen Scaleout uses the name assigned to the database definition to name the connectable. You need to create a client/server connectable to establish client/server connections to a database.
The tasks to create a connectable are:
Creating a connectable file
A connectable file specifies the attributes to use to connect to a database. The connectable file must use .connect as file name suffix. The file name prefix of the connectable file sets the name of the connectable. For example, a connectable file named database1CS.connect creates a connectable named database1cs.
Note:
Connectable names have the same restrictions as Data Source Names. See "Specifying Data Source Names to identify TimesTen databases" in the Oracle TimesTen In-Memory Database Operations Guide for more information.Create a client/server connectable file with the connection attributes for the database1 database as the one shown in Example 5-4.
The example shows the contents of a connectable file named database1CS.connect that sets AL32UTF8 as the connection character set and terry as the user ID for the connection.
ConnectionCharacterSet=AL32UTF8
UID=terry
Note:
If you do not provide a user ID, TimesTen utilizes the OS user ID of the user that sends the connection request as theUID. In this case, connection requests coming from systems other than the localhost fail since the OS user ID cannot be authenticated. See "UID and PWD" in the Oracle TimesTen In-Memory Database Reference and "Authentication in TimesTen" in the Oracle TimesTen In-Memory Database Security Guide for more information.Creating a connectable based on the connectable file
The ttGridAdmin connectableCreate command creates a connectable based on a connectable file.
Create the database1CS connectable based on the database1CS.connect connectable file.
% ttGridAdmin connectableCreate -dbdef database1 -cs /mydir/database1CS.connect
Connectable database1CS created.
Note:
-
The
-csoption enables the connectable for client connections instead of direct connections. -
Use the
-onlyoption to establish client connections only to the element of the specified data instance.
Apply the creation of the database1CS connectable to the current version of the model to make the connectable available for use.
% ttGridAdmin modelApply
...
Updating grid state...................................................OK
Pushing new configuration files to each instance......................OK
...
ttGridAdmin modelApply complete
For more information on the ttGridAdmin connectableCreate or ttGridAdmin modelApply command, see "Create a connectable (connectableCreate)" in the Oracle TimesTen In-Memory Database Reference or "Applying the changes made to the model" in this document, respectively.
Connect to a database using ODBC and JDBC drivers
Applications can use the ODBC direct driver, the ODBC client driver, or an ODBC driver manager to connect to a database. See "Connecting to TimesTen with ODBC and JDBC drivers" in the Oracle TimesTen In-Memory Database Operations Guide for more information.
The following topics discuss how to use those DSNs to establish direct and client connections to a database:
Establishing direct connections from a data instance
TimesTen Scaleout automatically creates a direct connectable that includes any general connection attribute included in the database definition file. TimesTen Scaleout uses the name of the database definition to name the connectable. When the connectable is applied to the current version of the model, TimesTen Scaleout defines a DSN in every data instance with the same name as the connectable. This allows ODBC and JDBC applications to connect to the database associated with the connectable.
You may use the ttIsql utility from a data instance to establish direct connections to a database.
From the host3.instance1 data instance, connect to the database1 database using the database1 connectable.
% ttIsql -connStr "DSN=database1"

Copyright (c) 1996, 2016, Oracle and/or its affiliates. All rights reserved.
Type ? or "help" for help, type "exit" to quit ttIsql.

connect "DSN=database1";
Connection successful: DSN=database1;UID=pat;DataStore=/disk1/databases/database1;
DatabaseCharacterSet=AL32UTF8;ConnectionCharacterSet=US7ASCII;LogDir=/disk2/logs;
PermSize=32768;TempSize=4096;TypeMode=0;
(Default setting AutoCommit=1)
Command>
Note:
The example connects to the database as the instance administrator, which is defined for all instances (data and management) of thegrid1 grid. For more information on database users, see "Overview of TimesTen users" in the Oracle TimesTen In-Memory Database Security Guide.For more information on the ttIsql utility, see "Using the ttIsql Utility" in the Oracle TimesTen In-Memory Database Operations Guide.
Establishing client connections from a TimesTen Client
A client/server connectable enables all data instances to accept connections from a TimesTen Client instance or applications using the TimesTen Client driver. However, to establish a client connection from a TimesTen Client that is not part of the grid, you have to create a client DSN in the system or user odbc.ini file of the TimesTen Client.
The ttGridAdmin gridClientExport command exports every client/server connectable available for the grid into a file that is formatted to replace the system or user odbc.ini file used by the TimesTen Client.
Export the client/server connectables of the grid1 grid into a file.
% ttGridAdmin gridClientExport /mydir/sys.odbc.ini
Example 5-5 shows the content of the resulting file.
Example 5-5 Exported odbc.ini file
[ODBC Data Sources]
database1CS=TimesTen 18.1.4 Client Driver

[database1CS]
TTC_SERVER_DSN=DATABASE1
# External address/port info for host3.instance1
TTC_SERVER1=host3.example.com/6625
# External address/port info for host4.instance1
TTC_SERVER2=host4.example.com/6625
# External address/port info for host5.instance1
TTC_SERVER3=host5.example.com/6625
# External address/port info for host6.instance1
TTC_SERVER4=host6.example.com/6625
# External address/port info for host7.instance1
TTC_SERVER5=host7.example.com/6625
# External address/port info for host8.instance1
TTC_SERVER6=host8.example.com/6625
ConnectionCharacterSet=AL32UTF8
UID=terry
For more information on the ttGridAdmin gridClientExport command, see "Export sys.odbc.ini for client/server connections outside grid (gridClientExport)" in the Oracle TimesTen In-Memory Database Reference.
Adding a client DSN to a TimesTen Client on Linux or UNIX
To add a client DSN to a TimesTen Client on Linux or UNIX, either replace the system or user odbc.ini file of the TimesTen Client with the file you just created, or copy the contents of the file into the system or user odbc.ini file. Then, from the TimesTen Client, connect to the database1 database using the database1CS DSN with the ttIsqlCS utility.
% ttIsqlCS -connStr "DSN=database1CS"

Copyright (c) 1996, 2016, Oracle and/or its affiliates. All rights reserved.
Type ? or "help" for help, type "exit" to quit ttIsql.

connect "DSN=database1CS;UID=terry;
Enter password for 'terry':
Connection successful: DSN=database1CS;TTC_SERVER=host3.example.com;
TTC_SERVER_DSN=DATABASE1;UID=terry;DATASTORE=/disk1/databases/database1;
DATABASECHARACTERSET=AL32UTF8;CONNECTIONCHARACTERSET=AL32UTF8;
PERMSIZE=32768;TEMPSIZE=4096;TYPEMODE=0;
(Default setting AutoCommit=1)
Command>
Note:
The example connects to the database with theterry user, which has at least CREATE SESSION privileges on the database. For more information on database users and how to create them, see "Creating or identifying a database user" in the Oracle TimesTen In-Memory Database Security Guide.For more information on the ttIsqlCS utility and the TimesTen Client, see "Working with the TimesTen Client and Server" in the Oracle TimesTen In-Memory Database Operations Guide.
Adding a client DSN to a TimesTen Client on Windows
You can add a client DSN to a TimesTen Client on Windows by using the ttInstallDSN utility included in the TimesTen Client Release 18.1. The ttInstallDSN utility creates a system DSN based on the contents of the output file of the ttGridAdmin gridClientExport command. You will need to make the file or its contents available to the Windows system where the TimesTen Client is installed.
C:\>ttInstallDSN -f C:\Users\terry\Downloads\sys.odbc.ini

Found the following DSNs in available 'C:\Users\terry\Downloads\sys.odbc.ini'.
0 : database1CS
[ Please select the DSN to be imported: ]
0
Adding DSN 'database1CS'.
Note:
You must run thettInstallDSN utility as administrator of Windows with the environment variables for the TimesTen Client set. See "Setting environment variables for TimesTen" in the Oracle TimesTen In-Memory Database Installation, Migration, and Upgrade Guide for further details.From the TimesTen Client system, you can now connect to the database1 database using the database1CS DSN with the ttIsql utility.
C:\>ttIsql -connStr "DSN=database1CS"

Copyright (c) 1996, 2016, Oracle and/or its affiliates. All rights reserved.
Type ? or "help" for help, type "exit" to quit ttIsql.

connect "DSN=database1CS;UID=terry;
Enter password for 'terry':
Connection successful: DSN=database1CS;TTC_SERVER=host3.example.com;
TTC_SERVER_DSN=DATABASE1;UID=terry;DATASTORE=/disk1/databases/database1;
DATABASECHARACTERSET=AL32UTF8;CONNECTIONCHARACTERSET=AL32UTF8;
PERMSIZE=256;TEMPSIZE=128;TYPEMODE=0;
(Default setting AutoCommit=1)
Command>
Note:
The example connects to the database with theterry user, which has at least CREATE SESSION privileges on the database. For more information on database users and how to create them, see "Creating or identifying a database user" in the Oracle TimesTen In-Memory Database Security Guide.For more information on the ttInstallDSN utility, see "ttInstallDSN" in the Oracle TimesTen In-Memory Database Reference.
For more information on the ttIsql utility and the TimesTen Client, see "Working with the TimesTen Client and Server" in the Oracle TimesTen In-Memory Database Operations Guide.
Using a connection string to establish a client connection
Alternatively, you can connect to a specific element by defining in the connection string the address of the host associated with that element, the database name, and a database user with at least CREATE SESSION privileges. (The client TCP/IP port is only necessary if the instance is not running with the default port.)
% ttIsqlCS -connStr "TTC_SERVER=host3.example.com;TTC_SERVER_DSN=database1;
 TCP_Port=6625;UID=terry"
Redirecting client connections
When an application connects to a client/server connectable a TCP/IP connection is established to one of the data instances in the grid. However, if the instance is busy then the instance can automatically redirect the client connection to another instance in the grid.
By default, a client connection can be automatically redirected to any available instance within the grid. However, you can limit or change this behavior with:
-
The
TTC_Redirectconnection attribute, which defines how a client is redirected.-
Automatic redirection: By default, this connection attribute is set to
1so that a client connection is automatically redirected to any available instance within the grid if the current instance is busy or unavailable. The connection is redirected to the instance with the fewest number of client connections. -
Elements within a single replica set: If you want the client to connect to instances with elements within a single replica set (because the data you are interested in is contained within this replica set), then set the
TTC_Redirectattribute to0. Then, the client connects only to the instances with elements in the same replica set. If the connection is rejected, then a connection error is returned.
-
-
The
TTC_Redirect_Limitconnection attribute, which limits how many times the client is redirected. The number of instances in your grid may be of a size that you want to limit the number of redirected client connection attempts for performance reasons. You can set theTTC_Redirect_Limitattribute to the number of connection redirection attempts. For example, settingTTC_Redirect_Limitlimits the number of client connection redirection attempts to other instances to 10 attempts. If the client does not connect within this number of attempts, a connection error is returned.
If the client connection cannot be redirected to a suitable instance, then the client connection fails. See "Client connection failover" for more information on the client failover process.
For more information on the TTC_Redirect or TTC_Redirect_Limit connection attributes, see "TTC_REDIRECT" or "TTC_Redirect_Limit", respectively, in the Oracle TimesTen In-Memory Database Reference.
See "Modify the connection attributes in a connectable" for information on how to modify TimesTen Client connection attributes.
Verify if your database is a distributed database
If you want to verify that the database you are connected to is indeed a distributed database (TimesTen Scaleout) and not a single-instance database (TimesTen Classic), call for the value of the ttGridEnable attribute with the ttConfiguration built-in procedure. The built-in procedure returns ttGridEnable=1 for databases in a grid.
Command> CALL ttConfiguration('ttGridEnable');
< TTGridEnable, 1 >
1 row found.
Command>
For more information on the ttConfiguration built-in procedure, see "ttConfiguration" in the Oracle TimesTen In-Memory Database Reference.
Defining table distribution schemes
In TimesTen Scaleout, data is distributed across the elements of the grid. How the data is distributed is defined by the distribution scheme specified in the DISTRIBUTE BY clause of the CREATE TABLE statement. Regardless of how the data is distributed or on which element specific data is located, applications can access all the data in the database while connecting to a single element. However, there are some considerations you should take into account when defining the distribution scheme of a table.
Important:
Before you start creating database objects, see "Authentication in TimesTen" in the Oracle TimesTen In-Memory Database Security Guide.The available data distribution schemes for a table in TimesTen Scaleout are:
Hash
The hash distribution scheme distributes data based on the hash of the primary key or a set of user-specified columns. The hash key determines in which replica set a row should be stored. Any given row in the table is stored in only one replica set. If the table does not have a primary key or a user-specified distribution column, TimesTen Scaleout distributes the data based on the hash of a hidden column that TimesTen Scaleout adds for this purpose. This distribution scheme is adaptive to topology changes and uses consistent hashing. In other words, a row with an specific value in the hash key columns will always be allocated on the same replica set, provided that the topology does not change. If the topology changes, the location of the row may change when the data is re-distributed.
Note:
If you create a table without specifying aDISTRIBUTE BY clause, TimesTen Scaleout defines a hash distribution scheme on the table. In addition, if a column is not specified in the DISTRIBUTE BY HASH clause, TimesTen Scaleout selects the primary key columns as the key columns of the distribution scheme. If a primary key is not defined, TimesTen Scaleout creates a hidden column as the hash key.Create the customers table that uses a DISTRIBUTE BY HASH clause, which distributes data based on the hash of the cust_id primary key column.
CREATE TABLE customers (
    cust_id            NUMBER(10,0) NOT NULL PRIMARY KEY,
    first_name         VARCHAR2(30) NOT NULL,
    last_name          VARCHAR2(30) NOT NULL,
    addr1              VARCHAR2(64),
    addr2              VARCHAR2(64),
    zipcode            VARCHAR2(5),
    member_since       DATE NOT NULL
) DISTRIBUTE BY HASH;
Figure 5-1 shows the data distribution for the customers table in the database1 database, as configured in "Creating a database". TimesTen Scaleout distributes the data to each element based on the hash of the cust_id column.
For more information on the hash distribution scheme, see "CREATE TABLE" in the Oracle TimesTen In-Memory Database SQL Reference.
Reference
The reference distribution scheme distributes the data of a child table based on the location of the corresponding parent row of a foreign key constraint. This distribution scheme optimizes the performance of joins by distributing related data on a single element. When you join the parent and child tables, TimesTen Scaleout does not need to access different elements because all of the data is stored on the same element. The parent table can be distributed by hash or reference, which allows for a multi-tiered reference distribution.
Note:
Ensure you declare the child key columns of a foreign key constraint asNOT NULL when you use the DISTRIBUTE BY REFERENCE clause.Create the customers parent table that uses a DISTRIBUTE BY HASH clause that distributes data based on the hash of the cust_id primary key column. Then, create the accounts child table that uses a DISTRIBUTE BY REFERENCE clause that distributes the data in the accounts table based on the location of the corresponding value of the referenced column, customers(cust_id), in the fk_customer foreign key.
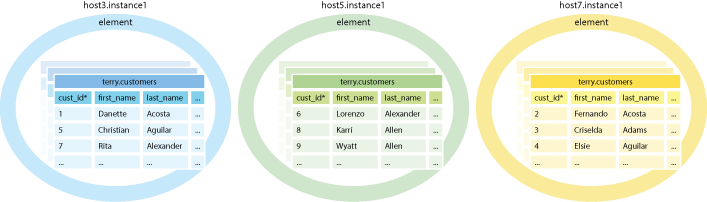
CREATE TABLE customers (
    cust_id            NUMBER(10,0) NOT NULL PRIMARY KEY,
    first_name         VARCHAR2(30) NOT NULL,
    last_name          VARCHAR2(30) NOT NULL,
    addr1              VARCHAR2(64),
    addr2              VARCHAR2(64),
    zipcode            VARCHAR2(5),
    member_since       DATE NOT NULL
) DISTRIBUTE BY HASH;

CREATE TABLE accounts (
    account_id         NUMBER(10,0) NOT NULL PRIMARY KEY,
    phone              VARCHAR2(15) NOT NULL,
    account_type       CHAR(1) NOT NULL,
    status             NUMBER(2) NOT NULL,
    current_balance    NUMBER(10,2) NOT NULL,
    prev_balance       NUMBER(10,2) NOT NULL,
    date_created       DATE NOT NULL,
    cust_id            NUMBER(10,0) NOT NULL,
    CONSTRAINT fk_customer
        FOREIGN KEY (cust_id)
            REFERENCES customers(cust_id)
) DISTRIBUTE BY REFERENCE (fk_customer);
Figure 5-2 shows the data distribution for the customers table in the database1 database, as configured in "Creating a database". TimesTen Scaleout distributes the data in the customers table to each replica set based on the hash of the cust_id primary key column. The figure also shows the data distribution for the accounts table, which is based on the location of the corresponding value of the referenced column, cutomers(cust_id), in the fk_customer foreign key.
Figure 5-2 Table distributed by reference

Description of ''Figure 5-2 Table distributed by reference''
For more information on the reference distribution scheme, see "CREATE TABLE" in the Oracle TimesTen In-Memory Database SQL Reference.
Duplicate
The duplicate distribution scheme distributes identical copies of the data of a table to all the elements of a database. This distribution scheme optimizes the performance of reads and joins against the table by ensuring that all data access is local. However, inserts and updates are more resource intensive than other distribution schemes.
Create the account_type table that uses a DUPLICATE clause that distributes the data to all the elements of a database.
CREATE TABLE account_type (
    type            CHAR(1) NOT NULL PRIMARY KEY,
    description     VARCHAR2(100) NOT NULL
) DUPLICATE;
Figure 5-3 shows the data distribution for the account_type table in the database1 database, as configured in "Creating a database". TimesTen Scaleout creates a copy of the data on all the elements of the database.
Figure 5-3 Table distributed by duplicate
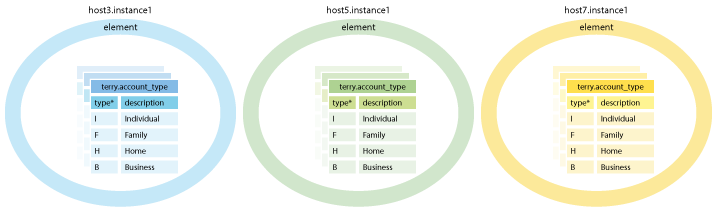
Description of ''Figure 5-3 Table distributed by duplicate''
For more information on the duplicate distribution scheme, see "CREATE TABLE" in the Oracle TimesTen In-Memory Database SQL Reference.
Materialized views as a secondary form of distribution
Materialized views enable you to create a secondary form of distribution for a table and can be useful in scenarios such as:
-
If you have a table with a primary key and a unique column and you distribute the table by hash based on the primary key column, TimesTen Scaleout would need to connect to every element of the database to verify the uniqueness of the values inserted or updated in the unique column. In this case, the hash distribution scheme cannot guarantee that duplicate values are located in the same element. If you additionally create a materialized view of the table that is distributed by hash based on the unique column, TimesTen Scaleout would be able to verify the uniqueness of the values in the unique column more efficiently since the location of the row in the materialized view would be determined by the value in the unique column. It is also recommended to create an index on the materialized view for the unique column to get optimum query performance. See Example 5-6 for an example of this scenario.
-
If you have a table with two independent groups of columns that are commonly joined in queries, consider distributing the table by hash based on one of the groups of columns. This will optimize the queries against this group of columns. Then, to optimize queries against the second groups of columns, create a materialized view of the table that is distributed by hash based on the second group of columns. See Example 5-7 for an example of this scenario.
Consider the following when using materialized views in TimesTen Scaleout:
-
Distribution is limited to the hash distribution scheme only.
-
The hash key column must be explicitly specified, even if you intend to use the primary key as the hash key.
-
The SQL optimizer may re-write a query against a base table to use an available materialized view instead if it detects that it may improve the execution time of the query.
Example 5-6 Materialized view with an unique column as hash key
This example creates the customers parent table that uses a DISTRIBUTE BY HASH clause, which distributes data based on the hash of the cust_id primary key column. The example also creates the accounts child table that uses a DISTRIBUTE BY REFERENCE clause. TimesTen Scaleout distributes the data in the accounts table based on the location to the corresponding value of the cust_id foreign key column. Finally, the example creates the phone_mv materialized view that uses a DISTRIBUTE BY HASH clause, which distributes data based on the hash of the phone unique column. This example enables you to validate the uniqueness of the values of the phone column in the accounts table while only reviewing the data contained in single data instance for a specific phone value.
CREATE TABLE customers (
    cust_id            NUMBER(10,0) NOT NULL PRIMARY KEY,
    first_name         VARCHAR2(30) NOT NULL,
    last_name          VARCHAR2(30) NOT NULL,
    addr1              VARCHAR2(64),
    addr2              VARCHAR2(64),
    zipcode            VARCHAR2(5),
    member_since       DATE NOT NULL
) DISTRIBUTE BY HASH;

CREATE TABLE accounts (
    account_id         NUMBER(10,0) NOT NULL PRIMARY KEY,
    phone              VARCHAR2(16) NOT NULL UNIQUE,
    account_type       CHAR(1) NOT NULL,
    status             NUMBER(2,0) NOT NULL,
    current_balance    NUMBER(10,2) NOT NULL,
    prev_balance       NUMBER(10,2) NOT NULL,
    date_created       DATE NOT NULL,
    cust_id            NUMBER(10,0) NOT NULL,
    CONSTRAINT fk_customer
        FOREIGN KEY (cust_id)
            REFERENCES customers(cust_id)
) DISTRIBUTE BY REFERENCE (fk_customer);

CREATE MATERIALIZED VIEW phone_mv
    DISTRIBUTE BY HASH (phone)
    AS SELECT phone FROM accounts;
Example 5-7 Materialized views for independent column groups
This example creates the customers table that uses a DISTRIBUTE BY HASH clause, which distributes data based on the hash of the cust_id primary key column. The example also creates the accounts table that uses a DISTRIBUTE BY HASH clause, which distributes data based on the hash of the account_id primary key column. Then, creates the call_records table that uses a DISTRIBUTE BY HASH clause, which distributes data based on the hash of the call_id primary key column.
CREATE TABLE customers (
    cust_id            NUMBER(10,0) NOT NULL PRIMARY KEY,
    first_name         VARCHAR2(30) NOT NULL,
    last_name          VARCHAR2(30) NOT NULL,
    addr1              VARCHAR2(64),
    addr2              VARCHAR2(64),
    zipcode            VARCHAR2(5),
    account_id         NUMBER(10,0),
    member_since       DATE NOT NULL
) DISTRIBUTE BY HASH;

CREATE TABLE accounts (
    account_id         NUMBER(10,0) NOT NULL PRIMARY KEY,
    phone              VARCHAR2(15) NOT NULL,
    account_type       CHAR(1) NOT NULL,
    status             NUMBER(2,0) NOT NULL,
    current_balance    NUMBER(10,2) NOT NULL,
    prev_balance       NUMBER(10,2) NOT NULL,
    date_created       DATE NOT NULL,
    cust_id            NUMBER(10,0) NOT NULL UNIQUE
) DISTRIBUTE BY HASH;

CREATE TABLE call_records (
    call_id            NUMBER(10,0) NOT NULL PRIMARY KEY,
    caller             NUMBER(10,0) NOT NULL,
    receiver           NUMBER(10,0) NOT NULL,
    call_time          TIMESTAMP NOT NULL,
    code               INT NOT NULL
) DISTRIBUTE BY HASH;
Consider that you need a report on the accounts and customers that made a call with an specific code, like shown in the following query.
SELECT accounts.account_id, customers.cust_id, call_records.code
    FROM accounts, customers, call_records
    WHERE customers.cust_id = call_records.caller
        AND call_records.code = ?
        AND customers.account_id = accounts.account_id;
To optimize the join between the customers and call_records tables, the example creates the customers_calls_mv materialized view on the call_records table based on the caller column.
CREATE MATERIALIZED VIEW customers_calls_mv
    DISTRIBUTE BY HASH (caller)
    AS SELECT caller, code FROM call_records;
Also, to optimize the join between the customers and accounts tables, the example creates the customes_account_mv materialized view on the customers table based on the account_id column.
CREATE MATERIALIZED VIEW customers_account_mv
    DISTRIBUTE BY HASH (account_id)
    AS SELECT account_id FROM customers;
For more information on materialized views, see "CREATE MATERIALIZED VIEW" in the Oracle TimesTen In-Memory Database SQL Reference.
Determining the value of the PermSize attribute
You must have enough memory available in both the permanent and temporary memory regions of every element for the database to operate successfully. You can monitor the amount of memory allocated, in-use, and in-use high-water for this two regions for the local element or all elements of the database by querying the SYS.V$MONITOR and SYS.GV$MONITOR system views, respectively, as shown in Example 5-8.
Example 5-8 Monitoring the memory regions of an element
Command> SELECT elementid, perm_allocated_size, perm_in_use_size,
 perm_in_use_high_water, temp_allocated_size, temp_in_use_size,
 temp_in_use_high_water FROM sys.v$monitor;

  ELEMENTID:                1
  PERM_ALLOCATED_SIZE:      262144
  PERM_IN_USE_SIZE:         30338
  PERM_IN_USE_HIGH_WATER:   30338
  TEMP_ALLOCATED_SIZE:      131072
  TEMP_IN_USE_SIZE:         21073
  TEMP_IN_USE_HIGH_WATER:   24600

1 row found.
Command> SELECT elementid, perm_allocated_size, perm_in_use_size,
 perm_in_use_high_water, temp_allocated_size, temp_in_use_size,
 temp_in_use_high_water FROM sys.gv$monitor;

  ELEMENTID:                1
  PERM_ALLOCATED_SIZE:      262144
  PERM_IN_USE_SIZE:         30338
  PERM_IN_USE_HIGH_WATER:   30338
  TEMP_ALLOCATED_SIZE:      131072
  TEMP_IN_USE_SIZE:         21073
  TEMP_IN_USE_HIGH_WATER:   24600


  ELEMENTID:                3
  PERM_ALLOCATED_SIZE:      262144
  PERM_IN_USE_SIZE:         30289
  PERM_IN_USE_HIGH_WATER:   30322
  TEMP_ALLOCATED_SIZE:      131072
  TEMP_IN_USE_SIZE:         21070
  TEMP_IN_USE_HIGH_WATER:   24470


  ELEMENTID:                5
  PERM_ALLOCATED_SIZE:      262144
  PERM_IN_USE_SIZE:         30289
  PERM_IN_USE_HIGH_WATER:   30322
  TEMP_ALLOCATED_SIZE:      131072
  TEMP_IN_USE_SIZE:         20943
  TEMP_IN_USE_HIGH_WATER:   24407


  ELEMENTID:                2
  PERM_ALLOCATED_SIZE:      262144
  PERM_IN_USE_SIZE:         30338
  PERM_IN_USE_HIGH_WATER:   30338
  TEMP_ALLOCATED_SIZE:      131072
  TEMP_IN_USE_SIZE:         20943
  TEMP_IN_USE_HIGH_WATER:   24470


  ELEMENTID:                4
  PERM_ALLOCATED_SIZE:      262144
  PERM_IN_USE_SIZE:         30289
  PERM_IN_USE_HIGH_WATER:   30322
  TEMP_ALLOCATED_SIZE:      131072
  TEMP_IN_USE_SIZE:         21006
  TEMP_IN_USE_HIGH_WATER:   24407


  ELEMENTID:                6
  PERM_ALLOCATED_SIZE:      262144
  PERM_IN_USE_SIZE:         30289
  PERM_IN_USE_HIGH_WATER:   30322
  TEMP_ALLOCATED_SIZE:      131072
  TEMP_IN_USE_SIZE:         21006
  TEMP_IN_USE_HIGH_WATER:   24470
1 row found.
If necessary, increase the amount of memory allocated for either region by increasing the value of the PermSize or TempSize attribute. See "Modify the connection attributes in a database definition" for information on how to modify the PermSize or TempSize attribute of a database.
You can estimate the value of the PermSize attribute based on the SQL schema and the expected number of rows for each table of the database with the ttSize utility. For example, if you eventually expect to insert 1,000,000 rows into the customers table, the table will need about 287 MB (300,448,527 bytes = 286.53 MB) available, as shown in Example 5-9.
Example 5-9 Estimating the size of a table
% ttSize -tbl terry.customers -rows 1000000 database1

 Rows = 1000000

Total in-line row bytes = 300442597

Indexes:
  Range index TERRY.CUSTOMERS adds 5930 bytes
  Total index bytes = 5930

Total = 300448527
However, the ttSize utility is optimized for databases in TimesTen Classic. A database in TimesTen Scaleout uses 8 to 16 bytes more per row than a similar database in TimesTen Classic. Consider adding to the value calculated by the ttSize utility from 8 to 16 bytes per row for a more accurate estimate. In the case of the customers table, if you add 16 bytes per row to the value calculated by the ttSize utility, you will need about 302 MB (316,448,527 bytes = 301.79 MB) available.
If you repeat this estimate for every table of the database, you can get a rough idea of the size of the permanent memory region a database requires across all hosts by adding the estimated size of every table. However, the PermSize attribute defines the amount of memory allocated for an element, not the whole database. To determine how much of the size estimated for each table you must assign to each element you have to take into consideration the distribution scheme of the table:
-
For a table using a hash or reference distribution scheme, divide the number of rows by the number of replica sets before doing the estimation with the
ttSizeutility.Note:
Consider that tables with a reference distribution scheme may reference key values unevenly. If your data uses one or more key values as reference more often then any other key value available, it is possible that dividing the number of rows by the number of replica sets would be an inaccurate calculation. You should take special considerations based on the composition of your data. -
For a table using a duplicate distribution scheme, use the total number of rows for the estimation. After all, you find every row of a table using a duplicate distribution on every element of the database.
Considering that the customers table uses a hash distribution scheme and that the database1 database consists of three replica sets, each element should be able to store 333,334 rows, which represents 101 MB (100,209,711 + 16 * 333,334 bytes = 100.65 MB) in the permanent memory region (defined by the PermSize attribute) for just the customers table, as shown in Example 5-10.
Example 5-10 Estimating the size of a table in a single element
% ttSize -tbl terry.customers -rows 333334 database1

Rows = 333334

Total in-line row bytes = 100203781

Indexes:
  Range index TERRY.CUSTOMERS adds 5930 bytes
  Total index bytes = 5930

Total = 100209711
For more information on the ttSize utility, see "ttSize" in the Oracle TimesTen In-Memory Database Reference.
Bulk loading data into a database
TimesTen Scaleout enables you to load data into a database from various sources. You can load data into a specific table either from a file by using the ttBulkCp utility or an Oracle database table by using the ttLoadFromOracle built-in procedure.
Both the ttBulkCp utility and ttLoadFromOracle built-in procedure support in TimesTen Scaleout a localOnly filter option that enables you to load only the rows that are hashed to the local element and its replicas. If you use the localOnly filter option, the ttBulkCp utility and ttLoadFromOracle built-in procedure ignore rows that are hashed to remote elements that are not a replica of the local element. Regardless of the options you specify, the ttBulkCp utility and ttLoadFromOracle built-in procedure do not copy duplicate rows into a table.
With the localOnly filter option enabled and depending of the distribution scheme of the table, the ttBulkCp utility and ttLoadFromOracle built-in procedure behave as follows:
-
Hash: Retain and insert rows that have hash key values that are hashed to the elements of the local data instance and its replicas. They ignore rows that are hashed to the remaining elements.
-
Reference: Retain and insert rows whose reference key value references to a hash or reference key value that is hashed to the local element and its replicas. They ignore rows that are hashed to the remaining elements.
-
Duplicate: Ignore the
localOnlyoption. They insert rows into the elements of all data instances.
The advantages of using the localOnly filter option are:
-
It requires less network bandwidth to distribute the data during the bulk loading operation.
-
It allows a failed bulk loading operation to be retried independent of other elements.
The disadvantages of using the localOnly filter option are:
-
The source file must be available to all hosts, or at least to one host for each replica set of the grid. This only applies for bulk loading operations with the
ttBulkCputility. -
You must run a bulk loading operation on an element of every replica set.
-
Every bulk loading operation must process the entire data set, even though it ignores any rows hashed to a different replica set.
These sections describe how to load data into a table in TimesTen Scaleout.
Note:
The following examples consider the same grid scenario as the one described in "Define the distribution map of the database".Populating a table with the ttBulkCp utility
The ttBulkCp utility with the -i option enables you to load data from a file. This option uses standard INSERT SQL statements to load data into a specific table of a database. The ttBulkCp utility inserts each row into its corresponding element based on the distribution scheme of the table.
Note:
-
Unlike operations performed with the
ttGridAdminutility, thettBulkCputility (and thettBulkCpCSutility) must be run on a data instance instead of the active management instance, and its use is not limited to the instance administrator. -
Ensure that the user running the command or the one specified in the connection string has
INSERTprivileges on the specified table.
These sections describe the options for loading data into a database while using the ttBulkCp utility.
Populate a table from a single location
If the source file is only available to a single data instance, run the ttBulkCp utility with the -i option to insert the rows of the specified database into their corresponding element based on the distribution scheme of the specified database.
From the data instance with access to the source file, insert all rows in the file into the customers table of the database1 database.
% ttBulkCp -i -connStr "DSN=database1;UID=terry" customers
 /mydir/customers_data.dmp
Enter password for 'terry':

/mydir/customers_data.dmp:
    1000 rows inserted
    1000 rows total
For more information on using the ttBulkCp utility, see "Bulk copy data using the ttBulkCp utility" in the Oracle TimesTen In-Memory Database Operations Guide and "ttBulkCp" in the Oracle TimesTen In-Memory Database Reference.
Populate a table from several locations
If the source file is available to any given host in the grid, run the ttBulkCp utility with the -i and -localOnly options on one data instance of each replica set of the database to insert the rows hashed to the local element and its replicas from a file into a table.
Use the ttGridAdmin dbStatus -replicaset command from the active management instance (in this example the active management instance is host1.instance1) to help you determine the data instances associated with each replica set.
% ttGridAdmin dbStatus database1 -replicaset
Database database1 Replica Set status as of Thu Jan 11 13:17:29 PST 2018

RS DS Elem Host  Instance  Status Date/Time of Event  Message
-- -- ---- ----- --------- ------ ------------------- -------
 1  1    1 host3 instance1 opened 2018-01-10 14:34:43
    2    2 host4 instance1 opened 2018-01-10 14:34:43
 2  1    3 host5 instance1 opened 2018-01-10 14:34:42
    2    4 host6 instance1 opened 2018-01-10 14:34:42
 3  1    5 host7 instance1 opened 2018-01-10 14:34:42
    2    6 host8 instance1 opened 2018-01-10 14:34:42
Insert the rows hashed to the local element and its replica from the source file into the customers table of the database1 database. Ensure you run the ttBulkCp utility on one data instance of each replica set available, the host3.instance1, host5.instance1, and host7.instance1 data instances for example.
On the host3.instance1 data instance:
% ttBulkCp -i -localOnly -connStr "DSN=database1;UID=terry" customers
 /mydir/customers_data.dmp
Enter password for 'terry':

/mydir/customers_data.dmp:
    339 rows inserted
    661 rows not inserted (ignored)
    1000 rows total
Note:
For this example where the element of thehost4.instance1 data instance is defined as the replica of the element of the host3.instance1 data instance, the same rows inserted into the customers table in the element of the host3.instance1 data instance are inserted into the customers table in the element of the host4.instance1 data instance.On the host5.instance1 data instance:
% ttBulkCp -i -localOnly -connStr "DSN=database1;UID=terry" customers
 /mydir/customers_data.dmp
Enter password for 'terry':

/mydir/customers_data.dmp:
    327 rows inserted
    673 rows not inserted (ignored)
    1000 rows total
Note:
For this example where the element of thehost6.instance1 data instance is defined as the replica of the element of the host5.instance1 data instance, the same rows inserted into the customers table in the element of the host5.instance1 data instance are inserted into the customers table in the element of the host6.instance1 data instance.On the host7.instance1 data instance:
% ttBulkCp -i -localOnly -connStr "DSN=database1;UID=terry" customers
 /mydir/customers_data.dmp
Enter password for 'terry':

/mydir/customers_data.dmp:
    334 rows inserted
    666 rows not inserted (ignored)
    1000 rows total
Note:
For this example where the element of thehost8.instance1 data instance is defined as the replica of the element of the host7.instance1 data instance, the same rows inserted into the customers table in the element of the host7.instance1 data instance are inserted into the customers table in the element of the host8.instance1 data instance.For more information on the ttGridAdmin dbStatus command, see "Monitor the status of a database (dbStatus)" in the Oracle TimesTen In-Memory Database Reference.
For more information on using the ttBulkCp utility, see "Bulk copy data using the ttBulkCp utility" in the Oracle TimesTen In-Memory Database Operations Guide and "ttBulkCp" in the Oracle TimesTen In-Memory Database Reference.
Populating a table with the ttLoadFromOracle built-in procedure
The ttLoadFromOracle built-in procedure enables you to load data from an Oracle database.
These sections describe how to load data from a Oracle database into a database while using the ttLoadFromOracle built-in procedure.
Enable communication to an Oracle database
For the ttLoadFromOracle built-in procedure to be able to import data from an Oracle database table into a database table, TimesTen Scaleout must be able to recognize and communicate with the Oracle database. For this to happen, you need to:
Note:
Importing the contents of both thesqlnet.ora and tnsnames.ora files is also relevant for applications that use OCI, Pro*C/C++, or ODP.NET to communicate with an Oracle Database. See "Oracle Database operations" in the Oracle TimesTen In-Memory Database Reference for further details.Import the contents of the sqlnet.ora file
The ttGridAdmin SQLNetImport command imports the contents of a sqlnet.ora file into the latest version of the model.
Import the contents of the sqlnet.ora file.
% ttGridAdmin SQLNetImport /mydir/sqlnet.ora
SQLNet configuration file /mydir/sqlnet.ora imported
Import the contents of the tnsnames.ora file
The ttGridAdmin TNSNamesImport command imports the contents of a tnsnames.ora file into the latest version of the model.
Import the contents of the tnsnames.ora file.
% ttGridAdmin TNSNamesImport /mydir/tnsnames.ora
TNSNames configuration file /mydir/tnsnames.ora imported
Apply the changes made to the latest version of the model
The ttGridAdmin modelApply command applies the changes made to the latest version of the model into the operational grid.
% ttGridAdmin modelApply
...
Updating grid state...................................................OK
Pushing new configuration files to each Instance......................OK
...
ttGridAdmin modelApply complete
See "Applying the changes made to the model" for more information on the ttGridAdmin modelApply command.
Populate a table from a single location
The following example connects with the ttIsql utility to the database1 database to copy the rows from the terry.customers table of an Oracle database into the terry.customers table of the database1 database.
Note:
Ensure that the database user has theINSERT privilege on the table the built-in procedure copies data into.From a connection to the element of any data instance:
Command> call ttLoadFromOracle('terry', 'customers', 'SELECT * FROM
 terry.customers');
< 1000 >
1 row found.
For more information on the ttLoadFromOracle built-in procedure, see "ttLoadFromOracle" in the Oracle TimesTen In-Memory Database Reference.
Populate a table from several locations
Call the ttLoadFromOracle built-in procedure with the localOnly=Y parameter to copy the rows hashed to a local element and its replicas from an Oracle database table into a TimesTen Scaleout database table. If you use the localOnly=Y parameter, the ttLoadFromOracle built-in procedure ignores rows that are hashed to remote elements that are not a replicas of the local element.
The following example connects with the ttIsql utility to the database1 database to copy the rows hashed to the local element and its replicas from the terry.customers table of an Oracle database into the terry.customers table of the database1 database. If necessary, use the ttGridAdmin dbStatus -replicaset command from the active management instance (in this example the active management instance is host1.instance1) to help you determine the data instances associated with each replica set.
% ttGridAdmin dbStatus database1 -replicaset
Database database1 Replica Set status as of Thu Jan 11 13:17:29 PST 2018

RS DS Elem Host  Instance  Status Date/Time of Event  Message
-- -- ---- ----- --------- ------ ------------------- -------
 1  1    1 host3 instance1 opened 2018-01-10 14:34:43
    2    2 host4 instance1 opened 2018-01-10 14:34:43
 2  1    3 host5 instance1 opened 2018-01-10 14:34:42
    2    4 host6 instance1 opened 2018-01-10 14:34:42
 3  1    5 host7 instance1 opened 2018-01-10 14:34:42
    2    6 host8 instance1 opened 2018-01-10 14:34:42
Ensure you call the ttLoadFromOracle built-in procedure on one replica of each replica set available, the host3.instance1, host5.instance1, and host7.instance1 data instances for example.
Note:
Ensure that the database user has theINSERT privilege on the table the built-in procedure copies data into.From a connection to the element of the host3.instance1 data instance:
Command> call ttLoadFromOracle('terry', 'customers', 'SELECT * FROM
 terry.customers', 4, 'localOnly=Y');
< 339 >
1 row found.
Note:
For this example where the element of thehost4.instance1 data instance is defined as the replica of the element of the host3.instance1 data instance, the same rows inserted into the customers table in the element of the host3.instance1 data instance are inserted into the customers table in the element of the host4.instance1 data instance.From a connection to the element of the host5.instance1 data instance:
Command> call ttLoadFromOracle('terry', 'customers', 'SELECT * FROM
 terry.customers', 4, 'localOnly=Y');
< 327 >
1 row found.
Note:
For this example where the element of thehost6.instance1 data instance is defined as the replica of the element of the host5.instance1 data instance, the same rows inserted into the customers table in the element of the host5.instance1 data instance are inserted into the customers table in the element of the host6.instance1 data instance.From a connection to the element of the host7.instance1 data instance:
Command> call ttLoadFromOracle('terry', 'customers', 'SELECT * FROM
 terry.customers', 4, 'localOnly=Y');
< 334 >
1 row found.
Note:
For this example where the element of thehost8.instance1 data instance is defined as the replica of the element of the host7.instance1 data instance, the same rows inserted into the customers table in the element of the host7.instance1 data instance are inserted into the customers table in the element of the host8.instance1 data instance.For more information on the ttGridAdmin dbStatus command or ttLoadFromOracle built-in procedure, see "Monitor the status of a database (dbStatus)" or "ttLoadFromOracle", respectively, in the Oracle TimesTen In-Memory Database Reference.
Unloading a database from memory
In TimesTen Scaleout, a database is automatically loaded into memory upon creation. Once loaded into memory, a database remains in memory until the database is explicitly unloaded. Closing all connections to the database will not automatically unload the database from memory.
One of the reasons you may need to unload a database is to modify the value of a first connection attribute, like increasing the value of the PermSize attribute.
To unload a database from memory, perform these tasks:
-
Close the database to user connections. The
ttGridAdmin dbClosecommand disables new user connections to a database. -
Disconnect all applications from the database. The
ttGridAdmin dbDisconnectcommand terminates all user connections to a database. -
Unload the database from memory. The
ttGridAdmin dbUnloadcommand unloads every element of the database from the memory of their respective hosts.
Close the database1 database from user connections.
% ttGridAdmin dbClose database1
Database database1 close started
Note:
ThettGridAdmin dbClose command does not close existing connections to the database, but instead disallows the creation of new user connections. You must terminate all open connections independently. Closing a database is an asynchronous operation that is performed independently to each element by its data instance.
Also, the instance administrator can always create new connections to a database regardless of the database being closed or not.
Verify that all the elements of the database1 database are closed to user connections.
% ttGridAdmin dbStatus database1 -elements
Database database1 element level status as of Tue Nov 27 13:35:45 PST 2018

Host  Instance  Elem Status Date/Time of Event  Message
----- --------- ---- ------ ------------------- -------
host3 instance1    1 loaded 2018-11-27 13:35:43
host4 instance1    2 loaded 2018-11-27 13:35:43
host5 instance1    3 loaded 2018-11-27 13:35:43
host6 instance1    4 loaded 2018-11-27 13:35:43
host7 instance1    5 loaded 2018-11-27 13:35:43
host8 instance1    6 loaded 2018-11-27 13:35:43
Note:
ThettGridAdmin dbStatus utility displays the status of an element as loaded instead of opened when the element is closed to user connections.Disconnect all applications from the database1 database. You must stop the workload and gracefully disconnect every application from the database. If you are unable to individually disconnect every application from the database, use the ttGridAdmin dbDisconnect command to disconnect all user connections from the database as shown in Example 5-11.
Example 5-11 Disconnecting applications from a database
The example disconnects all user connections from the database1 database once all open transactions commit or roll back.
% ttGridAdmin dbDisconnect database1 -transactional
Database database1 dbDisconnect started
Use the ttGridAdmin dbDisconnectStatus command to check the status of the disconnection process.
% ttGridAdmin dbDisconnectStatus database1
Database  Host  Instance  Elem State        Started
--------- ----- --------- ---- ------------ ------------------------
database1                      Complete     2018-11-27T13:38:43.000Z
          host3 instance1    1 Disconnected
          host4 instance1    2 Disconnected
          host5 instance1    3 Disconnected
          host6 instance1    4 Disconnected
          host7 instance1    5 Disconnected
          host8 instance1    6 Disconnected
Then, verify that there are no connections to the database with the -connections option of ttGridAdmin dbStatus command.
% ttGridAdmin dbStatus database1 -connections
Host Instance ConnId Name Pid Type CHost CAddr CPid
---- -------- ------ ---- --- ---- ----- ----- ----
Note:
If the-transactional option fails or takes too long, use the -immediate option of the ttGridAdmin dbDisconnect command to force a rollback on all open transactions and disconnect the applications.
Furthermore, if the -immediate option fails to close all connections, you can use the -abort option. This option ungracefully disconnects all applications and may cause loss of data.
Unload the database1 database.
% ttGridAdmin dbUnload database1
Database database1 unload started
The unloading of the database is an asynchronous operation that is performed independently by each data instance. This operation returns an error if there is an open user connection to the database.
Note:
If you used thettGridAdmin dbDisconnect -abort command, some elements may be invalidated and the ttGridAdmin dbUnload command may fail. Use the -force option of the ttGridAdmin dbUnload command to allow the unload to proceed anyway. This option may cause loss of data.You can verify the status of the database unloading process with the ttGridAdmin dbStatus command as shown in Example 5-12.
Example 5-12 Verifying the status of the unloading process of a database
The example shows a status summary for the database1 database. Notice that the report shows all elements of the database as closed and unloaded.
% ttGridAdmin dbStatus database1
Database database1 summary status as of Tue Nov 27 13:41:18 PST 2018

created,unloaded,closed
Completely created elements: 6 (of 6)
Completely loaded elements: 0 (of 6)
Completely created replica sets: 3 (of 3)
Completely loaded replica sets: 0 (of 3)

Open elements: 0 (of 6)
For more information on the ttGridAdmin dbClose, ttGridAdmin dbDisconnect, ttGridAdmin dbDisconnectStatus, ttGridAdmin dbUnload, or ttGridAdmin dbStatus command, see "Close a database (dbClose)", "Force all connections to disconnect (dbDisconnect)", "Check status of forced disconnection (dbDisconnectStatus)", "Unload a database (dbUnload)", or "Monitor the status of a database (dbStatus)", respectively, in the Oracle TimesTen In-Memory Database Reference.
Reloading a database into memory
To reload a database into memory, perform these the tasks:
-
Load the database into memory. The
ttGridAdmin dbLoadcommand loads every element of the database into memory of their respective hosts. -
Open the database for user connections. The
ttGridAdmin dbOpencommand enables the database for user connections.
Load all the elements of the database1 database into memory.
% ttGridAdmin dbLoad database1
Database database1 load started
Open the database1 database for user connections.
% ttGridAdmin dbOpen database1
Database database1 open started
For more information on the ttGridAdmin dbLoad or ttGridAdmin dbOpen command, see "Load a database into memory (dbLoad)" or "Open a database (dbOpen)", respectively, in the Oracle TimesTen In-Memory Database Reference.
Modifying the connection attributes of a database
There are three types of connection attributes based on their persistence:
-
Attributes that are set on database creation and that cannot be modified. You store the value assigned for these attributes in the database definition.
-
Attributes that are set when the database is loaded into memory and that can only be modified upon unloading and reloading the database into memory. You store the value assigned for these attributes in the database definition.
-
Attributes that are set by each connection to the database and persist for the duration of that connection. You store the value assigned for these attributes in a connectable.
These sections describe how to modify the connection attributes of a database depending on where they are stored:
Modify the connection attributes in a database definition
To modify a database definition is to modify the assigned value of the connection attributes that a database definition supports. The types of connection attributes that a database definition supports and that can be modified after database creation are:
-
First connection attributes
-
PL/SQL first connection attributes
-
TimesTen Server connection attributes
Note:
You cannot modify data store attributes after database creation. To use a different value for a data store attribute, you need to destroy and re-create the database. See "Destroying a database" and "Creating a database" for details on how to destroy and re-create a database.TimesTen Scaleout assigns the default value to any supported attribute not explicitly specified in the database definition. Attributes with the default value assigned can be modified by including the attribute in the database definition. Once you add or modify the attributes defined in a database definition and apply the changes to current version of the model, TimesTen Scaleout overwrites the configuration files of every data instance with the new attributes in the DSN associated with the database definition.
To modify the values assigned to the attributes supported by a database definition, perform these tasks:
-
If you don't have access to the file that you used to create (or modify) the database definition, export the contents of the
database1database definition to a file.% ttGridAdmin dbdefExport database1 /mydir/database1.dbdef
Example 5-13 shows the contents of the exported file.
-
Modify the value of the
PermSizeattribute from32768and49152in the exported database definition file, as shown in Example 5-14. -
Import the contents of the modified database definition file into the
database1database definition.% ttGridAdmin dbdefModify /mydir/database1.dbdef Database Definition DATABASE1 modified.
-
Apply the changes to the
database1database definition to the current version of the model.% ttGridAdmin modelApply ... Updating grid state...................................................OK Pushing new configuration files to each Instance......................OK ... ttGridAdmin modelApply complete
-
Unload the
database1database as shown in "Unloading a database from memory". -
Restart the
database1database as shown in "Reloading a database into memory" to bring the changes you made to thedatabase1database definition into effect.
For a complete description of all the connection attributes, see "Connection Attributes" in the Oracle TimesTen In-Memory Database Reference.
For more information on the ttGridAdmin dbdefExport, ttGridAdmin dbdefModify, or ttGridAdmin modelApply command, see "Export a database definition (dbdefExport)", "Modify a database definition (dbdefModify)", or "Apply the latest version of the model (modelApply)", respectively, in the Oracle TimesTen In-Memory Database Reference.
Modify the connection attributes in a connectable
To modify a connectable is to modify the assigned value of the connection attributes that a connectable supports. The types of connection attributes that a connectable supports are:
-
General connection attributes
-
NLS general connection attributes
-
PL/SQL connection attributes
-
TimesTen Client connection attributes
TimesTen Scaleout assigns the default value to any supported attribute not explicitly specified in the connectable. Attributes with the default value assigned can be modified by including the attribute in the connectable. Once you add or modify the attributes defined in a connectable and apply the changes to current version of the model, TimesTen Scaleout overwrites the configuration files of every data instance with the new attributes in the DSN associated with the connectable.
To modify the values assigned to the attributes supported by a connectable, perform these tasks:
-
If you don't have access to the file that you used to create (or modify) the connectable, export the contents of the
database1CSconnectable to a file.% ttGridAdmin connectableExport database1CS /mydir/database1CS.connect
Example 5-15 shows the contents of the exported file.
-
Modify the value of the
SQLQueryTimeoutconnection attribute to300in the exported connectable file, as shown in Example 5-16. -
Import the contents of the modified connectable file into the
database1CSconnectable.% ttGridAdmin connectableModify /mydir/database1CS.connect Connectable DATABASE1CS modified.
-
Apply the changes to the
database1CSconnectable to the current version of the model.% ttGridAdmin modelApply ... Updating grid state...................................................OK Pushing new configuration files to each Instance......................OK ... ttGridAdmin modelApply complete
For a complete description of all the connection attributes, see "Connection Attributes" in the Oracle TimesTen In-Memory Database Reference.
For more information on the ttGridAdmin connectableExport, ttGridAdmin connectableModify, or ttGridAdmin modelApply command, see "Export a connectable (connectableExport)", "Modify a connectable (connectableModify)", or "Apply the latest version of the model (modelApply)", respectively, in the Oracle TimesTen In-Memory Database Reference.
Destroying a database
Before you attempt to destroy a database, ensure you backup all your data, since it will be discarded in the destruction process. See "Backing up and restoring a database" for more information on how to backup your data in TimesTen Scaleout.
The ttGridAdmin dbDestroy command performs these operations in order to destroy a database:
-
Delete the checkpoint and log files of the database stored on every data instance.
-
Delete the entries in the management instance that keep track of the status of the database, including the entry that recorded the creation of the database.
However, before you can destroy a database, you must unload the database. See "Unloading a database from memory" for details.
Destroy the database1 database.
% ttGridAdmin dbDestroy database1
Database DATABASE1 destroy started
You may also want to delete the database definition associated with the database. The ttGridAdmin dbdefDelete command deletes a database definition in the latest version of the model. This command also deletes any connectable associated with the database definition.
Delete the database1 database definition and its associated connectables from the latest version of the model.
% ttGridAdmin dbdefDelete database1
Database Definition database1 deleted
Apply the deletion of the database1 database definition to the current version of the model.
% ttGridAdmin modelApply
...
Pushing new configuration files to each Instance......................OK
...
ttGridAdmin modelApply complete
TimesTen Scaleout removes the database definition and its connectables from the grid.
For more information on the ttGridAdmin dbDestroy, ttGridAdmin dbdefDelete, or ttGridAdmin modelApply command, see "Destroy a database (dbDestroy)", "Delete a database definition (dbdefDelete)", or "Apply the latest version of the model (modelApply)", respectively, in the Oracle TimesTen In-Memory Database Reference.