Working with Istio as a Standalone Program
Find out how to install Istio as a standalone program on clusters you've created with Kubernetes Engine (OKE).
This topic provides an example of how to install Istio as a standalone program on clusters you've created with Kubernetes Engine (OKE). In addition, key features of OKE and Istio are demonstrated.
Topics covered include:
- Installing Istio as a Standalone Program
- Exploring Istio Observability
- Managing Traffic
- Securing Istio
Note that service mesh products (such as Istio) are supported regardless of the CNI plugin you are using for pod networking (either the OCI VCN-Native Pod Networking CNI plugin or the flannel CNI plugin). Worker nodes must be running Kubernetes 1.26 (or later).
You can use Istio with managed node pools, but not with virtual node pools.
Installing Istio as a Standalone Program
To get started using Istio, create an OKE cluster or use an existing OKE cluster, then install Istio. The sections provided below discuss the steps to install and test your Istio setup. For a complete list of installation options, see here.
Creating an OKE cluster
Create an OKE cluster.
- If you have not already done so, create an OKE cluster within your OCI tenancy. Multiple options are available to create an OKE cluster . The simplest option is the Quick Create wizard in the web console.
- To access the OKE cluster on your local machine, install kubectl and oci-cli .
-
Access the OKE cluster from the command line using
kubectlby setting up thekubeconfigfile and ensure thatkubectlcan access the cluster.
Downloading Istio from the Command Line
Follow these steps to download Istio from the command line.
- Download Istio by running the following command:
curl -L https://istio.io/downloadIstio | sh - - Move to the Istio package directory. For example, if the package is
istio-1.11.2:
cd istio-1.11.2 - Add the
istioctlclient tool to thePATHfor your workstation.export PATH=$PWD/bin:$PATH - Validate if the cluster meets Istio install requirements by running the
precheck:
istioctl x precheck
Installing Istio with istioctl
istioctl using the following command:
istioctl installRunning the Bookinfo Application
The Istio project provides the Bookinfo application as a way to demonstrate Istio features. The application displays information about a book, similar to a single catalog entry of an online book store. Each book page contains a description of the book, details about the book (ISBN, number of pages), and a few book reviews. For more information on the Bookinfo application, see the Bookinfo docs here.
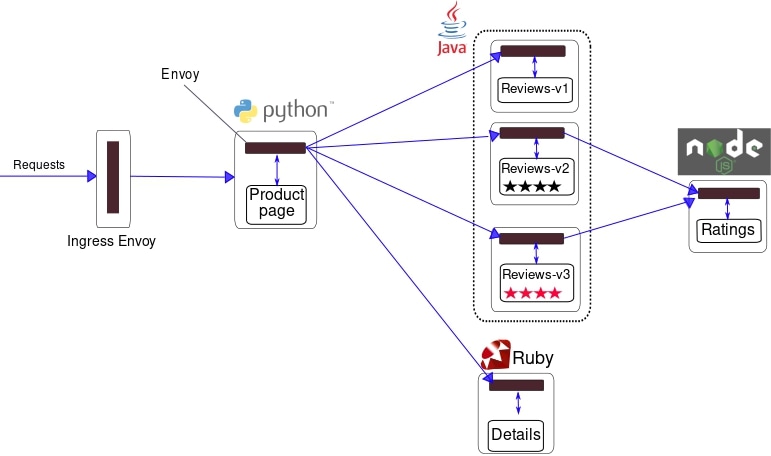
As you can see from the diagram, the Bookinfo application is composed of four microservices.
- Product Page Service: Calls the Details and Reviews services to create a product page.
- Details Service: Returns book information.
- Reviews Service: Returns book reviews and calls the Ratings service.
- Ratings Service: Returns ranking information for a book review.
To install and run the Bookinfo application, follow these steps.
- Label the namespace that hosts the application with
istio-injection=enabled.kubectl label namespace default istio-injection=enabled - Deploy the sample Bookinfo application.
kubectl apply -f samples/bookinfo/platform/kube/bookinfo.yaml - Verify that all services and pods are running.
kubectl get services kubectl get pods - Confirm that the application is running by sending a curl command from a pod.
kubectl exec "$(kubectl get pod -l app=ratings -o jsonpath='{.items[0].metadata.name}')" -c ratings -- curl -sS productpage:9080/productpage | grep -o "<title>.*</title>" - Make the application accessible from outside the cluster.
kubectl apply -f samples/bookinfo/networking/bookinfo-gateway.yaml - Verify that the application is using the gateway. Determine the
INGRESS_HOSTandINGRESS_PORTusing these instructions.curl -s "http://${INGRESS_HOST}:${INGRESS_PORT}/productpage" | grep -o "<title>.*</title>"
Also, open the URL
http://${INGRESS_HOST}:${INGRESS_PORT}/productpage in a browser
to view the Bookinfo web page. Refresh the page several times to see different
versions of reviews shown on the product page.
Adding Istio Integration Applications
Istio integrates well with several popular Kubernetes related applications.
Prometheus
Istio provides a basic sample installation to quickly get Prometheus up and running.
kubectl apply -f samples/addons/prometheus.yamlAlternatively, install prometheus and configure it to scrape Istio metrics.
For production-scale monitoring using Prometheus, see Using Prometheus for production-scale monitoring.
Grafana
Istio provides a basic sample installation to get Grafana up and running quickly. All the Istio dashboards are included in the installation.
kubectl apply -f samples/addons/grafana.yamlAlternatively, install Grafana separately. In addition, Istio's preconfigured dashboards can be imported.
Jaeger
Istio provides a basic sample installation to quickly get Jaeger up and running.
kubectl apply -f samples/addons/jaeger.yamlAlternatively, install Jaeger separately and configure Istio to send traces to the Jaeger deployment.
Zipkin
Istio provides a basic sample installation to quickly get zipkin up and running.
kubectl apply -f samples/addons/extras/zipkin.yamlAlternatively, install zipkin separately and configure Istio to send traces to the zipkin deployment.
Kiali
Istio provides a basic sample installation to quickly get Kiali up and running:
kubectl apply -f samples/addons/kiali.yaml
Alternatively, install and configure Kiali separately.
Exploring Istio Observability
In this section, explore the performance metrics and tracing features provided by the Istio integration applications.
Querying Metrics from Prometheus for Bookinfo application
With Prometheus and Istio, the Bookinfo performance data is analyzed in several ways.
First, verify that Prometheus is installed.
kubectl -n istio-system get svc prometheusStart the Prometheus UI with the following command:
istioctl dashboard prometheusSelect Graph to the right of Prometheus in the header. To see some data, generate traffic for product page using a browser or curl. The traffic is reflected in the Prometheus dashboard.
- For viewing results, follow the instructions here.
- For more on querying Prometheus, read the Istio querying docs.
Visualizing Metrics for Bookinfo Application with Grafana
Combining Prometheus with Grafana provides some nice performance dashboards for applications. To use the dashboards, first verify that both Prometheus and Grafana are installed.
kubectl -n istio-system get svc prometheus
kubectl -n istio-system get svc grafana
Start the Istio Grafana dashboard.
istioctl dashboard grafanaManaging Grafana Dashboards
The Istio service mesh delivers six Grafana dashboards. The Istio service mesh Grafana dashboard snapshots are captured here.
Generate traffic to the product page using a browser or
curl and
see it reflected in the Grafana dashboard.Istio Mesh Dashboard

Istio Service Dashboard

Istio Workload Dashboard

Istio Performance Dashboard

Istio Control Pane Dashboard

For more on how to create, configure, and edit dashboards, see the Grafana documentation.
Performing Distributed Tracing using Jaeger
Use the Jaeger open source framework to perform application tracing with Istio.
- Enable and configure tracing using
istioctl:istioctl install --set meshConfig.enableTracing=true - With the Bookinfo application deployed, open the Jaeger UI using
istioctl.istioctl dashboard jaeger - To generate traces, send in requests to the product
page.
for i in $(seq 1 100); do curl -s -o /dev/null "http://$INGRESS_HOST:$INGRESS_PORT/productpage"; done
You see that the traces reflected in the Jaeger dashboard.
Jaeger Dashboard

Jaeger Application Trace

Performing Distributed Tracing using zipkin
Use the zipkin open source framework to perform application tracing with Istio.
- Enable and configure tracing using
istioctl.istioctl install --set meshConfig.enableTracing=true - With the Bookinfo application deployed, open the zipkin UI using
istioctl.istioctl dashboard zipkin - To generate traces, send in requests to the product page.
for i in $(seq 1 100); do curl -s -o /dev/null "http://$INGRESS_HOST:$INGRESS_PORT/productpage"; done
You see that the traces reflect in the zipkin dashboard.
Sample zipkin Dashboard
Performing Distributed Tracing with OCI Application Performance Monitoring
OCI Application Performance Monitoring (APM) integrates with open source tracing system tools such as Jaeger and zipkin. APM enables you to upload trace data in OCI. To integrate with OCI APM, create an APM domain by following the instructions mentioned here. An APM domain is an OCI resource which contains the systems monitored by APM.
After the domain is created, view the domain details and obtain the data upload endpoint, private key, and public key to construct the APM Collector URL. The APM collector URL is required when configuring open source tracers to communicate with the APM service. The Collector URL format requires a URL constructed using the data upload endpoint as the base URL and generates the path based on choices including values from our private or public key. The format is documented here. With the URL path constructed, plug the URL into the Istio config.
For more detailed information on configuring APM service policies, see:
Configuring Istio to Send Traces to APM
- Enable tracing with
istioctl.istioctl install --set meshConfig.defaultConfig.tracing.zipkin.address=aaaabbbb.apm-agt.us-ashburn-1.oci.oraclecloud.com:443Note
The endpoint address ofaaaabbbb.apm-agt.us-ashburn-1.oci.oraclecloud.comis an example and not an actual endpoint. - Configure Envoy to send the zipkin traces to APM. Replace the code in
samples/custom-bootstrap/custom-bootstrap.yamlwith the following code block.apiVersion: v1 kind: ConfigMap metadata: name: istio-custom-bootstrap-config namespace: default data: custom_bootstrap.json: | { "tracing": { "http": { "name": "envoy.tracers.zipkin", "typed_config": { "@type": "type.googleapis.com/envoy.config.trace.v3.ZipkinConfig", "collector_cluster": "aaaabbbb.apm-agt.us-ashburn-1.oci.oraclecloud.com", // [Replace this with data upload endpoint of your apm domain] "collector_endpoint": "/20200101/observations/private-span?dataFormat=zipkin&dataFormatVersion=2&dataKey=2C6YOLQSUZ5Q7IGN", // [Replace with the private datakey of your apm domain. You can also use public datakey but change the observation type to public-span] "collectorEndpointVersion": "HTTP_JSON", "trace_id_128bit": true, "shared_span_context": false } } }, "static_resources": { "clusters": [{ "name": "aaaabbbb.apm-agt.us-ashburn-1.oci.oraclecloud.com", // [Replace this with data upload endpoint of your apm domain:443] "type": "STRICT_DNS", "lb_policy": "ROUND_ROBIN", "load_assignment": { "cluster_name": "aaaabbbb.apm-agt.us-ashburn-1.oci.oraclecloud.com", // [Replace this with data upload endpoint of your apm domain] "endpoints": [{ "lb_endpoints": [{ "endpoint": { "address": { "socket_address": { "address": "aaaabbbb.apm-agt.us-ashburn-1.oci.oraclecloud.com", // [Replace this with data upload endpoint of your apm domain] "port_value": 443 } } } }] }] }, "transport_socket": { "name": "envoy.transport_sockets.tls", "typed_config": { "@type": "type.googleapis.com/envoy.extensions.transport_sockets.tls.v3.UpstreamTlsContext", "sni": "aaaabbbb.apm-agt.us-ashburn-1.oci.oraclecloud.com" // [Replace this with data upload endpoint of your apm domain] } } }] } } EOF - Apply the custom config.
kubectl apply -f samples/custom-bootstrap/custom-bootstrap.yaml - For all our services in Bookinfo to use this custom bootstrap configuration, add an annotation
sidecar.istio.io/bootstrapOverridewith the name of custom ConfigMap as the value. In the following example, an annotation is added for product page undersamples/bookinfo/platform/kube/bookinfo.yaml. Add a similar annotation to other services.apiVersion: apps/v1 kind: Deployment metadata: name: productpage-v1 labels: app: productpage version: v1 spec: replicas: 1 selector: matchLabels: app: productpage version: v1 template: metadata: labels: app: productpage version: v1 annotations: sidecar.istio.io/bootstrapOverride: "istio-custom-bootstrap-config" #[Name of custom configmap] spec: serviceAccountName: bookinfo-productpage containers: - name: productpage image: docker.io/istio/examples-bookinfo-productpage-v1:1.16.2 imagePullPolicy: IfNotPresent ports: - containerPort: 9080 volumeMounts: - name: tmp mountPath: /tmp securityContext: runAsUser: 1000 volumes: - name: tmp emptyDir: {} --- - Apply the yaml, all the restarted pods start sending traces to APM.
kubectl apply -f samples/bookinfo/platform/kube/bookinfo.yaml - To enable an ingress-gateway to send traces, create a
configmapnamedcustom-bootstrap.yamlin the istio-system namespace:apiVersion: v1 kind: ConfigMap metadata: name: istio-custom-bootstrap-config namespace: istio-system data: custom_bootstrap.json: | { "tracing": { "http": { "name": "envoy.tracers.zipkin", "typed_config": { "@type": "type.googleapis.com/envoy.config.trace.v3.ZipkinConfig", "collector_cluster": "aaaabbbb.apm-agt.us-ashburn-1.oci.oraclecloud.com", // [Replace this with data upload endpoint of your apm domain] "collector_endpoint": "/20200101/observations/private-span?dataFormat=zipkin&dataFormatVersion=2&dataKey=2C6YOLQSUZ5Q7IGN", // [Replace with the private datakey of your apm domain. You can also use public datakey but change the observation type to public-span] "collectorEndpointVersion": "HTTP_JSON", "trace_id_128bit": true, "shared_span_context": false } } }, "static_resources": { "clusters": [{ "name": "aaaabbbb.apm-agt.us-ashburn-1.oci.oraclecloud.com", // [Replace this with data upload endpoint of your apm domain:443] "type": "STRICT_DNS", "lb_policy": "ROUND_ROBIN", "load_assignment": { "cluster_name": "aaaabbbb.apm-agt.us-ashburn-1.oci.oraclecloud.com", // [Replace this with data upload endpoint of your apm domain] "endpoints": [{ "lb_endpoints": [{ "endpoint": { "address": { "socket_address": { "address": "aaaabbbb.apm-agt.us-ashburn-1.oci.oraclecloud.com", // [Replace this with data upload endpoint of your apm domain] "port_value": 443 } } } }] }] }, "transport_socket": { "name": "envoy.transport_sockets.tls", "typed_config": { "@type": "type.googleapis.com/envoy.extensions.transport_sockets.tls.v3.UpstreamTlsContext", "sni": "aaaabbbb.apm-agt.us-ashburn-1.oci.oraclecloud.com" // [Replace this with data upload endpoint of your apm domain] } } }] } } EOF - Create a patch named
gateway-patch.yamlfor the ingress-gateway to start using custom-bootstrap config:spec: template: spec: containers: - name: istio-proxy env: - name: ISTIO_BOOTSTRAP_OVERRIDE value: /etc/istio/custom-bootstrap/custom_bootstrap.json volumeMounts: - mountPath: /etc/istio/custom-bootstrap name: custom-bootstrap-volume readOnly: true volumes: - configMap: name: istio-custom-bootstrap-config defaultMode: 420 optional: false name: custom-bootstrap-volume - Apply the previous patch for the ingress gateway:
kubectl --namespace istio-system patch deployment istio-ingressgateway --patch "$(cat gateway-patch.yaml)" - To generate traces, send in requests to the product page.
for i in $(seq 1 100); do curl -s -o /dev/null "http://$INGRESS_HOST:$INGRESS_PORT/productpage"; done
You see that the traces reflect in the APM dashboard by following the steps here.
Zipkin Trace Explorer

Zipkin Trace

Zipkin Spans
To see the spans, select Home in the APM list.

Zipkin App Dashboard
APM provides functionality to create dashboards and explore the spans generated over time. Dashboards can be created by following the steps here.

Zipkin Metrics Explorer
APM allows you to monitor the health, capacity, and performance of your applications by using metrics, alarms, and notifications. Follow to steps here to configure metrics.

Observing Logs with OCI Logging
OCI Logging is a central component for analyzing and searching log file entries for tenancies in OCI. Kubernetes container logs from OKE worker nodes can be published as custom logs to OCI Logging. Follow the steps described here to configure OCI Logging to ingest container logs.
- Enable envoy access logging in Istio with
istioctl.istioctl install --set meshConfig.accessLogFile=/dev/stdout - Access the Bookinfo product page using a browser or curl. The generated access
logs can be viewed using the
kubectlcommand.kubectl logs -l app=productpage -c istio-proxy
If OCI Logging is configured for the cluster, these logs can be queried and analyzed using OCI console's log search page.
OCI Logging Search

OCI Logging Search Expanded

Visualizing Mesh Using Kiali
Verify that Kiali is installed.
kubectl -n istio-system get svc kialiOpen the Kiali UI in the browser.
istioctl dashboard kialiSend some traffic to the product page.
for i in $(seq 1 100); do curl -s -o /dev/null "http://$INGRESS_HOST:$INGRESS_PORT/productpage"; doneVisualize your mesh in Kiali by following step 5 from here.
Managing Traffic
Istio's traffic routing rules lets you control the flow of traffic between services and simplifies configuration of service-level properties like circuit breakers, timeouts, and retries. Istio makes it easy to set up important tasks like A/B testing, canary rollouts, and staged rollouts with percentage-based traffic splits.
Istio's traffic management API resources:
kubectl apply -f samples/bookinfo/networking/destination-rule-all.yamlShifting Traffic
Istio allows us to migrate traffic gradually from one version of a microservice to another version using Istio's weighted routing feature. The following example shows how to configure to send 50% of traffic to reviews:v1 and 50% to reviews:v3. After that, complete the migration by sending 100% of traffic to reviews:v3.
- Route all traffic to the v1 version of each microservice.
kubectl apply -f samples/bookinfo/networking/virtual-service-all-v1.yamlTo view the Bookinfo web page, open the URL
http://${INGRESS_HOST}:${INGRESS_PORT}/productpagein a browser. Notice that the reviews part of the page displays with no rating stars, no matter how many times you refresh. Istio is configured to route all traffic for the reviews service toreviews:v1and this version of the service does not access the star ratings service. - Transfer 50% of the traffic from
reviews:v1toreviews:v3with the following command, and wait for the new rules to propagate.kubectl apply -f samples/bookinfo/networking/virtual-service-reviews-50-v3.yamlRefresh the
/productpageURL in your browser and see red colored star ratings approximately 50% of the time. Thereviews:v3accesses the star ratings service, but thereviews:v1version does not. - Now route 100% of the traffic to
reviews:v3.kubectl apply -f samples/bookinfo/networking/virtual-service-reviews-v3.yaml - Refresh the
/productpageURL in your browser and see red colored star ratings all the time for each review.
Managing Request Routing
kubectl apply -f samples/bookinfo/networking/virtual-service-all-v1.yamlTo view the Bookinfo web page, open the URL
http://${INGRESS_HOST}:${INGRESS_PORT}/productpage in a browser
. Notice that the reviews part of the page displays with no rating stars, no matter
how many times you refresh. Because Istio is configured to route all traffic for the
reviews service to the version reviews:v1. This version of the
service does not access the star ratings service.

Routing based on User Identity
To route based on user identity:
- Change the route configuration so that all traffic from a specific user named
jasonis routed toreviews:v2. Istio doesn't have any special, built-in understanding of user identity. In this example, theproductpageservice adds a custom end-user header to all outbound HTTP requests to the reviews service.kubectl apply -f samples/bookinfo/networking/virtual-service-reviews-test-v2.yaml -
To view the Bookinfo web page and login as user
jason, open the URLhttp://${INGRESS_HOST}:${INGRESS_PORT}/productpagein a browser. Refresh the browser to see that star ratings appear next to each review.
-
Open the URL
http://${INGRESS_HOST}:${INGRESS_PORT}/productpagein a browser to view the Bookinfo web page and login as user other thanjason. Refresh the browser to see no stars for each review.
Routing based on URL Rewriting
In this example, HTTP requests with a path that starts with
/products or /bookinfoproductpage are
rewritten to /productpage. HTTP requests are sent to pods with
productpage running on port 9080. For more information on Istio
URL rewriting, see here.
- Apply the following yaml:
kubectl apply -f - <<EOF apiVersion: networking.istio.io/v1beta1 kind: VirtualService metadata: name: bookinfo spec: hosts: - "*" gateways: - bookinfo-gateway http: - match: - uri: prefix: /products - uri: prefix: /bookinfoproductpage rewrite: uri: /productpage route: - destination: host: productpage port: number: 9080 EOF -
To view the Bookinfo web page, open the URL
http://${INGRESS_HOST}:${INGRESS_PORT}/productsandhttp://${INGRESS_HOST}:${INGRESS_PORT}/bookinfoproductpagein a browser. In both the cases, a rewrite is performed before forwarding the request.Rewrite /bookproductpage

Rewrite /products

- Clean up the yaml file to the original version provided by Istio and apply it.
kubectl apply -f samples/bookinfo/networking/bookinfo-gateway.yaml -
Open the URL
http://${INGRESS_HOST}:${INGRESS_PORT}/bookinfoproductpageorhttp://${INGRESS_HOST}:${INGRESS_PORT}/productsto not see the product page because the yaml doesn't rewrite the request.404 Error /products

404 Error /booksproductpage

Testing Network Resilience
Istio allows you to configure your installation for request timeouts, fault injection, and circuit breakers. These settings allow manage and test the fault tolerance of deployed applications.
Setting Request Timeouts
A timeout is the amount of time an Envoy proxy waits for replies from a given service. The timeout ensures that services don't wait for replies indefinitely and ensures that calls succeed or fail within a predictable timeframe. For more information on timeouts, see here.
A timeout for HTTP requests can be specified using the timeout field of the route rule. By default, the request timeout is disabled.
- Initialize the application version routing by running the following command:
kubectl apply -f samples/bookinfo/networking/virtual-service-all-v1.yaml - Route requests to
reviews:v2service, in effect, a version that calls the ratings service:kubectl apply -f - <<EOF apiVersion: networking.istio.io/v1beta1 kind: VirtualService metadata: name: reviews spec: hosts: - reviews http: - route: - destination: host: reviews subset: v2 EOF - Add a 2-second delay to calls to the ratings service:
kubectl apply -f - <<EOF apiVersion: networking.istio.io/v1beta1 kind: VirtualService metadata: name: ratings spec: hosts: - ratings http: - fault: delay: percent: 100 fixedDelay: 2s route: - destination: host: ratings subset: v1 EOF - To view the Bookinfo web page with ratings stars displayed, open the URL
http://${INGRESS_HOST}:${INGRESS_PORT}/productpagein a browser . A 2-second delay occurs whenever you refresh the page.
- Add a half second request timeout for calls to the reviews service:
kubectl apply -f - <<EOF apiVersion: networking.istio.io/v1beta1 kind: VirtualService metadata: name: reviews spec: hosts: - reviews http: - route: - destination: host: reviews subset: v2 timeout: 0.5s EOF - To view the Bookinfo web page, open the URL
http://${INGRESS_HOST}:${INGRESS_PORT}/productpagein a browser. Notice the page returns in about 1 second, instead of 2, and the reviews are unavailable.
The reason that the response takes 1 second, even though the timeout is configured at
half a second, is because a hard-coded retry in the productpage
service. The service calls the timed out reviews service twice before returning.
In addition to overriding them in route rules, the timeout can also be overridden on
a per-request basis if the application adds an
x-envoy-upstream-rq-timeout-ms header on outbound requests.
Managing Fault Injection
Fault injection is a testing method that introduces errors into a system to ensure that the system withstands and recovers from error conditions. Istio allows fault injection at the application layer such as HTTP error codes. Istio injects two types of faults, both configured using a virtual service. For more information on fault injection, see here.
- Delays: Delays are timing failures that mimic increased network latency or an overloaded upstream service.
- Aborts: Aborts are crash failures that mimic failures in upstream services. Aborts manifest in the form of HTTP error codes or TCP connection failures.
To test fault injection, run the following command to initialize the application version routing:
kubectl apply -f samples/bookinfo/networking/virtual-service-all-v1.yaml
kubectl apply -f samples/bookinfo/networking/virtual-service-reviews-test-v2.yaml
Injecting an HTTP Delay Fault
To inject a delay fault, follow these steps:
- Create a fault injection rule to delay traffic coming from the user
jason. The following command injects a 7-second delay between thereviews:v2and ratings microservices for userjason.kubectl apply -f samples/bookinfo/networking/virtual-service-ratings-test-delay.yamlNote
Thereviews:v2service has a 10-s hard-coded connection timeout for calls to the ratings service. With 7-second delay, expect the end-to-end flow to continue without any errors. - To view the Bookinfo web page, open the URL
http://${INGRESS_HOST}:${INGRESS_PORT}/productpagein a browser.
The Bookinfo home page loads without any errors in approximately seven seconds. However, the reviews section displays an error message: Sorry, product reviews are currently unavailable for this book. A bug exists in the application code. The hard-coded timeout between the
productpageand thereviewsservice results in a 6-second delay, 3 seconds plus 1 retry. As a result, theproductpagecall toreviewstimes out prematurely and throws an error after 6 seconds.To fix the bug, increase the
productpagetoreviewsservice timeout, or decrease thereviewstoratingstimeout to less than 3 seconds. - Let's fix the bug by adding a 2-second delay to the
ratingsservice for userjason.kubectl apply -f - <<EOF apiVersion: networking.istio.io/v1beta1 kind: VirtualService metadata: name: ratings spec: hosts: - ratings http: - match: - headers: end-user: exact: jason fault: delay: percentage: value: 100.0 fixedDelay: 2s route: - destination: host: ratings subset: v1 - route: - destination: host: ratings subset: v1 EOF - Now that the bug is fixed, open the URL
http://${INGRESS_HOST}:${INGRESS_PORT}/productpagein a browser to view the Bookinfo web page. Sign in asjasonwith ratings stars displayed.
Injecting an HTTP Abort Fault
Follow these steps to inject an abort fault:
- Create a fault injection rule to send an HTTP abort response for user
jason:kubectl apply -f samples/bookinfo/networking/virtual-service-ratings-test-abort.yaml - To view the Bookinfo web page, open the URL
http://${INGRESS_HOST}:${INGRESS_PORT}/productpagein a browser. Login as userjason. A message indicates theratingsservice is unavailable.
Logout from user
jasonor login with any other user to not see any error message.
Creating Circuit Breakers
Circuit breaking allows us to write applications that limit the impact of failures, latency spikes, and other undesirable effects of network peculiarities. For more information on circuit breakers, see here.
- Create a destination rule to apply circuit breaking settings when calling the
product service. The following rule sets the maximum number of connections to be
not more than one and have a maximum of one HTTP pending requests. In addition,
the rules configure hosts to be scanned every 1 second. Any host that fails one
time with a 5XX error code is ejected for 3 minutes. Also, 100% of hosts in the
load balancing pool for the upstream service are ejected.
kubectl apply -f - <<EOF apiVersion: networking.istio.io/v1beta1 kind: DestinationRule metadata: name: productpage spec: host: productpage trafficPolicy: connectionPool: tcp: maxConnections: 1 http: http1MaxPendingRequests: 1 maxRequestsPerConnection: 1 outlierDetection: consecutive5xxErrors: 1 interval: 1s baseEjectionTime: 3m maxEjectionPercent: 100 subsets: - name: v1 labels: version: v1 EOF - Route all traffic to the v1 version of each microservice.
kubectl apply -f samples/bookinfo/networking/virtual-service-all-v1.yaml - Create a client to send traffic to the product service. Fortio lets you control
the number of connections, concurrency, and delays for outgoing HTTP calls. If
you have enabled automatic sidecar injection, deploy the
fortioservice:kubectl apply -f samples/httpbin/sample-client/fortio-deploy.yamlAlternatively, manually inject the sidecar before deploying thefortioapplication.kubectl apply -f <(istioctl kube-inject -f samples/httpbin/sample-client/fortio-deploy.yaml) - Log in to the client pod and use the
fortiotool to callproductpageand verify the response status code to be 200 with the following commands.export FORTIO_POD=$(kubectl get pods -l app=fortio -o 'jsonpath={.items[0].metadata.name}') kubectl exec "$FORTIO_POD" -c fortio -- /usr/bin/fortio curl http://productpage:9080The following output is produced:HTTP/1.1 200 OK content-type: text/html; charset=utf-8 content-length: 1683 server: envoy date: Tue, 07 Sep 2021 11:01:02 GMT x-envoy-upstream-service-time: 5 - Call the service with 2 concurrent connections (-c 2) and send 20 requests (-n
20). Interestingly, 16 requests passthrough and 4 fail.
kubectl exec "$FORTIO_POD" -c fortio -- /usr/bin/fortio load -c 2 -qps 0 -n 20 -loglevel Warning http://productpage:9080The command produces output similar to the following.11:03:43 I logger.go:127> Log level is now 3 Warning (was 2 Info) Fortio 1.11.3 running at 0 queries per second, 128->128 procs, for 20 calls: http://productpage:9080 Starting at max qps with 2 thread(s) [gomax 128] for exactly 20 calls (10 per thread + 0) 11:03:43 W http_client.go:693> Parsed non ok code 503 (HTTP/1.1 503) 11:03:43 W http_client.go:693> Parsed non ok code 503 (HTTP/1.1 503) 11:03:43 W http_client.go:693> Parsed non ok code 503 (HTTP/1.1 503) 11:03:43 W http_client.go:693> Parsed non ok code 503 (HTTP/1.1 503) Ended after 51.340006ms : 20 calls. qps=389.56 Aggregated Function Time : count 20 avg 0.0045031997 +/- 0.002036 min 0.000387421 max 0.007704444 sum 0.090063995 # range, mid point, percentile, count >= 0.000387421 <= 0.001 , 0.000693711 , 15.00, 3 > 0.003 <= 0.004 , 0.0035 , 20.00, 1 > 0.004 <= 0.005 , 0.0045 , 65.00, 9 > 0.005 <= 0.006 , 0.0055 , 75.00, 2 > 0.006 <= 0.007 , 0.0065 , 95.00, 4 > 0.007 <= 0.00770444 , 0.00735222 , 100.00, 1 # target 50% 0.00466667 # target 75% 0.006 # target 90% 0.00675 # target 99% 0.00756356 # target 99.9% 0.00769036 Sockets used: 5 (for perfect keepalive, would be 2) Jitter: false Code 200 : 16 (80.0 %) Code 503 : 4 (20.0 %) Response Header Sizes : count 20 avg 133.6 +/- 66.8 min 0 max 167 sum 2672 Response Body/Total Sizes : count 20 avg 1528.2 +/- 643.6 min 241 max 1850 sum 30564 All done 20 calls (plus 0 warmup) 4.503 ms avg, 389.6 qps - Increase the number of concurrent connections to 3.
kubectl exec "$FORTIO_POD" -c fortio -- /usr/bin/fortio load -c 3 -qps 0 -n 30 -loglevel Warning http://productpage:9080Only 26.7% of the requests succeeded and circuit breaking traps the rest.11:10:19 I logger.go:127> Log level is now 3 Warning (was 2 Info) Fortio 1.11.3 running at 0 queries per second, 128->128 procs, for 30 calls: http://productpage:9080 Starting at max qps with 3 thread(s) [gomax 128] for exactly 30 calls (10 per thread + 0) 11:10:19 W http_client.go:693> Parsed non ok code 503 (HTTP/1.1 503) 11:10:19 W http_client.go:693> Parsed non ok code 503 (HTTP/1.1 503) 11:10:19 W http_client.go:693> Parsed non ok code 503 (HTTP/1.1 503) 11:10:19 W http_client.go:693> Parsed non ok code 503 (HTTP/1.1 503) 11:10:19 W http_client.go:693> Parsed non ok code 503 (HTTP/1.1 503) 11:10:19 W http_client.go:693> Parsed non ok code 503 (HTTP/1.1 503) 11:10:19 W http_client.go:693> Parsed non ok code 503 (HTTP/1.1 503) 11:10:19 W http_client.go:693> Parsed non ok code 503 (HTTP/1.1 503) 11:10:19 W http_client.go:693> Parsed non ok code 503 (HTTP/1.1 503) 11:10:19 W http_client.go:693> Parsed non ok code 503 (HTTP/1.1 503) 11:10:19 W http_client.go:693> Parsed non ok code 503 (HTTP/1.1 503) 11:10:19 W http_client.go:693> Parsed non ok code 503 (HTTP/1.1 503) 11:10:19 W http_client.go:693> Parsed non ok code 503 (HTTP/1.1 503) 11:10:19 W http_client.go:693> Parsed non ok code 503 (HTTP/1.1 503) 11:10:19 W http_client.go:693> Parsed non ok code 503 (HTTP/1.1 503) 11:10:19 W http_client.go:693> Parsed non ok code 503 (HTTP/1.1 503) 11:10:19 W http_client.go:693> Parsed non ok code 503 (HTTP/1.1 503) 11:10:19 W http_client.go:693> Parsed non ok code 503 (HTTP/1.1 503) 11:10:19 W http_client.go:693> Parsed non ok code 503 (HTTP/1.1 503) 11:10:19 W http_client.go:693> Parsed non ok code 503 (HTTP/1.1 503) 11:10:19 W http_client.go:693> Parsed non ok code 503 (HTTP/1.1 503) 11:10:19 W http_client.go:693> Parsed non ok code 503 (HTTP/1.1 503) Ended after 28.105508ms : 30 calls. qps=1067.4 Aggregated Function Time : count 30 avg 0.0024256753 +/- 0.003264 min 0.000261072 max 0.010510116 sum 0.07277026 # range, mid point, percentile, count >= 0.000261072 <= 0.001 , 0.000630536 , 66.67, 20 > 0.001 <= 0.002 , 0.0015 , 73.33, 2 > 0.005 <= 0.006 , 0.0055 , 76.67, 1 > 0.006 <= 0.007 , 0.0065 , 83.33, 2 > 0.007 <= 0.008 , 0.0075 , 93.33, 3 > 0.009 <= 0.01 , 0.0095 , 96.67, 1 > 0.01 <= 0.0105101 , 0.0102551 , 100.00, 1 # target 50% 0.000805545 # target 75% 0.0055 # target 90% 0.00766667 # target 99% 0.0103571 # target 99.9% 0.0104948 Sockets used: 25 (for perfect keepalive, would be 3) Jitter: false Code 200 : 8 (26.7 %) Code 503 : 22 (73.3 %) Response Header Sizes : count 30 avg 44.533333 +/- 73.85 min 0 max 167 sum 1336 Response Body/Total Sizes : count 30 avg 670.06667 +/- 711.5 min 241 max 1850 sum 20102 All done 30 calls (plus 0 warmup) 2.426 ms avg, 1067.4 qps - Query the
istio-proxystats to gain more information.kubectl exec "$FORTIO_POD" -c istio-proxy -- pilot-agent request GET stats | grep productpage | grep pendingCircuit breaking flags 32 calls by looking at the metricupstream_rq_pending_overflow.cluster.outbound|9080|v1|productpage.default.svc.cluster.local.circuit_breakers.default.remaining_pending: 1 cluster.outbound|9080|v1|productpage.default.svc.cluster.local.circuit_breakers.default.rq_pending_open: 0 cluster.outbound|9080|v1|productpage.default.svc.cluster.local.circuit_breakers.high.rq_pending_open: 0 cluster.outbound|9080|v1|productpage.default.svc.cluster.local.upstream_rq_pending_active: 0 cluster.outbound|9080|v1|productpage.default.svc.cluster.local.upstream_rq_pending_failure_eject: 0 cluster.outbound|9080|v1|productpage.default.svc.cluster.local.upstream_rq_pending_overflow: 32 cluster.outbound|9080|v1|productpage.default.svc.cluster.local.upstream_rq_pending_total: 39 - Clean up the client.
kubectl apply -f samples/bookinfo/networking/destination-rule-all.yaml
kubectl delete deploy fortio-deploy
kubectl delete svc fortio
Mirroring
Traffic mirroring, also called shadowing, allows teams to bring changes to production with as little risk as possible. Mirroring sends a copy of live traffic to a mirrored service. The mirrored traffic occurs outside of the critical request path for the primary service.
- Route all traffic to the v1 version of each microservice.
kubectl apply -f samples/bookinfo/networking/virtual-service-all-v1.yaml - Change the route rule to mirror traffic to
reviews:v2.kubectl apply -f - <<EOF apiVersion: networking.istio.io/v1beta1 kind: VirtualService metadata: name: reviews spec: hosts: - reviews http: - route: - destination: host: reviews subset: v1 weight: 100 mirror: host: reviews subset: v2 mirrorPercentage: value: 100.0 EOFThe previous route rule sends 100% of the traffic to
reviews:v1and mirrors 100% of the same traffic to thereviews:v2service.When traffic gets mirrored, the requests are sent to the mirrored service with their Host/Authority headers appended with
-shadow. For example, reviews becomereviews-shadow.Mirroredrequests considered as "fire and forget." The mirrored responses are discarded.Instead of mirroring all requests, change the value field under the
mirrorPercentagefield to mirror a fraction of the traffic. If this field is absent, all traffic is mirrored. - Send in some traffic by refreshing the url
http://${INGRESS_HOST}:${INGRESS_PORT}/productpagein a browser. - Logs of
reviews:v1service. Note v1 service does not call the ratings service.
- Logs of
reviews:v2mirrored service. Note for the v2 service, the header is appended with-shadow.
Managing Gateways
Gateway describes a load balancer operating at the edge of the mesh receiving
incoming or outgoing HTTP/TCP connections. Gateway configurations are applied to
standalone Envoy proxies that are running at the edge of the mesh, rather than
sidecar Envoy proxies running alongside your service workloads. Istio provides some
preconfigured gateway proxy deployments istio-ingressgateway and
istio-egressgateway.
istioctl installThe command deploys Istio using the default settings which includes a gateway. For more information, see here.
Configuring Ingress using Istio Gateway
The ingress gateway configures exposed ports and protocols, but unlike Kubernetes Ingress Resources, does not include any traffic routing configuration. Traffic routing for ingress traffic is instead configured using Istio routing rules. For more information on Istio ingress, see here.
If you have already deployed the Bookinfo application, the following steps are not required.
- Create an Istio gateway that configures on port 80 for HTTP traffic.
kubectl apply -f - <<EOF apiVersion: networking.istio.io/v1beta1 kind: Gateway metadata: name: bookinfo-gateway spec: selector: istio: ingressgateway # use istio default controller servers: - port: number: 80 name: http protocol: HTTP hosts: - "*" EOF - Configure routes for traffic entering through the Gateway:
kubectl apply -f - <<EOF apiVersion: networking.istio.io/v1beta1 kind: VirtualService metadata: name: bookinfo spec: hosts: - "*" gateways: - bookinfo-gateway http: - match: - uri: exact: /productpage - uri: prefix: /static - uri: exact: /login - uri: exact: /logout - uri: prefix: /api/v1/products route: - destination: host: productpage port: number: 9080 EOF - To deploy the Bookinfo application, see the "Running the Bookinfo Application" section of the Installing Istio and OKE page.
- Access the
productpageservice using curl:curl -s -I http://$INGRESS_HOST:$INGRESS_PORT/productpageThe command produces the following output:
HTTP/1.1 200 OK content-type: text/html; charset=utf-8 content-length: 4183 server: istio-envoy date: Tue, 07 Sep 2021 13:48:39 GMT x-envoy-upstream-service-time: 36 - Access any other URL that has not been explicitly exposed. You see an HTTP 404
error.
curl -s -I http://$INGRESS_HOST:$INGRESS_PORT/anyThe command produces the following output:
HTTP/1.1 404 Not Found date: Tue, 07 Sep 2021 13:49:45 GMT server: istio-envoy transfer-encoding: chunked - For explicit hosts in gateways, use the -H flag to set the Host HTTP header. The
flag is needed because your ingress gateway and virtual service are configured
to handle the host. For example, your host is example.com and the name is
specified in both gateways and virtual service.
curl -s -I -HHost:example.com http://$INGRESS_HOST:$INGRESS_PORT/productpage - Also, open the URL
http://${INGRESS_HOST}:${INGRESS_PORT}/productpagein a browser to view the Bookinfo web page.
Configuring Ingress using Kubernetes Ingress Resource
The reader assumes that Bookinfo application is deployed into the cluster. To deploy the Bookinfo application, see the "Running the Bookinfo Application" section of the Installing Istio and OKE page.
- Remove the Istio gateway if the configuration is already applied.
kubectl delete -f samples/bookinfo/networking/bookinfo-gateway.yaml - Create an Ingress resource on port 80 for HTTP traffic.
kubectl apply -f - <<EOF
apiVersion: networking.k8s.io/v1
kind: Ingress
metadata:
  annotations:
    kubernetes.io/ingress.class: istio
  name: ingress
spec:
  rules:
  - http:
     paths:
     - path: /productpage
       pathType: Prefix
       backend:
          service:
            name: productpage
            port:
              number: 9080
EOF
The
kubernetes.io/ingress.classannotation is required to tell the Istio gateway controller to handle thisIngress. - Verify accessing the Bookinfo application by following the instructions from previous section.
- Delete the resource and enable Istio gateway for further tasks.
kubectl delete ingress ingress
kubectl apply -f samples/bookinfo/networking/bookinfo-gateway.yaml
Accessing External Services with Egress
By default, all outbound traffic from an Istio enabled pod is redirected to its
sidecar proxy and Istio configures the Envoy proxy to pass through requests for
unknown services. Istio configures the sidecar handling of external services through
a configuration field meshConfig.outboundTrafficPolicy.mode. If
this option is set to:
-
ALLOW_ANY(default): Istio proxy lets calls to unknown services pass through. -
REGISTRY_ONLY: Istio proxy blocks any host without an HTTP service or service entry defined within the mesh.
The reader assumes that the Bookinfo application is deployed into the cluster. If not, follow the steps to deploy the Bookinfo application.
Managing Envoy Passthrough to External Services
To enable passthrough to external services, follow these steps.
- Change the
meshConfig.outboundTrafficPolicy.modeoption toALLOW_ANYwithistioctl.istioctl install --set meshConfig.outboundTrafficPolicy.mode=ALLOW_ANYNote
This step is required only if you have explicitly set the option toREGISTRY_ONLYduring the installation. - To confirm successful 200 responses, make a request to external services from
the
SOURCE_POD:export SOURCE_POD=$(kubectl get pod -l app=ratings -o jsonpath='{.items..metadata.name}') kubectl exec $SOURCE_POD -c ratings -- curl -sI http://httpbin.org/headers | grep "HTTP"The command produces the following output:HTTP/1.1 200 OK
However, the drawback with this approach is that Istio monitoring and control for traffic to external services is lost.
Controlling Access to External Services [Recommended]
To set up controlled access to external services, follow these steps:
- Change the
meshConfig.outboundTrafficPolicy.modeoption toREGISTRY_ONLY. This step is required only if you haven't explicitly set the option toREGISTRY_ONLYduring the installation. - Follow only step 1 from the "Envoy Passthrough to External Services" section.
The only change to make here is that replace
ALLOW_ANYwithREGISTRY_ONLY. - To verify that the external services are blocked, make a couple of requests to
external HTTPS services from the
SOURCE_POD. Configuration changes take several seconds to propagate, so successful connections are possible. Wait for several seconds and then retry the last command.export SOURCE_POD=$(kubectl get pod -l app=ratings -o jsonpath='{.items..metadata.name}') kubectl exec $SOURCE_POD -c ratings -- curl -sI http://httpbin.org/headers | grep "HTTP"The command produces the following output:
HTTP/1.1 502 Bad Gateway - Create a
ServiceEntryto allow access to an external HTTP service.kubectl apply -f - <<EOF apiVersion: networking.istio.io/v1beta1 kind: ServiceEntry metadata: name: httpbin-ext spec: hosts: - httpbin.org ports: - number: 80 name: http protocol: HTTP resolution: DNS location: MESH_EXTERNAL EOF - Make a request to the external HTTP service from
SOURCE_POD. Notice that the headers added by the Istio sidecar proxy:X-Envoy-Decorator-Operation.kubectl exec $SOURCE_POD -c ratings -- curl -sI http://httpbin.org/headers | grep "HTTP"The command produces the following output:HTTP/1.1 200 OKRemove the
grepcommand to see all the headers.kubectl exec $SOURCE_POD -c ratings -- curl -sS http://httpbin.org/headersThe command produces the following output:
{ "headers": { "Accept": "*/*", "Host": "httpbin.org", "User-Agent": "curl/7.52.1", "X-Amzn-Trace-Id": "Root=1-61384b41-2d3cf8b5571ba7504ab9a834", "X-B3-Sampled": "0", "X-B3-Spanid": "6983ef0cec914f83", "X-B3-Traceid": "d510c4d190cb099d6983ef0cec914f83", "X-Envoy-Attempt-Count": "1", "X-Envoy-Decorator-Operation": "httpbin.org:80/*", "X-Envoy-Peer-Metadata": "ChsKDkFQUF9DT05UQUlORVJTEgkaB3JhdGluZ3MKGgoKQ0xVU1RFUl9JRBIMGgpLdWJlcm5ldGVzChkKDUlTVElPX1ZFUlNJT04SCBoGMS4xMS4xCtQBCgZMQUJFTFMSyQEqxgEKEAoDYXBwEgkaB3JhdGluZ3MKIAoRcG9kLXRlbXBsYXRlLWhhc2gSCxoJYzk5NDdiOTlmCiQKGXNlY3VyaXR5LmlzdGlvLmlvL3Rsc01vZGUSBxoFaXN0aW8KLAofc2VydmljZS5pc3Rpby5pby9jYW5vbmljYWwtbmFtZRIJGgdyYXRpbmdzCisKI3NlcnZpY2UuaXN0aW8uaW8vY2Fub25pY2FsLXJldmlzaW9uEgQaAnYxCg8KB3ZlcnNpb24SBBoCdjEKGgoHTUVTSF9JRBIPGg1jbHVzdGVyLmxvY2FsCiQKBE5BTUUSHBoacmF0aW5ncy12MS1jOTk0N2I5OWYtbGN4bHQKFgoJTkFNRVNQQUNFEgkaB2RlZmF1bHQKTgoFT1dORVISRRpDa3ViZXJuZXRlczovL2FwaXMvYXBwcy92MS9uYW1lc3BhY2VzL2RlZmF1bHQvZGVwbG95bWVudHMvcmF0aW5ncy12MQoXChFQTEFURk9STV9NRVRBREFUQRICKgAKHQoNV09SS0xPQURfTkFNRRIMGgpyYXRpbmdzLXYx", "X-Envoy-Peer-Metadata-Id": "sidecar~10.244.0.11~ratings-v1-c9947b99f-lcxlt.default~default.svc.cluster.local" } } - For accessing HTTPS calls, replace the port and protocol when creating service entries.
- The approach adds external service traffic management features like timeouts and
fault injection. The following request returns 200 (OK) in approximately five
seconds.
kubectl exec $SOURCE_POD -c ratings -- curl http://httpbin.org/delay/5Usekubectlto set a 3-second timeout on calls to the httpbin.org external service:kubectl apply -f - <<EOF apiVersion: networking.istio.io/v1beta1 kind: VirtualService metadata: name: httpbin-ext spec: hosts: - httpbin.org http: - timeout: 3s route: - destination: host: httpbin.org weight: 100 EOFThis time a timeout appears after 3 seconds. Although httpbin.org was waiting five seconds, Istio cut off the request at 3 seconds:kubectl exec $SOURCE_POD -c ratings -- curl http://httpbin.org/delay/5 - Clean up the resources for further future tasks.
kubectl delete serviceentry httpbin-ext
kubectl delete virtualservice httpbin-ext --ignore-not-found=true
Directing Access to External Services
This approach bypasses the Istio sidecar proxy, giving services direct access to any external server. However, configuring the proxy this way does require cluster-provider specific knowledge and configuration. Similar to the first approach, we lose monitoring of access to external services and can't apply Istio features on traffic to external services. Follow these steps to provide direct access to external services.
Securing Istio
The Istio security features provide strong identity, powerful policy, transparent TLS encryption, and authentication, authorization, and audit (AAA) tools to protect your services and data.
Configuring Authentication
Istio offers mutual TLS as a full-stack solution for transport authentication, which is enabled without requiring service code changes.
sleep and httpbin services in the default namespace.
kubectl apply -f samples/sleep/sleep.yaml
kubectl apply -f samples/httpbin/httpbin.yaml
By default, Istio performs several tasks. Istio tracks the server workloads migrated to Istio proxies. Istio configures client proxies to send mutual TLS traffic to those workloads automatically. Istio sends plain text traffic to workloads without sidecars.
sleep pod to httpbin pod and look
for the X-Forwarded-Client-Cert header.
kubectl exec "$(kubectl get pod -l app=sleep -o jsonpath={.items..metadata.name})" -c sleep -- curl -s http://httpbin.default:8000/headers -s | grep X-Forwarded-Client-Cert | sed 's/Hash=[a-z0-9]*;/Hash=<redacted>;/'sleep and httpbin services without the sidecar
enabled. kubectl create ns legacy
kubectl apply -f samples/sleep/sleep.yaml -n legacy
kubectl apply -f samples/httpbin/httpbin.yaml -n legacysleep pod in the default namespace to httpbin pod in the legacy
namespace is plaintext because the destination is not sidecar enabled. Verify that plain text is sent by running the following command.
kubectl exec "$(kubectl get pod -l app=sleep -o jsonpath={.items..metadata.name})" -c sleep -- curl http://httpbin.legacy:8000/headers -s | grep X-Forwarded-Client-Certsleep pod in the legacy namespace to httpbin in the default
namespace also succeeds with a plaintext connection. The can be verified with the
following
command.kubectl exec "$(kubectl get pod -l app=sleep -n legacy -o jsonpath={.items..metadata.name})" -n legacy -c sleep -- curl http://httpbin.default:8000/headersSTRICT.
kubectl apply -f - <<EOF
apiVersion: security.istio.io/v1beta1
kind: PeerAuthentication
metadata:
  name: "default"
  namespace: "istio-system"
spec:
  mtls:
    mode: STRICT
EOFsleep pod in the legacy namespace to httpbin in default namespace no longer works when mutual TLS mode is set to STRICT. kubectl exec "$(kubectl get pod -l app=sleep -n legacy -o jsonpath={.items..metadata.name})" -n legacy -c sleep -- curl http://httpbin.default:8000/headersSTRICT peer authentication setting by deleting the CR. kubectl delete peerauthentication -n istio-system defaultIn addition to the global mutual TLS setting, it can also be set at a namespace or workload level. Follow the Istio documentation for detailed authentication configurations.
Configurating Authorization
Istio allows you to configure authorization policies for your applications.
allow-nothing policy that rejects all
requests to the workload, and then grants more access to the workload gradually and
incrementally.
kubectl apply -f - <<EOF
apiVersion: security.istio.io/v1beta1
kind: AuthorizationPolicy
metadata:
  name: allow-nothing
  namespace: default
spec:
  {}
EOF
Open the Bookinfo product page in your browser. It shows "RBAC: access denied" error confirming that the deny-all policy is working as intended.
kubectl apply -f - <<EOF
apiVersion: security.istio.io/v1beta1
kind: AuthorizationPolicy
metadata:
  name: "productpage-viewer"
  namespace: default
spec:
  selector:
    matchLabels:
      app: productpage
  action: ALLOW
  rules:
  - to:
    - operation:
        methods: ["GET"]
EOF
You see the "Bookinfo Sample" page but the productpage service cannot access the details and reviews page.
Add the following policies to grant productpage workload access to the details and reviews workloads and reviews workload access to the ratings workload.
Set Details Viewer
kubectl apply -f - <<EOF
apiVersion: security.istio.io/v1beta1
kind: AuthorizationPolicy
metadata:
  name: "details-viewer"
  namespace: default
spec:
  selector:
    matchLabels:
      app: details
  action: ALLOW
  rules:
  - from:
    - source:
        principals: ["cluster.local/ns/default/sa/bookinfo-productpage"]
    to:
    - operation:
        methods: ["GET"]
EOF
Set Reviews Viewer
kubectl apply -f - <<EOF
apiVersion: security.istio.io/v1beta1
kind: AuthorizationPolicy
metadata:
  name: "reviews-viewer"
  namespace: default
spec:
  selector:
    matchLabels:
      app: reviews
  action: ALLOW
  rules:
  - from:
    - source:
        principals: ["cluster.local/ns/default/sa/bookinfo-productpage"]
    to:
    - operation:
        methods: ["GET"]
EOF
Set Ratings Viewer
kubectl apply -f - <<EOF
apiVersion: security.istio.io/v1beta1
kind: AuthorizationPolicy
metadata:
  name: "ratings-viewer"
  namespace: default
spec:
  selector:
    matchLabels:
      app: ratings
  action: ALLOW
  rules:
  - from:
    - source:
        principals: ["cluster.local/ns/default/sa/bookinfo-reviews"]
    to:
    - operation:
        methods: ["GET"]
EOF
View the product page from a browser without any errors.
To revert the applied policies, enter the following commands.
kubectl delete authorizationpolicy.security.istio.io/allow-nothing
kubectl delete authorizationpolicy.security.istio.io/productpage-viewer
kubectl delete authorizationpolicy.security.istio.io/details-viewer
kubectl delete authorizationpolicy.security.istio.io/reviews-viewer
kubectl delete authorizationpolicy.security.istio.io/ratings-viewer
Securing Gateways with TLS
We can expose the Bookinfo application as a secure HTTPS service using either simple or mutual TLS. To sign the certificates for your services, create a root certificate and private key:
openssl req -x509 -sha256 -nodes -days 365 -newkey rsa:2048 -subj '/O=example Inc./CN=example.com' -keyout example.com.key -out example.com.crtCreate a certificate and a private key for productpage.bookinfo.com.
openssl req -out bookinfo.example.com.csr -newkey rsa:2048 -nodes -keyout bookinfo.example.com.key -subj "/CN=bookinfo.example.com/O=bookinfo organization"
openssl x509 -req -days 365 -CA example.com.crt -CAkey example.com.key -set_serial 0 -in bookinfo.example.com.csr -out bookinfo.example.com.crt
Ensure you have deployed the Bookinfo application. Create a secret for the ingress gateway certificates.
kubectl create -n istio-system secret tls bookinfo-credential --key=bookinfo.example.com.key --cert=bookinfo.example.com.crtUpdate the Bookinfo gateway to include a secure port.
kubectl apply -f - <<EOF
apiVersion: networking.istio.io/v1beta1
kind: Gateway
metadata:
  name: bookinfo-gateway-https
spec:
  selector:
    istio: ingressgateway
  servers:
  - port:
      number: 443
      name: https
      protocol: HTTPS
    tls:
      mode: SIMPLE
      credentialName: bookinfo-credential
    hosts:
    - bookinfo.example.com
EOF
Create Bookinfo destination rules if not already created.
kubectl apply -f samples/bookinfo/networking/destination-rule-all.yamlCreate a virtual service bound to the gateway.
kubectl apply -f - <<EOF
apiVersion: networking.istio.io/v1beta1
kind: VirtualService
metadata:
  name: bookinfo-https
spec:
  hosts:
  - "bookinfo.example.com"
  gateways:
  - bookinfo-gateway-https
  http:
  - route:
    - destination:
        host: productpage
        subset: v1
EOF
You can verify TLS connection to the gateway with the following curl command.
curl -v -HHost:bookinfo.example.com --resolve "bookinfo.example.com:443:$INGRESS_HOST" --cacert example.com.crt "https://bookinfo.example.com/productpage"