Troubleshooting the VMware Solution Management Appliance
Apply these solutions when troubleshooting the VMware Solution Management Appliance.
Creating a Management Appliance Takes Longer than Expected
Errors in Management Appliance States
The Management Appliance can be in a wrong or inconsistent state after provisioning, or after system changes occur.
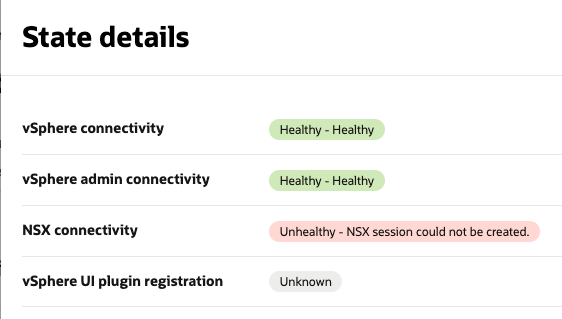
In the following example, the OCI Console shows the Management Appliance in the Needs Attention state.

Select View details to see the explanation. The State details appear.
| Issue | Troubleshooting Steps | |
|---|---|---|
| vSphere connectivity | The Management Appliance connects to the vSphere API. It uses the credentials of the ocvssystem user which are stored in a vault secret described Create Vault Secrets with User Credentials. The credentials are used for read-only operations run by the Management Appliance, such as reading metric information. |
|
| vSphere admin connectivity |
For some operations the Management Appliance connects to vSphere API with admin privileges. This type of connectivity is similar to "vSphere connectivity," but in this case the Management Appliance, it has more permissions which allow it to do more serious modifications in vCenter. The admin credentials are provided in a separate Vault secret and required for OCVS vSphere UI plugin registration and for unregistration (when the Management Appliance is deleted). For security reasons, we recommend you revoke access to the credentials to the Management Appliance as soon as registration is done. |
|
| NSX connectivity | NSX connectivity is required for network configuration operations performed by the Management Appliance. For example, the Add ESXi Host operation uses this connectivity for making sure ESXi host has proper network transport node configured. |
|
| vSphere UI plugin registration | The Management Appliance runs an internal web server which implements backend for the OCVS vSphere UI plugin. The plugin should be registered in vSphere before it can be used. The registration is done automatically by the Management Appliance. When starting it calls vSphere API using vSphere administrator credentials. If admin credentials aren't available at that moment the registration operation might fail and OCVS vSphere UI plugin functionality aren't available. |
Check if the vSphere administrator user credentials are provided in the Vault secret and have correct values and the secret is linked to the Management Appliance. If you update the credentials, it takes up 3-5 minutes for the Management Appliance to complete registration before the vSphere UI plugin registration items receives the Healthy green state. |
SSH access to the Management Appliance Network Diagnostics and Log Collection
SSH access to the Management Appliance is required for troubleshooting purposes and you should proceed with caution. If SSH access is not available, it might cause Management Appliance to operate incorrectly.
Since the Management Appliance Compute instance is provisioned without a public IP address, you must have access to the subnet of your SDDC through a bastion or another jump host with public IP address.
To apply SSH to the Management Appliance, use a private SSH key which is a paired key for the public key you used when creating the Management Appliance. For more information, see SSH access to the Management Appliance Network Diagnostics and Log Collection.
Checking Connectivity to vSphere Client and NSX Manager
Collecting Logs
The following folders contain log files related to work of the Management Appliance vSphere UI plugin:
- Web server logs:
/opt/oracle/mgmt_agent/plugins/ocvp/stateDir/log - Management Agent:
logs/opt/oracle/mgmt_agent/agent_inst/log
To copy the log output into a single support bundle file, run the following command:
sudo zip -r ~/support-bundle.zip /opt/oracle/mgmt_agent/agent_inst/log/
/opt/oracle/mgmt_agent/installer-logs /opt/oracle/mgmt_agent/configure-logs
/opt/oracle/mgmt_agent/plugins/ocvp/stateDir/log/ /opt/oracle/mgmt_agent/zip/logs
This action generates the support-bundle.zip file in /home/ops folder. Download this file to your local environment and use it when contacting our Oracle Support for troubleshooting.
After file is downloaded, you can delete it from the Management Appliance by running the following command:
rm ~/support-bundle.zipResetting the Management Appliance
Sometimes it might be necessary to reset the Management Appliance, such as if it's not functioning properly for unknown reasons, or if hardware issues that require you to provision a new Management Appliance instance. We recommended you check if OCVS UI plugin is unregistered before installing a new Management Appliance. See Manual unregistration of OCVS UI plugin section.
Manually Unregistering the OCVS UI Plugin
If the Management Appliance is terminated without your administrator credentials being up-to-date, the Compute instance is terminated, but the vSphere UI still allows the OCVS UI Plugin plugin to appear to the user. In this case, the plugin's screen components are displayed as empty gray rectangles. If this occurs, you must perform a manual unregistration of OCVS UI Plugin plugin. Perform the following steps:
- Open Administration → Solutions → Client Plugins page.
- Find the OCI-OCVS Integration Plugin and select the link for details.
- Select the plugin server name's box and select Remove.
Manually Terminating the Management Agent
When the Management Appliance is terminated, the Management Agent Resource is terminated as well. However, in case of emergency termination of the Management Appliance, such as a hardware failure, the Management Agent Resource might still remain in inactive mode. In this case, you must delete the resource manually.
- Select your region from the OCI Console.
- Open the navigation menu and select Observability & Management. Under Management Agent, select Agents.
- Select the Agents and Gateways menu section.
- Select the compartment of your SDDC.
- In the list of agents, find agent corresponding to your Management Appliance. It can be identified by Host column's value which has same name as your host name of the Management Appliance.
Troubleshooting the OCVS UI Plugin
When you run automated activities with OCVS VMware UI plugin, such as Add ESXi host or Add Datastore, the activities can fail when running a configuration step. The failures can be the result of some custom configurations in your SDDC. You might rename some objects or add new types of objects into the system which might cause configuration algorithm to fail. Some job steps might have already succeeded and they might have created some objects that aren't needed because the full job execution has failed.
The following image shows how a failed Add ESXi Host Job appears. The job failed in the "Waiting for NSX to be configured for ESXi host" step.

When you experience an error in a job step, we provide a troubleshooting manual describing how to do manual recovery for that step an how to manually proceed with further steps. The manual proceed steps are based on our existing documentation Add an ESXi Host to an Oracle Cloud VMware Solution Cluster and Integrate OCI Block Volumes with Oracle Cloud VMware Solution.
The following sections provide information on how you should address different job steps failures.
Add ESXi Host Job Troubleshooting and Recovery Plan
The Add ESXi Host job in Management Appliance automates the following manual workflow Add an ESXi Host to an Oracle Cloud VMware Solution Cluster which described in Oracle public documentation and available to the customer. When Add ESXi Host job is run, it makes status updates for each step it performs. If a step fails, proceed with the manual workflow described in Add an ESXi Host to an Oracle Cloud VMware Solution Cluster starting from the point of failure.
| Step | Description | Troubleshooting |
|---|---|---|
| 1. Provision ESXi Host in OCI |
This step provisions ESXi host for an SDDC in OCI. This job step corresponds to Task 1: Add an ESXi Host in OCI Console to a Cluster in Your SDDC section in Add an ESXi Host to an Oracle Cloud VMware Solution Cluster document. |
What can go wrong: If this error happens it means that system couldn't provision ESXi host in OCI. The error message in the job step should display the root cause. The root cause might be connected to compute capacity or customer's limits, or there might be some other reason. Step rollback: Delete any resources/configuration, that was created during ESXi host provisioning in OCI Console. Proceed instructions: You can fix some root causes and run the "Add ESXi host" operation again. Because the step can leave a unneeded resources in OCI, you should perform a manual rollback (deletion of created resources and/or configuration in OCI). The error message should point to instructions for the manual rollback. Refer to manual guide: Task 1: Add an ESXi Host in OCI Console to a Cluster in Your SDDC. |
| 2. Add ESXi Host to vCenter |
This step creates the ESXi host object in vCenter. It refers to an existing ESXi host in OCI. This job step corresponds to Task 3: Add ESXi Host to the vCenter Cluster and Configure Host Networking → Add ESXi Host to vCenter Cluster section in Add an ESXi Host to an Oracle Cloud VMware Solution Cluster document. |
What can go wrong:
Step rollback: Remove created ESXi host from vCenter inventory:
Proceed instructions: Proceed from Task 3: Add ESXi Host to the vCenter Cluster and Configure Host Networking → Add ESXi Host to vCenter Cluster. |
| 3. Set ESXi Host to Maintenance Mode |
This step sets the ESXi host to maintenance mode to start further operations. This job step corresponds to the Task 3: Add ESXi Host to the vCenter Cluster and Configure Host Networking → Set ESXi Host to Maintenance Mode section in Add an ESXi Host to an Oracle Cloud VMware Solution Cluster document. |
What can go wrong:
Step rollback: Exit maintenance mode for an ESXi host:
Proceed instructions: Proceed from Task 3: Add ESXi Host to the vCenter Cluster and Configure Host Networking→ Set ESXi Host to Maintenance Mode. |
| 4. Add ESXi Host to Distributed Switch |
This step adds the ESXi host to distributed virtual switch. Distributed virtual switch is identified by name <cluster-name>-DSwitch where <cluster-name> is a name of the cluster ESX host is created in. This job step corresponds to the Task 3: Add ESXi Host to the vCenter Cluster and Configure Host Networking → Add ESXi Host to Distributed Switch section in Add an ESXi Host to an Oracle Cloud VMware Solution Cluster document. |
What can go wrong:
Step rollback: Remove the ESXi host from the distributed virtual switch (DVS):
Proceed instructions: Proceed from Task 3: Add ESXi Host to the vCenter Cluster and Configure Host Networking→ Add ESXi Host to Distributed Switch. |
| 5. Move ESXi Host to vCenter Cluster |
This step moves the ESXi host object to vCenter cluster. It automatically starts NSX agent installation and transport node configuration process for the host. This job step corresponds to the Task 3: Add ESXi Host to the vCenter Cluster and Configure Host Networking → Move ESXi Host to vCenter Cluster section in Add an ESXi Host to an Oracle Cloud VMware Solution Cluster document. |
What can go wrong:
Step rollback: Move host out of the cluster if host is in the cluster:
Proceed instructions: Proceed form Task 3: Add ESXi Host to the vCenter Cluster and Configure Host Networking→ Move ESXi Host to vCenter Cluster. |
| 6. Verify NSX Configuration on the ESXi Host |
This step checks the ESXi host's transport node in NSX It waits until it finishes configuration and has successful status. This job step corresponds to the Task 4: Verify NSX Configuration on the ESXi Host section in Add an ESXi Host to an Oracle Cloud VMware Solution Cluster document. |
What can go wrong:
Step rollback: None. No rollback exists because the step doesn't change anything. It only checks for a proper state of transport node. Proceed instructions: Configure the transport node manually in NSX console and proceed from Task 5: Configure Datastores and Exit Maintenance Mode. |
| 7. Configure Virtual Machine File System Datastore |
This step configures the ESXi host to use VMFS datastore as primary storage that's used by the cluster. This step is run only if the ESXi host has a standard shape configuration. This job step corresponds to the Scenario 1: Configure Virtual Machine File System (VMFS) Datastores (Standard Shapes) section, 1-9 items in Add an ESXi Host to an Oracle Cloud VMware Solution Cluster document. |
What can go wrong:
Step rollback: Remove the ESXi host from the VMFS datastore:
Proceed instructions: Proceed from Scenario 1: Configure Virtual Machine File System (VMFS) Datastores (Standard Shapes). |
| 8. Configure vSAN Datastore |
This step configures the ESXi host to use vSAN datastore as primary storage. This step is run only if the ESXi host has a dense shape configuration. This job step corresponds to the Scenario 2: Configure vSAN Datastore and Fault Domain (Dense Shapes) section, 2-7 items in Add an ESXi Host to an Oracle Cloud VMware Solution Cluster document. |
What can go wrong:
Step rollback: Remove the ESXi host from vSAN cluster:
Proceed instructions: Proceed from Scenario 2: Configure vSAN Datastore and Fault Domain (Dense Shapes). |
| 9. Configure Fault Domain for ESXi Host |
This step configures the fault domain (FD) for an ESXi host. You can change the fault domain manually later on. This step is run only if the ESXi host has a dense shape configuration. This job step corresponds to the Scenario 2: Configure vSAN Datastore and Fault Domain (Dense Shapes) section, 8-10 items in Add an ESXi Host to an Oracle Cloud VMware Solution Cluster document. |
What can go wrong:
Step rollback: Move the ESXi host from fault domain:
Proceed instructions: Proceed from Scenario 2: Configure vSAN Datastore and Fault Domain (Dense Shapes). |
| 10. Exiting maintenance mode for ESXi Host |
This step exists maintenance mode for an ESXi host.
This job step corresponds to:
|
What can go wrong:
Step rollback: No action is required. In case of failure, the ESXi host is going to remain in maintenance mode. Proceed instructions:
|
Add Datastore Job Troubleshooting and Recovery Plan
The Add Datastore job in the Management Appliance automates the following manual workflow Integrate OCI Block Volumes with Oracle Cloud VMware Solution. When you run an Add Datastore job, it makes status updates for each step it performs. If a step fails proceed with manual workflow described in Integrate OCI Block Volumes with Oracle Cloud VMware Solution starting from the point of failure.
| Step | Description | Troubleshooting |
|---|---|---|
| 1. Create OCI resources | Creates OCI resources: block volume, datastore, datastore bluster and attaches created block volumes to the ESXi host Compute instances. This step corresponds to Task 1: Create an OCI Block Volume and Task 2: Attach the OCI Block Volume to ESXi Hosts section. |
If this step fails, you should not normally do anything because the workflow cleans up the resources it created. If there are still objects remaining after this failed step, contact Oracle Support. Step rollback: You can manually roll back this step. The sequence of actions to perform is:
Proceed instructions: You can retry running the job or follow the manual guide: Task 1: Create an OCI Block Volume. |
| 2. Configure Host Storage Adapter for iSCSI | Corresponds to the Task 3: Configure Storage Adapter (vmhba) for iSCSI section. |
What can go wrong:
Step rollback: To remove added storage devices from storage adapter:
Proceed instructions: Proceed with manual configuration Task 3: Configure Storage Adapter (vmhba) for iSCSI section. |
| 3. Create Datastore in vCenter | Corresponds to the Task 4: Add the new VMFS Datastore to Oracle Cloud VMware Solution Cluster section. |
What can go wrong:
Step rollback:
Proceed instructions: Proceed with manual configuration Task 4: Add the new VMFS Datastore to Oracle Cloud VMware Solution Cluster section. |
| 4. Create Datastore Cluster in vCenter |
Creates datastore cluster in vCenter. This step is run only if a new datastore cluster creation was selected. |
What can go wrong:
Step rollback:
Proceed instructions: These instructions are for the datastore cluster creation and configuration as vCenter UI presents the datastore cluster creation wizard with datastore cluster configuration.
After you select Finish, the datastore cluster is created, configured and the selected datastores) are automatically moved into datastore cluster you created. |
| 5. Configure vCenter Datastore Cluster |
Configures Datastore Cluster with default options in vCenter. This step is executed only if new Datastore Cluster creation was selected. |
What can go wrong:
Step rollback: No action is required. Proceed instructions: No action is required. The datastore cluster configuration is done while creating the new datastore cluster. See the Proceed instructions step no. 4 in the Create Datastore Cluster in vCenter step. You can reconfigure the datastore cluster by selecting the datastore cluster and navigating to the Configure tab. |
| 6. Move datastore to Datastore Cluster |
Moves the created datastore to the datastore cluster. |
What can go wrong:
Step rollback:
Proceed instructions: No action is required. If the datastore cluster was created manually, there is nothing to do as datastore is automatically moved to the datastore cluster. If the datastore cluster was created, but couldn't be moved automatically, you can drag the datastore object into the datastore cluster object. You can also right-click on the datastore object and select Move To.... |