Scenario: Sending Queue Messages to a Function
Integrate Queue with Functions using Connector Hub.
This scenario involves creating a function and then referencing that function as a target in a connector (Connector Hub) to receive and process messages from queues.
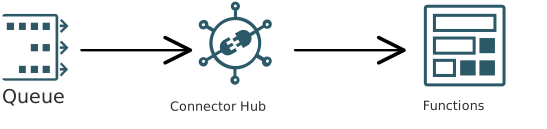
The payload received by the function contains only messages from the queue.
For a related tutorial, see Use OCI Functions and OCI Queue to Authorize User Capabilities without Exposing Admin Privilege to Approvers.
For help with troubleshooting, see Troubleshooting Connectors.
Required IAM Policy
If you're a member of the Administrators group, you already have the required access to execute this scenario. Otherwise, you need access to Functions .
The workflow for creating the connector includes a default policy when needed to provide permission for writing to the target service. If you're new to policies, see IAM Policies Overview.
Error Handling When Processing Queues
In the context of queue messages sent to functions, partial failures during processing of messages within a batch aren't supported.
When a function that's processing a batch of messages from a queue encounters an error, all messages in that batch become visible in the queue again, including messages that the function processed successfully. Therefore, a message could be processed by the function several times. As with any target, the connector keeps retrying indefinitely until the function target succeeds. For more information, see Delivery Details.
If a failure occurs while processing a batch of messages, the delivery count for those messages is still increased. If the delivery count for a message reaches the maximum defined at the queue level, then the message is sent to the dead letter queue. For more information, see Delivery count.
To prevent reprocessing of messages, make your function idempotent.
Setting Up the Queue and Function
Before you can create the connector (Connector Hub) , you must set up a queue and a function to receive data from the queue.
For queue instructions, see Creating a Queue.
For function instructions, see the following:
On the Connectors list page, select Create connector. If you need help finding the list page, see Listing Connectors.
1. Basic Connector Information
Enter identifying information.
- Connector name: Enter a user-friendly name for the new connector and an optional description. Avoid entering confidential information.
- Select a compartment: Select the compartment to store the new connector in.
Select Next.
2. Configure Connector Source
Specify the source metric for the connector to transfer data from.
- Select source: Select Queue.
- Configure source:
- Compartment: Select the compartment that contains the queue that you want.
- Queue: Select the queue that contains the messages that you want.Note
To select a queue for a connector, you must have authorization to read the queue. See IAM Policies (Securing Connector Hub). -
Channel Filter (under Message filtering) (optional): To filter messages from channels in the queue, enter a value.
For example, to filter messages by channel ID, enter the channel ID.
For supported values, see
channelFilterat GetMessages (Queue API).
Note
A message that has been transferred to the connector's target is considered "consumed." To meet requirements of the Queue service, the connector deletes transferred messages from the source queue. For more information, see Consuming Messages. - Create policy: Select to accept the default policy provided for the entered source configuration.
Select Next.
3. Configure Connector Task
Select Next (skip this section).
4. Configure Connector Target
Enter the metric namespace and metric name that you want to use for the filtered log data.
- Target: Select Functions.
- Configure target: Enter the following information.
- Compartment: Select the compartment that contains the function that you want.
- Function application: Select the name of the function application that contains the function that you want.
- Function: Select the name of the function that you want to send the data to.
- Show additional options (Optional): Select this link and specify limits for each batch of data sent to the function. To use manual settings, provide values for batch size limit (either KBs or number of messages) and batch time limit (seconds).
For example, limit batch size by selecting either 5,000 kilobytes or 10 messages. An example batch time limit is 5 seconds.
Considerations for Functions targets:
- The connector flushes source data as a JSON list in batches. Maximum batch, or payload, size is 6 MB.
- Functions are invoked synchronously with 6 MB of data per invocation. If data exceeds 6 MB, then the connector invokes the function again to move the data that's over the limit. Such invocations are handled sequentially.
- Functions can execute for up to five minutes. See Delivery Details.
- Don't return data from Functions targets to connectors. Connector Hub doesn't read data returned from Functions targets.
- Create policy: Select to accept the default policy provided for the entered target configuration.
Select Next.
Connector Preview
Review the connector configuration and then select Create.
The creation process begins, and its progress is displayed. On completion, the connector's details page opens.
Run the CreateServiceConnector operation to create the connector.
Example request:
POST /20200909/serviceConnectors
Host: service-connector-hub.us-phoenix-1.oraclecloud.com
<authorization and other headers>
{
  "displayName": "My Queue to Function Connector",
  "compartmentId": "<compartment_OCID>",
  "description": "My connector description",
  "source": {
    "kind": "plugin",
    "pluginName": "QueueSource",
    "configMap": {
      "queueId": "<queue_OCID>"
    }
  },
  "target": {
    "kind": "functions",
    "functionId": "<function_OCID>",
    "batchSizeInKbs": "5000",
    "batchSizeInNum": "10",
    "batchTimeInSec": "60"
  }
}
Verify and Troubleshoot Invokes
To verify and troubleshoot invokes on the Functions service, see Storing and Viewing Function Logs.
Confirm That the New Connector Moves Data
After you create the connector, confirm that it's moving data.
- Enable logs for the connector to get details on data flow.
- Check for expected results at the target service.
Confirming that data is moved helps you avoid automatic deactivation, which happens when a connector fails for a long time.