Restore Autonomous AI Database
Learn how to restore an Autonomous AI Database using the Automatic Backup, Manual Backup (Standalone Backup), Long-Term Backup, Point-in-time and Cross-region options.
Restore from Automatic Backup
These are steps to restore your Autonomous AI Database from an automatic backup.
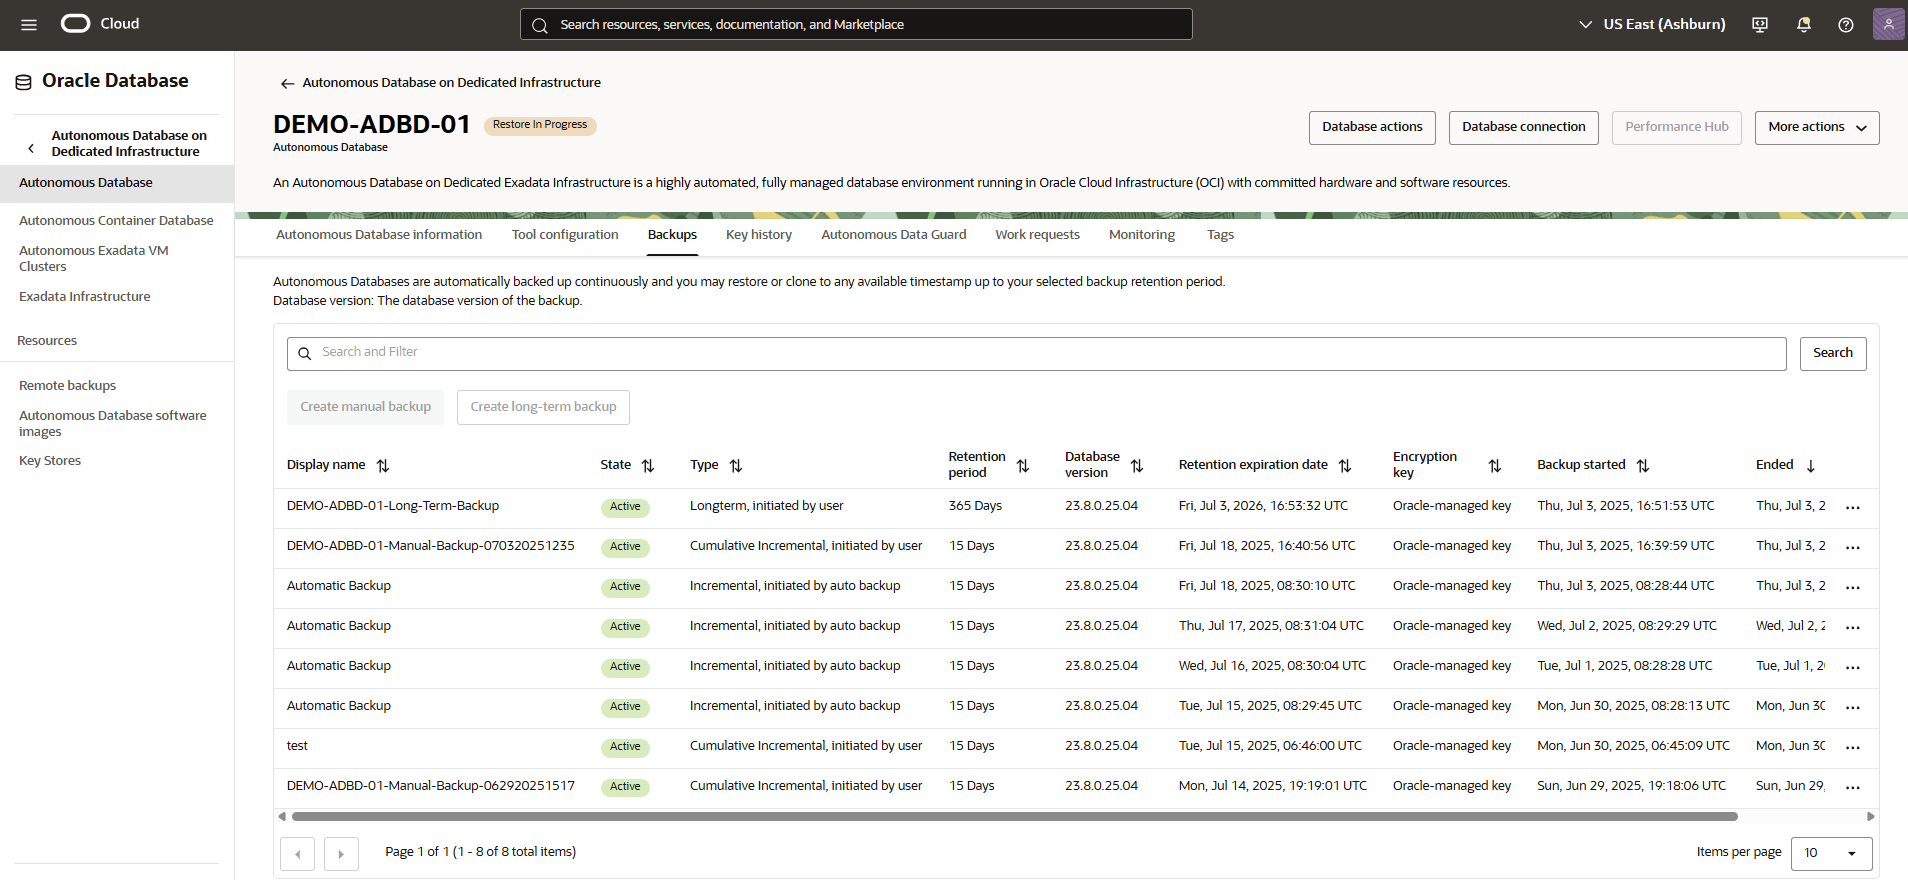
- From the OCI console, you can navigate to Autonomous AI Database, and then select Backups tab.
- From the Backups tab, select the three-dot navigation menu , and then select the Restore button.
- A warning message will appear to confirm the results of the attempted restore. This action will restore the current database to the selected timestamps. After confirming, select the Restore button.
- Return to the Backups tab within your Autonomous AI Database to view the State of your restore process. Once the restoring process is complete, the State will change from Active to Restore in Progress.
Restore from Manual Backup (Standalone Backup)
Learn how to restore and clone your Autonomous AI Database from manual backup in the OCI console.
- From the OCI console, select Autonomous AI Database that you are using.
- Select the Backups tab. Do not select any backup from the list that has the following attributes:
- Display name: Automatic Backup
- Type:Longterm and initiated by user
- From the three-dot navigation menu, select either the Restore or Create clone option.
- From the Create Autonomous AI Database clone page, complete the following substeps:
- Select your Clone type as Full clone.
- Select your compartment that you want to create the clone in.
- Enter a Display name that helps you easily identify the resource.
- Specify a Database name.
- Select your preferred Region from the list. Select the region where you want to create the clone.
- Select your Compartment and Exadata infrastructure from the dropdown lists.
- Select your Compartment and Autonomous Exadata VM Cluster from the dropdown lists.
- Select your Compartment and Autonomous Container Database from the dropdown lists.
- Navigate to the Database configuration section, and then specify your ECPU count, Storage (GB).
- Navigate to Administrator credentials creation section, and then enter your Password and Confirm password
- Enter your Contact email for operational notifications and announcements. You can select the Add customer contact and fill required information.
- Review your information, and then select the Clone details.
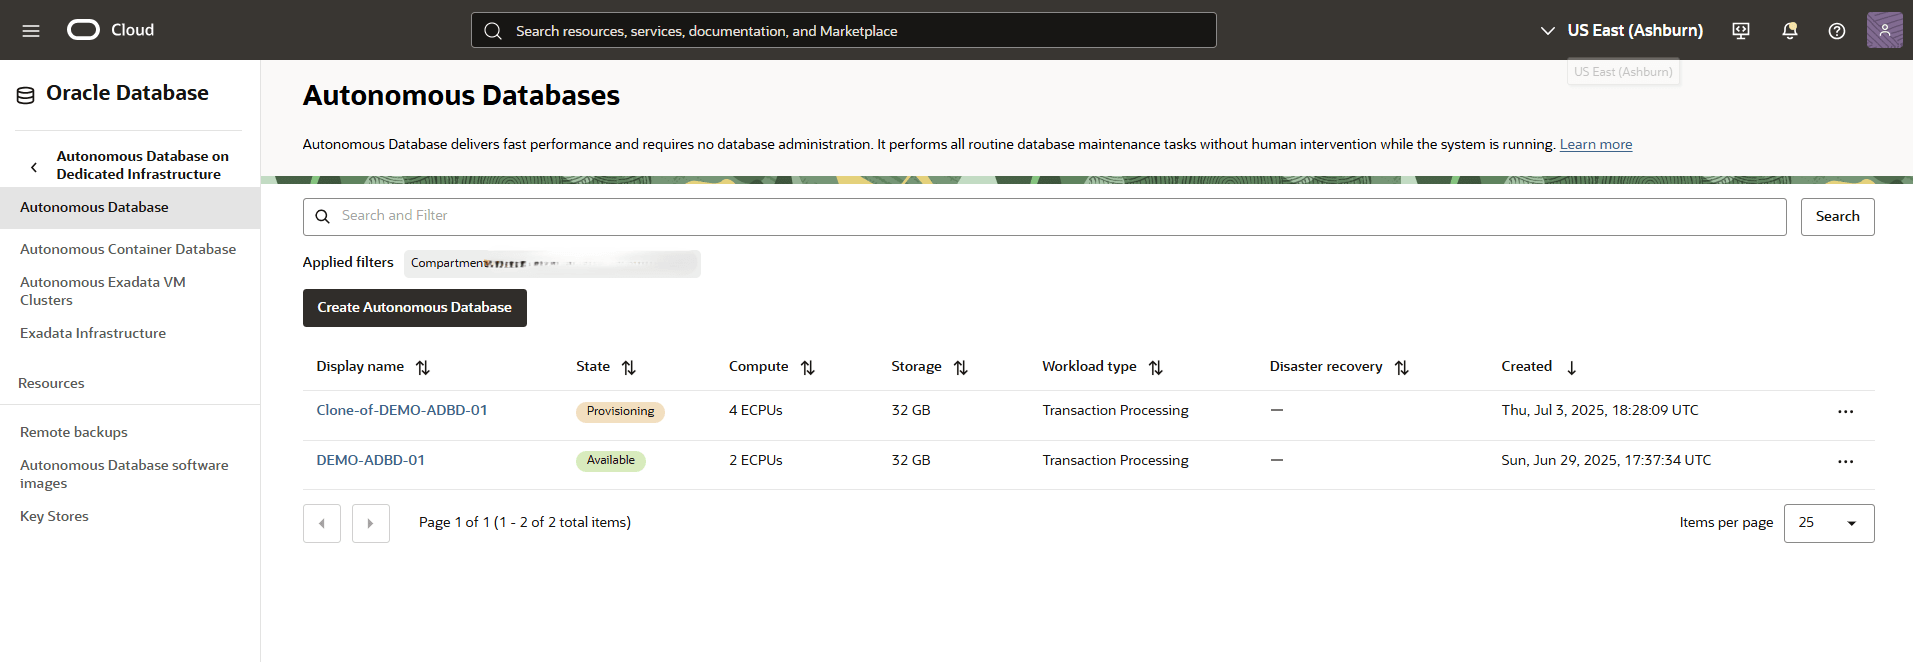
- Return to the Autonomous AI Database to view the State of your clone or restore process. Once the process is complete, the State will change from Available to Restore in Progress.
Restore from Long-Term Backup
Learn how to restore and clone from a long-term backup in the OCI console.
- From the OCI console, select Autonomous AI Database that you are using.
- Select the Backups tab. Do not select any backup from the list that has the following attributes:
- Display name: Automatic Backup
- Type:Longterm and initiated by user
- From the three-dot navigation menu, select the Create clone option.
- From the Create Autonomous AI Database clone page, complete the following substeps:
- Select your Clone type as Full clone.
- Select your compartment that you want to create the clone in.
- Enter a Display name that helps you easily identify the resource.
- Specify a Database name.
- Select your preferred Region from the list. Select the region where you want to create the clone.
- Select your Compartment and Exadata infrastructure from the dropdown lists.
- Select your Compartment and Autonomous Exadata VM Cluster from the dropdown lists.
- Select your Compartment and Autonomous Container Database from the dropdown lists.
- Navigate to the Database configuration section, and then specify your ECPU count, Storage (GB).
- Navigate to Administrator credentials creation section, and then enter your Password and Confirm password
- Enter your Contact email for operational notifications and announcements. You can select the Add customer contact and fill required information.
- Review your information, and then select the Clone details.
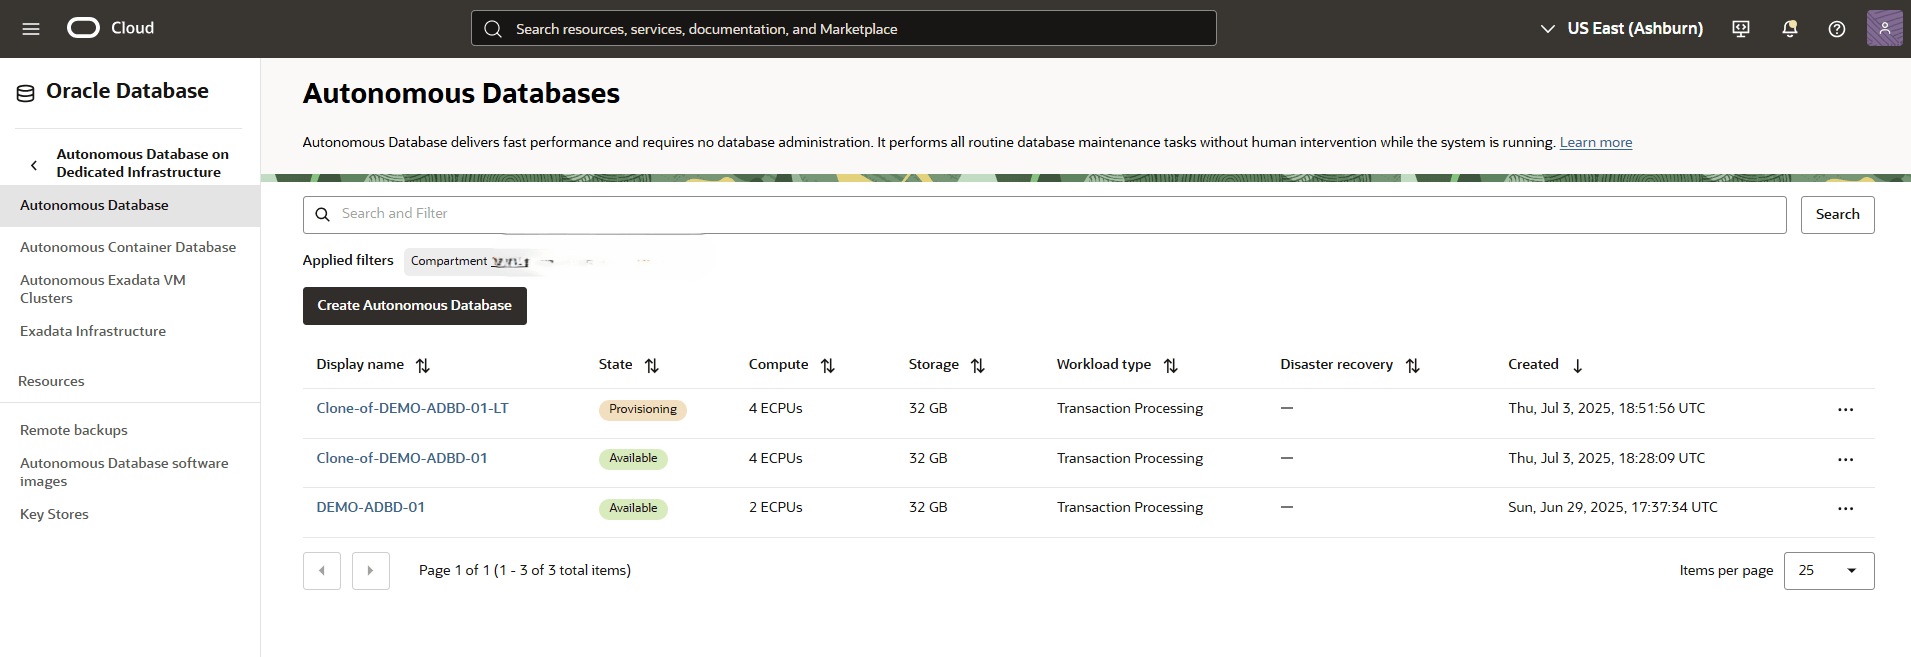
- Return to the Autonomous AI Database to view the State of your clone process.
Point-in-Time Restore
Learn how to perform point-in-time restore in the OCI console.
- From the OCI console, select Autonomous AI Database that you are using.
- Select the More actions button, and then select the Restore.
- From the Restore page, specify a timestamp within your configured backup retention window to use for the point-in-time restore. Select the Enter timestamp option.
- Specify your date and time.
- Select the Restore button.
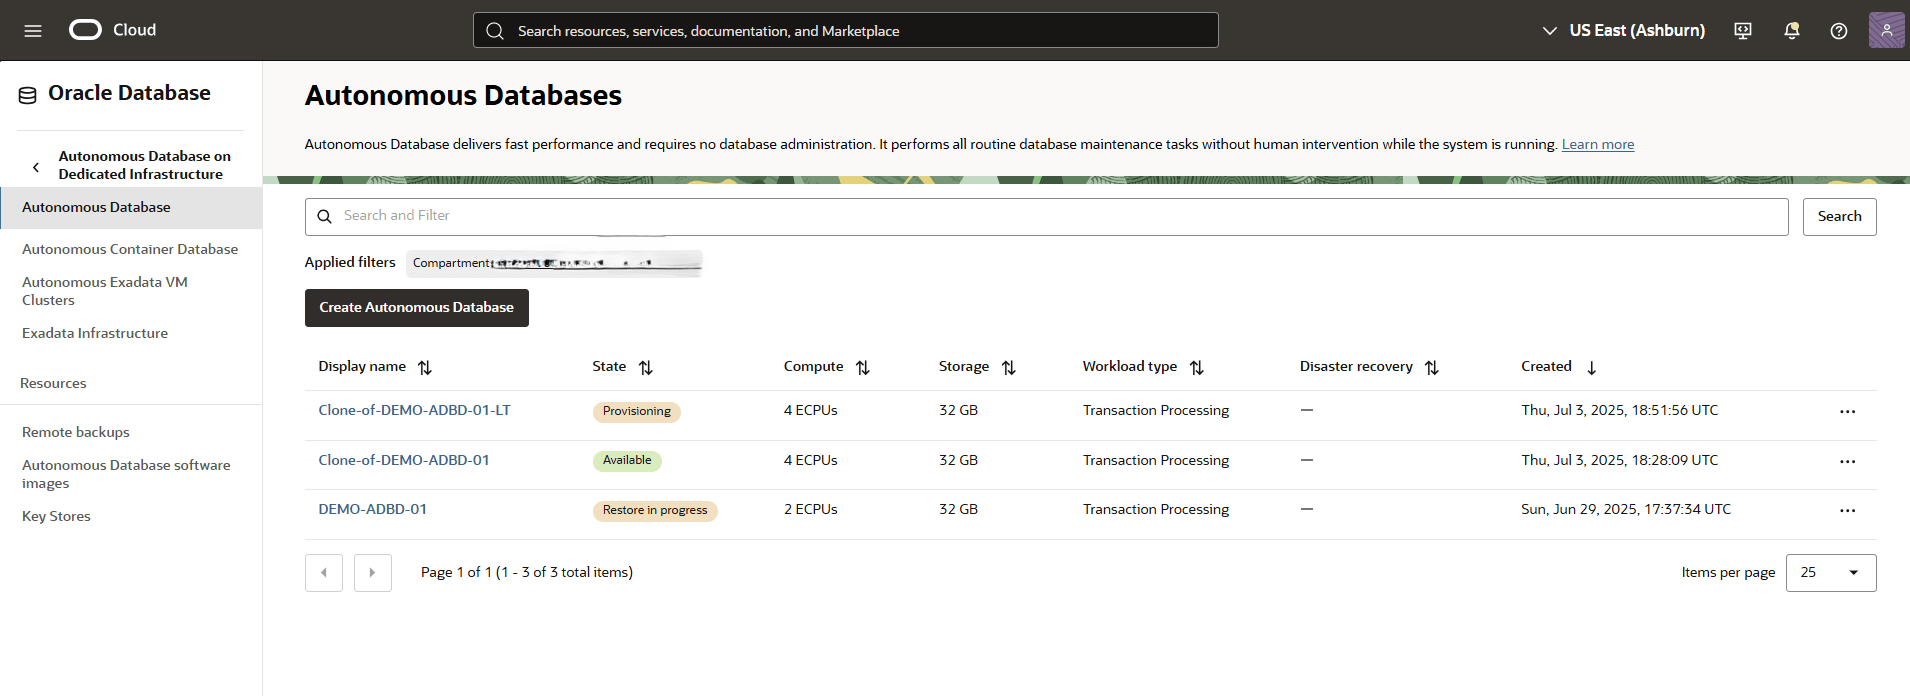
- Return to the Autonomous AI Database to view the State of your restore process.
Cross-Region Restore
Cross-region restore for Autonomous AI Databases enables you to leverage Amazon S3–based automated backups to perform database restores across regions. Cross‑region restore for Oracle Autonomous AI Database on Dedicated Exadata Infrastructure enables you to restore your database across supported regions. This capability allows you to create a copy of your database in another region, supporting key use cases such as application development, testing and running analytics workload on a copy of your production data.
These are the steps to perform a cross-region restore of an Autonomous AI Database, where the AWS Oregon region (mapped to the OCI Boardman region) will be used as the source region and AWS N. Virginia region (mapped to the OCI Ashburn region) will be used as the target region.
- Cross-region restore is not supported for databases that use AWS Key Management Service (KMS) for Transparent Data Encryption (TDE).
- Cross-region restore operations may incur additional costs, such as cross-region data transfer fees.
- Prerequisites:
- Autonomous Container Database in the source region is configured with automatic backups to Amazon S3.
- Autonomous VM Cluster in the target region is configured to use an ODB network with Restore region enabled and source region is selected from the dropdown list. To learn more about how to enable the restore region for your ODB network, follow the Create ODB Network or Modify ODB Network steps.
- You must have an Autonomous VM Cluster and an Autonomous Container Database created in the target region.
Subsequent steps are performed through the OCI Console.
- In the OCI console, use the Regions dropdown in the top-right corner to select the source region.
- From the hamburger menu, select Oracle AI Database, and then select Autonomous AI Database on Dedicated Infrastructure.
- From the left menu, select Autonomous AI Database, and the compartment where your Autonomous AI Database is provisioned. Then select your source Autonomous AI Database which you want to restore to the target region.
- Select the More actions button, and then select the Create clone option.
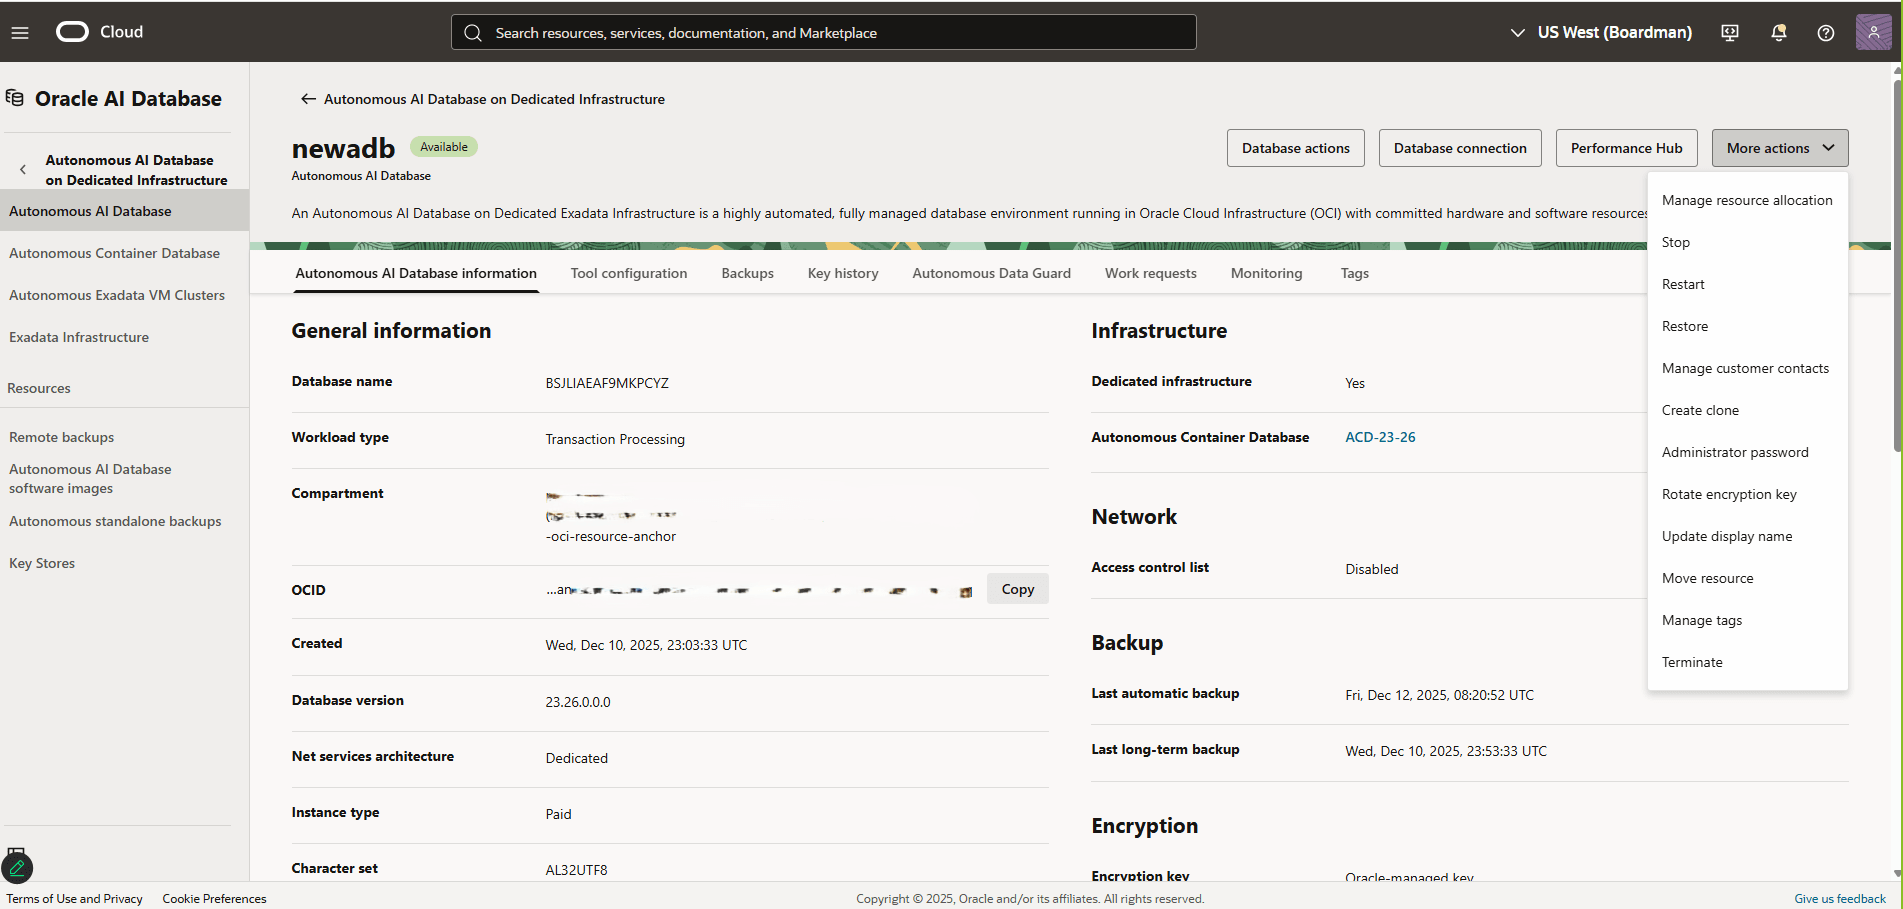
- From the Create Autonomous AI Database clone page. Complete the following substeps:
- Select your Clone type as Full clone.
- Select the Clone from a backup option as your Clone source. Choose a date and time.
- Select your compartment that you want to create the clone in.
- Enter a Display name that helps you easily identify the resource. The display name must be 1 to 255 characters, of letters, numbers, underscores (_) and hyphens (-). Display name must start with a letter or underscore (_) and cannot contain two successive hyphens (-).
- Specify a Database name. The database name must contain only letters and numbers, starting with a letter. It can be up to 30 characters. Spaces are not allowed.
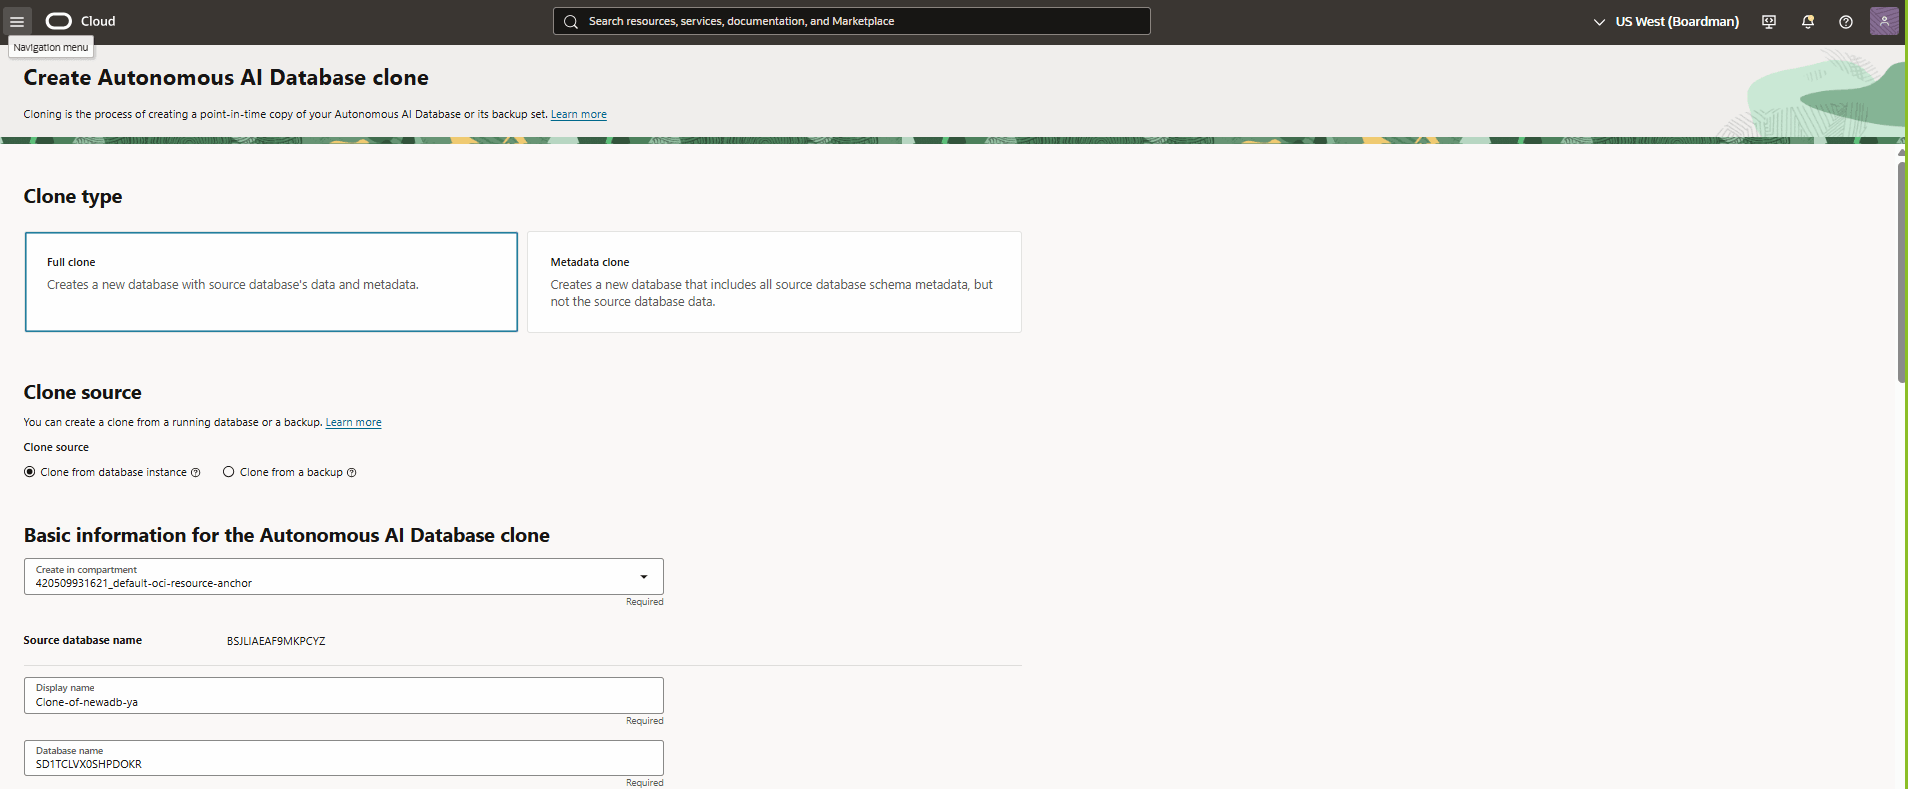
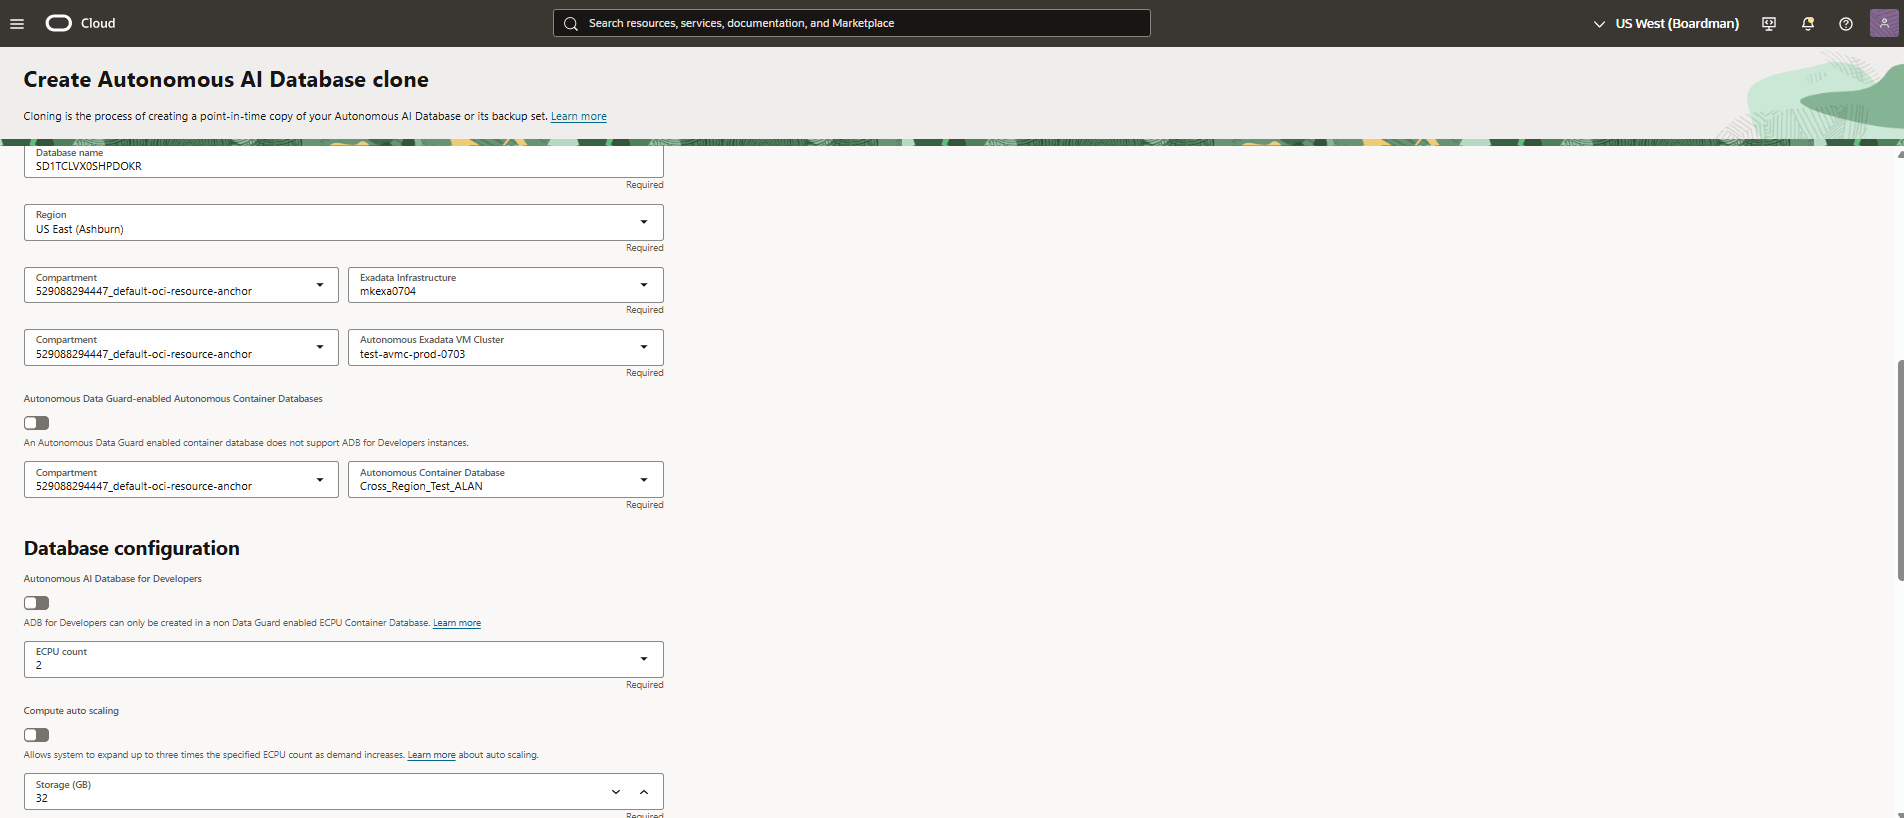
- From the Region list, select the target region where your backup will be restored.
Note
The OCI region Ashburn is mapped to the AWS region N. Virginia. The target Autonomous AI VM Cluster is physically located in N. Virginia. - From the Compartment dropdown list, select your compartment in which your Exadata Infrastructure resides.
- From the Exadata Infrastructure dropdown list, select your Exadata Infrastructure.
- From the Compartment dropdown list, select your compartment in which your Autonomous Exadata VM Cluster resides and then select your target Autonomous Exadata VM Cluster.
- If you want to use Autonomous Data Guard–enabled Autonomous Container Databases, turn on the toggle. This step is optional.
Note
An Autonomous Data Guard enabled container database does not support Autonomous AI Database for Developers instances. - Select your Compartment and Autonomous Container Database from the dropdown lists.
- Navigate to the Database configuration section. To enable Autonomous AI Database for Developers, turn on the toggle. This step is optional.
Note
Autonomous AI Database for Developers can only be created in a non Data Guard enabled ECPU Container Database. For more information, see Autonomous AI Database for Developers. - Select the ECPU count from the dropdown list. Only available ECPU values are displayed.
- The Compute auto scaling is optional. This option allows the system to expand up to three times the specified ECPU count as demand increases. For more information, see CPU Allocation When Auto-Scaling.
- Specify the Storage (GB).
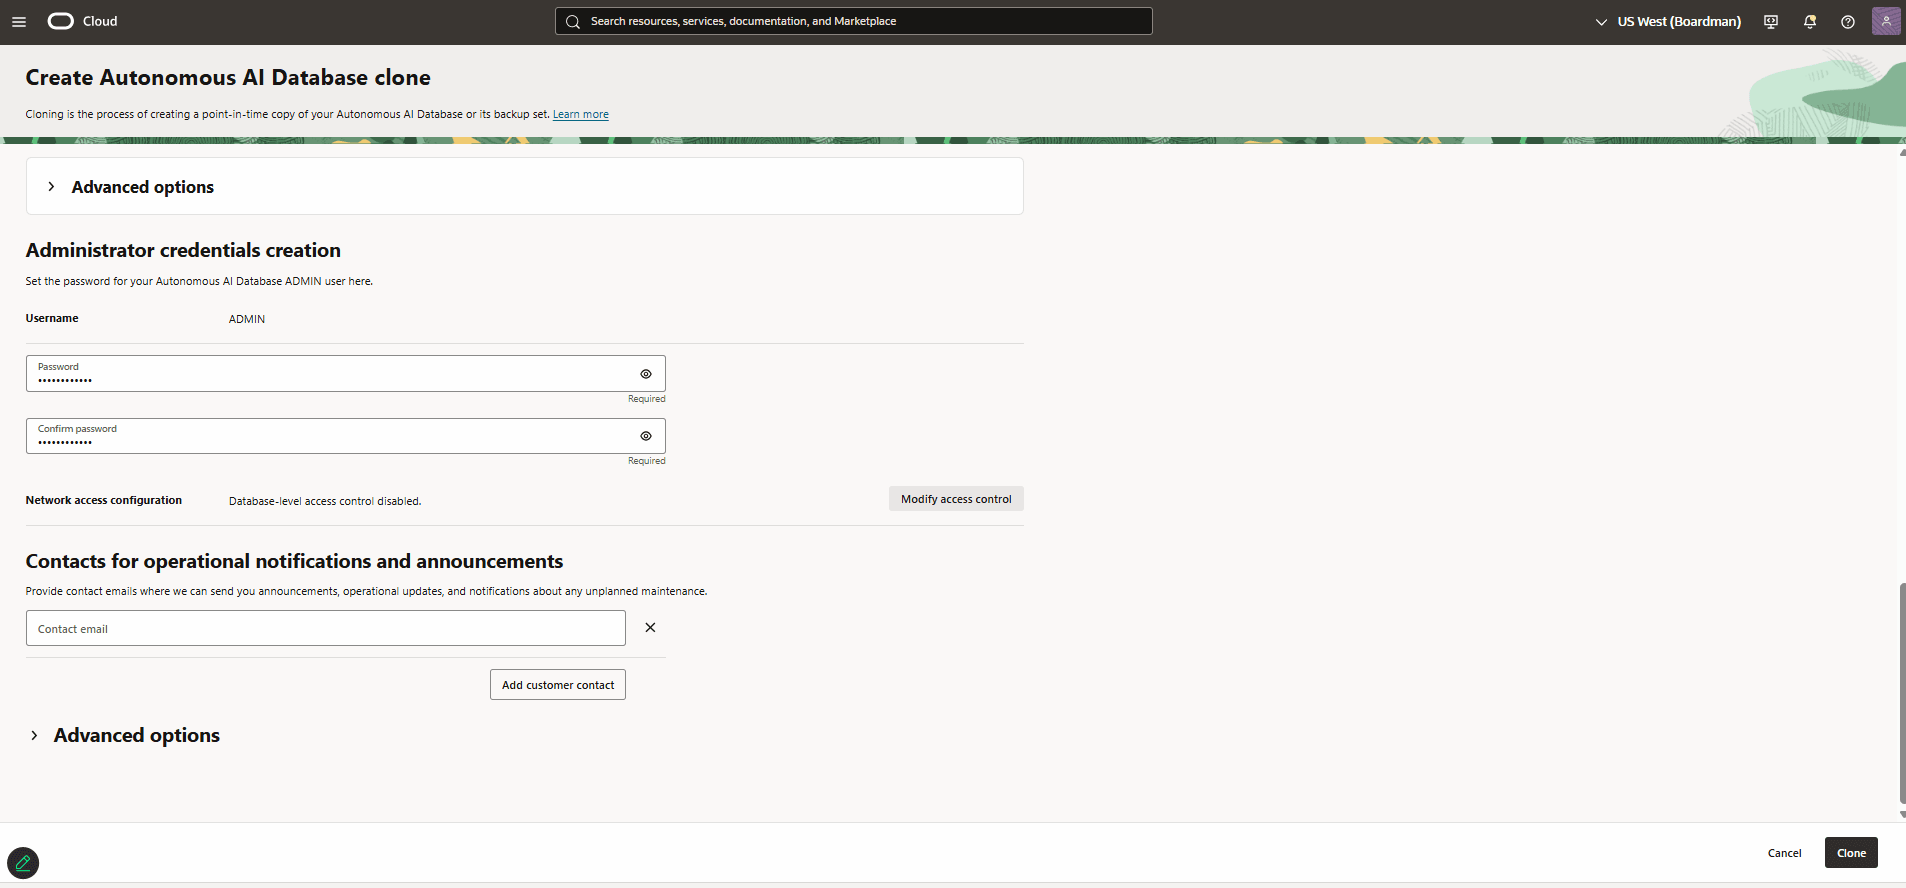
- Expand the Advanced options section located under the Database configuration. Enabling the elastic pool is optional.
- Navigate to Administrator credentials creation section, and then enter your Password. The password must be 12 to 30 characters and contain at least one uppercase letter, one lowercase letter, and one number. The password cannot contain a single quote (') or a double quote (") character or the user-name "admin".
- Reenter your password in the Confirm password field. The confirm password must match password you entered in the previous step.
- The Network access configuration is disabled by default. Based on your requirements, you can modify access control. This step is optional.
- If you enable it, from the Edit access control list page, turn on the Enable database-level access control toggle, and select the Add access control rule button.
Note
An access control list (ACL) blocks all IP addresses and CIDR blocks that are not in the list. Only the clients in with these IP addresses in ACL can access the database. - From the dropdown list, select IP notation type and add IP address in the Values field.
- Select the Save button to save the changes.
- If you enable it, from the Edit access control list page, turn on the Enable database-level access control toggle, and select the Add access control rule button.
- Enter your Contact email for operational notifications and announcements. You can select the Add customer contact, and then enter the required information.
- The Advanced options section is optional.
- The Encryption key section displays the chosen Encryption key.
- From the Management section, you can view the Character set and National character set details.
- In the Database In-Memory section, the Enable Database In-Memory option depends on the ECPU count you selected in step 5m. Scaling down an Autonomous AI Database to less than 16 ECPUs or 4 OCPUs automatically disables Database In-Memory for that database. For more information, see Database In-Memory.
- From the Tags section, you can add additional metadata to organize resources with free-form and defined tags.
- Review your information, and then select the Clone button.
- Select your target region from the Regions dropdown list, select Oracle AI Database, and then select Autonomous AI Database on Dedicated Infrastructure. From the left menu, select Autonomous AI Database, and then select your Autonomous AI Database. To view the State of your database created using cross-region restore, select the Work requests tab. Once it is created successfully, the State displays Succeeded. If creation of the Autonomous AI Database fails, refer to the Work Request ID when opening a service request at My Oracle Support. For more information, see Creating a Support Request.