Creating an AI Assistant with Search with OpenSearch and OCI Generative AI
Create an AI assistant with OpenSearch and OCI Generative AI to simplify data analysis.
This topic describes how to build your own chatbot in OpenSearch using a conversational agent. Sometimes a large language model (LLM) can't answer a question because its knowledge base doesn't contain the needed proprietary data. Here, you might need an agent to provide more information to an LLM in a later call. The conversational agent can run tools to access more information from configured data sources and send the additional information to the LLM as context.
Prerequisites
- The tenancy must be subscribed to the US Midwest (Chicago) region or the Germany Central (Frankfurt) region. You don't need to create the cluster in either of those regions, just ensure that the tenancy is subscribed to one of the regions.
- To use AI assistant toolkit with OpenSearch, you need a cluster with OpenSearch image version 2.15 or later. By default, new clusters are configured to use version 2.15. To create a cluster, see Creating a Search with OpenSearch Cluster.
For existing clusters configured for version 2.3 or version 2.11, you can perform an inline upgrade to version 2.15, for more information, see Upgrading Search with OpenSearch Cluster Software.
To upgrade existing clusters configured for version 1.2.3 to 2.15, you need to use the upgrade process described in Upgrading Search with OpenSearch Cluster Software.
- Create a policy to grant access to Generative AI resources. The following policy example includes the required permissions:For information on creating a policy, see Creating a Policy.
ALLOW ANY-USER to manage generative-ai-family in tenancy WHERE ALL {request.principal.type='opensearchcluster', request.resource.compartment.id='<cluster_compartment_OCID>'}If you're new to policies, see Getting Started with Policies and Common Policies.
-
Use the settings operation of the Cluster APIs to configure the recommended cluster settings that let you to create a connector. The following example includes the recommended settings:
PUT _cluster/settings
{
  "persistent": {
    "plugins": {
      "ml_commons": {
        "only_run_on_ml_node": "false",
        "model_access_control_enabled": "true",
        "native_memory_threshold": "99",
        "rag_pipeline_feature_enabled": "true",
        "memory_feature_enabled": "true",
        "allow_registering_model_via_local_file": "true",
        "allow_registering_model_via_url": "true",
        "model_auto_redeploy.enable":"true",
        "model_auto_redeploy.lifetime_retry_times": 10
      }
    }
  }
}
Example response:
{
  "acknowledged": true,
  "persistent": {
    "plugins": {
      "ml_commons": {
        "rag_pipeline_feature_enabled": "true",
        "memory_feature_enabled": "true",
        "only_run_on_ml_node": "false",
        "model_access_control_enabled": "true",
        "native_memory_threshold": "99",
        "allow_registering_model_via_local_file": "true",
        "model_auto_redeploy": {
          "lifetime_retry_times": "10",
          "enable": "true"
        },
        "allow_registering_model_via_url": "true"
      }
    }
  },
  "transient": {}
}
Creating the Generative AI Chat Model
To use the Generative AI Assistant, you need to create a Generative AI chat model to interpret the user's instructions and then respond with the requested information. Creating a Generative AI model includes the following steps:
- Register the model group.
- Create the connector.
- Register the model.
- Deploy the model.
Register the Model Group
Register a model group using the register operation in the Model Group APIs, as shown in the following example:
POST /_plugins/_ml/model_groups/_register
{
    "name": "demo_model_group",
    "description": "This is a model group"
}
Make note of the model_group_id returned in the response:
{
  "model_group_id": "<model_group_id>",
  "status": "CREATED"
}
Creating a Connector to Generative AI
You need a connector to create a model with Generative AI. The commands to create the connector are specific to the model. Find other examples in Create the Connector.
The Generative AI service regularly updates the available models. Check Pretrained Foundational Models in Generative AI to get information on the supported chat models. The Generative AI service team typically sends out notifications when they're about to deprecate a model. If you're using the On-DEMAND model, adhere to those notifications and update your agent model as needed to avoid any disruptions in your agent service.
Cohere.command-r-plus-08-2024
The following example shows the configuration of a create connector with Cohere.command-r-plus-08-2024 chat model:
POST _plugins/_ml/connectors/_create
{
    "name": "Cohere Commndr-R-Plus Chat Connector",
    "description": "demo genai connector",
    "version": 2,
    "protocol": "oci_sigv1",
    "parameters": {
    "endpoint": "inference.generativeai.us-chicago-1.oci.oraclecloud.com",
      "auth_type": "resource_principal"
    },
    "credential": {
    },
    "actions": [
      {
        "action_type": "predict",
        "method": "POST",
        "url": "https://${parameters.endpoint}/20231130/actions/chat",
        "request_body": "{\"compartmentId\":\"<compartment_OCID>\",\"servingMode\":{\"modelId\":\"cohere.command-r-plus-08-2024\",\"servingType\":\"ON_DEMAND\"},\"chatRequest\":{\"message\":\"${parameters.prompt}\",\"maxTokens\":600,\"temperature\":1,\"frequencyPenalty\":0,\"presencePenalty\":0,\"topP\":0.75,\"topK\":0,\"isStream\":false,\"chatHistory\":[],\"apiFormat\":\"COHERE\"}}",
        "post_process_function": "def text = params['chatResponse']['text'].replace('\n', '\\\\n').replace('\"','');\n return text"
    }
  ]
}
Substitute <compartment_OCID> with the OCID of your compartment.
Make note of the connector_id returned in the response:
{
  "connector_id": "<connector_ID>",
}
OpenAI AI Assistant Connector Payloads
This section shows the connectors and agents for the following OpenAI AI Assistant connector payloads:
40
POST _plugins/_ml/connectors/_create
{
     "name": "4o-agent-connector",
     "description": "OpenAI 4o connector for AI assistant",
     "version": 2,
     "protocol": "oci_sigv1",
     "parameters": {
         "endpoint": "inference.generativeai.us-chicago-1.oci.oraclecloud.com",
         "auth_type": "resource_principal"
     },
     "credential": {
     },
     "actions": [
         {
             "action_type": "predict",
             "method": "POST",
             "url": "https://${parameters.endpoint}/20231130/actions/chat",
             "request_body": "{\"compartmentId\":\"<compartment_ocid>\",\"servingMode\":{\"modelId\":\"openai.gpt-4o\",\"servingType\":\"ON_DEMAND\"},\"chatRequest\":{\"maxCompletionTokens\":600,\"temperature\":0.5,\"frequencyPenalty\":0,\"presencePenalty\":0,\"topP\":1.0,\"isStream\":false,\"apiFormat\":\"GENERIC\",\"messages\":[{\"role\":\"USER\",\"content\":[{\"type\":\"TEXT\",\"text\":\"${parameters.prompt}\"}]}]}}",
              "post_process_function": "def text = params['chatResponse']['choices'][0]['message']['content'][0]['text'];\n return text"
         }
     ]
 }
4o-mini
POST _plugins/_ml/connectors/_create
{
     "name": "4o-mini-agent-connector",
     "description": "OpenAI 4o-mini connector for AI Assistant",
     "version": 2,
     "protocol": "oci_sigv1",
     "parameters": {
         "endpoint": "inference.generativeai.us-chicago-1.oci.oraclecloud.com",
         "auth_type": "resource_principal"
     },
     "credential": {
     },
     "actions": [
         {
             "action_type": "predict",
             "method": "POST",
             "url": "https://${parameters.endpoint}/20231130/actions/chat",
             "request_body": "{\"compartmentId\":\"<compartment_ocid>\",\"servingMode\":{\"modelId\":\"openai.gpt-4o-mini\",\"servingType\":\"ON_DEMAND\"},\"chatRequest\":{\"maxCompletionTokens\":600,\"temperature\":0.5,\"frequencyPenalty\":0,\"presencePenalty\":0,\"topP\":1.0,\"isStream\":false,\"apiFormat\":\"GENERIC\",\"messages\":[{\"role\":\"USER\",\"content\":[{\"type\":\"TEXT\",\"text\":\"${parameters.prompt}\"}]}]}}",
              "post_process_function": "def text = params['chatResponse']['choices'][0]['message']['content'][0]['text'];\n return text"
         }
     ]
 }
o3-mini/o1
{
  "name": "agent-connector",
  "description": "OpenAI connector for AI Assitant",
  "version": "2",
  "protocol": "oci_sigv1",
  "parameters": {
    "endpoint": "inference.generativeai.us-chicago-1.oci.oraclecloud.com",
    "auth_type": "resource_principal"
  },
  "actions": [
    {
      "action_type": "PREDICT",
      "method": "POST",
      "url": "https://${parameters.endpoint}/20231130/actions/chat",
      "request_body": """{"compartmentId":"<compartment_ocid>","servingMode":{"modelId":"<MODEL NAME>","servingType":"ON_DEMAND"},"chatRequest":{"isStream":false,"apiFormat":"GENERIC","reasoningEffort":"LOW","messages":[{"role":"USER","content":[{"type":"TEXT","text":"${parameters.prompt}"}]}]}}""",
      "post_process_function": """def text = params['chatResponse']['choices'][0]['message']['content'][0]['text'].replace('\n', '\\\n');\nreturn text"""
    }
  ]
}
Register the Model
Register the model as shown in the following example:
POST /_plugins/_ml/models/_register
{
  "name": "demo_genai_model",
  "function_name": "remote",
  "model_group_id": "<model_group_ID>",
  "description": "demo genai model",
  "connector_id": "<connector_ID>"
}
Make note of the model_id returned in the response:
{
  "task_id": "<task_ID>",
  "status": "CREATED",
  "model_id": "<genAI_model_ID>"
}
Deploy the Model
Deploy the model as shown in the following example:
POST /_plugins/_ml/models/<genAI_model_ID>/_deployA response similar to the following is returned:
{
  "task_id": "-C1m4pQBpfOUfebnTqCc",
  "task_type": "DEPLOY_MODEL",
  "status": "COMPLETED"
}
Test the Model
You can optionally test the model, as shown in the following example:
POST /_plugins/_ml/models/<genAI_model_ID>/_predict
{
  "parameters": {
    "prompt": "\n\nHuman: how are you? \n\nAssistant:"
  }
}
A response similar to the following is returned:
{
  "inference_results": [
    {
      "output": [
        {
          "name": "response",
          "dataAsMap": {
            "inferenceResponse": {
              "generatedTexts": [
                {
                  "text": "I'm an AI language model, so I don't have feelings or emotions as
                  humans do. However, I'm functioning properly and ready to assist you with any questions
                  or tasks you may have! How can I help you today?"
                }
              ]
            }
          }
        }
      ],
      "status_code": 200
    }
  ]
}
Create a Conversational Agent
After you create the Generative AI model, you can use it to create a conversational agent. This agent combines the Generative AI model with user-specified tools, allowing it to interpret user text into invocations of tools, returning its interpretation of the results to the user. The model then returns the interpreted results. See Build your own chatbot and Agents and tools for more information.
This example uses the built-in opensearch_dashboards_sample_data_ecommerce index, which you can add to your OpenSearch cluster through the Dashboard. In this example, the agent is given a PPLTool and CatIndexTool. The PPLTool translates user instructions into Piped Processing Language (PPL), which allows the agent to run requests against index data. The CatIndexTool allows the agent to list indexes in the cluster. This tool is necessary for any useful assistant. Use the OpenSearch documentation on AI Agents for information on configuring your own usecase.
Select the following links for more information on these OpenSearch features:
POST _plugins/_ml/agents/_register
{
  "name": "Chat Agent with Llama",
  "type": "conversational",
  "description": "this is a test agent",
  "app_type": "os_chat",
  "llm": {
    "model_id": "<genAI_model_ID>",
    "parameters": {
      "max_iteration": 5,
      "message_history_limit": 5,
      "disable_trace": false
    }
  },
  "memory": {
    "type": "conversation_index"
  },
  "tools": [
    {
      "type": "PPLTool",
      "description": "Use this tool to transfer natural language to generate PPL and execute PPL to query inside. Use this tool after you know the index name, otherwise, call IndexRoutingTool first. The input parameters are: {index:IndexName, question:UserQuestion}.",
      "parameters": {
        "model_id": "<genAI_model_ID>",
        "model_type": "OPENAI",
        "execute": true
      },
      "include_output_in_agent_response": true
    },
    {
      "type": "CatIndexTool",
      "description": "Use this tool to get OpenSearch index information: (health, status, index, uuid, primary count, replica count, docs.count, docs.deleted, store.size, primary.store.size). \nIt takes 2 optional arguments named `index` which is a comma-delimited list of one or more indices to get information from (default is an empty list meaning all indices), and `local` which means whether to return information from the local node only instead of the cluster manager node (default is false)."
    }
  ]
}
A response similar to the following is returned. Make note of the agent_id returned.
{
  "agent_id": "<conversational_agent_ID>"
}
<genAI_model_ID>
Test the Conversational Agent
You can optionally test the conversational agent, as shown in the following example:
POST _plugins/_ml/agents/<conversational_agent_ID>/_execute
{
    "parameters": {
    "question": "Can you query with index opensearch_dashboards_sample_data_ecommerce to find out how many orders happened between 4 AM and 9 PM on 3/24/2025?",
    "verbose": false,
    "selected_tools": ["PPLTool", "CatIndexTool"]
    }
}
A response similar to the following is returned:
{
  "inference_results": [
   {
     "output": [
     {
       "name": "memory_id",
       "result": "11lPppUBsqYDrOfXM-Uf"
     },
     {
       "name": "parent_interaction_id",
       "result": "2FlPppUBsqYDrOfXM-Ur"
     },
     {
       "name": "response",
       "dataAsMap":
       {
         "response": "The count of orders between 4 AM and 9 PM on 3/24/2025 is 102.",
         "additional_info":
         {
            "TransferQuestionToPPLAndExecuteTool.output": [
                "Failed to run the tool TransferQuestionToPPLAndExecuteTool with the error message execute ppl:source=opensearch_dashboards_sample_data_ecommerce | where type = 'order' AND order_date >= '2025-03-24T04:00:00+00:00' AND order_date < '2025-03-24T21:00:00+00:00' | stats COUNT() AS count, get error: timestamp:2025-03-24T04:00:00+00:00 in unsupported format, please use 'yyyy-MM-dd HH:mm:ss[.SSSSSSSSS]'.",
                """{"ppl":"source\u003dopensearch_dashboards_sample_data_ecommerce | where order_date \u003e\u003d \u00272025-03-24 04:00:00\u0027 AND order_date \u003c\u003d \u00272025-03-24 21:00:00\u0027 | stats COUNT() AS count","executionResult":"{\n  \"schema\": [\n    {\n      \"name\": \"count\",\n      \"type\": \"integer\"\n    }\n  ],\n  \"datarows\": [\n    [\n      102\n    ]\n  ],\n  \"total\": 1,\n  \"size\": 1\n}"}"""]
          }
        }
      }]
    }]
}
While the PPLTool originally rejects the query because of an improper date format, the agent can receive that response and reformat the query, allowing the second invocation of the PPL tool to succeed.
Create a Root Chatbot Agent in an OpenSearch Dashboard
After you create the conversational agent, you create the chatbot agent and configure it as the root chatbot agent in OpenSearch Dashboard for the cluster. The chatbot agent in this example uses the conversational agent to interpret and answer questions, and also uses the MLModelTool to suggest new questions.
Create the Chatbot Agent
Create the chatbot agent, as shown in the following example:
POST /_plugins/_ml/agents/_register
{
  "name": "Chatbot agent",
  "type": "flow",
  "description": "this is a test chatbot agent",
  "tools": [
    {
      "type": "AgentTool",
      "name": "LLMResponseGenerator",
      "parameters": {
        "agent_id": "<conversational_agent_ID>"
      },
      "include_output_in_agent_response": true
    }
  ],
  "memory": {
    "type": "conversation_index"
  }
}
A response similar to the following is returned. Make note of the agent_id returned.
{
  "agent_id": "-i2m4pQBpfOUfebnxKAf"
}
Configure the Root Chatbot Agent in the OpenSearch Dashboard
After you create the chatbot agent, you can configure the agent as the root agent in the OpenSearch Dashboard, as shown in the following example:
PUT .plugins-ml-config/_doc/os_chat
{
    "type":"os_chat_root_agent",
    "configuration":{
        "agent_id": "<root_conversational_agent_ID>"
    }
}
A response similar to the following is returned:
{
"_index": ".plugins-ml-config",
"_id": "os_chat",
"_version": 1,
"result": "created",
"_shards": {
"total": 2,
"successful": 2,
"failed": 0
},
"_seq_no": 1,
"_primary_term": 1
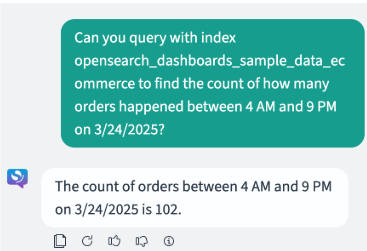
}Testing the Root Agent
You can test the root agent by asking the OpenSearch Assistant questions in the OpenSearch cluster's OpenSearch Dashboard: