Prerequisites to Use Customer-Managed Encryption Keys on Autonomous AI Database in OCI Vault
Perform these prerequisite steps to use customer-managed keys on Autonomous AI Database in OCI Vault:
-
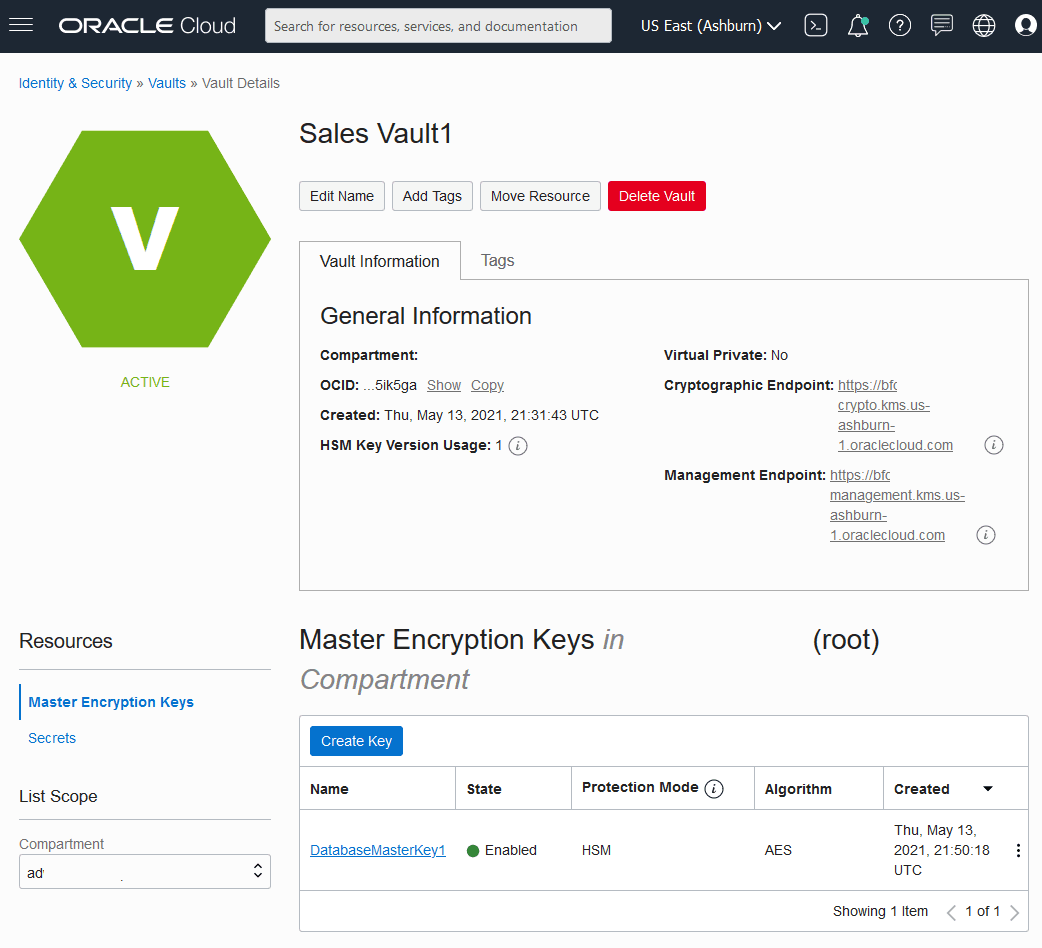
Create an Oracle Cloud Infrastructure Vault.
-
Open the Oracle Cloud Infrastructure Console by clicking the
 next to Oracle Cloud.
 -
From the Oracle Cloud Infrastructure left navigation menu click Identity and Security.
-
Under Key Management & Secret Management click Vault.
-
Select an existing Vault or create a new Vault.
For more details, see Creating a Vault.
-
-
Create a Master Encryption Key in the Vault.
Note
Note:
You must use these options when you create the key:
-
Key Shape: Algorithm: AES (Symmetric key used for Encrypt and Decrypt)
-
Key Shape: Length: 256 bits
For more information, see Creating a Master Encryption Key and Overview of Key Management.
-
-
Create dynamic group and policy statements for the dynamic group to enable access to Oracle Cloud Infrastructure resources (Vaults and Keys).
This step depends on whether the vault is on the same tenancy as the Autonomous AI Database instance or on a different tenancy:
-
Vault and keys are in the same tenancy as the Autonomous AI Database instance. See Create Dynamic Group and Policies for Customer Managed Keys with Vault in Same Tenancy as Database for more information.
-
Vault and keys are in a different tenancy. See Create Dynamic Group and Policies for Customer Managed Keys with Vault in Different Tenancy than the Database for more information.
-
You must replicate the vault and keys to use customer-managed encryption keys with Autonomous Data Guard with a remote Standby database. Customer-Managed Encryption Keys are only supported with a single cross region Autonomous Data Guard standby. Multiple cross region standbys are not supported because Oracle Cloud Infrastructure Vault only supports replication to one remote region.
See the following for more information:
Create Dynamic Group and Policies for Customer Managed Keys with Vault in Same Tenancy as Database
Create dynamic group and policies to provide access to the vault and keys for customer-managed keys when the vault and keys are in the same tenancy as the Autonomous AI Database instance.
-
Create a dynamic group to make the master encryption key accessible to the Autonomous AI Database instance.
-
In the Oracle Cloud Infrastructure console click Identity & Security.
-
Under Identity click Domains and select an identity domain (or create a new identity domain).
-
Under Identity domain, click Dynamic groups.
-
Click Create dynamic group and enter a Name, a Description, and a rule.
-
Create Dynamic Group for an existing database:
You can specify that an Autonomous AI Database instance is part of the dynamic group. The dynamic group in the following example includes only the Autonomous AI Database whose OCID is specified in the
resource.idparameter:resource.id = '<your_Autonomous_Database_instance_OCID>' -
Create a Dynamic Group for a database that has not been provisioned yet:
When you are creating the dynamic group before you provision or clone an Autonomous AI Database instance, the OCID for the new database is not yet available. For this case, create a dynamic group that specifies the resources in a given compartment:
resource.compartment.id = '*<your_Compartment_OCID>*'
-
-
Click Create.
-
-
Write policy statements for the dynamic group to enable access to Oracle Cloud Infrastructure resources (vaults and keys).
-
In the Oracle Cloud Infrastructure console click Identity & Security and click Policies.
-
To write policies for a dynamic group, click Create Policy, and enter a Name and a Description.
-
Use the Policy Builder to create a policy for vault and keys in the local tenancy.
For example, the following allows the members of the dynamic group
DGKeyCustomer1to access the vaults and keys in the compartment namedtraining:Allow dynamic-group DGKeyCustomer1 to use vaults in compartment training Allow dynamic-group DGKeyCustomer1 to use keys in compartment trainingThis sample policy applies for a single compartment. You can specify that a policy applies for your tenancy, a compartment, a resource, or a group of resources.
To use customer-managed keys with Autonomous Data Guard with a remote standby, the following policy is also required:
Allow dynamic-group DGKeyCustomer1 to manage vaults in compartment training Allow dynamic-group DGKeyCustomer1 to manage keys in compartment training -
Click Create to save the policy.
See the following for more information:
-
Create Dynamic Group and Policies for Customer Managed Keys with Vault in Different Tenancy than the Database
Perform these steps to use customer-managed keys when the Autonomous AI Database instance and vaults and keys are in different tenancies.
In this case, you need to supply OCID values when you change to customer-managed keys. In addition, you need to define dynamic groups and policies that allow the Autonomous AI Database instance to use vaults and keys in a different tenancy.
-
Copy the master encryption key OCID.
-
Copy the vault OCID.
-
Copy the tenancy OCID (the remote tenancy that contains vaults and keys).
-
On the tenancy with the Autonomous AI Database instance, create a dynamic group.
a. In the Oracle Cloud Infrastructure console, on the tenancy with the Autonomous AI Database instance, click Identity & Security.
b. Under Identity click Domains and select an identity domain (or create a new identity domain).
c. Under Identity domain, click Dynamic groups.
d. Click Create dynamic group and enter a Name, a Description, and a rule.
-
Create Dynamic Group for an existing database:
You can specify that an Autonomous AI Database instance is part of the dynamic group. The dynamic group in the following example includes only the Autonomous AI Database whose OCID is specified in the
resource.idparameter:resource.id = '*<your_Autonomous_Database_instance_OCID>*' -
Create a Dynamic Group for a database that has not been provisioned yet:
When you are creating the dynamic group before you provision or clone an Autonomous AI Database instance, the OCID for the new database is not yet available. For this case, create a dynamic group that specifies the resources in a given compartment:
resource.compartment.id = '*<your_Compartment_OCID>*'
e. Click Create.
-
-
On the tenancy with the Autonomous AI Database instance, define the policies to allow access to vaults and keys (where the vaults and keys are on a different tenancy).
a. In the Oracle Cloud Infrastructure console click Identity & Security.
b. Under Identity click Policies.
c. To write a policy, click Create Policy.
d. On the Create Policy page, enter a Name and a Description.
e. On the Create Policy page, select Show manual editor.
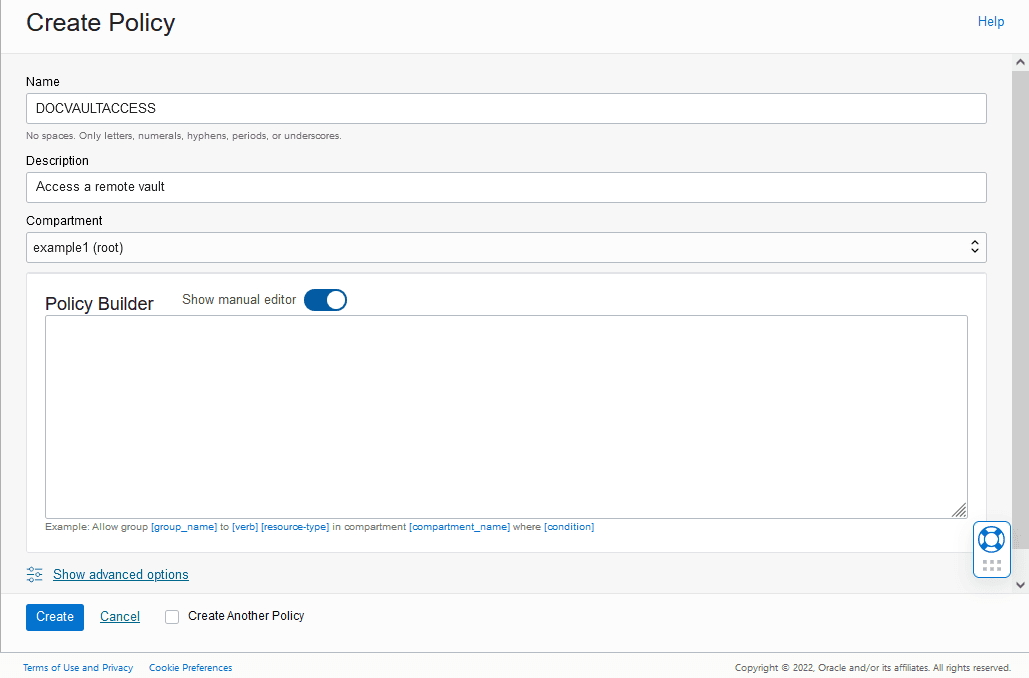
Description of the illustration adb_keys_create_policy_manual.png
f. In the policy builder, add policies so that the Autonomous AI Database instance is able to access vaults and keys located in the different tenancy. Also add policies for the IAM group that the IAM user belongs to so that the Oracle Cloud Infrastructure Console for the Autonomous AI Database instance can show details about the key that resides in a different tenancy.
For example, in the generic policy, call the tenancy with the Autonomous AI Database instance Tenancy-1 and the tenancy with vaults and keys, Tenancy-2:
Copy the following policy and replace the variables and names with the values you define, where the dynamic group name
ADB-DynamicGroupis the dynamic group you created in Step 4:define tenancy REMTEN as <*ocid of tenancy-2*> endorse dynamic-group ADB-DynamicGroup to use vaults in tenancy REMTEN endorse dynamic-group ADB-DynamicGroup to use keys in tenancy REMTEN endorse group MyUserGroup to use vaults in tenancy REMTEN endorse group MyUserGroup to use keys in tenancy REMTENFor example, the following allows the members of the dynamic group
DGKeyCustomer1to access the remote vaults and keys in the tenancy namedtraining2:define tenancy training2 as ocid1.tenancy.oc1..aaa_example_rcyx2a endorse dynamic-group DGKeyCustomer1 to use vaults in tenancy training2 endorse dynamic-group DGKeyCustomer1 to use keys in tenancy training2 endorse group MyUserGroup to use vaults in tenancy training2 endorse group MyUserGroup to use keys in tenancy training2g. Click Create to save the policy.
-
Copy the tenancy OCID (the tenancy that contains the Autonomous AI Database instance).
-
Copy the Dynamic Group OCID (for the Dynamic Group you created in Step 4).
-
On the remote tenancy with vaults and keys, define a dynamic group and policies to allow the Autonomous AI Database instance to access vaults and keys.
a. In the Oracle Cloud Infrastructure console, click Identity & Security.
b. Under Identity click Policies.
c. To create a policy, click Create Policy.
d. On the Create Policy page, enter a Name and a Description.
e. On the Create Policy page, select Show manual editor.
f. In the policy builder, add policies and a dynamic group to provide access to the dynamic group on the tenancy with the Autonomous AI Database instance ( Tenancy-1), such that the Autonomous AI Database instance can use the vaults and keys in Tenancy-2. Also need to add policies to allow the user group to access the vault and keys to display information on the Oracle Cloud Infrastructure Console for the Autonomous AI Database instance in a different tenancy.
Use the Policy Builder to create a dynamic group and a policy for vaults and keys.
define tenancy ADBTEN as <*ocid of tenancy-1*>
define dynamic-group REM-ADB-DG as <*ocid of the Dynamic Group in tenancy-1*>
define group REMGROUP as <*group-ocid*>
admit dynamic-group REM-ADB-DG of tenancy ADBTEN to use vaults in tenancy
admit dynamic-group REM-ADB-DG of tenancy ADBTEN to use keys in tenancy
admit group REMGROUP of tenancy ADBTEN to use vaults in tenancy
admit group REMGROUP of tenancy ADBTEN to use keys in tenancy
For example define the following on the remote tenancy to allow the members of the dynamic group
DGKeyCustomer1and the groupREMGROUPto access the remote vaults and keys in the tenancy namedtraining2:define tenancy adbdemo5 as ocid1.tenancy.oc1..aaa_example_4cnl5q define dynamic-group REM-ADB-DG as ocid1.dynamicgroup.oc1..aaa_example_526bia define group REMGROUP as ocid1.group.oc1..aaa_example_6vctn6xsaq admit dynamic-group REM-ADB-DG of tenancy adbdemo5 to use vaults in tenancy admit dynamic-group REM-ADB-DG of tenancy adbdemo5 to use keys in tenancy admit group REMGROUP of tenancy ADBTEN to use vaults in tenancy admit group REMGROUP of tenancy ADBTEN to use keys in tenancy -
Click Create to save the policy.