Loading Data from a Local File to an Existing Table
This feature is not available for MySQL database services.
To load data from a local file to an existing table:
You can also follow the steps in Loading Data from Multiple Local Files into Mutiple Tables to load data to an existing table.
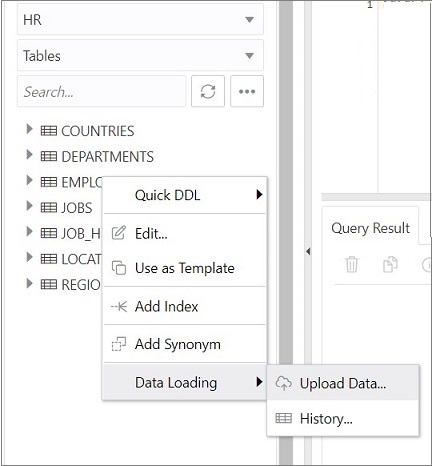
- In the Navigator tab, in the left pane, right-click the table that you want to
load data into, select Data Loading, and then select
Upload Data.

The Import data dialog is displayed.
- Drag and drop the file from your system into the dialog, or click
Select Files to browse for the file and open
it.A preview of the data is displayed in a grid format.
- Click Show/Hide options
 to display options that you can modify for data preview:
- Column names: Select Get from file to display column headers in the first row.
- Encoding: An option to select the encoding type is visible when the loaded file is in plain text format (CSV, TSV, or TXT). The default encoding type is UTF-8.
- Text enclosure and Field delimiter: These options are visible only when the selected file is in plain text format (CSV, TSV, or TXT). Select or enter the character used in the source file for text enclosure and field delimiter.
- Rows to skip: Enter or use the up and down arrows to select the number of rows to skip.
- Rows to load: Enter or use the up and down arrows to select the number of rows to load.
- Preview size: Enter or use the up and down arrows to select the number of rows to preview.
To remove the options selected and the data preview, click Clear.
After selecting the required options, click Apply, and then click Next.
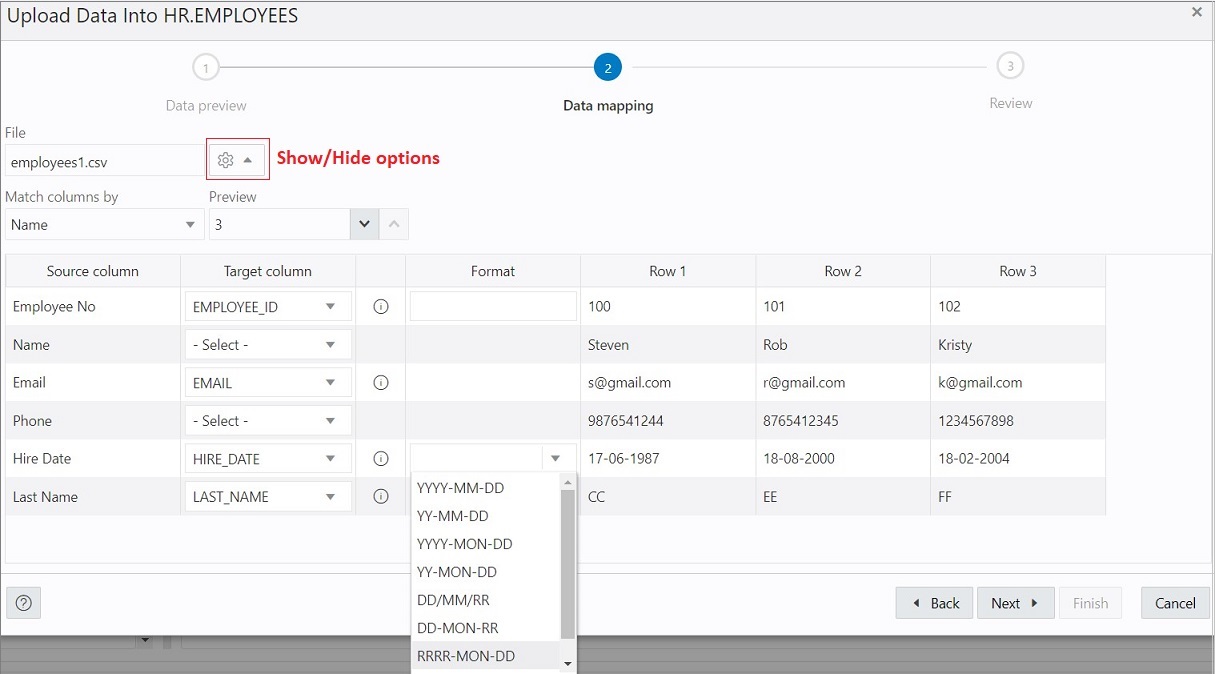
- In Data mapping, match the data in the file to the appropriate columns in the
target table. By default, the matching is done using column name.

To modify, click Show/Hide options
 .
.
In Match columns by:
- Select Name to match columns based on the name of the column in the target table.
- Select Position if you want to match columns based on the position of the column in the target table.
- Select None to remove the current selections and to select the target column for each source column from the drop-down list.
Note
Based on the data in the file, attempts are made to automatically retrieve the correct format mask of date-based columns. If this is incorrect, you can change the suggested format by entering it directly into the target cell.If there are any issues to resolve, you see a notification such as
 on the top right of the dialog.
Click Next.
- A summary of the previous screens is displayed. Click
Finish.
The data will start uploading to the target table. After it is completed, an entry is added to the Log with the status of the operation. To view the Log, click the timestamp notification at the bottom of the page. If the operation is successful, a Data Import Completed notification is displayed.
- For a detailed summary of the upload process, right-click the table in the
Navigator tab, select Data Loading, and then select
History. A summary of the data loaded is displayed in
the Data Loading History dialog.
If any data failed to load, you can view the number of rows in the Failed Rows column. Click the column to open a dialog showing the failed rows.
In the Data Loading History dialog, you can also search for files loaded by schema name, table name, or file name. To remove the loaded files, click Remove all history
 .
.