Configuring the Firewall with Firewalld
This chapter describes the concepts, tools, and methods for configuring the firewall with
firewalld based tools. It also provides examples for displaying the
firewall settings that enforce network security on a system.
firewalld Configuration Tools
You can configure the firewall by using one of the following tools:
-
By using the firewall-cmd command and its several options.
-
By using the Firewall Configuration GUI
To use this tool you must install the
firewall-configpackage first, then start it by using the same command as the package name, for example:sudo dnf install firewall-config
sudo firewall-config &
The command opens the configuration tool, as shown in the following figure: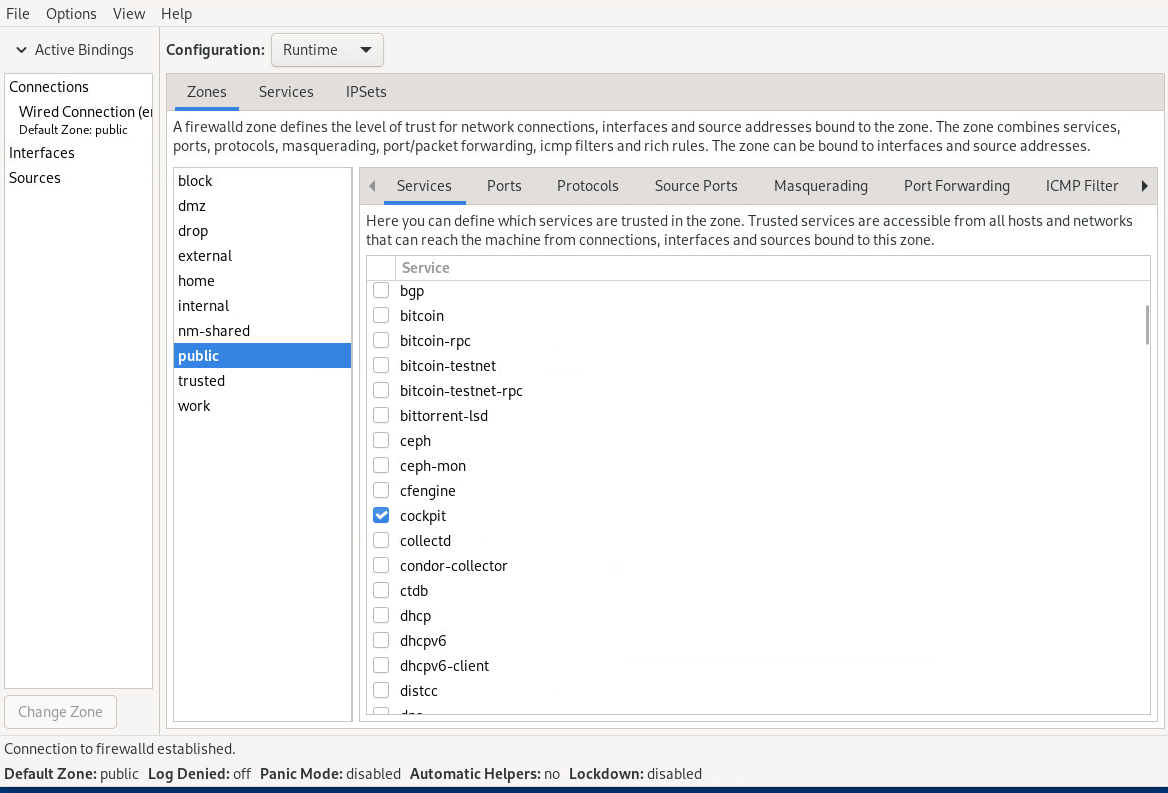
-
Cockpit is a browser-based configuration tool that you can also use to perform firewall configurations. See Oracle Linux: Using the Cockpit Web Console.
Controlling the firewalld Service
In Oracle Linux, the firewall service,
firewalld, is enabled by default. The service is controlled by the
systemctl command.
To start the service:
sudo systemctl unmask firewalld
sudo systemctl start firewalld
To ensure that the service starts automatically when the system starts, run the following command after starting the firewall:
sudo systemctl enable firewalld
To stop the firewall service and prevent it from automatically starting when the system starts, run the following command:
sudo systemctl stop firewalld
sudo systemctl disable firewalld
To prevent the firewall service from being started by other
services or through the firewalld D-Bus
interface, run the following command after disabling the
firewall:
sudo systemctl mask firewalld
To display the current status of the firewall service:
sudo systemctl status firewalld
Do the following:
-
For Oracle Linux 8, the status output resembles:
firewalld.service - firewalld - dynamic firewall daemon Loaded: loaded (/usr/lib/systemd/system/firewalld.service; enabled; vendor preset: enabled) Active: active (running) since Wed 2022-04-20 18:33:59 BST; 2 weeks 5 days ago Docs: man:firewalld(1) Main PID: 4261 (firewalld) Tasks: 3 (limit: 99538) Memory: 4.7M CGroup: /system.slice/firewalld.service └─4261 /usr/libexec/platform-python -s /usr/sbin/firewalld --nofork --nopid -
For Oracle Linux 9, the status output resembles:
firewalld.service - firewalld - dynamic firewall daemon Loaded: loaded (/usr/lib/systemd/system/firewalld.service; enabled; vendor preset: enabled) Active: active (running) since Thu 2022-05-05 08:41:36 GMT; 5 days ago Docs: man:firewalld(1) Main PID: 1155 (firewalld) Tasks: 4 (limit: 93659) Memory: 32.5M CPU: 1.438s CGroup: /system.slice/firewalld.service └─1155 /usr/bin/python3 -s /usr/sbin/firewalld --nofork --nopid -
For Oracle Linux 10, the status output resembles:
firewalld.service - firewalld - dynamic firewall daemon
      Loaded: loaded (/usr/lib/systemd/system/firewalld.service; enabled; vendor preset: enabled)
      Active: active (running) since Thu 2025-01-04 08:41:36 GMT; 5 days ago
        Docs: man:firewalld(1)
    Main PID: 1155 (firewalld)
       Tasks: 4 (limit: 93659)
      Memory: 32.5M
         CPU: 1.438s
      CGroup: /system.slice/firewalld.service
         └─1155 /usr/bin/python3 -s /usr/sbin/firewalld --nofork --nopid
About Zones and Services
Firewall security is implemented through the concepts of zones and services.
Zones are predefined sets of filtering rules that correspond to
levels of trust for network access. You can add to the default
filtering rules of a zone by reconfiguring the zone's settings
and therefore refine the zone's control of traffic flow. When
you install Oracle Linux, a default zone called
public is automatically assigned to the
system.
Firewall rules are applied through services that are assigned to a zone. The service ports are the access points of network traffic. Services assigned to a zone automatically have their ports opened to receive and send network packets.
For more information about zones and firewall-related services,
see the firewalld.zone(5) and the
firewalld.service(5) manual pages.
Displaying Information About Zones
When you configure the firewall for zones, displaying the current zone and service settings and other information as part of the configuration steps is a good practice. With this approach you can monitor the changes you're introducing to the firewall and identify potential errors that would make the changes invalid.
To display the system's default zone, run the following command:
firewall-cmd --get-default
List all the predefined zones that are included in the installation as follows:
firewall-cmd --get-zones
Do the following:
-
For Oracle Linux 8, the output is:
block dmz drop external home internal public trusted work
-
For Oracle Linux 9 and Oracle Linux 10, the output is:
block dmz drop external home internal nm-shared public trusted work
You can configure any zone in the list. As you change settings of a particular zone, that zone becomes an active zone. To identify the active zone, type the following:
firewall-cmd --get-active-zone
By default, all configurations are implemented on the default zone. Note also that an active zone isn't necessarily the default zone. Therefore, you must specify the zone name in the command to define settings for that specific zone. Otherwise, the definitions are applied to the default zone.
Displaying Zone Settings
To obtain the settings of a zone:
sudo firewall-cmd --list-all [--zone=zonename]
Without specifying a zone, the command displays the settings of the default zone. Thus, to
list the settings of the work zone, you would use the following command;
sudo firewall-cmd --list-all --zone=work
work
  target: default
  icmp-block-inversion: no
  interfaces:
  sources:
  services: cockpit dhcpv6-client ssh
  ports:
  protocols:
  forward: yes
  masquerade: no
  forward-ports:
  source-ports:
  icmp-blocks:
  rich rules:
Configuring firewalld Zones
The following tasks describe how to use the
firewall-cmd command to configure firewall
rules for a zone. The rules are then recorded in the
/etc/firewalld hierarchy for
firewalld.
Configuring the firewall means setting all or some of a zone settings to specific values to enable the firewall to control network traffic according to specifications.
Controlling Access to Services
Setting the services of a zone is the default way to configure the
firewall. Each zone has predefined services assigned to it. To configure this setting further,
you either add services to the zone or remove services from the zone.
To list predefined services, use the firewall-cmd --list-services command.
For example, the following command shows that the work zone has the
cockpit, dhcpv6-client, and ssh services
assigned to it:
sudo firewall-cmd --list-services --zone=work
cockpit dhcpv6-client ssh
To open access to a new service, use the --add-service
service option. Optionally, include the --permanent option
to make the rule persistent across reboots.
For example, to add the HTTP and NFS services to the
work zone, you would use the following
command:
sudo firewall-cmd --permanent --zone=work --add-service=http --add-service=nfs
sudo firewall-cmd --list-services --zone=work
cockpit dhcpv6-client ssh http nfs
To remove access to a service, use the
--remove-service
service option:
sudo firewall-cmd --permanent --zone=work --remove-service=cockpit
sudo firewall-cmd --list-services --zone=work
dhcpv6-client ssh http nfs
Controlling Access to Ports
Network traffic through the zone's services uses the ports of those services. Ports must be opened to accept traffic. You can open more ports for network access by specifying the port number and the associated protocol.
The --list-ports option lists the ports and associated protocols to which
you have explicitly allowed access. However, ports that have been opened as a service aren't
included in this command's output. Therefore, when listing ports, the best practice is to use
the --list-all option to obtain more complete information.
Use the --add-port option to allow access
to specific ports. Ports must be specified by using the format
port-number/port-type.
Port types can be tcp,
udp, sctp, or
dccp. Ensure that the type and the network
traffic match, for example:
sudo firewall-cmd --permanent --zone=work --add-port=5353/udp --add-port=3689/tcp
sudo firewall-cmd --list-all --zone=work
work
  target: default
  icmp-clock-inversion: no
  interfaces:
  sources:
  services: dhcpv6-client ssh http nfs
  ports: 5353/udp 3689/tcp
...
Similarly, the --remove-port option removes access to a port. Remember to
use the --permanent option to make the change persist.
For more information, see the
firewall-cmd(1) manual page.
Assigning a Network Interface to a Zone
A system's network interface is automatically assigned to the default zone. In Oracle Linux, you can configure multiple zones with their specific services, ports, and so on. You then activate a specific zone's rules to become operative by assigning the interface to that zone. Thus, you have the flexibility to easily change the firewall rules that are active on the system by reassigning the network interface.
Suppose that you want to activate the firewall configuration
of the work zone. You would assign the
interface to the zone as follows:
sudo firewall-cmd --zone=work --change-interface=enp0s1
firewall-cmd --get-active-zone
work
  interfaces: enp0s1
You don't need to use the --permanent option to make the setting persist
across reboots. If you set the zone to be the default zone, as explained in Changing the Default Zone, then the
interface reassignment becomes permanent.
Changing the Default Zone
You can change a system's default zone as follows:
sudo firewall-cmd --set-default-zone=work
You can also verify that the changes have been applied:
firewall-cmd --get-default-zone
To display the entire and final results of the configuration:
sudo firewall-cmd --zone=work --list-all
work (active)
  target: default
  interfaces:  enp0s1
  sources:
  services: dhcpv6-client ssh http nfs
  ports: 5353/udp 3689/tcp
...
Setting a Default Rule for Controlling Incoming Traffic
The target setting establishes the default
behavior of the firewall when managing incoming traffic. This
zone setting is automatically configured to
default for all the predefined zones. To
change the default behavior of a zone, use the following
command;
sudo firewall-cmd --zone=zone-name --set-target=ACCEPT|REJECT|DROP
You can specify the following options:
-
ACCEPTaccpets all incoming traffic except those you have set to be rejected in another rule. -
REJECTblocks all incoming traffic except those you have allowed in another rule. The source machine is informed about the rejecion. -
DROPis similar toREJECTbut no notice of the rejection is sent to the source machine.
Managing Incoming Traffic Based on Sources
You can manage incoming traffic to a zone based on the traffic source. The two following two zone settings enable you to specify the origin of the packets:
-
sourceidentifies the sending node or network. -
source-portsidentifies the port from which traffic originates.
To accept incoming traffic from a sending node, use the following command:
sudo firewall-cmd --zone=zone-name --add-source=IP-address
Note that the IP address can include the netmask in CIDR
notation, such as 192.0.2.0/24.
Run the following command to transform the current runtime ruleset to a permanent ruleset:
sudo firewall-cmd --runtime-to-permanent
Omit this command if you're setting a temporary configuration that's dropped if the system is rebooted.
The following similar syntax is used to set the source-port setting:
sudo firewall-cmd --zone=<zone-name> --add-source-port=<portid>/<protocol>
tcpudpsctpdccp
You can combine different settings to configure the firewall. The trusted
zone can be configured to accept HTTP traffic from the 192.0.2.0 network
source, as shown in the following example:
sudo firewall-cmd --zone=trusted --add-source=192.0.2.0/24
sudo firewall-cmd --zone=trusted --add-service=http
sudo firewall-cmd --zone=trusted --list-all
trusted (active)
  target: ACCEPT
  sources: 192.0.2.0/24
  services: http
Creating Customized Zones
You can create zones and then configure the zone's settings for a customized firewall protection.
Using the firewall-cmd Command
As shown in the following example, you can use the firewall-cmd CLI
to create an empty zone, which means that no default services are assigned. When configuring a
customized zone, you must always include the --permanent option in the
command. Otherwise, an error message is generated.
sudo firewall-cmd --permanent --new-zone=testzone
sudo firewall-cmd --permanent --get-zones
Do the following:
-
For Oracle Linux 8, the output is:
block dmz drop external home internal testzone public trusted work
-
For Oracle Linux 9 and Oracle Linux 10, the output is:
block dmz drop external home internal nm-shared public testzone trusted work
sudo firewall-cmd --permanent --info-zone=testzone
testzone
  target: default
  icmp-block-inversion: no
  interfaces:
  sources:
  services:
  ports:
  protocols:
  masquerade: no
  forward-ports:
  source-ports:
  icmp-blocks:
  rich rules:
Without the --permanent option, the
--get-zones option does not display the
created zone.
The
--info-zone=zone-name
option generates the same output as the
--list-all option.
To make this zone creation persistent, add the following command:
sudo firewall-cmd --runtime-to-permanent
After creating the zone, you can add services, ports, assign interfaces, and so on, by using the command options that are provided in the previous examples:
sudo firewall-cmd --zone=testzone --add-service=http
Error: INVALID ZONE: testzone
sudo firewall-cmd --permanent --zone=testzone --add-service=http
Ensure that you use the --permanent option when using these commands.
Using a Zone Configuration File
All zones have corresponding configuration files. For the
predefined zones that are installed with the operating system,
the configuration files are in the
/usr/lib/firewalld/zones directory.
When you configure a predefined zone, the configuration file
is copied to the /etc/firewalld/zones
directory and the changes are stored in that location. If you
use a configuration file to create new zones, you must also
use /etc/firewalld/zones as the working
directory.
If you're creating a zone with only minor differences from the settings of predefined zones, copying an existing configuration file to the working directory is the easiest approach. You can use either of the following commands:
sudo cp /etc/firewalld/zones/existing-conf-file.xml new-zone.xml
sudo cp /usr/lib/firewalld/zones/existing-conf-file.xml /etc/firewalld/zones/new-zone.xml
Then, using a text editor, revise the settings in the new configuration file. The following
example shows what the configuration file of testzone might contain.
testzone accepts traffic for one service (SSH) and one port range for the
TCP and UDP protocols:
<?xml version="1.0" encoding="utf-8"?>
<zone>
  <short>testzone</short>
  <description>Put description here</description>
    <service name="ssh"/>
    <port port="1025-65535" protocol="tcp"/>
    <port port="1025-65535" protocol="udp"/>
</zone>