Using Systemd to Manage Control Groups
Introduces cgroups concepts in Oracle Linux and shows how systemd organizes and manages resource control.
Control groups, referred to as cgroups, are an Oracle Linux kernel feature that organizes systemd
services, and if required, individual processes (PIDs), into hierarchical
groups for allocating system resources, such as CPU, memory, and I/O.
For example, if you need to divide CPU resource among three systemd services,
myservice1.service, myservice2.service, and
myservice3.service, in a ratio of 150:100:50, you can use the
systemd tools to assign each service's corresponding
cgroup a CPU weight that matches its target share.
systemd is responsible for creating and managing its
cgroups in the /sys/fs/cgroup/ virtual file system.
The systemd suite provides safe, high-level ways to configure
cgroup resources, such as using drop-in files or the systemctl
set-property command. Direct modification of systemd objects in the
/sys/fs/cgroup/ virtual file system is not recommended.
By default, systemd creates a cgroup for the following:
-
Each
systemdservice set up on the host.For example, a server might have control group
NetworkManager.serviceto group processes owned by theNetworkManagerservice, and control groupfirewalld.serviceto group processes owned by thefirewalldservice, and so on. -
Each user (
UID) on the host.
The cgroup functionality is mounted as a virtual file system under /sys/fs/cgroup.
Each cgroup has a corresponding folder within /sys/fs/cgroup file system. For example, the cgroups created by systemd for the services it manages can be seen by running the command ls -l /sys/fs/cgroup/system.slice | grep ".service" as shown in the following sample code block:
ls -l /sys/fs/cgroup/system.slice | grep ".service"
...root root 0 Mar 22 10:47 atd.service
...root root 0 Mar 22 10:47 auditd.service
...root root 0 Mar 22 10:47 chronyd.service
...root root 0 Mar 22 10:47 crond.service
...root root 0 Mar 22 10:47 dbus-broker.service
...root root 0 Mar 22 10:47 dtprobed.service
...root root 0 Mar 22 10:47 firewalld.service
...root root 0 Mar 22 10:47 httpd.service
...You can also create custom cgroups outside of the systemd branches, for
example under a location such as /sys/fs/cgroup/MyGroups/, and assign
process IDs (PIDs) to different cgroups according to the
system needs. However, this approach should only be used for specific scenarios, such as
temporary debugging or testing. For most use cases, we recommend using
systemd to configure cgroups to ensure correct and
persistent resource management.
Oracle Linux provides two types of control groups:
- Control groups version 1 (
cgroups v1) -
These groups provide a per-resource controller hierarchy.
Each resource, such as CPU, memory, I/O, and so on, has its own control group hierarchy. A disadvantage of this group is the difficulty of establishing proper coordination of resource use among groups that might belong to different process hierarchies.
- Control groups version 2 (
cgroups v2) -
These groups provide a single control group hierarchy against which all resource controllers are mounted. In this hierarchy, you can obtain better proper coordination of resource uses across different resource controllers. This version is an improvement over
cgroups v1whose over flexibility prevented proper coordination of resource use among the system consumers.
Oracle Linux 8 includes both versions, with cgroups v1 enabled and mounted by default. Oracle Linux 9 also provides both versions but enables and mounts cgroups v2 by default.
Oracle Linux 10 offers only the control groups version 2 implementation. cgroups v1 is deprecated and not available. cgroups v2 is enabled and mounted by default.
For more information about control groups, see the cgroups(7) and
sysfs(5) manual pages.
About Control Groups and systemd
Control groups can be used by the systemd system and service manager for resource management. systemd uses these groups to organize units and services that consume resources. For more information about systemd, see Managing the System With systemd.
systemd provides different unit types, three of which are for resource control purposes:
-
Service: A process or a group of processes whose settings are based on a unit configuration file. Services encompass specified processes in a "collection" so that
systemdcan start or stop the processes as one set. Service names follow the formatname.service. -
Scope: A group of externally created processes, such as user sessions, containers, virtual machines, and so on.
Similar to services, scopes encapsulate these created processes and are started or stopped by the arbitrary processes and then registered by
systemdat runtime. Scope names follow the formatname.scope. -
Slice: A group of hierarchically organized units in which services and scopes are located.
Thus, slices themselves don't contain processes. Rather, the scopes and services in a slice define the processes. Every name of a slice unit corresponds to the path to a location in the hierarchy. Root slices, typically
user.slicefor all user-based processes andsystem.slicefor system-based processes, are automatically created in the hierarchy. Parent slices exist immediately below the root slice and follow the formatparent-name.slice. These root slices can then have subslices on multiple levels.
The service, the scope, and the slice units directly map to objects in the control group hierarchy. When these units are activated, they map directly to control group paths that are built from the unit names. To display the mapping between the systemd resource unit types and control groups, type:
sudo systemd-cglsWorking directory /sys/fs/cgroup:
├─user.slice (#1243)
│ → trusted.invocation_id: 50ce3909b2644f919ee420adc39edb4b
│ ├─user-1001.slice (#4167)
│ │ → trusted.invocation_id: 02e80a960d4549a7a9c69ce0fb546c26
│ │ ├─session-2.scope (#4405)
│ │ │ ├─2417 sshd: alice [priv]
│ │ │ ├─2430 sshd: alice@pts/0
│ │ │ ├─2431 -bash
│ │ │ ├─2689 sudo systemd-cgls
│ │ │ ├─2691 systemd-cgls
│ │ │ └─2692 less
...
│ └─user@984.service … (#3827)
│ → trusted.delegate: 1
│ → trusted.invocation_id: 09b47ce9f3124239b75814114353f3f2
│ └─init.scope (#3861)
│ ├─2058 /usr/lib/systemd/systemd --user
│ └─2099 (sd-pam)
├─init.scope (#19)
│ └─1 /usr/lib/systemd/systemd --switched-root --system --deserialize 17
└─system.slice (#53)
...
├─chronyd.service (#2467)
│ → trusted.invocation_id: c0f77aaa9c7844e6bef6a6898ae4dd56
│ └─1358 /usr/sbin/chronyd -F 2
├─auditd.service (#2331)
│ → trusted.invocation_id: 756808add6a348609316c9e8c1801846
│ └─1310 /sbin/auditd
├─tuned.service (#3079)
│ → trusted.invocation_id: 2c358135fc46464d862b05550338d4f4
│ └─1415 /usr/bin/python3 -Es /usr/sbin/tuned -l -P
├─systemd-journald.service (#1651)
│ → trusted.invocation_id: 7cb7ccb14e044a899aadf47bbb583ada
│ └─977 /usr/lib/systemd/systemd-journald
├─atd.service (#3623)
│ → trusted.invocation_id: 597a7a4e5646468db407801b8562d869
│ └─1915 /usr/sbin/atd -f
├─sshd.service (#3419)
│ → trusted.invocation_id: 490504a683fc4311ab0fbeb0864a1a34
│ └─1871 sshd: /usr/sbin/sshd -D [listener] 0 of 10-100 startups
...For an example of how to use systemd commands such as systemctl to manage resources, see Controlling Access to System Resources. For further technical details, see the systemctl(1), systemd-cgls(1), and systemd.resource-control(5) manual pages.
Using systemd to Manage cgroups v2
Shows how systemd structures cgroups v2 for services and users and how to inspect the hierarchy.
The preferred method of managing resource allocation with cgroups v2 is
to use the control group functionality provided by systemd.
For information on enabling cgroups v2 functionality on the system, see Managing Resources Using Control Groups
By default, systemd creates a cgroup folder for each
systemd service set up on the host. systemd names
these folders using the format servicename.service,
where servicename is the name of the service associated with the
folder.
To see a list of the cgroup folders systemd creates for
the services, run the ls command on the
system.slice branch of the cgroup file
system as shown in the following sample code block:
ls /sys/fs/cgroup/system.slice/
... ... ...
app_service1.service cgroup.subtree_control httpd.service
app_service2.service chronyd.service ...
... crond.service ...
cgroup.controllers dbus-broker.service ...
cgroup.events dtprobed.service ...
cgroup.freeze firewalld.service ...
... gssproxy.service ...
... ... ...In the preceding command block:
-
The folders app_service1.
serviceand app_service2.servicerepresent custom application services that might run on the system.
In addition to service control groups, systemd also creates a
cgroup folder for each user on the host.
To see the
cgroups created for each user you can run the ls
command on the user.slice branch of the cgroup
file system as shown in the following sample code block:
ls /sys/fs/cgroup/user.slice/
cgroup.controllers cgroup.subtree_control user-1001.slice
cgroup.events cgroup.threads user-982.slice
cgroup.freeze cgroup.type ...
... ... ...
... ... ...
... ... ...In the preceding code block:
-
Each user
cgroupfolder is named using the formatuser-UID.slice. So, control groupuser-1001.sliceis for a user whoseUIDis 1001, for example.
systemd provides high-level access to the cgroups and
kernel resource controller features so you don't have to access the file system
directly.
For example, to set the CPU weight of a service called
app_service1.service, run the systemctl
set-property command as follows:
sudo systemctl set-property app_service1.service CPUWeight=150Thus, systemd enables you to manage resource distribution at an
application level, rather than the process PID level used when configuring
cgroups without using systemd functionality.
About Slices and Resource Allocation in systemd
This section looks at the way systemd initially divides each of the default kernel controllers, for example CPU, memory and blkio, into portions called "slices" as illustrated by the following example pie chart:
You can also create custom slices for resource distribution, as shown in section Setting Resource Controller Options and Creating Custom Slices.
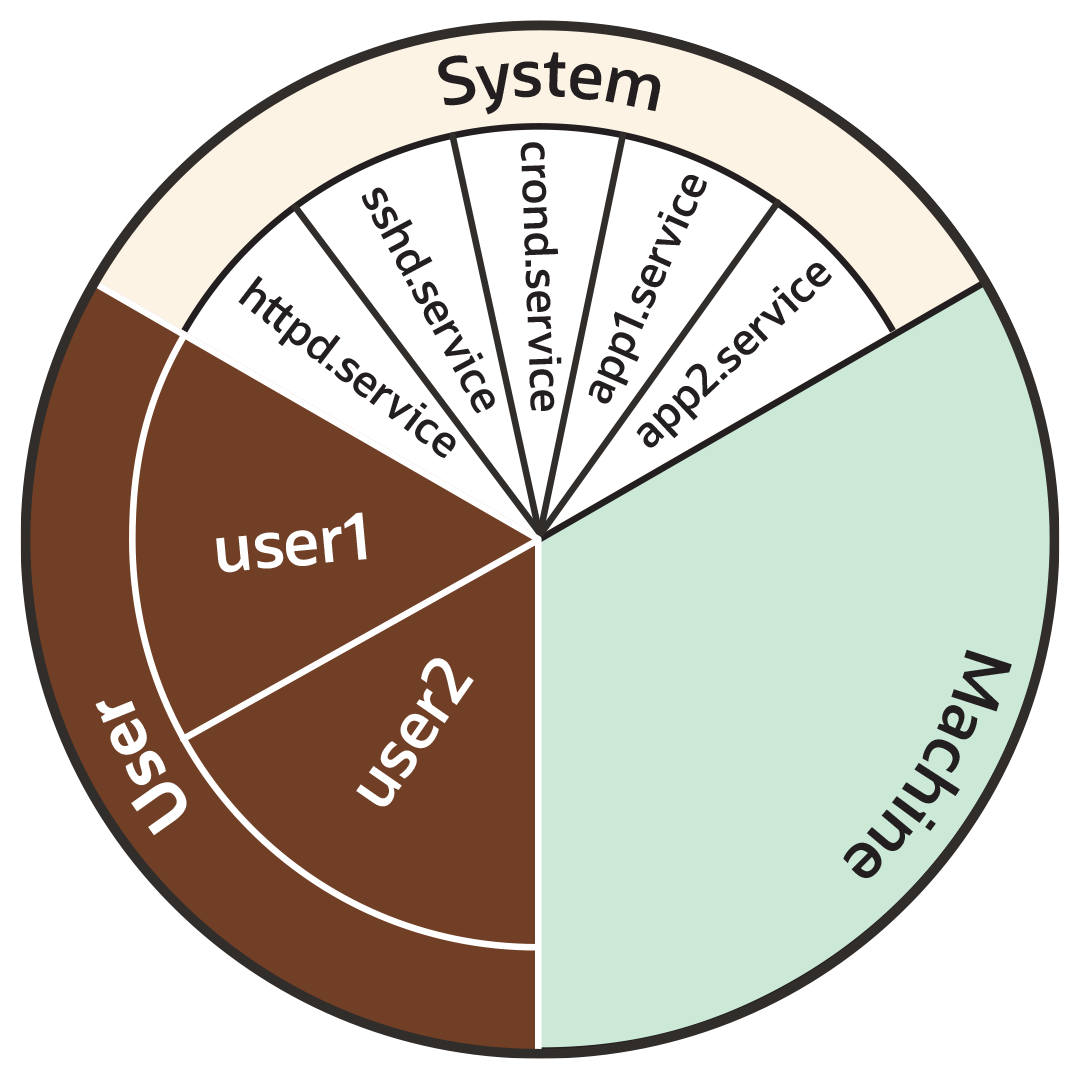
As the preceding pie chart shows, by default each resource controller is divided equally between the following 3 slices:
-
System (
system.slice). -
User (
user.slice). -
Machine (
machine.slice).
The following list looks at each slice more closely. For the purposes of discussion, the examples in the list focus on the CPU controller.
- System (
system.slice) -
This resource slice is used for managing resource allocation amongst daemons and service units.
As shown in the preceding example pie chart, the system slice is divided into further sub-slices. For example, in the case of CPU resources, we might have sub-slice allocations within the system slice that include the following:-
httpd.service(CPUWeight=100) -
sshd.service(CPUWeight=100) -
crond.service(CPUWeight=100) -
app1.
service(CPUWeight=100) -
app2.
service(CPUWeight=100)
serviceand app2.servicerepresent custom application services that might run on the system. -
- User (
user.slice) - This resource slice is used for managing resource allocation amongst user sessions. A single slice is created for each
UIDirrespective of how many logins the associated user has active on the server. Continuing with our pie chart example, the sub-slices might be as follows:-
user1 (
CPUWeight=100,UID=982) -
user2 (
CPUWeight=100,UID=1001)
-
- Machine (
machine.slice) - This slice of the resource is used for managing resource allocation amongst hosted virtual machines, such as KVM guests, and Linux Containers. The machine slice is only present on a server if the server is hosting virtual machines or Linux Containers.
Share allocations don't set a maximum limit for a resource.
In the preceding examples, the slice user.slice has 2 users: user1 and user2. Each user is allocated an equal share of the CPU resource available to the parent user.slice. However, if the processes associated with user1 are idle, and don't require any CPU resource, then its CPU share is available for allocation to user2 if needed. In such a situation, user2 might even be allocated the entire CPU resource apportioned to the parent user.slice if it's required by other users.
To cap CPU resource, you would need to set the CPUQuota property to the required percentage.
Slices, Services, and Scopes in the cgroup Hierarchy
The pie chart analogy used in the preceding sections is a helpful way to conceptualize
the division of resources into slices. However, in terms of structural organization, the
control groups are arranged in a hierarchy. You can view the systemd
control group hierarchy on the system by running the systemd-cgls
command as follows:
To see the entire cgroup hierarchy, starting from the root slice -.slice, as in the following example, ensure you run systemd-cgls from outside of the control group mount point /sys/fs/cgroup/.
Otherwise, If you run the command from within /sys/fs/cgroup/, the output starts from the cgroup location from which the command was run. See systemd-cgls(1) for more information.
systemd-cglsControl group /:
-.slice
...
├─user.slice (#1429)
│ → user.invocation_id: 604cf5ef07fa4bb4bb86993bb5ec15e0
│ ├─user-982.slice (#4131)
│ │ → user.invocation_id: 9d0d94d7b8a54bcea2498048911136c8
│ │ ├─session-c1.scope (#4437)
│ │ │ ├─2416 /usr/bin/sudo -u ocarun /usr/libexec/oracle-cloud-agent/plugins/runcommand/runcommand
│ │ │ └─2494 /usr/libexec/oracle-cloud-agent/plugins/runcommand/runcommand
│ │ └─user@982.service … (#4199)
│ │ → user.delegate: 1
│ │ → user.invocation_id: 37c7aed7aa6e4874980b79616acf0c82
│ │ └─init.scope (#4233)
│ │ ├─2437 /usr/lib/systemd/systemd --user
│ │ └─2445 (sd-pam)
│ └─user-1001.slice (#7225)
│ → user.invocation_id: ce93ad5f5299407e9477964494df63b7
│ ├─session-2.scope (#7463)
│ │ ├─20304 sshd: oracle [priv]
│ │ ├─20404 sshd: oracle@pts/0
│ │ ├─20405 -bash
│ │ ├─20441 systemd-cgls
│ │ └─20442 less
│ └─user@1001.service … (#7293)
│ → user.delegate: 1
│ → user.invocation_id: 70284db060c1476db5f3633e5fda7fba
│ └─init.scope (#7327)
│ ├─20395 /usr/lib/systemd/systemd --user
│ └─20397 (sd-pam)
├─init.scope (#19)
│ └─1 /usr/lib/systemd/systemd --switched-root --system --deserialize 28
└─system.slice (#53)
...
├─dbus-broker.service (#2737)
│ → user.invocation_id: 2bbe054a2c4d49809b16cb9c6552d5a6
│ ├─1450 /usr/bin/dbus-broker-launch --scope system --audit
│ └─1457 dbus-broker --log 4 --controller 9 --machine-id 852951209c274cfea35a953ad2964622 --max-bytes 536870912 --max-fds 4096 --max-matches 131072 --audit
...
├─chronyd.service (#2805)
│ → user.invocation_id: e264f67ad6114ad5afbe7929142faa4b
│ └─1482 /usr/sbin/chronyd -F 2
├─auditd.service (#2601)
│ → user.invocation_id: f7a8286921734949b73849b4642e3277
│ ├─1421 /sbin/auditd
│ └─1423 /usr/sbin/sedispatch
├─tuned.service (#3349)
│ → user.invocation_id: fec7f73678754ed687e3910017886c5e
│ └─1564 /usr/bin/python3 -Es /usr/sbin/tuned -l -P
├─systemd-journald.service (#1837)
│ → user.invocation_id: bf7fb22ba12f44afab3054aab661aedb
│ └─1068 /usr/lib/systemd/systemd-journald
├─atd.service (#3961)
│ → user.invocation_id: 1c59679265ab492482bfdc9c02f5eec5
│ └─2146 /usr/sbin/atd -f
├─sshd.service (#3757)
│ → user.invocation_id: 57e195491341431298db233e998fb180
│ └─2097 sshd: /usr/sbin/sshd -D [listener] 0 of 10-100 startups
├─crond.service (#3995)
│ → user.invocation_id: 4f5b380a53db4de5adcf23f35d638ff5
│ └─2150 /usr/sbin/crond -n
...
The preceding sample output shows how all "*.slice" control groups reside under the root slice -.slice. Beneath the root slice you can see the user.slice and system.slice control groups, each with their own child cgroup sub-slices.
Examining the systemd-cgls command output you can see how, except for
root -.slice , all processes are on leaf nodes. This arrangement is
enforced by cgroups v2, in a rule called the "no internal processes"
rule. See cgroups (7) for more information about the "no internal
processes" rule.
The output in the preceding systemd-cgls command example also shows how slices can have descendent child control groups that are systemd scopes. systemd scopes are reviewed in the following section.
systemd Scopes
systemd scope is a systemd unit type that groups together system service worker processes that have been launched independently of systemd. The scope units are transient cgroups created programmatically using the bus interfaces of systemd.
For example, in the following sample code, the user with UID 1001 has run the systemd-cgls command, and the output shows session-2.scope has been created for processes the user has spawned independently of systemd (including the process for the command itself , 21380 sudo systemd-cgls):
In the following example, the command has been run from within the control group mount point
/sys/fs/cgroup/. Hence, instead of the root slice, the output starts from the cgroup location from which the command was run.sudo systemd-cglsWorking directory /sys/fs/cgroup:
...
├─user.slice (#1429)
│ → user.invocation_id: 604cf5ef07fa4bb4bb86993bb5ec15e0
│ → trusted.invocation_id: 604cf5ef07fa4bb4bb86993bb5ec15e0
...
│ └─user-1001.slice (#7225)
│ → user.invocation_id: ce93ad5f5299407e9477964494df63b7
│ → trusted.invocation_id: ce93ad5f5299407e9477964494df63b7
│ ├─session-2.scope (#7463)
│ │ ├─20304 sshd: oracle [priv]
│ │ ├─20404 sshd: oracle@pts/0
│ │ ├─20405 -bash
│ │ ├─21380 sudo systemd-cgls
│ │ ├─21382 systemd-cgls
│ │ └─21383 less
│ └─user@1001.service … (#7293)
│ → user.delegate: 1
│ → trusted.delegate: 1
│ → user.invocation_id: 70284db060c1476db5f3633e5fda7fba
│ → trusted.invocation_id: 70284db060c1476db5f3633e5fda7fba
│ └─init.scope (#7327)
│ ├─20395 /usr/lib/systemd/systemd --user
│ └─20397 (sd-pam)Setting Resource Controller Options and Creating Custom Slices
Demonstrates three approaches—unit files, drop-ins, and systemctl set-property—for fine-tuning resource controllers and slice layouts.
systemd provides the following methods for setting resource controller
options, such as CPUWeight, CPUQuota, and so on, to
customize resource allocation on the system:
-
Using service unit files.
-
Using drop-in files.
-
Using the
systemctl
          set-property
command.
The following sections provide example procedures for using each of these methods to configure resources and slices in the system.
Using Service Unit Files
To set options in a service unit file, perform the following steps:
Using Drop-in Files
To use a drop-in file to configure resources, perform the following steps:
Using systemctl set-property
The systemctl set-property command places the configuration files under the following location:
/etc/systemd/system.controlYou must not manually edit the files systemctl set-property command creates.
The systemctl set-property command doesn't recognize every
resource-control property used in the system-unit and drop-in files covered
earlier in this topic.
The following procedure shows how you can use the systemctl
set-property command to configure resource allocation: