Powering On Private Cloud Appliance for the First Time
When the rack is in its allocated space and connected to the data center network, follow the instructions in this section to power on Private Cloud Appliance for the first time.
Before you begin, review the safety guidelines in Preparing the Installation Site.
Inspecting the Appliance
Follow these steps to visually inspect your Private Cloud Appliance after it is physically installed at your site, and prior to power being applied to the system.
-
Check for rack damage.
-
Check the rack for loose or missing screws.
-
Check your Private Cloud Appliance for the ordered configuration. Refer to the Customer Information Sheet (CIS) on the side of the packaging. Retain this information so you can confirm all of the components are discovered during system initialization.
Note
Private Cloud Appliance is preconfigured by Oracle as a self-contained system. You should not move any equipment or add any unsupported hardware to the system.
-
Check that all cable connections are secure and firmly in place as follows:
-
Check the power cables. Ensure that the correct connectors have been supplied for the data center facility power source.
-
Check the network data cables.
-
-
Check the site location tile arrangement for cable access and airflow
-
Check the data center airflow that leads in to the front of the system.
For more information, see Environmental Requirements (Ventilation and Cooling).
Connecting the Power Cords
Follow these steps to connect power cords to your Private Cloud Appliance.
-
Open the rear cabinet door.
-
Ensure that the correct power connectors have been supplied.
-
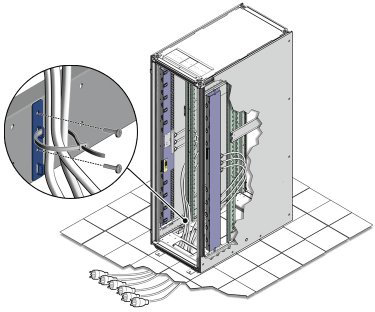
Unfasten the power cord cable ties. The ties are for shipping only and are no longer needed.
-
Route the power cords to the facility receptacles either above the rack or below the flooring.
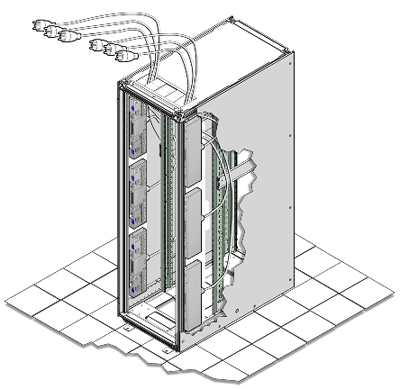
-
Secure the power cords in bundles.
-
Plug the power distribution unit (PDU) power cord connectors into the facility receptacles. Ensure the breaker switches are in the OFF position before connecting the power cables.
Applying Power to the System
Follow these steps to power on your Private Cloud Appliance.
You can connect to the appliance using a network connection to monitor the system power-on procedure. For instructions, see Connecting a Workstation to the System.
-
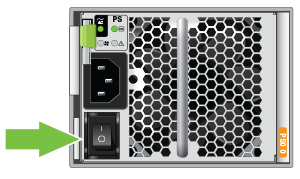
Ensure that the power switches located on the rear left and right side power supplies of the Oracle Storage Drive Enclosure DE3-24C and Oracle Storage Drive Enclosure DE3-24P are in the ON (|) position.
-
Switch on the power distribution unit (PDU) circuit breakers located on the rear of PDU A and B inside the rack. The circuit breakers are on the rear of the system cabinet as shown below. Press the ON (|) side of the toggle switch.
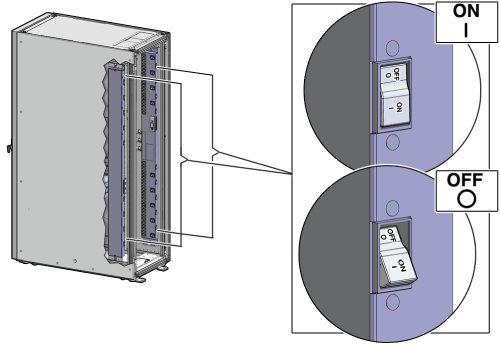
After power is applied, the LEDs on the all of the compute nodes and storage server heads will start to blink after approximately two minutes. From the rear of the rack, you can see the green LEDs on the power supply units (PSUs) on the compute nodes turn on instantly after power is applied. In addition, from the rear of the rack, you can see the display on the power distribution units (PDUs) illuminate once power is available.
Note
Allow 20 minutes for the storage controllers to come online before powering on each management node.
-
Press the Power button located on the front of each management node.
The first management node is located in rack unit 5 (U5). The second management node is located in rack unit 6 (U6), and the third management node is located in rack unit 7 (U7). A management nodes take approximately five to ten minutes to power on completely. Once complete, the Power/OK LED illuminates and remains a steady green.
The management nodes will verify all components within the system. The management nodes ensure that the correct networking switches and storage devices are installed in the system, and search for compute nodes to power on and add to the compute fabric.
Depending on your system configuration, powering on the compute nodes and bringing them to the ready-to-provision state should take approximately 10 minutes per compute node. Do not power cycle the management nodes during the discovery period. Proceed to configuring the appliance.
Caution
Once powered on, do not power down the management nodes until you have completed the initial configuration process described in Completing the Initial Setup and Configuration.