Workflow: Save an Oracle Radio Channel Subscription
Discover a channel, save it for your Radio user, and verify the saved subscription in the Radio app or through REST requests.
Use this workflow to retain a channel selection independently of a live connection. In the browser application, Join saves the subscription and starts listening. Saving through REST only records membership; the client must separately join a live WebSocket channel. Neither action starts transmitting audio. For live API communication, use the separate join workflow.
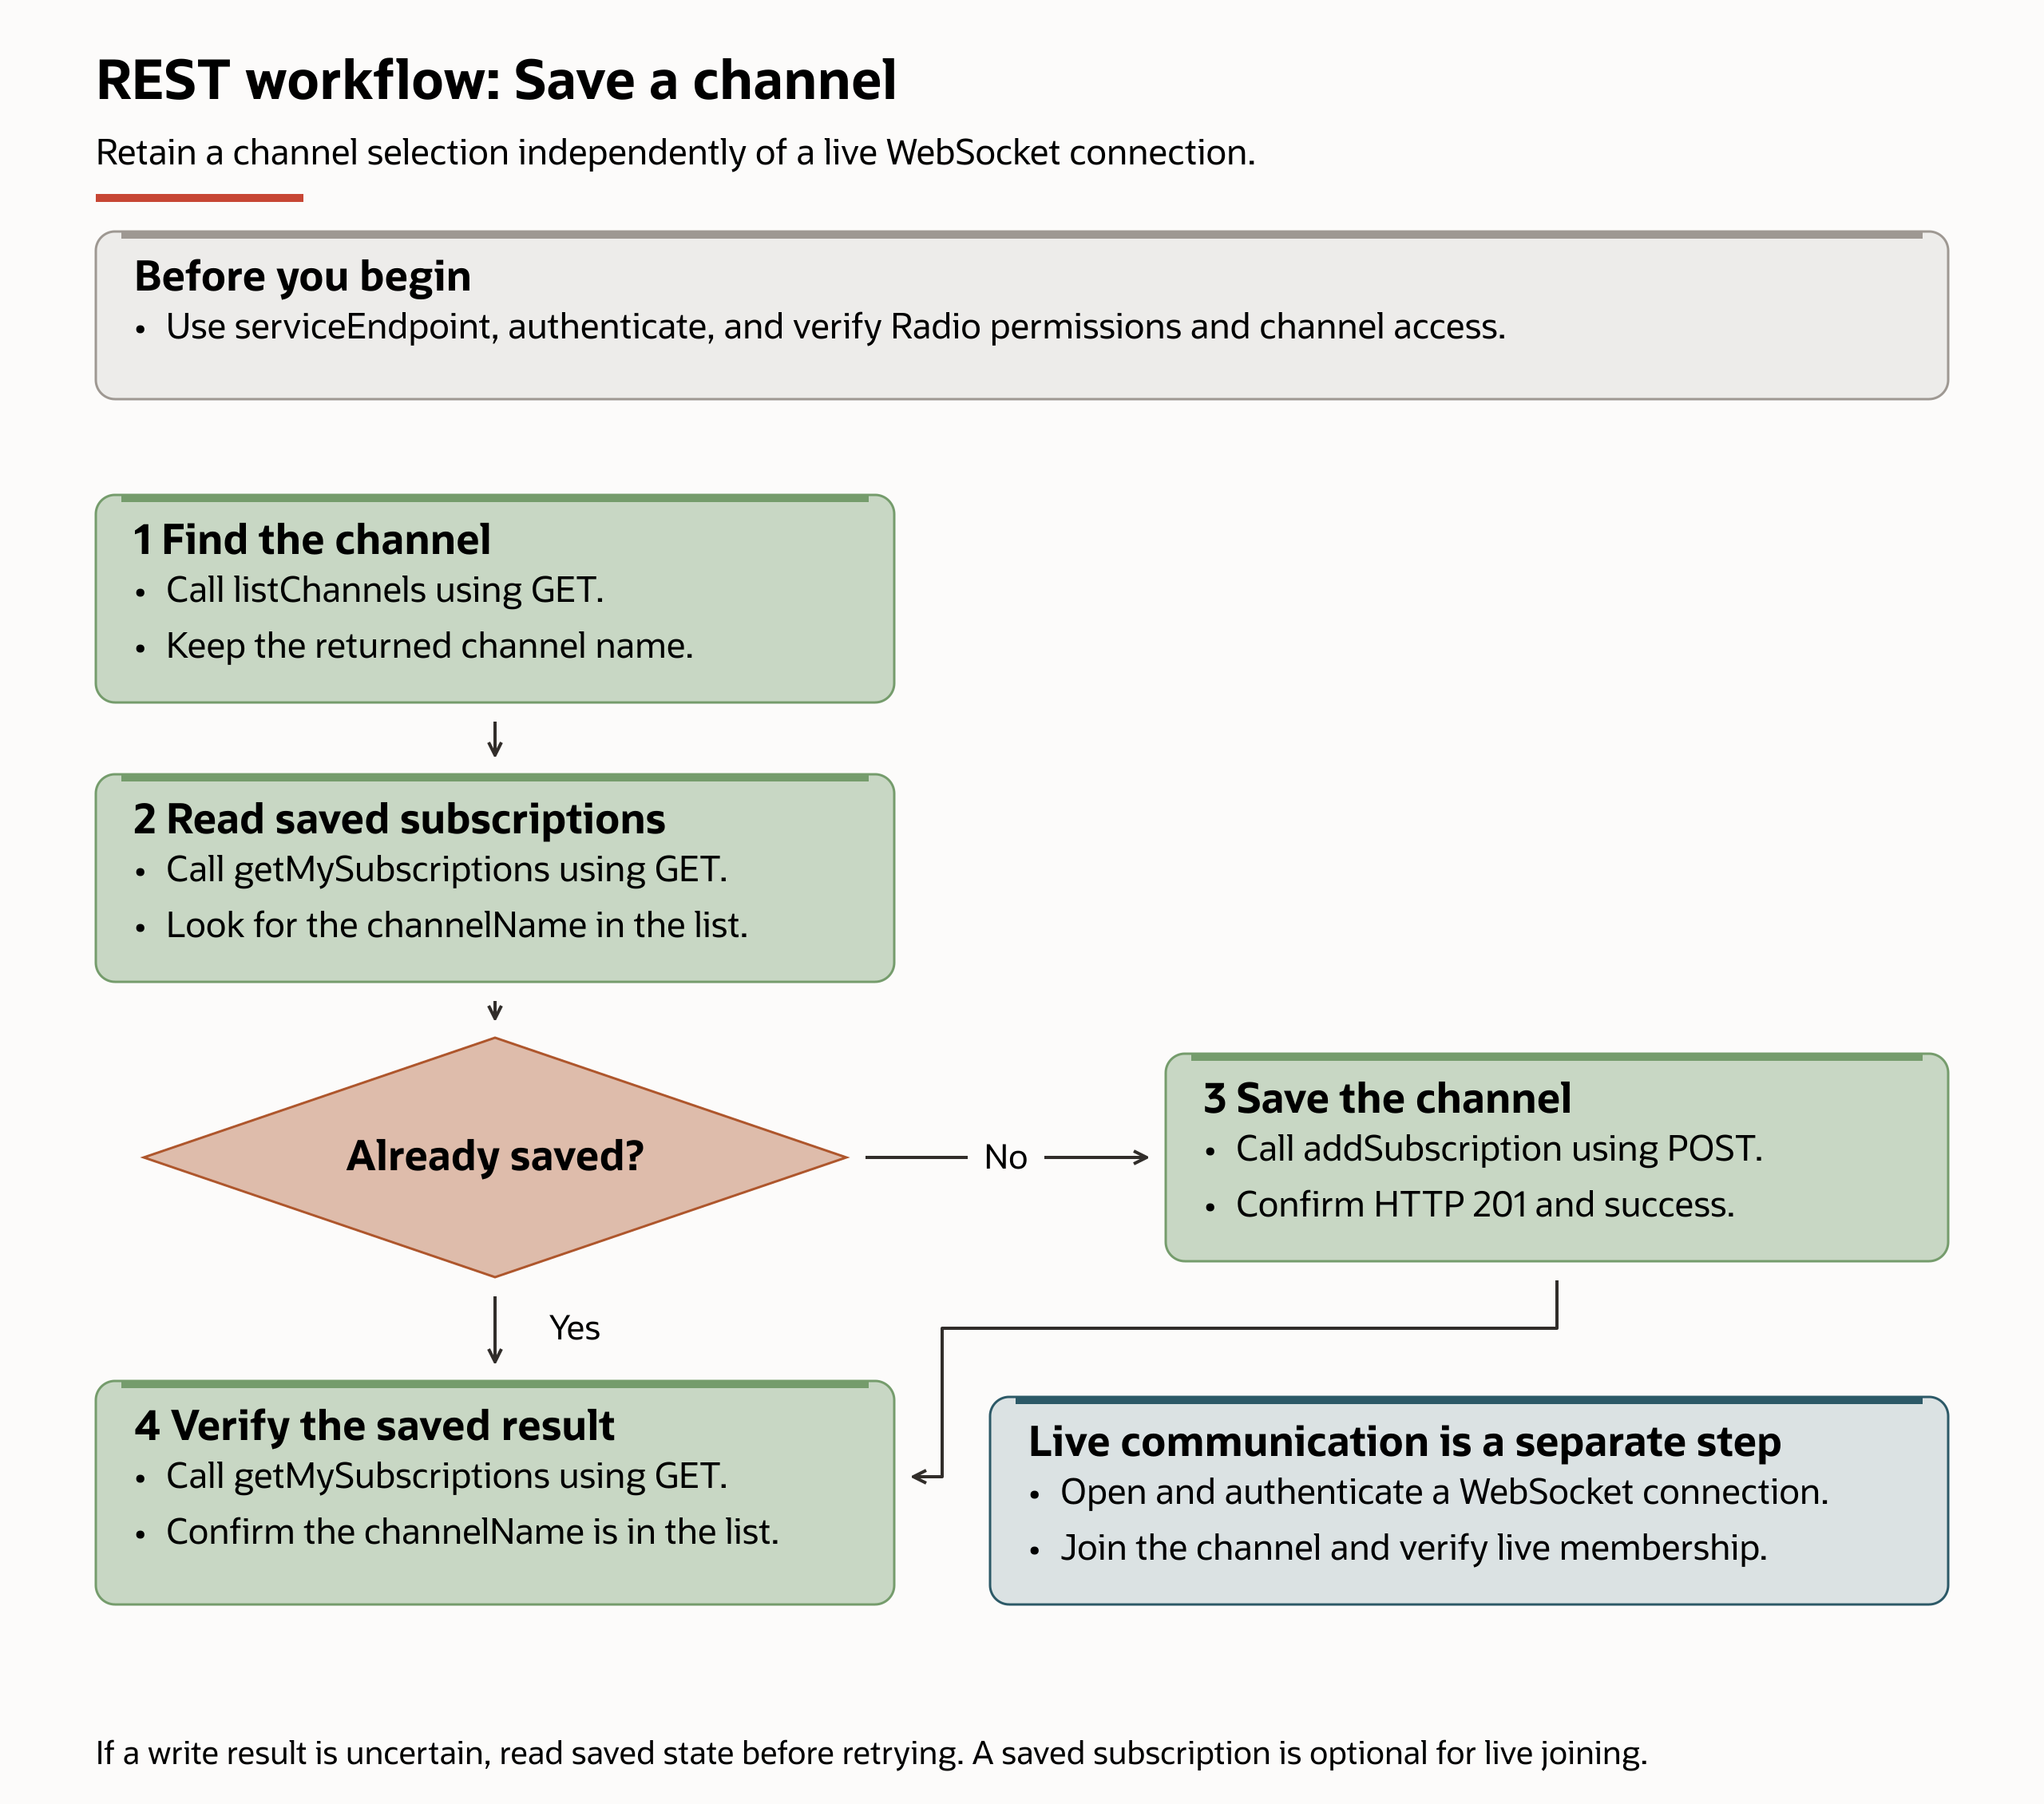
Before You Begin
- For the Radio app, sign in. For REST requests, complete the supported client's authentication steps and obtain a current user access token.
- Verify the user's
radio.channel.listandradio.subscription.managepermissions. The selected persistent channel must also allow that user to subscribe. - For REST requests, set
PSS_SERVICE_ENDPOINTto the instance's complete returnedserviceEndpoint, including its trailing/api/. SetRADIO_ACCESS_TOKENto the current access token using your protected credential-handling process. The cURL tabs use a POSIX-style shell; the PowerShell tabs read environment variables. Don't append a second/api/. See instance endpoints.
The examples use a channel named dispatch. Replace it with a channel name returned for your instance. Response examples use illustrative identifiers and timestamps; your values and existing subscriptions will differ. The app displays controls rather than HTTP responses.
The cURL and PowerShell examples illustrate requests made by supported mobile clients; they are not a supported command-line login workflow. Command-line, custom-browser, and server authentication contracts are not currently supported. Do not extract mobile credentials or create a separate OAuth application to run these examples. See supported authentication.
Keep access tokens temporary and protected. Don't paste them into scripts, shell history, logs, or support records. Clear the token variable when you finish.
Step 1: Find the Channel
Find a channel visible to your user. Selecting it in the app doesn't save a subscription or connect a call.
- Open Radio.
- Select Search channels in the Channels header and enter the channel name.
- Select the channel to open its workspace.
curl --include --request GET \
  --header "Authorization: Bearer ${RADIO_ACCESS_TOKEN}" \
  --header "Accept: application/json" \
  "${PSS_SERVICE_ENDPOINT}v1/radio/channels"
$response = Invoke-WebRequest -UseBasicParsing ` -Method Get ` -Uri "$($env:PSS_SERVICE_ENDPOINT)v1/radio/channels" ` -Headers @{ Authorization = "Bearer $env:RADIO_ACCESS_TOKEN"; Accept = "application/json" } $response.StatusCode $response.Content
Check the Channel Result
For REST, confirm HTTP 200. Retain the channel name, not its channelId. An example response is:
{
  "channels": [
    {
      "channel": "dispatch",
      "channelId": "11111111-1111-4111-8111-111111111111",
      "subscribers": 0,
      "busy": false,
      "busyBy": null,
      "busyByDisplayName": null,
      "mode": "normal",
      "owner": "radio-user-example",
      "domain": null
    }
  ]
}
See channel discovery for response fields. If the channel isn't visible in either method, have an administrator check the channel and your access. Don't guess a name and repeatedly try to subscribe.
Step 2: Check Your Saved Subscriptions
Check whether you have already saved the selected channel. If so, skip the add action and continue to verification.
Inspect the channel's joined marker and action. Join is available for an unjoined channel; Leave is available for a joined channel. Wait for any Joining… or Leaving… action to finish.
Check the connection state separately; the membership action alone doesn't prove a live connection.
Don't select Leave merely to check membership, because it removes the saved subscription.
Use the REST result to verify persisted state independently.
curl --include --request GET \
  --header "Authorization: Bearer ${RADIO_ACCESS_TOKEN}" \
  --header "Accept: application/json" \
  "${PSS_SERVICE_ENDPOINT}v1/radio/me/subscriptions"
$response = Invoke-WebRequest -UseBasicParsing ` -Method Get ` -Uri "$($env:PSS_SERVICE_ENDPOINT)v1/radio/me/subscriptions" ` -Headers @{ Authorization = "Bearer $env:RADIO_ACCESS_TOKEN"; Accept = "application/json" } $response.StatusCode $response.Content
Check the Saved List
For REST, confirm HTTP 200 and look for the selected channelName in subscriptions. A user with no saved subscriptions receives:
{
  "subscriptions": [],
  "count": 0
}
An empty list is a successful result, not an error. Your list might already contain other channels; don't remove them for this workflow.
Step 3: Save the Subscription
Save the selected channel only if it isn't already saved. Choose one method; don't repeat the add action in every tab.
Select Join in the selected channel's workspace, channel list, or Channel actions menu. Wait for Joining… to finish and check the connection state.
The browser saves your subscription and starts listening. It doesn't provide a separate stop-listening control that retains membership.
Leave stops listening and removes the saved subscription; the REST tabs illustrate saving membership separately from a live connection.
Replace
dispatchwith the discovered channel name.curl --include --request POST \ --header "Authorization: Bearer ${RADIO_ACCESS_TOKEN}" \ --header "Content-Type: application/json" \ --header "Accept: application/json" \ --data '{"channel":"dispatch","clientInfo":"documentation-example"}' \ "${PSS_SERVICE_ENDPOINT}v1/radio/me/subscriptions"Replace
dispatchwith the discovered channel name.$body = @{ channel = "dispatch"; clientInfo = "documentation-example" } | ConvertTo-Json $response = Invoke-WebRequest -UseBasicParsing ` -Method Post ` -Uri "$($env:PSS_SERVICE_ENDPOINT)v1/radio/me/subscriptions" ` -Headers @{ Authorization = "Bearer $env:RADIO_ACCESS_TOKEN"; Accept = "application/json" } ` -ContentType "application/json" ` -Body $body $response.StatusCode $response.Content
Check the Save Result
For REST, confirm HTTP 201 and a successful response for the selected channel:
{
  "success": true,
  "channel": "dispatch",
  "message": "Subscribed to dispatch"
}
If the response is lost or the result is uncertain in either method, verify the saved state before retrying. For a rejected request, follow API errors; a concealed not-authorized-or-not-found response doesn't identify which access or resource check failed.
Step 4: Verify the Saved Result
Confirm that the selected channel is saved before continuing to a live call.
Check that the channel is marked as joined in the channel list. Listening and transmit selection are separate from that saved state.
Don't refresh just to verify membership: the browser starts listening to saved joined channels when it connects.
Use the REST result when you need to verify the persisted subscription independently.
curl --include --request GET \
  --header "Authorization: Bearer ${RADIO_ACCESS_TOKEN}" \
  --header "Accept: application/json" \
  "${PSS_SERVICE_ENDPOINT}v1/radio/me/subscriptions"
unset RADIO_ACCESS_TOKEN
$response = Invoke-WebRequest -UseBasicParsing ` -Method Get ` -Uri "$($env:PSS_SERVICE_ENDPOINT)v1/radio/me/subscriptions" ` -Headers @{ Authorization = "Bearer $env:RADIO_ACCESS_TOKEN"; Accept = "application/json" } $response.StatusCode $response.Content Remove-Item Env:RADIO_ACCESS_TOKEN Remove-Variable response
Check the Verified Result
For REST, confirm HTTP 200 and the chosen channelName in the returned list. This example shows one saved subscription after the REST add request:
{
  "subscriptions": [
    {
      "subscriptionId": "22222222-2222-4222-8222-222222222222",
      "channelId": "11111111-1111-4111-8111-111111111111",
      "subscribedAt": "2026-09-18T14:00:00+00:00",
      "clientInfo": "documentation-example",
      "channelName": "dispatch",
      "displayName": null,
      "channelMode": "normal"
    }
  ],
  "count": 1
}
The subscription belongs to the authenticated user; the self-service response doesn't contain userId. A subscription saved in the app can have different clientInfo. See List Subscriptions.
The saved subscription is recorded independently of a live connection. If you don't receive live events, follow the subscription guidance.
Next Steps
- In the browser, verify the listening channels and choose one transmit channel before talking. See channel actions.
- To receive live events, authenticate a WebSocket connection and follow the join steps. Then use the WebSocket workflows for messages or audio.
- If a subscription you added for testing is no longer needed, remove it and verify the list again. Don't remove a pre-existing subscription; the personal channel can't be removed through this operation.
- For more request details, use the subscription reference and REST FAQ.