- Installing Business Intelligence Applications
- Deploying the ODI Repository for Non-Oracle Source Databases
7 Deploying the ODI Repository for Non-Oracle Source Databases
This section provides information about deploying the Oracle Data Integrator (ODI) repository for non-Oracle source databases.
During installation and setup of Oracle Business Intelligence Applications (Oracle BI Applications), if your source database is Oracle, then an instance of the ODI repository is automatically deployed and no further setup steps are required. If your source database is Microsoft SQL Server or UDB DB2, then you must perform these configuration steps to deploy a new instance of the ODI repository.
-
JD Edwards (JDE) 92 is certified with DB2 UDB (DB2 v10.5) and Microsoft SQL Server 2016 source databases.
-
People Soft 92 HCM is certified with Microsoft SQL Server 2016 source databases.
-
People Soft 92 LM (Learning Management) is certified with Microsoft SQL Server 2016 source databases.
- People Soft 92 FSCM is certified with Microsoft SQL Server 2016 source databases.
- People Soft 92 SIA (Student Information Analytics) is certified with Microsoft SQL Server 2016 source databases.
Perform these steps in order:
- Export Security Settings from Original ODI Repository.
- Exporting Topology Settings from Original ODI Repository.
- Create a New Master ODI Repository.
- Connect to the New Master ODI Repository.
- Create a New Work Repository.
- Import Source Adaptor Metadata Content into the New ODI Repository.
- Import Security Settings Into the ODI Repository.
- Importing Connection Details Which Configures the Data Servers.
In Oracle BI Applications Configuration Manager, register sources, configure parameters, and generate load plans.
Note:
After you perform these procedures for a particular source and you then want to add a new source, you only need to perform the steps in Importing Source Adapter Metadata Content into the New ODI Repository. This is true regardless of the database technology of the second source.
For example, if you've a PeopleSoft 9.2 source on a Microsoft SQL Server database, then you'd perform the steps in Exporting Security Settings from Original ODI Repository through Importing Connection Details Which Configures the Data Servers. If you then wanted to add a second source, for example JD Edwards (on an Oracle, DB2, or Microsoft SQL Server database), you'd only need to perform the steps in Importing Source Adapter Metadata Content into the New ODI Repository.
Exporting Security Settings from Original ODI Repository
You need to export the security settings from the ODI Repository that were created using the Oracle Business Analytics Suite RCU.
- Create a local directory path for export as a precaution because the Import process that you run later may delete all the files and sub folders that are inside the import folder that you specify during the Import process.
- Launch the ODI Studio client and connect to the original ODI repository.
- Navigate to the Topology tab. From the Connect Navigator (the Topology icon drop-down on the top right side of the navigator pane), select Export. As part of the procedures described below, you export files to a local directory.
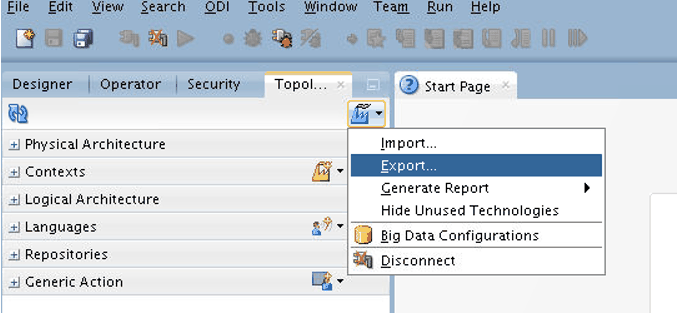
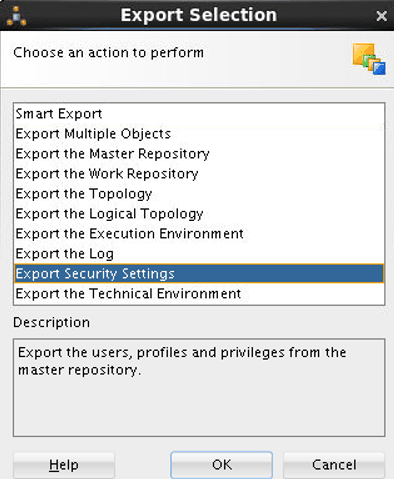
- Launch the Export Security Settings wizard from the Export Selection dialog.
- In Export Security Settings, perform the following and click OK:
- Specify the path for the newly created local directory for export in Export to directory.
- Select the Export to zip file check box.
- Provide the Zip File Name.
- Provide the Export key to export cipher data (passwords of connections).
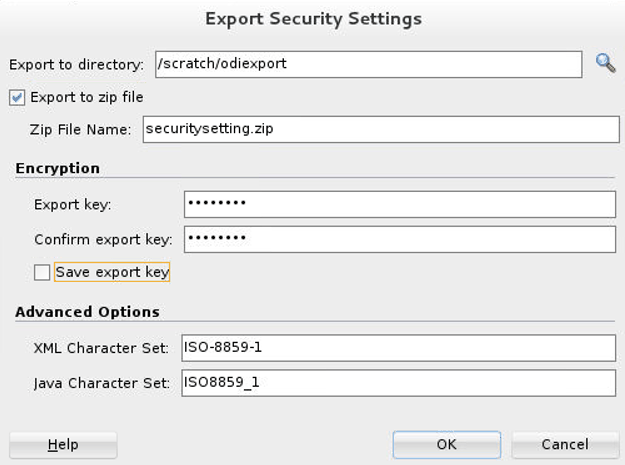 You use this zip export file to import the security settings in a later step.
 - Create a copy of the export directory along with the export zip file for backup.
Exporting Topology Settings from Original ODI Repository
You need to export the topology settings from the Original ODI Repository that were created using the Oracle Business Analytics Suite RCU.
- Create a local directory path for export as a precaution because the Import process that you run later may delete all the files and sub folders that are inside the import folder that you specify during the Import process.
- Launch the ODI Studio client and connect to the original ODI repository.
- Navigate to the Topology tab. From the Connect Navigator (Topology icon drop-down on the top right side of the navigator pane), select Export. As part of the procedures described below, you export files to a local directory.
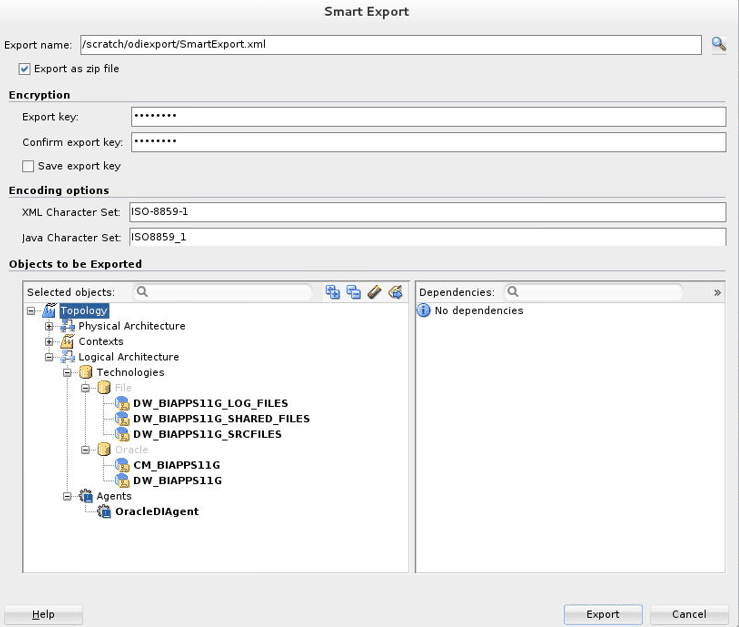
- Launch the Smart Export wizard from the Export Selection dialog.
- In Smart Export, perform the following:
- Specify the newly created local directory for export and provide a meaningful name for the export file.
- Check the Export as zip file check box.
- Provide the Export key to export along Cipher Data (Connection passwords).
- Select these logical schema objects and logical agents in Objects to be Exported:
From Files
- DW_BIAPPS11G_LOG_FILES
- DW_BIAPPS11G_SHARED_FILES
- DW_BIAPPS11G_SRCFILES
From Oracle
- CM_BIAPPS11G
- DW_BIAPPS11G
From Agents
- OracleDIAgent
- Click Export.
Description of the illustration 103-export-topology-settings-step4.gif - In ODI Studio, click Topology, select Physical Architecture, and then expand Agents.

- Right-click on the configured agent and then click Open.
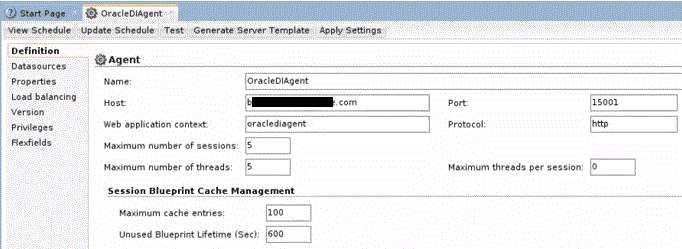

- Take a screen shot of the properties of the current physical agent to validate it after import.This exports the logical and physical topology including assigned data source num ID values, database connect details, and logical and physical agents.
- Create a copy of the export directory along with the export zip file for backup.
Creating a New Master Repository
Use ODI Studio to create a new master repository.
- Launch ODI Studio.
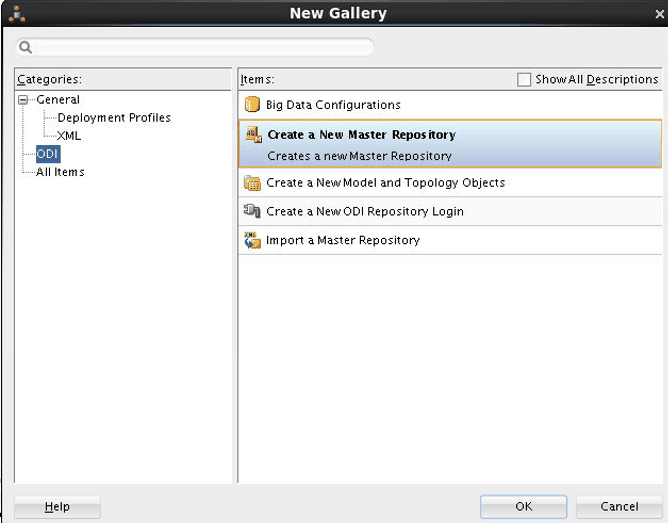
- Open the New Gallery by selecting File and then New.

- In the Categories tree of the New Gallery, select ODI.
- From the Items list, select Create a New Master Repository, and click OK.
The Master Repository Creation Wizard opens.
- Specify the Database Connection properties:
Property Description Technology
Select the technology that hosts your Master Repository.
JDBC Driver
The driver used to access the technology that hosts the repository.
JDBC URL
The URL used to establish the JDBC connection to the database.
Note that the JDBC Driver and URL properties are synchronized and the default values are technology dependent.
User
The name of the schema where the Master Repository is stored.*
Password
The password for the schema.
DBA User
The user ID on the database with DBA privileges such as SYSTEM.
Don't use SYS, which requires logging in as SYSDBA.
DBA Password
The password for the DBA User.
Note:
*Use the same credentials used by the installer to create the original repository.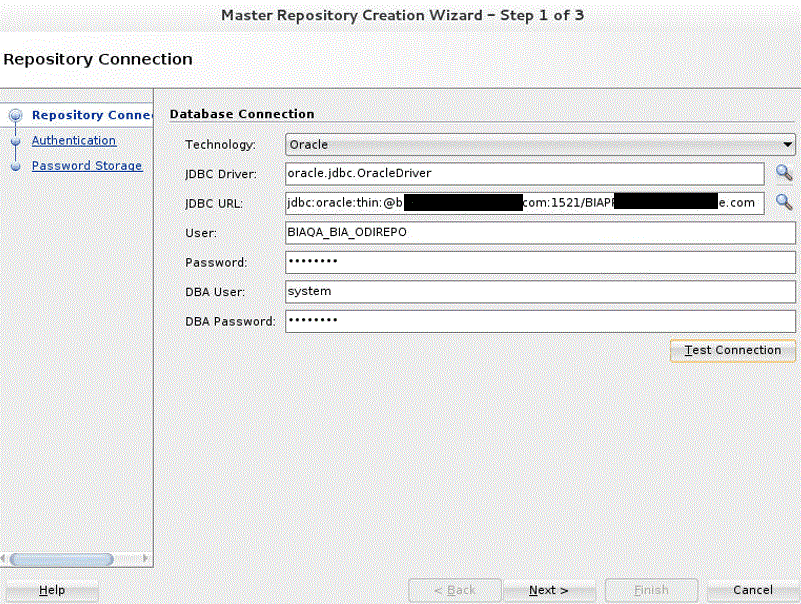
- (Optional) Click Test Connection to test the connection to the Master Repository, then click Next.
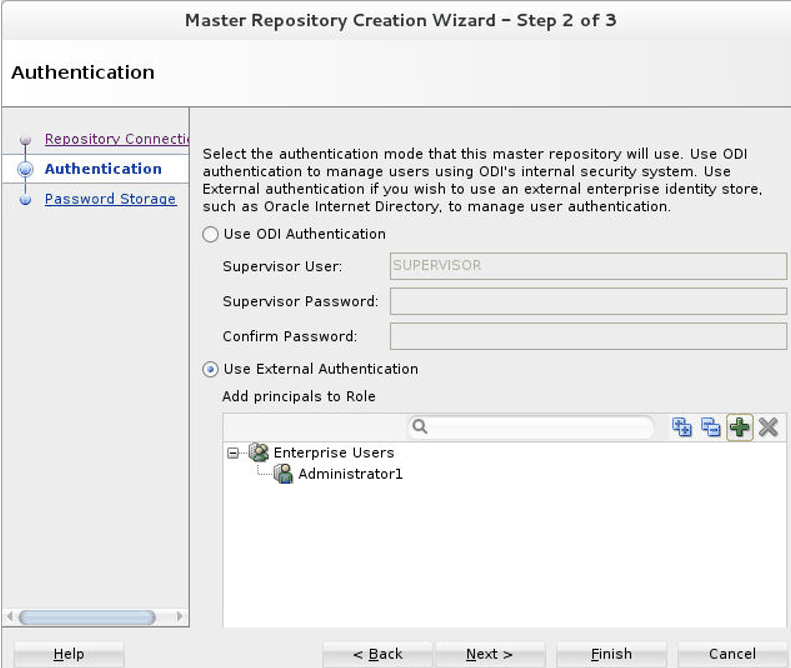
- In the Authentication screen, select Use External Authentication.
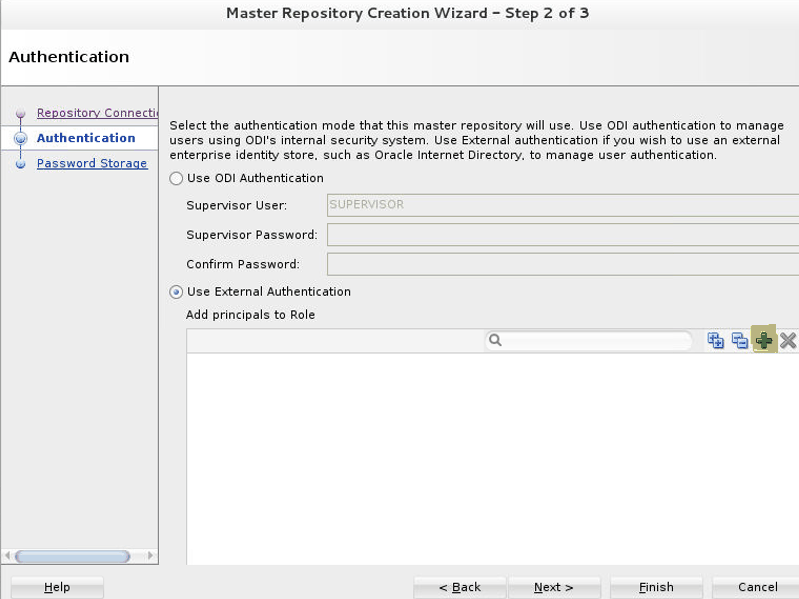
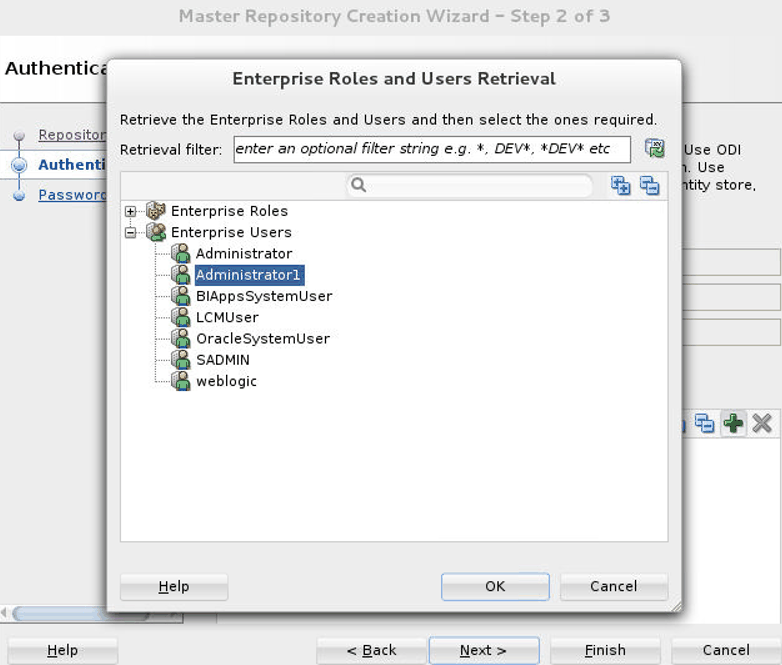
- Under Use External Authentication, click the Add icon +, then in the Enterprise Roles and Users Retrieval dialog, click the Retrieve Enterprise Roles and Users icon.

- In the Enterprise Roles and Users Retrieval dialog, expand Enterprise Users and select the users for which Supervisor Role is needed, and then click OK.
- Click Next.
- In the Password Storage dialog, select Internal Password Storage, and then click Finish.

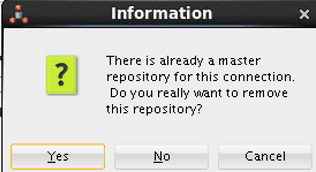
- Click Yes to indicate you want to remove the existing repository.
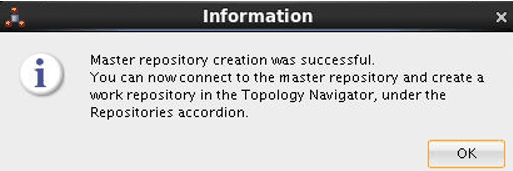
- In the information message, click OK.
Connecting to the New Master Repository
In this procedure, you create a new Master Repository login connection.
- Open the New Gallery by selecting File and then New.
- In the Categories tree of the New Gallery, select ODI.
- From the Items list, select Create a New ODI Repository Login.
- Click OK.
The Repository Connection Information dialog opens.
- Specify the ODI connection details:
Property Description Login name
A connection alias.
User
The ODI Supervisor user name that was defined during the Oracle BI Applications installation.
Note that the Supervisor user name is case sensitive and must be entered exactly as previously defined.
Password
The ODI Supervisor password that was defined during the Oracle BI Applications installation.
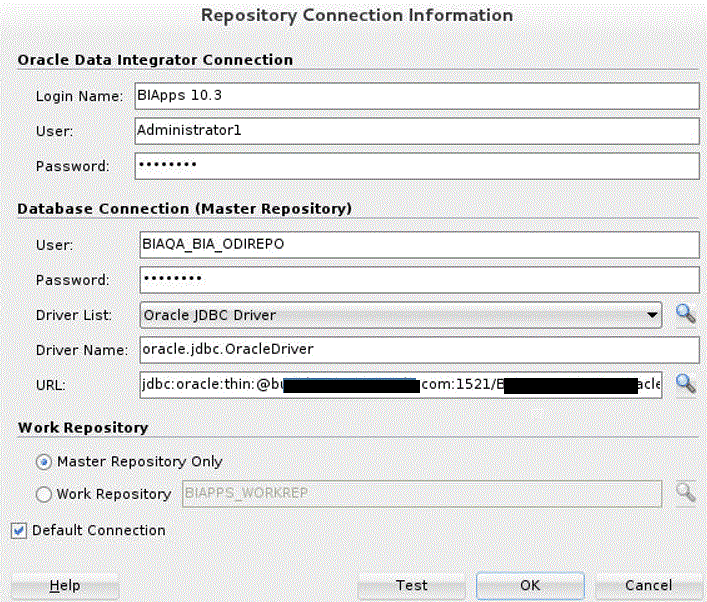
- Specify the Database Connection (Master Repository) details:
Property Description User
The database user login of the schema that contains the Master Repository.
Password
The User password.
Driver List
Select the driver required to connect to the database supporting the Master Repository.
Driver Name
The complete driver name.
URL
The URL used to establish the JDBC connection to the database hosting the repository.
- In the Work Repository area, select Master Repository Only.
- (Optional) Click Test to verify that the connection is working.
- Click OK.
Creating a New Work Repository
Use this procedure to create a new Work Repository.
- In the Topology Navigator, go to the Repositories panel.
- Right-click the Work Repositories node, and select New Work Repository.
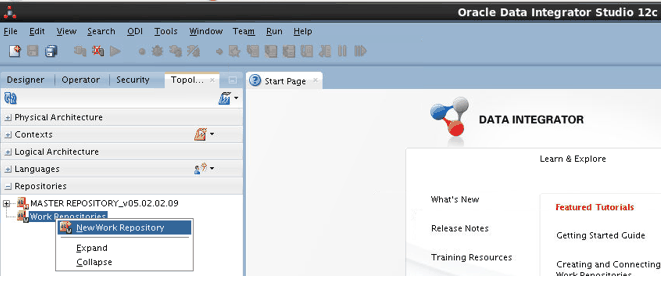
The Create Work Repository Wizard opens.
- Specify the ODI Work Repository connection details.
The Work Repository needs to be in the same schema as the Master Repository. Provide the same credentials used to create the Master Repository.
Property Description Technology
Select the technology that hosts your Work Repository.
JDBC Driver
The driver used to access the technology that hosts the repository.
JDBC URL
The complete path of the data server to host the Work Repository.
Note that the JDBC Driver and URL properties are synchronized and the default values are technology-dependent.
User
The name of the schema where the Work Repository is stored.
Password
The password for the schema.
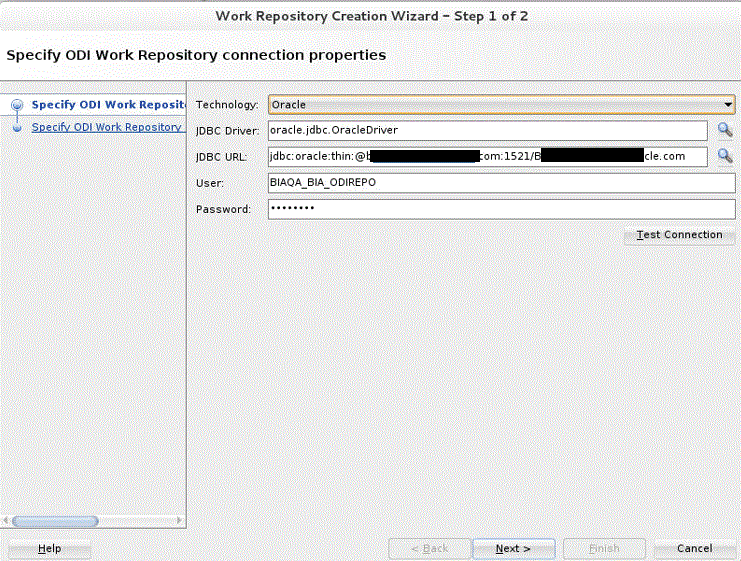
- (Optional) Click Test Connection to verify the connection is working, then click Next.
An informational dialog notifies you that a Work Repository already exists.
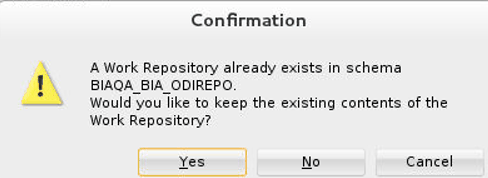
- Click No to overwrite the existing repository.
- Specify the Work Repository properties:
Property Description Name
A name for the Work Repository.
Password
This field is optional. The value can be any value. It doesn't correspond to the ODI Supervisor or database passwords.
Work Repository Type
Select Development.
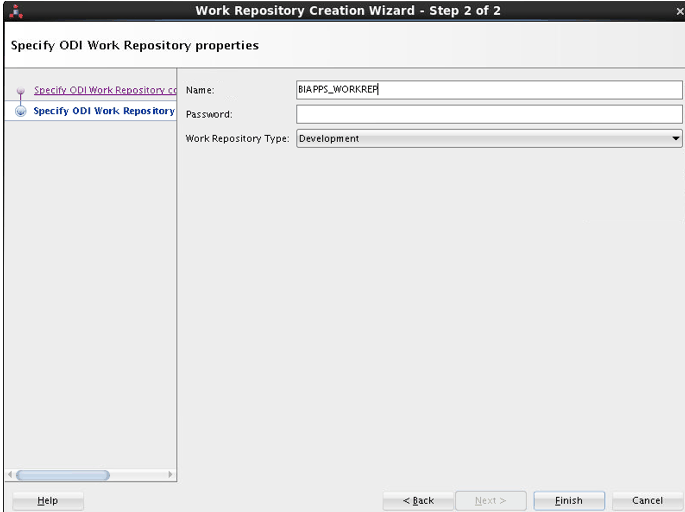
- Click Finish.

- When the Confirmation dialog asks if you'd like to create a login for the Work Repository, click No.
- Edit the repository connection details to connect to the Work Repository:
- Log off of the Work Repository.
- Open the Repository Connection Information dialog.
- In the Work Repository area, select the Work Repository option, and then select the name of the Work Repository you just created.
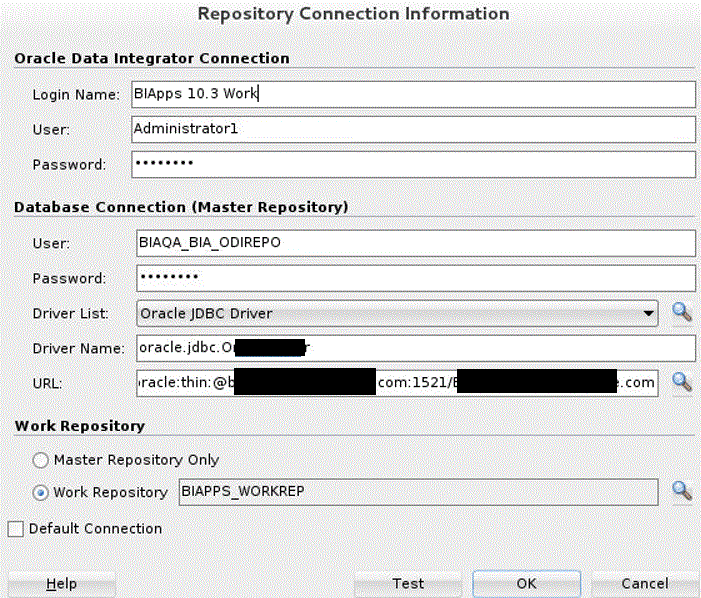
- Click OK.
Importing Source Adaptor Metadata Content into the New ODI Repository
In this procedure, you import source-specific metadata content into the new ODI Repository by running the command line utility.
Preparing to Import Source Adaptor Metadata Content
Use these instructions to import source-specific metadata content into the new ODI Repository.
- Locate the directory
<ORACLE_HOME>/bi/biapps/admin/provisioning/odi.Oracle Home example:
/scratch/product/Oracle/Middleware/Oracle_Home. The.zipfiles in this directory contain the source-specific metadata content that you import into the new repository. The naming convention for the.zipfiles is<Source adapter>_<database technology>_ODI_Metadata.zip.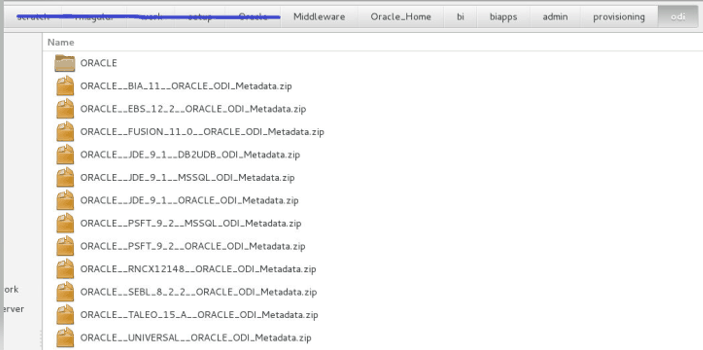
Description of the illustration 103-import-source-adapter-prepare-step1.gif - Unzip
ORACLE__BIA_11__ORACLE_ODI_Metadata.zipfirst and then unzip the appropriate metadata content file for your source adapter and database technology.Note:
While unzipping files, don't unzip into a separate folder. Use the Extract here option from the unzipping tools to unzip all metadata zip files.For example, once you unzip files, you see the following folder structure:
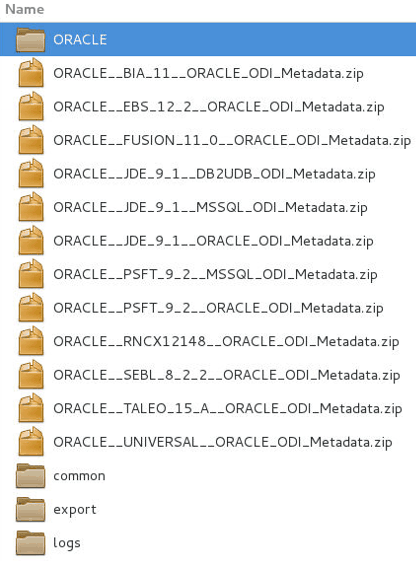
Description of the illustration 103-import-source-adapter-prepare-step2.gifInside ORACLE folder, you see the following folders:
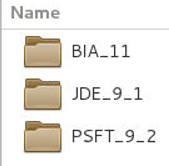
Description of the illustration 103-import-source-adapter-prepare-step2a.gif - Locate the file
bia-odi-util.jar, which is stored in<ORACLE_HOME>/bi/biapps/biaodiutil/lib. - Configure Oracle Data Integrator Studio, if you haven't configured it yet, and ensure that you can sign in.
- Ensure that the
jps-config-jse.xml, system-jazn-data.xml, andcwallet.ssofiles have been copied under<ORACLE_HOME>/odi/studio/binwhile configuring Oracle Data Integrator Studio.Note:
In the command, thejps-config-jse.xmlfile under<ORACLE_HOME>/odi/studio/binis referred to asJPSCONFIGFILE. - Create a directory to store the logs of the import process.
In the command, this directory is referred to as
LOGDIR. - Obtain these ODI Repository connection details:
- JDBC URL for the ODI Repository database
- JDBC driver
- Work Repository name
- ODI Repository database user name and password
- ODI user and password
This connection information is displayed in ODI Studio in the Repository Connection Details dialog.
Running the Command Line Utility to Import Source Adaptor Metadata Content
Use this procedure to import the metadata content files into the new ODI Repository. You first import the metadata for Oracle BI Applications, after which you import the metadata for the appropriate source adaptors.
For potential performance enhancement, Oracle recommends running the command line utility on the database server machine.
To import metadata content by running the command line utility:
- Open a command line utility.
- Navigate to the
<ORACLE_HOME>/odi/studio/bindirectory. - Run the following command to import the metadata of Oracle BI Applications first, which is mandatory before importing any source-specific metadata content.
The PLV code for this adaptor is BIA_11.
On UNIX/Linux:
<JAVA_HOME>/bin/java -client -Dfile.encoding=UTF-8 -classpath
        "<ORACLE_HOME>/odi/sdk/lib/*:<ORACLE_HOME>/oracle_common/jlib/*:<ORACLE_HOME>/oracle_common/modules/oracle.idm/*:<ORACLE_HOME>/oracle_common/modules/oracle.jps/*:<ORACLE_HOME>/oracle_common/modules/oracle.jdbc/*:<ORACLE_HOME>/oracle_common/modules/oracle.nlsrtl/*:<ORACLE_HOME>/oracle_common/modules/oracle.ucp.jar:<ORACLE_HOME>/bi/biapps/lib/*:<ORACLE_HOME>/bi/biapps/biaodiutil/lib/bia-odi-util.jar"
        -Dcommon.components.home=<ORACLE_HOME>/oracle_common/ oracle.apps.biaodiutil.Import
        MODE=IMPORT FILEDIR=<EXP_FILE_DIR> PLV=<PLV_CODE> JPSCONFIGFILE=<JPS_CONFIG_FILE>
        LOGDIR=<LOG_DIR>
For example:
/scratch/jdk/jdk_1.8.0_201/bin/java -client -Dfile.encoding=UTF-8 -classpath
          "/scratch/product/Oracle/Middelware/Oracle_Home/odi/sdk/lib/*:/scratch/product/Oracle/Middelware/Oracle_Home/oracle_common/jlib/*:/scratch/product/Oracle/Middelware/Oracle_Home/oracle_common/modules/oracle.idm/*:/scratch/product/Oracle/Middelware/Oracle_Home/oracle_common/modules/oracle.jps/*:/scratch/product/Oracle/Middelware/Oracle_Home/oracle_common/modules/oracle.jdbc/*:/scratch/product/Oracle/Middelware/Oracle_Home/oracle_common/modules/oracle.nlsrtl/*:/scratch/product/Oracle/Middelware/Oracle_Home/oracle_common/modules/oracle.ucp.jar:/scratch/product/Oracle/Middelware/Oracle_Home/bi/biapps/lib/*:/scratch/product/Oracle/Middelware/Oracle_Home/bi/biapps/biaodiutil/lib/bia-odi-util.jar"
          -Dcommon.components.home=/scratch/product/Oracle/Middelware/Oracle_Home/oracle_common/
          oracle.apps.biaodiutil.Import MODE=IMPORT
          FILEDIR=/scratch/product/Oracle/Middelware/Oracle_Home/bi/biapps/admin/provisioning/odi/
          PLV=BIA_11
          JPSCONFIGFILE=/scratch/product/Oracle/Middelware/Oracle_Home/odi/studio/bin/jps-config-jse.xml
          LOGDIR=/scratch/product/Oracle/Middelware/Oracle_Home/bi/biapps/admin/provisioning/odi/logs/
On Windows:
<JAVA_HOME>\bin\java -client -Dfile.encoding=UTF-8 -classpath
        "<ORACLE_HOME>\odi\sdk\lib\*;<ORACLE_HOME>\oracle_common\jlib\*;<ORACLE_HOME>\oracle_common\modules\oracle.idm\*;<ORACLE_HOME>\oracle_common\modules\oracle.jps\*;<ORACLE_HOME>\oracle_common\modules\oracle.jdbc\*;<ORACLE_HOME>\oracle_common\modules\oracle.nlsrtl\*;<ORACLE_HOME>\oracle_common\modules\oracle.ucp.jar;<ORACLE_HOME>\bi\biapps\lib\*;<ORACLE_HOME>\bi\biapps\biaodiutil\lib\bia-odi-util.jar"
        -Dcommon.components.home=<ORACLE_HOME>\oracle_common\ oracle.apps.biaodiutil.Import
        MODE=IMPORT FILEDIR=<EXP_FILE_DIR> PLV=<PLV_CODE> JPSCONFIGFILE=<JPS_CONFIG_FILE>
        LOGDIR=<LOG_DIR>
For example:
C:\jdk\jdk_1.8.0_201\bin\java -client -Dfile.encoding=UTF-8 -classpath "C:\product\Oracle\Middelware\Oracle_Home\odi\sdk\lib\*;C:\product\Oracle\Middelware\Oracle_Home\oracle_common\jlib\*;C:\product\Oracle\Middelware\Oracle_Home\oracle_common\modules\oracle.idm\*;C:\product\Oracle\Middelware\Oracle_Home\oracle_common\modules\oracle.jps\*;C:\product\Oracle\Middelware\Oracle_Home\oracle_common\modules\oracle.jdbc\*;C:\product\Oracle\Middelware\Oracle_Home\oracle_common\modules\oracle.nlsrtl\*;C:\product\Oracle\Middelware\Oracle_Home\oracle_common\modules\oracle.ucp.jar;C:\product\Oracle\Middelware\Oracle_Home\bi\biapps\lib\*;C:\product\Oracle\Middelware\Oracle_Home\bi\biapps\biaodiutil\lib\bia-odi-util.jar" -Dcommon.components.home=C:\product\Oracle\Middelware\Oracle_Home\oracle_common\ oracle.apps.biaodiutil.Import MODE=IMPORT FILEDIR=C:\product\Oracle\Middelware\Oracle_Home\bi\biapps\admin\provisioning\odi\ PLV=BIA_11 JPSCONFIGFILE=C:\product\Oracle\Middelware\Oracle_Home\odi\studio\bin\jps-config-jse.xml LOGDIR=C:\product\Oracle\Middelware\Oracle_Home\bi\biapps\admin\provisioning\odi\logs\ - Run the following command to import the source-specific metadata content. The PLV code and SRCTECH for the source-specific metadata content are given in the following parameters table.
This table describes the parameters:
Parameter Description MODE
(Mandatory) Possible values:
-
IMPREGEN - Use this mode to import the adaptor metadata content and generate scenarios for that adaptor.
-
IMPORT — Use this mode to import metadata content only, without generating scenarios. A parameter file is generated that allows you to do the scenario generation at a later time.
-
SCEREGEN — Use this mode to generate scenarios only. Before running this mode, you need to have imported content using the IMPORT mode so that the parameter file required for scenario generation is already present.
FILEDIR
(Mandatory) The complete path for the export file directory files.
CONNFILE
(Optional) The complete path of the file containing the Connection Details. If this parameter isn't used, the utility prompts for the connection details.
An example of a connection file is as follows:
# ===============================# ODI Connection Information# ================================# Connection Information for Destination Oracle Data #Integrator RepositoryMasterJDBCDriver=oracle.jdbc.OracleDriverMasterJDBCUrl=jdbc:oracle:thin:@<host>:1521:orclMasterJDBCUser=ODI_REPMasterJDBCPass=odirepWorkName=BIAPPS_WORKREPODIUser=BIAppsAdminUserODIPass=odipassLOGLEVEL
(Optional) Possible values are 1, 3, or 5. The default value is 1, with 5 being the most verbose.
LOGDIR
The complete path for the log directory.
The following log files are created:
-
Summary — Contains high level log information. The naming convention is Summary_ImportUtility_<DATE_TIME><ADAPTOR><SRCTECH>_log.
-
Import — Contains details about the import. Has a log and error file. The naming convention is BasicImport_<DATE_TIME>_<ADAPTOR>_log.
-
Scenario Generation — Contains details about the scenario generation. Has a log and error file. The naming convention is RegenScen_<DATE_TIME>_<ADAPTOR_MAPPING_FOLDER>_log.
PLV
(Mandatory) The PLV code for the adaptor being imported.
Possible values:
-
EBS_12_2
-
FUSION_11_0
-
JDE_9_1
-
PSFT_9_2
-
SEBL_8_2_2
- RNCX12148
- TALEO_15_A
- UNIVERSAL
SRCTECH
(Mandatory) The source technology for the adaptor being imported.
Possible values:
-
For IBM DB2 UDB: IBM_DB2_UDB
-
For SQL Server: MICROSOFT_SQL_SERVER
-
For ORACLE: ORACLE
-
For Oracle Fusion (via BI Server): ORACLE_BI
- For UNIVERSAL: FILE
If you've multiple sources on both Oracle and non-Oracle databases, you need to import the PLV metadata for the Oracle database using ORACLE (or ORACLE_BI for Oracle Fusion sources) as the SRCTECH value.
JPSCONFIGFILE
(Mandatory if the repository has already been enabled for external authentication.) The path and name of the JPSCONFIGFILE.
SSOFILE
(Optional) The path and name of the SSO file.
On Linux:
For example:
/scratch/jdk/jdk_1.8.0_201/bin/java -client -Dfile.encoding=UTF-8 -classpath
          "/scratch/product/Oracle/Middelware/Oracle_Home/odi/sdk/lib/*:/scratch/product/Oracle/Middelware/Oracle_Home/oracle_common/jlib/*:/scratch/product/Oracle/Middelware/Oracle_Home/oracle_common/modules/oracle.idm/*:/scratch/product/Oracle/Middelware/Oracle_Home/oracle_common/modules/oracle.jps/*:/scratch/product/Oracle/Middelware/Oracle_Home/oracle_common/modules/oracle.jdbc/*:/scratch/product/Oracle/Middelware/Oracle_Home/oracle_common/modules/oracle.nlsrtl/*:/scratch/product/Oracle/Middelware/Oracle_Home/oracle_common/modules/oracle.ucp.jar:/scratch/product/Oracle/Middelware/Oracle_Home/bi/biapps/lib/*:/scratch/product/Oracle/Middelware/Oracle_Home/bi/biapps/biaodiutil/lib/bia-odi-util.jar"
          -Dcommon.components.home=/scratch/product/Oracle/Middelware/Oracle_Home/oracle_common/
          oracle.apps.biaodiutil.Import MODE=IMPORT
          FILEDIR=/scratch/product/Oracle/Middelware/Oracle_Home/bi/biapps/admin/provisioning/odi/
          PLV=JDE_9_1 SRCTECH=MICROSOFT_SQL_SERVER
          JPSCONFIGFILE=/scratch/product/Oracle/Middelware/Oracle_Home/odi/studio/bin/jps-config-jse.xml
          LOGDIR=/scratch/product/Oracle/Middelware/Oracle_Home/bi/biapps/admin/provisioning/odi/logs/
Repeat Step 4 if you want to import any other source specific metadata content by choosing the appropriate PLV code and SRCTECH parameter.
Following are few sample commands for importing other source specific metadata:
JDE_9_1 for MSSQL:
/scratch/jdk/jdk_1.8.0_201/bin/java -client -Dfile.encoding=UTF-8 -classpath
          "/scratch/product/Oracle/Middelware/Oracle_Home/odi/sdk/lib/*:/scratch/product/Oracle/Middelware/Oracle_Home/oracle_common/jlib/*:/scratch/product/Oracle/Middelware/Oracle_Home/oracle_common/modules/oracle.idm/*:/scratch/product/Oracle/Middelware/Oracle_Home/oracle_common/modules/oracle.jps/*:/scratch/product/Oracle/Middelware/Oracle_Home/oracle_common/modules/oracle.jdbc/*:/scratch/product/Oracle/Middelware/Oracle_Home/oracle_common/modules/oracle.nlsrtl/*:/scratch/product/Oracle/Middelware/Oracle_Home/oracle_common/modules/oracle.ucp.jar:/scratch/product/Oracle/Middelware/Oracle_Home/bi/biapps/lib/*:/scratch/product/Oracle/Middelware/Oracle_Home/bi/biapps/biaodiutil/lib/bia-odi-util.jar"
          -Dcommon.components.home=/scratch/product/Oracle/Middelware/Oracle_Home/oracle_common/
          oracle.apps.biaodiutil.Import MODE=IMPORT
          FILEDIR=/scratch/product/Oracle/Middelware/Oracle_Home/bi/biapps/admin/provisioning/odi/
          PLV=JDE_9_1 SRCTECH=MICROSOFT_SQL_SERVER
          JPSCONFIGFILE=/scratch/product/Oracle/Middelware/Oracle_Home/odi/studio/bin/jps-config-jse.xml
          LOGDIR=/scratch/product/Oracle/Middelware/Oracle_Home/bi/biapps/admin/provisioning/odi/logs/
JDE_9_1 for ORACLE:
/scratch/jdk/jdk_1.8.0_201/bin/java -client -Dfile.encoding=UTF-8 -classpath
          "/scratch/product/Oracle/Middelware/Oracle_Home/odi/sdk/lib/*:/scratch/product/Oracle/Middelware/Oracle_Home/oracle_common/jlib/*:/scratch/product/Oracle/Middelware/Oracle_Home/oracle_common/modules/oracle.idm/*:/scratch/product/Oracle/Middelware/Oracle_Home/oracle_common/modules/oracle.jps/*:/scratch/product/Oracle/Middelware/Oracle_Home/oracle_common/modules/oracle.jdbc/*:/scratch/product/Oracle/Middelware/Oracle_Home/oracle_common/modules/oracle.nlsrtl/*:/scratch/product/Oracle/Middelware/Oracle_Home/oracle_common/modules/oracle.ucp.jar:/scratch/product/Oracle/Middelware/Oracle_Home/bi/biapps/lib/*:/scratch/product/Oracle/Middelware/Oracle_Home/bi/biapps/biaodiutil/lib/bia-odi-util.jar"
          -Dcommon.components.home=/scratch/product/Oracle/Middelware/Oracle_Home/oracle_common/
          oracle.apps.biaodiutil.Import MODE=IMPORT
          FILEDIR=/scratch/product/Oracle/Middelware/Oracle_Home/bi/biapps/admin/provisioning/odi/
          PLV=JDE_9_1 SRCTECH=ORACLE
          JPSCONFIGFILE=/scratch/product/Oracle/Middelware/Oracle_Home/odi/studio/bin/jps-config-jse.xml
          LOGDIR=/scratch/product/Oracle/Middelware/Oracle_Home/bi/biapps/admin/provisioning/odi/logs/
PSFT_9_2 for MSSQL:
/scratch/jdk/jdk_1.8.0_201/bin/java -client -Dfile.encoding=UTF-8 -classpath
          "/scratch/product/Oracle/Middelware/Oracle_Home/odi/sdk/lib/*:/scratch/product/Oracle/Middelware/Oracle_Home/oracle_common/jlib/*:/scratch/product/Oracle/Middelware/Oracle_Home/oracle_common/modules/oracle.idm/*:/scratch/product/Oracle/Middelware/Oracle_Home/oracle_common/modules/oracle.jps/*:/scratch/product/Oracle/Middelware/Oracle_Home/oracle_common/modules/oracle.jdbc/*:/scratch/product/Oracle/Middelware/Oracle_Home/oracle_common/modules/oracle.nlsrtl/*:/scratch/product/Oracle/Middelware/Oracle_Home/oracle_common/modules/oracle.ucp.jar:/scratch/product/Oracle/Middelware/Oracle_Home/bi/biapps/lib/*:/scratch/product/Oracle/Middelware/Oracle_Home/bi/biapps/biaodiutil/lib/bia-odi-util.jar"
          -Dcommon.components.home=/scratch/product/Oracle/Middelware/Oracle_Home/oracle_common/
          oracle.apps.biaodiutil.Import MODE=IMPORT
          FILEDIR=/scratch/product/Oracle/Middelware/Oracle_Home/bi/biapps/admin/provisioning/odi/
          PLV=PSFT_9_2 SRCTECH=MICROSOFT_SQL_SERVER
          JPSCONFIGFILE=/scratch/product/Oracle/Middelware/Oracle_Home/odi/studio/bin/jps-config-jse.xml
          LOGDIR=/scratch/product/Oracle/Middelware/Oracle_Home/bi/biapps/admin/provisioning/odi/logs/
PSFT_9_2 for ORACLE:
/scratch/jdk/jdk_1.8.0_201/bin/java -client -Dfile.encoding=UTF-8 -classpath
          "/scratch/product/Oracle/Middelware/Oracle_Home/odi/sdk/lib/*:/scratch/product/Oracle/Middelware/Oracle_Home/oracle_common/jlib/*:/scratch/product/Oracle/Middelware/Oracle_Home/oracle_common/modules/oracle.idm/*:/scratch/product/Oracle/Middelware/Oracle_Home/oracle_common/modules/oracle.jps/*:/scratch/product/Oracle/Middelware/Oracle_Home/oracle_common/modules/oracle.jdbc/*:/scratch/product/Oracle/Middelware/Oracle_Home/oracle_common/modules/oracle.nlsrtl/*:/scratch/product/Oracle/Middelware/Oracle_Home/oracle_common/modules/oracle.ucp.jar:/scratch/product/Oracle/Middelware/Oracle_Home/bi/biapps/lib/*:/scratch/product/Oracle/Middelware/Oracle_Home/bi/biapps/biaodiutil/lib/bia-odi-util.jar"
          -Dcommon.components.home=/scratch/product/Oracle/Middelware/Oracle_Home/oracle_common/
          oracle.apps.biaodiutil.Import MODE=IMPORT
          FILEDIR=/scratch/product/Oracle/Middelware/Oracle_Home/bi/biapps/admin/provisioning/odi/
          PLV=PSFT_9_2 SRCTECH=ORACLE
          JPSCONFIGFILE=/scratch/product/Oracle/Middelware/Oracle_Home/odi/studio/bin/jps-config-jse.xml
          LOGDIR=/scratch/product/Oracle/Middelware/Oracle_Home/bi/biapps/admin/provisioning/odi/logs/
UNIVERSAL ADAPTOR :
/scratch/jdk/jdk_1.8.0_201/bin/java -client -Dfile.encoding=UTF-8 -classpath
          "/scratch/product/Oracle/Middelware/Oracle_Home/odi/sdk/lib/*:/scratch/product/Oracle/Middelware/Oracle_Home/oracle_common/jlib/*:/scratch/product/Oracle/Middelware/Oracle_Home/oracle_common/modules/oracle.idm/*:/scratch/product/Oracle/Middelware/Oracle_Home/oracle_common/modules/oracle.jps/*:/scratch/product/Oracle/Middelware/Oracle_Home/oracle_common/modules/oracle.jdbc/*:/scratch/product/Oracle/Middelware/Oracle_Home/oracle_common/modules/oracle.nlsrtl/*:/scratch/product/Oracle/Middelware/Oracle_Home/oracle_common/modules/oracle.ucp.jar:/scratch/product/Oracle/Middelware/Oracle_Home/bi/biapps/lib/*:/scratch/product/Oracle/Middelware/Oracle_Home/bi/biapps/biaodiutil/lib/bia-odi-util.jar"
          -Dcommon.components.home=/scratch/product/Oracle/Middelware/Oracle_Home/oracle_common/
          oracle.apps.biaodiutil.Import MODE=IMPORT
          FILEDIR=/scratch/product/Oracle/Middelware/Oracle_Home/bi/biapps/admin/provisioning/odi/
          PLV=UNIVERSAL SRCTECH=FILE
          JPSCONFIGFILE=/scratch/product/Oracle/Middelware/Oracle_Home/odi/studio/bin/jps-config-jse.xml
          LOGDIR=/scratch/product/Oracle/Middelware/Oracle_Home/bi/biapps/admin/provisioning/odi/logs/
JDE_9_1 for IBM_DB2_UDB
/scratch/jdk/jdk_1.8.0_201/bin/java -client -Dfile.encoding=UTF-8
        -classpath
        "/scratch/product/Oracle/Middelware/Oracle_Home/odi/sdk/lib/*:/scratch/product/Oracle/Middelware/Oracle_Home/oracle_common/jlib/*:/scratch/product/Oracle/Middelware/Oracle_Home/oracle_common/modules/oracle.idm/*:/scratch/product/Oracle/Middelware/Oracle_Home/oracle_common/modules/oracle.jps/*:/scratch/product/Oracle/Middelware/Oracle_Home/oracle_common/modules/oracle.jdbc/*:/scratch/product/Oracle/Middelware/Oracle_Home/oracle_common/modules/oracle.nlsrtl/*:/scratch/product/Oracle/Middelware/Oracle_Home/oracle_common/modules/oracle.ucp.jar:/scratch/product/Oracle/Middelware/Oracle_Home/bi/biapps/lib/*:/scratch/product/Oracle/Middelware/Oracle_Home/bi/biapps/biaodiutil/lib/bia-odi-util.jar"
        -Dcommon.components.home=/scratch/product/Oracle/Middelware/Oracle_Home/oracle_common/
        oracle.apps.biaodiutil.Import MODE=IMPORT
        FILEDIR=/scratch/product/Oracle/Middelware/Oracle_Home/bi/biapps/admin/provisioning/odi/
        PLV=JDE_9_1 SRCTECH=IBM_DB2_UDB
        JPSCONFIGFILE=/scratch/product/Oracle/Middelware/Oracle_Home/odi/studio/bin/jps-config-jse.xml
        LOGDIR=/scratch/product/Oracle/Middelware/Oracle_Home/bi/biapps/admin/provisioning/odi/logs/
Note:
All the adaptor metadata zip files are delivered along with the package scenarios. When you run the command line utility to import these files, ensure that you use import mode as IMPORT which would import the adaptor metadata content for that adaptor. -
- Enter the ODI Repository connection details when prompted.
- Monitor the process by viewing the command line window or the log files being written to the logs directory.
This process can be lengthy and can last from 1 to 10 hours, depending on the number of adaptors for which you are importing metadata content.
- When the import process is complete, log into ODI Studio and verify the data stores and mappings for the new adaptor are present.
- Make a copy of file
<LOGDIR>/sceregenparams.propertiesas<LOGDIR>/sceregenparams.properties_<PLV>.For example, copyPLV=BIA_11in<LOGDIR>/sceregenparams.properties_BIA_11immediately after completing the import process for each adaptor. - Repeat steps 1 through 7 for each adaptor you need to import, substituting the appropriate PLV code and the source technology.
- After importing all the adaptors, sign in to ODI Studio.
- Click Designer, expand Global Objects, click Global User Functions, and then click Conversion Operation.
- Expand
TO_CHAR_JULIANand check for Used by. If there are any references, then note them as you must regenerate the scenarios using these references.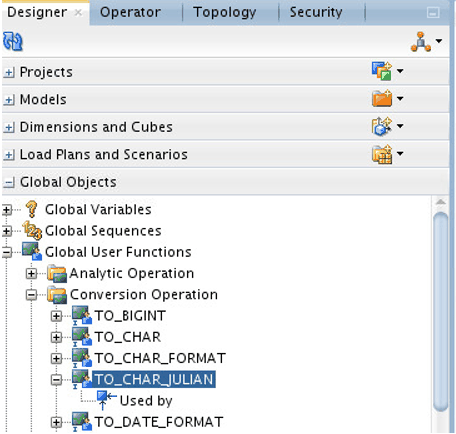
Note:
The user defined functions TO_CHAR and TO_CHAR_JULIAN have similar implementation syntax TO_CHAR($VALUE) and TO_CHAR($VALUE,’J’). Sometimes after import, the TO_CHAR function references are changed to TO_CHAR_JULIAN in the expressions. The TO_CHAR_JULIAN user-defined function isn't used in Oracle BI Applications 11.1.1.10.3. - Right-click the TO_CHAR_JULIAN user-defined function, click Delete, and then click Yes to remove it.
- Sign out of ODI Studio.
- For IBM DB2 UDB Technology, do the following:
- Run in import mode as IMPORT to import the adaptor metadata.
- After import is completed, sign in to ODI Studio.
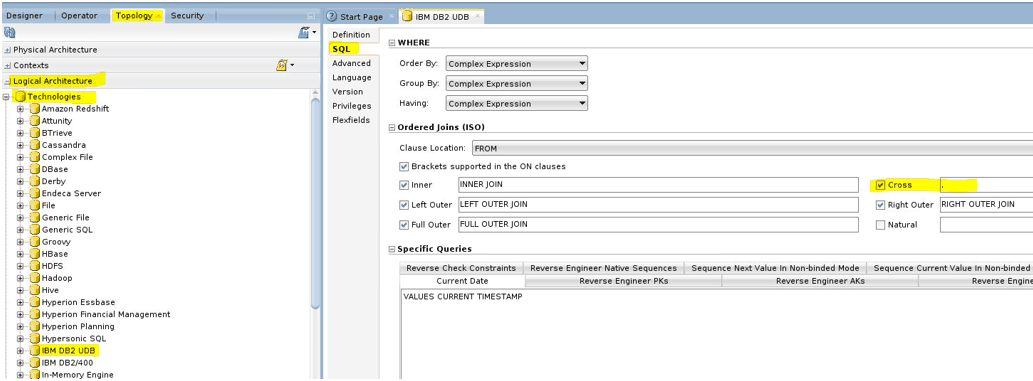
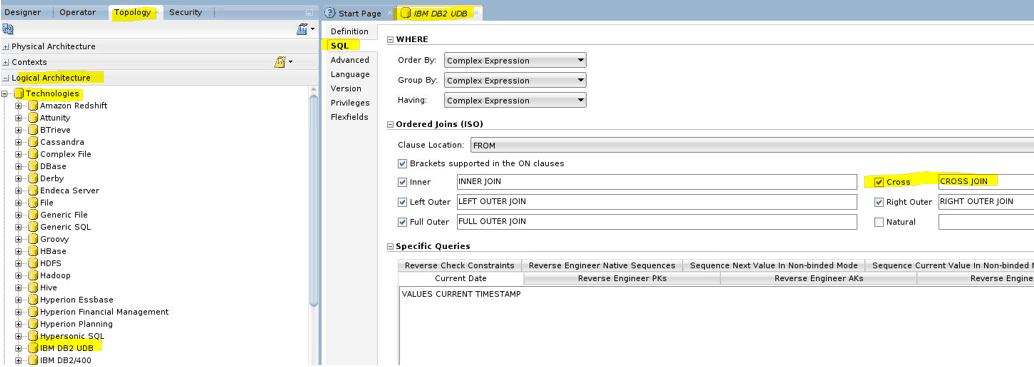
- Click on Topology, expand Logical Architecture, and then expand Technologies.
- Right-click IBM DB2 UDB and then click Open.
- Click SQL and in the Cross join syntax, and change “,” to CROSS JOIN.
Before changes:
After changes:
Click Save and sign out of ODI Studio.
- For each of the imported adaptors, repeat the steps to regenerate scenarios one by one.
- Overwrite the file
<LOGDIR>/sceregenparams.propertieswith backup file<LOGDIR>/sceregenparams.properties_<PLV>for the adaptor scenarios to be regenerated using this Unix command:cp <LOGDIR>/sceregenparams.properties_<PLV> <LOGDIR>/sceregenparams.properties.For example,PLV=BIA_11in<LOGDIR>/sceregenparams.properties_BIA_11. File<LOGDIR>/sceregenparams.propertiesmust contain the level 2 folders to regenerate for that adaptor. Examples of level 2 folders are SILOS, PLP for BIA_11, SDE_JDEE1_91_ADAPTOR for JDE_9_1, SDE_PSFT_92_ADAPTOR for PSFT_9_2. - Run the import in MODE=SCEREGEN substituting the appropriate PLV code and source technology.For example:
BIA_11:
/scratch/jdk/jdk_1.8.0_201/bin/java -client -Dfile.encoding=UTF-8
        -classpath
        "/scratch/product/Oracle/Middelware/Oracle_Home/odi/sdk/lib/*:/scratch/product/Oracle/Middelware/Oracle_Home/oracle_common/jlib/*:/scratch/product/Oracle/Middelware/Oracle_Home/oracle_common/modules/oracle.idm/*:/scratch/product/Oracle/Middelware/Oracle_Home/oracle_common/modules/oracle.jps/*:/scratch/product/Oracle/Middelware/Oracle_Home/oracle_common/modules/oracle.jdbc/*:/scratch/product/Oracle/Middelware/Oracle_Home/oracle_common/modules/oracle.nlsrtl/*:/scratch/product/Oracle/Middelware/Oracle_Home/oracle_common/modules/oracle.ucp.jar:/scratch/product/Oracle/Middelware/Oracle_Home/bi/biapps/lib/*:/scratch/product/Oracle/Middelware/Oracle_Home/bi/biapps/biaodiutil/lib/bia-odi-util.jar"
        -Dcommon.components.home=/scratch/product/Oracle/Middelware/Oracle_Home/oracle_common/
        oracle.apps.biaodiutil.Import MODE=SCEREGEN
        FILEDIR=/scratch/product/Oracle/Middelware/Oracle_Home/bi/biapps/admin/provisioning/odi/
        PLV=BIA_11
        JPSCONFIGFILE=/scratch/product/Oracle/Middelware/Oracle_Home/odi/studio/bin/jps-config-jse.xml
        LOGDIR=/scratch/product/Oracle/Middelware/Oracle_Home/bi/biapps/admin/provisioning/odi/logs/
PSFT_9_2 for MSSQL:
/scratch/jdk/jdk_1.8.0_201/bin/java -client -Dfile.encoding=UTF-8 -classpath "/scratch/product/Oracle/Middelware/Oracle_Home/odi/sdk/lib/*:/scratch/product/Oracle/Middelware/Oracle_Home/oracle_common/jlib/*:/scratch/product/Oracle/Middelware/Oracle_Home/oracle_common/modules/oracle.idm/*:/scratch/product/Oracle/Middelware/Oracle_Home/oracle_common/modules/oracle.jps/*:/scratch/product/Oracle/Middelware/Oracle_Home/oracle_common/modules/oracle.jdbc/*:/scratch/product/Oracle/Middelware/Oracle_Home/oracle_common/modules/oracle.nlsrtl/*:/scratch/product/Oracle/Middelware/Oracle_Home/oracle_common/modules/oracle.ucp.jar:/scratch/product/Oracle/Middelware/Oracle_Home/bi/biapps/lib/*:/scratch/product/Oracle/Middelware/Oracle_Home/bi/biapps/biaodiutil/lib/bia-odi-util.jar" -Dcommon.components.home=/scratch/product/Oracle/Middelware/Oracle_Home/oracle_common/ oracle.apps.biaodiutil.Import MODE=SCEREGEN FILEDIR=/scratch/product/Oracle/Middelware/Oracle_Home/bi/biapps/admin/provisioning/odi/ PLV=JDE_9_1 SRCTECH=MICROSOFT_SQL_SERVER JPSCONFIGFILE=/scratch/product/Oracle/Middelware/Oracle_Home/odi/studio/bin/jps-config-jse.xml LOGDIR=/scratch/product/Oracle/Middelware/Oracle_Home/bi/biapps/admin/provisioning/odi/logs/ - Enter the ODI Repository connection details when prompted.
- Monitor the process by viewing the command line window or the log files being written to the logs directory. This process can be lengthy and can last from 1 to 10 hours, depending on the number of adaptors for which you're importing the metadata content.
Importing Security Settings in to the ODI Repository
You can import security settings in to the ODI repository.
In this procedure you import the security settings that you exported in Exporting Security Settings from Original ODI Repository.
- Log in to ODI Studio.
- Navigate to Security, and select Import Security Settings.
- In the Import Security Settings dialog, select Import mode as Synonym Mode INSERT_UPDATE, select Import From a Zip file, browse for the export file, and then click OK.
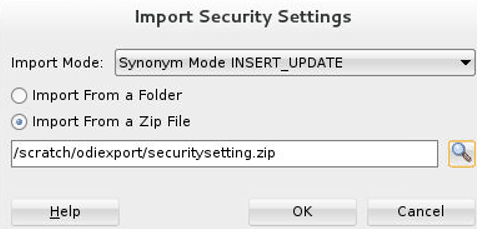
- Confirm that there are no issues in the Import report and close it.
You can now log into the ODI Repository with the security settings configured when the ODI Repository was created using the Oracle Business Analytics Suite RCU.
Importing Connection Details that Configure the Data Servers
Use this procedure to perform post-import configurations.
- Launch the ODI Studio client and connect to the ODI repository.
- Navigate to the Topology tab and complete these steps:
- Expand Physical Architecture, click Technologies, click Oracle, and then click the BIAPPS_DW data server.
- Double-click and open your physical schema such as BIAPPS_DW.BIA_DW and set the physical and work schema to match your warehouse schema details.
- Click Save and close.
- Navigate to the Topology tab. From the Connect Navigator (Topology icon dropdown on the top right side of the navigator pane), select Import. As part of the procedures described below, you import the file created by exporting the ’Global’ context in topic Exporting Topology Settings from Original ODI Repository.
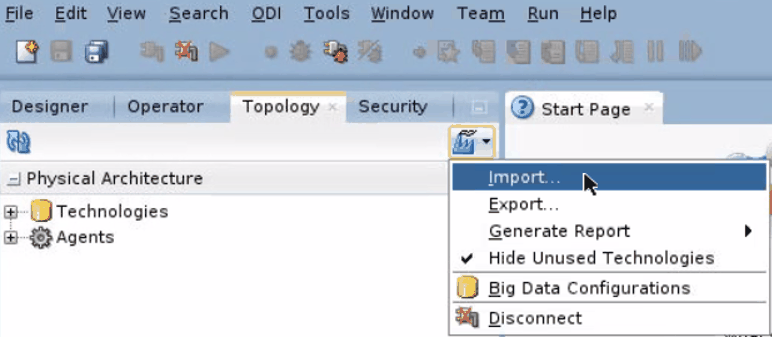
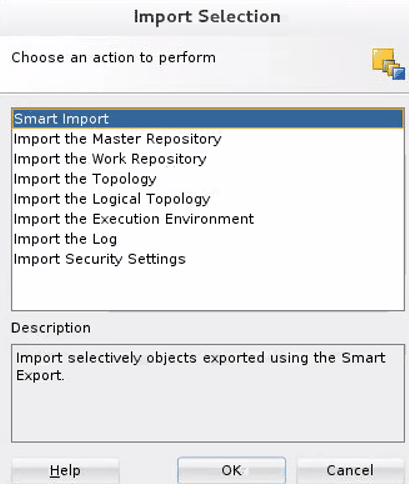
- In the Import Selection dialog, select Smart Import.
- In File Selection, browse and select the export zip file created in topic Exporting Topology Settings from Original ODI Repository and click Next.
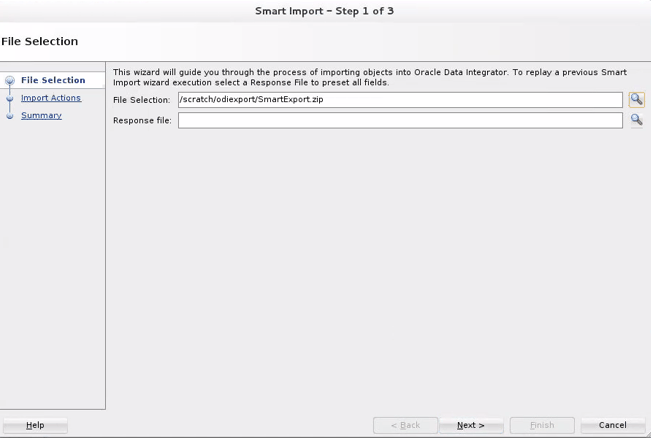
- In Enter Export Key, provide the export key.
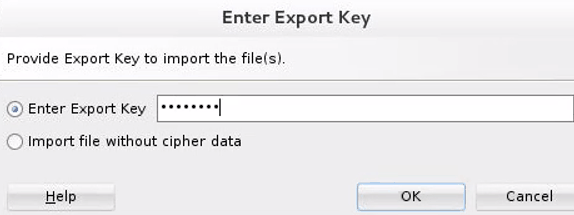
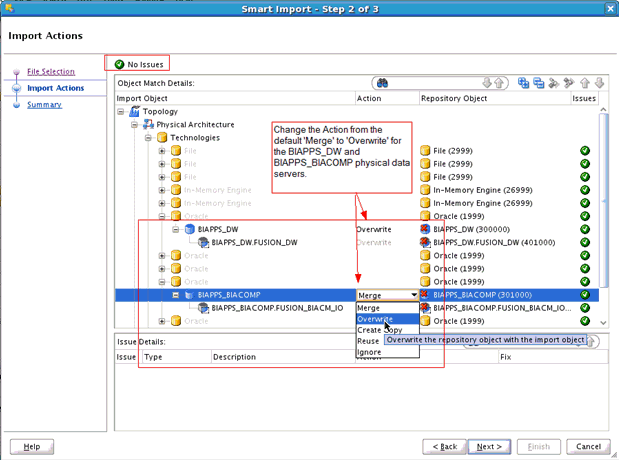
- The default behavior of Smart Import is to Merge details in the target repository. Ensure that no issues are reported – if issues are reported, resolve them to ensure that the existing details are replaced by the details being imported. Select the BIAPPS_DW and BIAPPS_BIACOMP Data Servers, select the Overwrite option, and continue.
- Verify the imported details.Verify that the following logical schemas have the correct data source
Num IDvalue set in the DATASOURCE_NUM_ID flex field:-
DW_BIAPPS11G -
DW_BIAPPS11G_LOG_FILES -
DW_BIAPPS11G_SHARED_FILES -
DW_BIAPPS11G_SRCFILES
If you don't see the value
999for all these logical schemas, then set the values to 999. -
- In ODI Studio, click Topology and select Physical Architecture. Open the
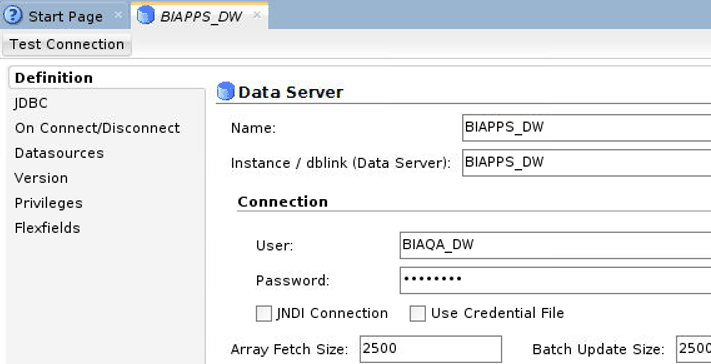
BIAPPS_DWphysical server. - Verify that the User and Password are correctly populated on the Definition tab.
- On the JDBC tab, verify that the JDBC URL is correctly set. If you used the default Merge action during the Smart Import, then the User and Password are updated but the JDBC URL remains unchanged.
- Repeat steps 1 through 4 for the
BIAPPS_BIACOMPphysical server. - Verify that the Physical schema for
BIACOMPandDWare set as defaults. If they aren't set as defaults, then the load plans fail.-
In ODI Studio, click Topology and select Physical Architecture.
-
Open the physical schema under the
BIAPPS_BIACOMPphysical server.
Description of the illustration 103-import-connection-details-step12.gif -
Select the Default check box if it isn't selected on the Definition tab.
-
Save your changes.
-
- Repeat steps 2 through 4 for the physical schema under the
BIAPPS_DWphysical server. - In ODI Studio, click Topology, select Physical Architecture, and then expand Agents.
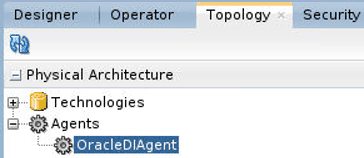
- Right-click on the configured agent and then click Open.
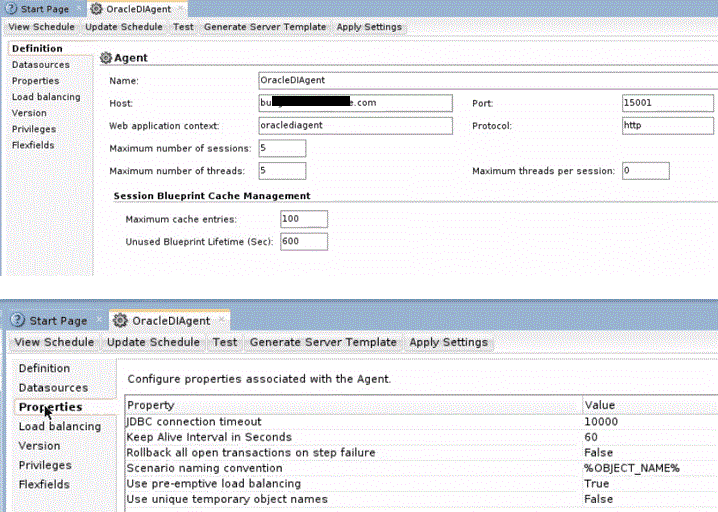
- Validate all the details with the screenshot before exporting. If they are different, then update the applicable details.
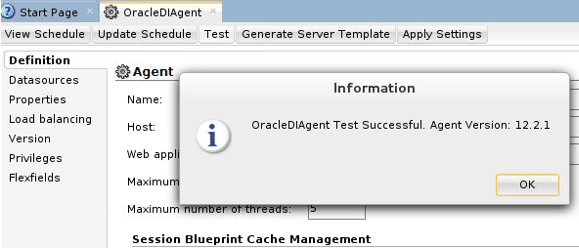
- If the physical agent is already configured, then click Test to test the physical agent.
- If the test connection fails with an error message, then sign out of ODI Studio.

- Navigate to the path
<Domain Home>/bitools/bin/and run the script./stop.shfor UNIX/Linux and run the scriptstop.cmdfor Windows to stop all the servers such as Node Manager, Admin Server, BI Server, and ODI Server.For example, <Domain Home> is/scratch/product/Oracle/Middleware/user_projects/domains/bidomain/wherebidomainis the domain name. - Navigate to the path
<Domain Home>/bitools/bin/and run the script./start.shfor UNIX/Linux and run the scriptstart.cmdfor Windows to start all the servers such as Node Manager, Admin Server, BI Server, and ODI Server. - Sign in to ODI Studio.
- In ODI Studio, click Topology, select Physical Architecture, expand Agents, right-click on the configured agent, and then click Open.
- Click Test and then click OK on the Information message.
