Creating a Custom Target Application

Create a custom target application that enables you to extract data from the Oracle Enterprise Performance Management Cloud, and then push the data into a flat file instead of loading it to an EPM Cloud application.

A custom target application enables you to load data from an EPM supported source, and then extract the data into a flat file instead of loading it to Oracle Essbase, Oracle Hyperion Planning, and Oracle Hyperion Financial Management. You can define the custom target application with required dimensionality. Instead of exporting the data to a target application, Oracle Hyperion Financial Data Quality Management, Enterprise Edition generates a data file that can be loaded to an external system using a custom process.

When creating a custom target application, note the following:

  • Data is written to the file in the following predefined order: Account, Entity, UD1, UD2 ... UD20, AMOUNT.

  • The sequence that is specified when you create the custom application definition is used to order the dimensions for mapping processing. Note the sequence in case you have scripts that have an order of processing dependency.

  • Data Rule—The POV category is not validated.

  • Data Load Mapping—Target values are not validated for custom applications.

  • Data Load Execution—FDMEE creates an output data file. The name of the data file is <Target App Name>_<Process ID>.dat, and it is written to the <APPL ROOT FOLDER>/outbox directory. You can access the data file from the Process Details page from the OUTPUT file column.

    When the data load rule is executed, FDMEE exports the data.

    If you want to create a custom file, then set the Enable Export to File option to No and then write a custom BefExport event script to create a data file. If you want to create a custom process to load target script automatically, then write a BefExport script.

To define a custom target application:
  1. On the Setup tab, under Register, select Target Application.
  2. In Target Application, in the Target Application summary grid, click Add.
  3. Select Local target application.
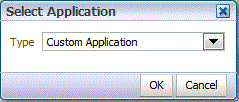
  4. From Select Application, select Custom Application, and then click OK.

    Image shows Select Application screen.
  5. In Application Details, enter the application name.
  6. Select the Dimension Details tab.
  7. Specify the Dimension Name.
  8. Select the Target Dimension Class or click Search button to select the Target Dimension Class for each dimension that is not defined in the application.

    The dimension class is a property that is defined by the dimension type. For example, if you have a Period dimension, the dimension class is also "Period". For Essbase applications, you must specify the appropriate dimension class for Account, Scenario, and Period. For Oracle Hyperion Public Sector Planning and Budgeting applications, you must specify the dimension class for Employee, Position, Job Code, Budget Item, and Element.

  9. In Data Table Column Name, specify the table column name of the column in the staging table (TDATASEG) where the dimension value is stored.

    Click Search button to search and select a data table column name.

  10. In Sequence, specify the order in which the maps are processed.

    For example, when Account is set to 1, Product is set to 2, and Entity is set to 3, then FDMEE first processes the mapping for Account dimension, followed by Product, and then by Entity.

  11. In Prefix Dimension for Duplicates, enable or check (set to Yes) to prefix member names by the dimension name.

    The member name that is loaded is in the format [Dimension Name]@[Dimension Member]. The prefixed dimension name is applied to all dimensions in the application when this option is enabled. You cannot select this option if there is a dimension in the target that has duplicate members. That is, only select this option when the duplicate members are across dimensions.

    If the application supports duplicate members and Prefix Dimension for Duplicates is disabled or unchecked (set to no), then the user must specify the fully qualified member names. Refer to the Essbase documentation for the fully qualified member name format.

    Note:

    Planning does not support duplicate members.
  12. Click Application Options.

    Image show Application Options tab for a custom target application.
  13. In Enable export to file, select Yes to have FDMEE create an output data file for the custom target application.

    A file is created in the outbox folder on the server with the following name format: <LOCATION>_<SEQUENCE>.dat. For example, when the location is named Texas and the next sequence is 16, then the file name is Texas_15.dat. The file is created during the export step of the workflow process.

    When the Enable export to file option is set to No, then the Export to Target option is unavailable in the execution window.

  14. In File Character Set, select the file character set.

    The file character set determines the method for mapping bit combinations to characters for creating, storing, and displaying text. Each encoding has a name; for example, UTF-8. Within an encoding, each character maps to a specific bit combination; for example, in UTF-8, uppercase A maps to HEX41.

  15. In Column Delimiter, select the character to use for delimiting columns in the output file.

    Available column delimiters are:

    • ,

    • |

    • !

    • ;

    • :

  16. In File Name to Download, enter the file name to copy.
  17. Click Save.