Registering Target Applications
Note:
For more information, see Registering Applications in Administering Data Integration for Oracle Enterprise Performance Management Cloud.
Target applications enable Oracle Hyperion Financial Data Quality Management, Enterprise Edition to be used as a primary gateway to integrate data between different source systems and target applications. In this way, you can deploy local Oracle Fusion Cloud Enterprise Performance Management applications, business process instance to business process instance deployments (cloud to cloud applications), and custom applications into your existing EPM portfolio. The process to integrate source applications with target applications provides data visibility, integrity, and verification systems.
The following application types describe the types of target application that can be used:
-
local—This application type refers to a local EPM application (on-premise deployment) in the current service.
You might use the integration to import data from existing on-premise ERP applications or synchronize data between on-premise EPM applications.
For example, Oracle Hyperion Financial Management customers can add Oracle Hyperion Planning data, or a Planningcustomer can add more Planning applications. In addition, this integration enables you to write back from a cloud to an on-premise application or other external reporting applications.
-
Cloud—This application type refers to a service instance that uses a remote service to integrate data. A business process instance is a self-contained unit often containing the web server and the database application. In this case, connection information must be selected between the two business process instances.
This feature enables EPM customers to adapt cloud deployments into their existing EPM portfolio including
- Planning Modules
- Planning
- Financial Consolidation and Close
- Oracle Hyperion Profitability and Cost Management
- Tax Reporting
To register a target application:
-
Select the Setup tab, and then under Register, select Target Application.
-
In Target Application, in the summary grid, click Add, and then select the type of deployment.
Available options are Cloud (for a Cloud deployment) or Local (for an on-premise deployment).
For a Cloud deployment, go to step 3.
For a Local deployment, go to step 4.
-
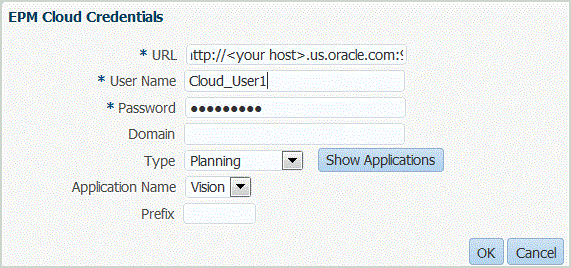
To register a Cloud deployment, select Cloud and then complete the following steps on the EPM Cloud Credentials screen:
-
In URL, specify the service URL that you use to log on to your service.
-
In User name, specify the user name for the Cloud Service application.
-
In Password, specify the password for the Cloud Service application.
-
In Domain, specify the domain name associated with the Cloud Service Application.
An identity domain controls the accounts of users who need access to service instances. It also controls the features that authorized users can access. A service instance belongs to an identity domain.
Note:
Administrators can update the domain name that is presented to the user, but FDMEE requires the original domain name that was provided when the customer signed up for the service. Alias domain names cannot be used when setting up Cloud EPM connections from FDMEE. -
From Type, specify the type of application, and click OK.
Valid application types:
-
Planning
-
Essbase
-
Consolidation
-
Tax Reporting
You can also click Show Applications and select the application.
-
-
In Application Name, enter the application name.
-
To register a target application with the same name as an existing target application, in Prefix, specify a prefix to make the name unique.
The prefix name is joined to the existing target application name. For example, if you want to name a demo target application the same name as the existing "Vision" application, you might assign the Demo prefix to designate the target application with a unique name. In this case, the FDMEE joins the names to form the name DemoVision.
-
Click OK.

-
- Click OK.
-
In Application Details, enter the application name.
-
Click OK.
-
If using an Essbase database, select the Essbase Database Name.
-
Click Refresh Members.
To refresh metadata and members from theCloud EPM, you must click Refresh Members.
-
Click Save.
-
Define the dimension details.
See Defining Application Dimension Details.
Optional: If not all dimensions are displayed, click Refresh Metadata. -
Select the application options.
For Planning applications, see Defining Application Options for Essbase and Planning.
For Financial Management, see Defining Application Options for Financial Management.
Note:
No application options are available for the Account Reconciliation Manager.