- Administrator's Guide
- Setting Up Account Reconciliation Manager
- Managing Formats
- Creating Formats
- Adding Transaction Details, Action Plans, and Rules
Adding Transaction Details, Action Plans, and Rules
Transaction Attributes determine the information that the Preparer provides when transactions are entered into the reconciliation. Transaction Attributes are displayed in the Reconciliation dialog box on the Transaction Detail tab.
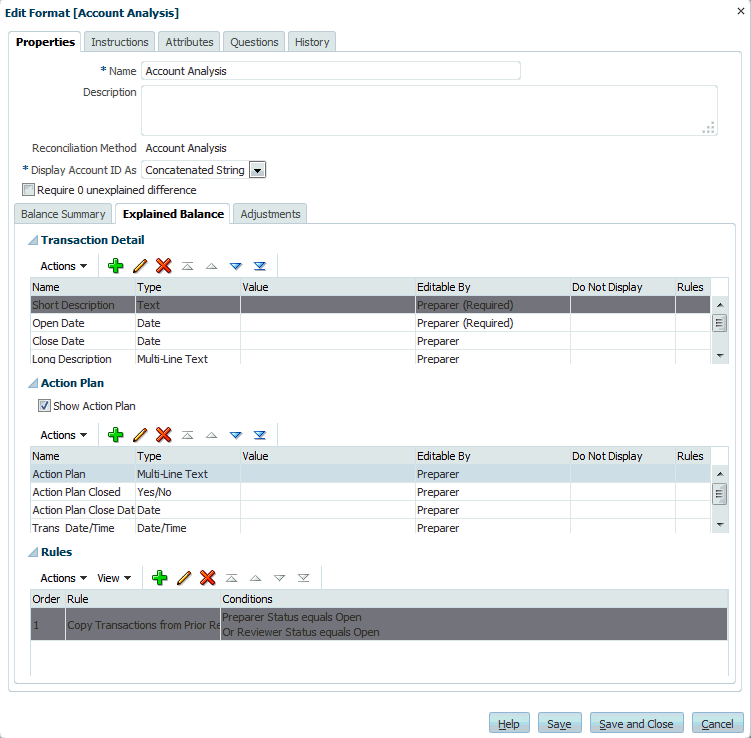
The following is an example of an Account Analysis Explained Balance tab with the Transaction Detail, Action Plan, and Rules sections:

To add or edit Format Transaction Details, Action Plans, and Rules:
-
In New Format or Edit Format, on the Properties tab, select an attributes tab specific to the reconciliation method you selected on the Properties tab:
-
For Account Analysis, select Explained Balance or Adjustments
-
For Balance Comparison, select System Adjustments or Subsystem Adjustments
Attributes tabs sections:
-
Transaction Detail
The attributes assigned to the transaction, including standard and attributes. Assign sufficient attributes to enable Preparers of reconciliations to fully document the nature of the transaction.
-
Action Plan
Lists the action plans related to reconciliation transactions. The attributes in this section have different behavior according to the access privileges to ensure that Preparers can document resolution of outstanding items, even after the reconciliation is submitted.
-
Rules
Lists the rules related to reconciliation transactions.
-
-
For the Transaction Detail and Action Plan sections, click Add, and, on the Properties tab enter the following information:
For Account Analysis and Balance Comparison reconciliation methods, enter:
-
Attribute
Select an attribute from the list of defined attributes; for example: Accrual Category or Action Plan.
-
Type
Noneditable field is populated by the attribute type.
-
Value
Select a value.
-
Access
All roles have view access unless otherwise specified in the table below.
To add an access, for each of the Text Box and Attachments tabs:
-
Click Add.
-
Select a role.
-
Select one of the Role access types:
-
Text Box:
-
Do Not Display—Does not see this attribute on the Reconciliation List or in any of the dashboards, list views, or reports.
-
Allow Edits—Has the ability to add, change, and remove values for the attribute, but subject to the editability rules.
-
Required—Requires a value for the attribute. The Required option is available for Preparers and Reviewers. Until a value is provided, Preparers are prevented from submitting, and Approvers are prevented from approving.
-
-
The Multi-Line Text Box has 2 access tabs:
-
Text Box tab:
-
Do Not Display—Does not see this attribute on the Reconciliation List or in any of the dashboards, list views, or reports.
-
Allow Edits— Has the ability to add, change, and remove values for the attribute, but subject to the editability rules.
-
Required—Requires a value for the attribute. The Required option is available for Preparers and Reviewers. Until a value is provided, Preparers are prevented from submitting, and Approvers are prevented from approving.
-
-
Attachments tab:
-
Do Not Display—Does not see this attribute on the Reconciliation or in any of the dashboards, list views, or reports.
-
Add & Remove—Has the ability to add files and remove files that they themselves added, but subject to the editability rules.
-
Required—Requires the Preparer or Reviewer to attach at least one file. The Required option is only available for Preparers and Reviewers. Until a file is attached, Preparers are prevented from submitting, and Approvers are prevented from approving.
-
Add & Remove All—Can add their own files, remove their own files, and also remove files added by other roles.
-
-
-
-
Click OK.
-
-
-
In Rules, select Add and enter the applicable information:
- Rules—See Order of Precedence Rules for Account Reconciliation.
-
Description
Optional. Explain why you configured the rule and how should be used.
- The Rules tab defines rules for the attribute being assigned.
- To set the Access for the "Set Attribute Access" rule.
- Select Create Filter and populate the conditions section or select Use Saved Filter, and then select a filter. The filter selected and configured for the rule determines the conditions that trigger the rule to apply.
-
Conditions
-
If Use Saved Filter is selected, the Conditions section displays a read-only version of the conditions associated with the saved filter.
-
If Create Filter is selected, the Conditions section is enabled.
Conjunction, Source, Attribute, Operand, and Value behave as they do for the existing advanced filter feature. When creating filters, you can use these rules:
-
Any Reconciliation or Transaction attribute, including calculated attributes that are classified as Reconciliation and Transaction attributes
-
Period Frequency
-
-