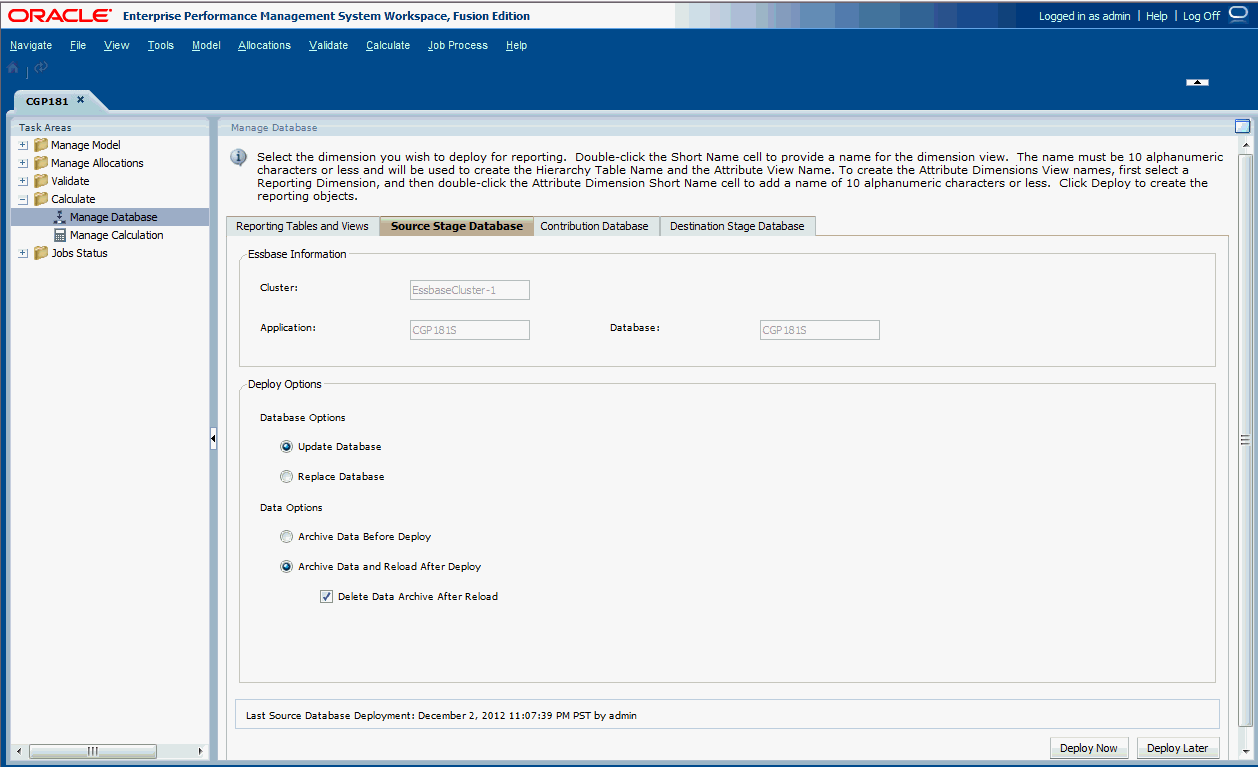
Deploying Detailed Profitability Source Stage Database
To deploy source stage database:
- In an open model, from
Task Areas, select Calculate, and then Manage Database.Select the Source Stage Database tab.

- Under Essbase Information, review the following information:
-
Cluster displays the name of the Oracle Essbase database cluster that contains the model.
-
Application displays the name of the Essbase application to which the application is being deployed.
-
Database displays the name of the Essbase database to which the application is being deployed.
-
- Under Deploy Options, select the Database Options for deploying the source stage database:
-
For the first deployment of a database, all selections are grayed out. This option creates the entire database for the first time.
-
To redeploy an existing database, select Update Database to retain existing artifacts and property settings in the new database, and change the outline to reflect current metadata.
-
For subsequent deployments, select Replace Database to remove the database and applications completely, and recreate them.
-
- Under Deploy Options, select the Data Options to be used for the source stage database deployment:
-
Select Archive Data Before Deploy to export existing data to the application database folder. For the Calculation database, Only Level-0 data is exported for the ASO database. Data is always exported in the native format.
-
Select Archive Data and Reload After Deploy to automatically import the data back into Essbase, using the previously exported data files. A Rules File is not generated for ASO databases.
This option is available only if no dimensions are being added or removed. Dimensions can be added or removed in the Profitability Applications Console, or by adding, deleting, or changing a stage in Oracle Hyperion Profitability and Cost Management.
After deleting dimension members, the Archive Data and Reload After Deploy option for redeploying the cube to Essbase and preserving the data is not guaranteed to always work, depending on how Essbase is able to deal with those deleted members. As a workaround, you may have to export all data and remove the data for the deleted members and then reload the data in a separate step after deploying the cube without the Archive Data and Reload After Deploy option selected.
-
Optional: If Archive Data and Reload After Deploy was chosen, you can select Delete Data Archive After Reload to automatically delete the archived data only after the successful data reload.
-
-
Optional: Click Deploy Later to schedule a
convenient date and time to run the deployment.
If this option is not selected when the task is created, you will not be able to schedule the task.
- Optional: Click Deploy Now to deploy the source stage database immediately.
A confirmation message is displayed, indicating that the job has started and identifying the assigned taskflow ID.
Depending on the size and complexity of the model, this operation may take a significant amount of time.
- Select Jobs Status, and then Job Library to monitor the task status.
- If the Replace Database option was chosen, or the data import failed for some reason, after deployment, rerun the Data Transfer for this database.
- Run Data Transfer for the generated database.