Deploying Detailed Profitability Reporting Views

After validating the structure and data of a model, you must deploy the dimension objects to create system-generated Reporting Views and synchronize the views. The views are created on the Detailed Profitability Product schema with access grants to the Model Data Schema that was selected on the Model Level Preferences tab.

All deployed dimensions are listed, including managed dimensions, POV dimensions, and attribute dimensions. To see which dimensions should be included, you can view the list for the application in the Application Library. Attribute dimensions are only displayed if they are in the application.

There are two categories of system-generated reporting views:

  • Reporting Hierarchy Table – Displays one row for each ancestor level in the hierarchy (parent, grandparent, and so on).

  • Reporting Attribute View – Displays one row per dimension member, including all levels of the hierarchy (the dimension member and any defined dimension attributes) This joins the dimension member with other attribute values.

The view and table names are generated in the following format:

<Product Name>_<Application Name>_<User-Defined Dimension Short Name><View/Table Type_V>(for views only)

For example:

  • HPMD_DEMO_ACCOUNTS_HIER (Hierarchy Table)

  • HPMD_DEMO_ACCOUNTS_ATTR_V (Attribute View)

The deployed views and tables are available under the Model Data Schema as synonyms, and these views and tables are useful for creating the custom reports.

To create the Reporting View, you must first deploy the application in Oracle Essbase. After the deployment, change the Short Names, if required.

To create or recreate the application dimension views:
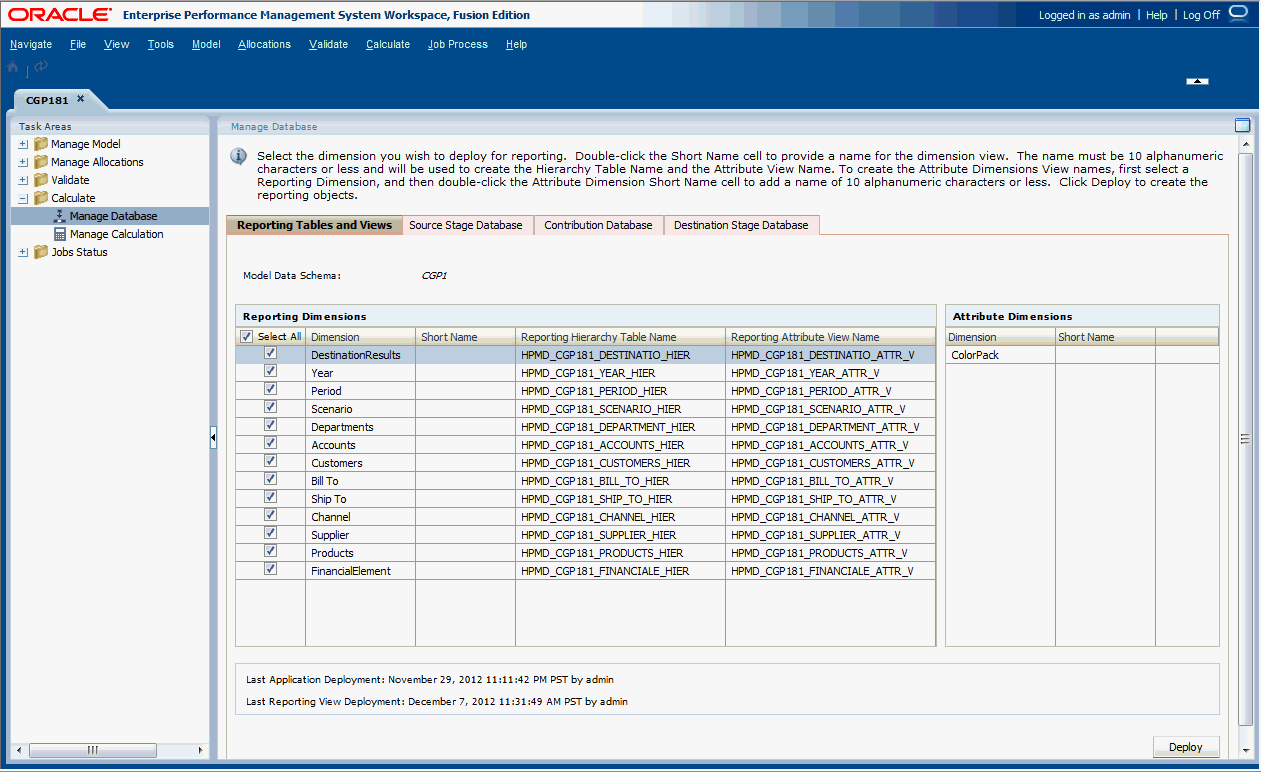
  1. Ensure that the selected application has been deployed in Essbase. See Oracle Essbase Database Administrator's Guide for instructions.
  2. From Oracle Hyperion Enterprise Performance Management Workspace, select Navigate, then Applications, then Profitability, and then select the application for which you want to create reporting views.
  3. In an open model, from Task Areas, select Calculate, and then Manage Database.

    Use the Manage Database tab to deploy dimension views.
  4. On Manage Database, on the Reporting Tables and Views tab, review the Model Data Schema.

    If the Model Data Schema is not the one that you want to use, you cannot change it on this screen. You must go back to the Model Level Preferences tab to select the correct one. See Selecting the Detailed Model Data Schema.

  5. Optional: Under Last Application Deployment and Last Reporting View Deployment, review the displayed dates.

    The Last Reporting View Deployment date should be later than the Last Application Deployment. If not, redeploy the Reporting Views to synchronize the applications.

  6. On the Reporting Dimensions pane, select the dimensions to be included in the deployment:
    • Check Select All to include all listed dimensions.

    • Check individual dimensions to include only those dimensions.

  7. Optional: Under the dimension Short Name, for any selected dimension, double-click the cell to open it for editing and enter a short name of up to 10 characters. This short name is used to create the Reporting View names.

    By default, the first 10 characters of the dimension name are used when the table is generated. This short name is used in the Reporting View names. By default, the characters are all in uppercase.

    Note:

    Do not use special or restricted characters in the Short Name, such as /,+, or @ signs. See the Oracle Essbase Database Administrator's Guide to view the latest naming restrictions.

  8. Click Deploy.

    The deployed views are based on the Oracle Hyperion Profitability and Cost Management application tables.

    These views are created on the Profitability and Cost Management Product schema, and grants are made to access the Reporting Views in the Model Data Schema. See the Oracle Hyperion Profitability and Cost Management Administrator's Guide.