Importing Transactions Directly From Excel Using the Smart View Extension for Reconciliation Compliance
This topic describes how to initialize and import transactions into Reconciliation Compliance using the Smart View Account Reconciliation extension.
You can use Excel to load transactions into Reconciliation Compliance by using the Smart View Account Reconciliation extension. The direct integration requires the base installation of Smart View plus the new Smart View Extension for Reconciliation Compliance.
You can either Add to your existing transactions, or use Replace All to replace your existing transactions with this new import file.
For instructions on how to install Smart View and how to download the Smart View Extension for Reconciliation Compliance, see Setting Up Account Reconciliation in Smart View.
To load transactions, you use the Initialize and then Import options on the Smart View Reconciliation Compliance ribbon to import the data. Initialize prepares the header row (always Row 1) in the spreadsheet for the import based on Transaction Type and selection of formats. Import performs the actual import of the transactions.
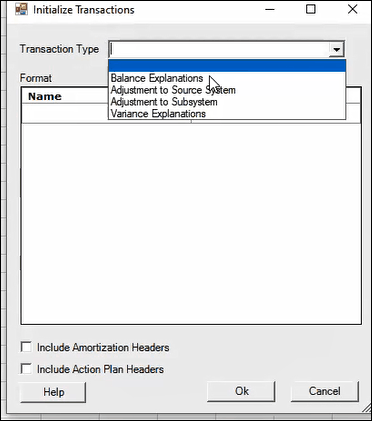
You can load any of the following Transaction Types across one or many reconciliations in one import: Balance Explanations, Adjustment to Source System, Adjustment to Subsystem, and Variance Explanations.
For the procedure to initialize, see Initializing the Import
For the procedure to import the transactions, see Importing the Transactions
Initializing the Import
The Initialize option prepares the header row for the import based on specification of Transaction Type and selecting one or more formats. You can also include Amortization headers as well as Action Plan headers.
Note:
If you are loading transactions using the same header row from a previous load, you do not have to use the Initialize option again. You can go directly to the Import option.
-
Once the Smartview installation steps are complete, open Excel, and establish the private connection. Note that you see the Smart View menu option as well as Reconciliation Compliance on the Smart View ribbon.

Once you connect. you see the Initialize and Import options are active and ready to use.

- Click Initialize.

- Select a Transaction Type from the drop down and the list
of formats display for that transaction type.

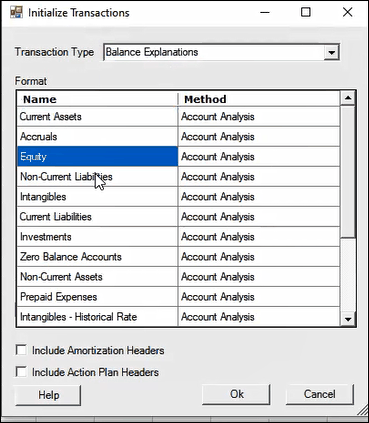
- Select one or more Formats. The Formats selected will determine which Attributes are created in the header row after the Initialize step is complete.
- You can select the checkbox to Include Amortization
Headers and/or Include Action Plan
Headers. Then click OK. If you leave
these blank, they will not be included in the Header Row.
Here's an example of the header row:

Rows and Columns - You can add your own rows and columns to the spreadsheet to include pre-import notes, calculations or anything else that may help your work process. Rows without an Account ID and columns without a predefined header will be ignored by the Import.
Here is a summary of the difference between column headers in Excel and the premapped Reconciliation Compliance Transaction Import file layout in Account Reconciliation:
Smart View Excel Transaction Import Premapped Reconciliation Compliance Transaction Import File Notes Account ID Reconciliation Account ID These are the same. Example: 101-22270 <Sub Segment Name> SubSegmentx Used if one or more of the selected formats is a group reconciliation. Example: Store Short Description Short Description These are the same. Example: Contract - AirNow Long Description Long Description These are the same. Transaction Date Transaction Date These are the same. Close Date Close Date These are the same. <Entered> Amount Amountx For the Smart View import, use the same currency bucket names as specified in the Currency Buckets configuration in Account Reconciliation. Bucket names are configurable. Default names are Entered, Functional, or Reporting.
<Entered> Currency Amount Currencyx For the Smart View import, use the same currency bucket names as specified in the Currency Buckets configuration in Account Reconciliation. Example: USD Bucket names are configurable. Default names are Entered, Functional, or Reporting.
<Attribute> Attributex
Attribute Valuex
For the Smart View import, use the same Attribute Name as specified in the Attributes configuration in Account Reconciliation. Amortization Amortization Example: Amortizing Amortization Method Amortization Method Example: Straight Line Amortization Half Month Conversion Amortization Half Month Conversion Example: No Amortization Periods Amortization Periods Example: 7 Amortization Start Period Amortization Start Period Example: Jan-19 Amortization Start Date
Amortization End Date
Amortization Start Date
Amortization End Date
Amortization Original <Entered> Amortization Original Amount1 For the Smart View import, use the same bucket name as specified in the configuration in Account Reconciliation. Bucket names are configurable. Default names are Entered, Functional, or Reporting.
Action Plan Closed
Action Plan Closed Example: Y Action Plan Closed Date Action Plan Closed Date Example: 1/20/2020 Action Plan <Attribute>
Action Plan AttributeX
Action Plan Attribute Valuex
For the Smart View import, use the same Action Plan Attribute Name as specified in the Attributes configuration in Account Reconciliation.
Note:
The Smart View import requires the Amount or Date fields to be formatted in Excel as Amount or Date format. They cannot be Text or other format.Note:
Excel commonly converts Amortization Period names to dates, which will cause errors on import. To prevent this, format the column as Text (Initialize does this automatically) or prefix the Period name with a single quote (ex: 'January 2021)
Importing the Transactions
Once your header row layout is ready, you can load your transactions into Reconciliation Compliance via Smart View.
- Make sure your Excel header row is ready and you are connected to the Account Reconciliation instance.
- Create transactions for import in the sheet that has your header row configured.

- In Smart View's Reconciliation Compliance ribbon, click Import.
-
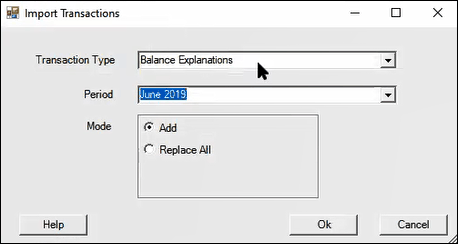
The Import Transactions dialog displays. You can change the Transaction Type if you wish.
-
Select the period from the drop down of Open and Closed periods.
Note:
You can load transactions for a period whether or not reconciliations are created for that period. Once the reconciliations are created, the transactions are displayed on the Reconciliation. If the reconciliation is deleted, the transactions that were loaded using Smart View still remain in the database.
- Select the import mode of either Add or
Replace All. Then click OK.
Add adds the transactions to your existing
transactions. Replace All replaces your existing
transactions with this new transaction import file.
When processing is complete, you see a Results dialog. Note that it warns you that any attributes with Read Only access are ignored. You can also download the file, if you wish.
Note:
Once you set up the header row, if you want to perform another import of transactions, you can go directly to Import without initializing again.