Adding Condition-Based Alerts Using a Mobile Smartphone
To add condition-based maintenance alerts:
Open the application by tapping the CBM Alert icon on your device, and then log in.
Tap the Add icon on the CBM Alert screen.
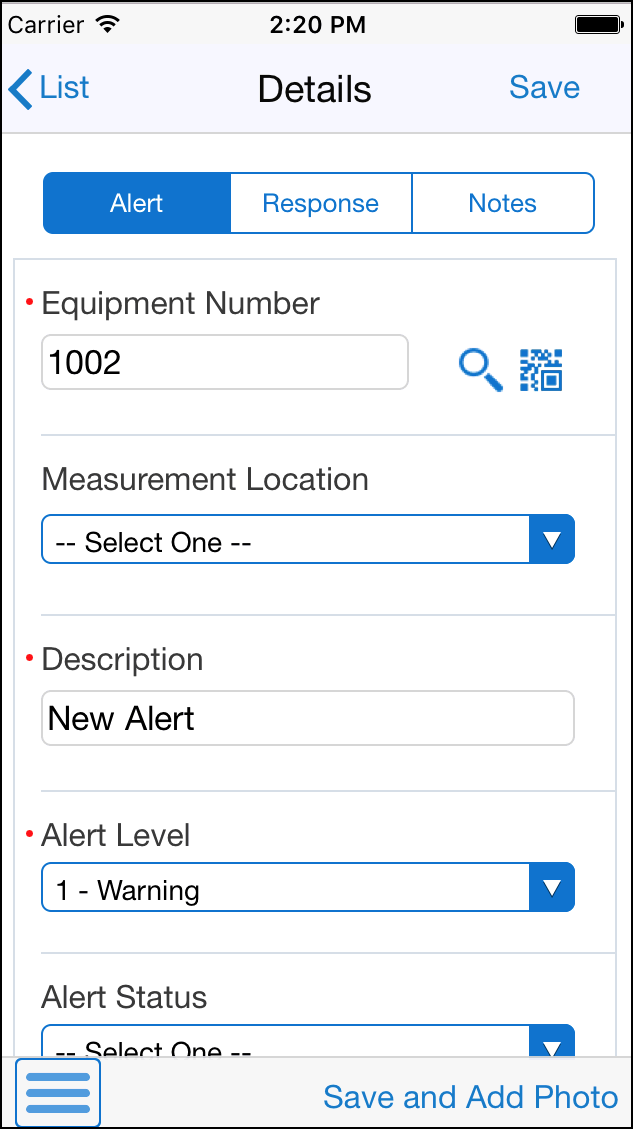
Enter the alert details on the Alert tab of the Details screen.
- Equipment Number (Release 9.2 Update)
This is a required field. Enter data in the Equipment Number field using one of these options:
Use the keyboard on your mobile device to manually enter the data. Alternately, you can tap the search and select button to search and select a piece of equipment.
Use the camera application on your mobile device to scan the data.
To use this option, tap the QR Code button next to the Equipment Number field. The system launches the device camera and you can scan the barcode of the equipment.
Use a Bluetooth-enabled scanning device to scan the data.
To use this option, tap the Equipment Number field to activate the scanning device. Then, scan the barcode of the equipment using the scanning device.
See Setting Up the Bluetooth Option in the Mobile Device to Scan Barcodes..
Note:The Equipment Number field is designed to accept the asset that you identify with an identification symbol in the Fixed Assets Constants program (P001012).
See Setting Up Fixed Asset Constants in the JD Edwards EnterpriseOne Applications Fixed Assets
Implementation Guide.For example, if the symbol to identify the serial number is "/" and the serial number is "4CE0460D0G"; then you need to enter "/4CE0460D0G" in the Equipment Number field to search and select a piece of equipment.
- Measurement Location and Description
Select a value from the Measurement Location drop-down that indicates a measurement location on a piece of equipment. You can use this code to indicate where a measurement is taken or where an alert originates from a piece of equipment.
Enter a description for measurement location in the Description field. You must enter a value in the Description field.
- Alert Level
Select a level for the alert from the Alert Level drop-down menu. You must select a value in this field.
- Alert Status
Select a status for the alert from the Alert Status drop-down menu. If you leave this field blank, the system automatically assigns an open status to the alert.
- Event Date/Time
Enter the date on which an event occurred, such as the date of a test reading or the date of a condition-based alarm. This is a required field.
- Send Notification Message
Select the radio button to specify that a notification message is sent when a condition-based alert is entered into the system. If you do not select the button, the system does not send a notification message.
The status of radio button can be populated from the processing options or from the information setup in the alert action rules.
Additionally, complete any of the remaining optional fields on the Alert tab, and then tap the Save button at the top right.
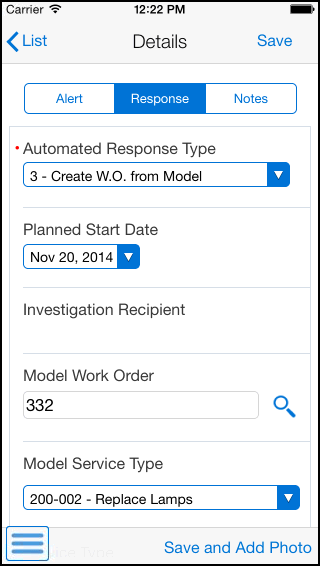
To set up alert action rules to respond to alerts automatically, tap the Response tab.
- Automated Response Type
Select a value from the drop-down menu to specify the value for the automated response type for the condition-based alert record. Based on the value you select in this field, the device activates some of the fields for user entry:
2: When you specify the response type 2, the device enables the Investigation Recipient field for user entry.
3: When you specify the response type 3, the device enables the Model Work Order and Model Service Type fields.
4: When you specify the response type 4, the device enables the Service Type field for user entry.
Note: You must enter values in the fields that the device enables based on the response type that you select.
Additionally, complete any of the remaining optional fields on the Response tab, and then tap the Save button at the top right.
When you save a new alert, the device displays the CBM Alert screen with the new alert displayed on the top of the list of alerts.
Tap the Notes tab to add new notes to the record. To enter a new note, enter text in the New Notes section and tap the Save button. The new note appears at the bottom of the Notes History section after it is saved.
To add photos for the new alert, while entering details on the Alert, Response, or Notes tab, tap the Save and Add Photo button at the bottom right of the respective tab to save the record and add photos for the new alert.
Tap the Add button on the CBM Alert Photos screen, and then select Album or Camera.
To attach an existing photo from your device's photo gallery, tap the Album option and then select the photo you want to attach. To take a new photo, tap the Camera option, and then take a new photo using the device's camera feature. On the New Photo screen, enter a name for the photo and tap the Save button.
Tap the Back button on the Photos screen to return to the CBM Alert screen.
To log out of the application, tap the Menu button at the bottom left of the screen, and then tap Logout.