Adding Work Orders Using the Create Service Orders Mobile Tablet Application
To add service orders:
Open the application by tapping the Service WO icon on your device, and log in.
See Logging In to Mobile Enterprise Applications.

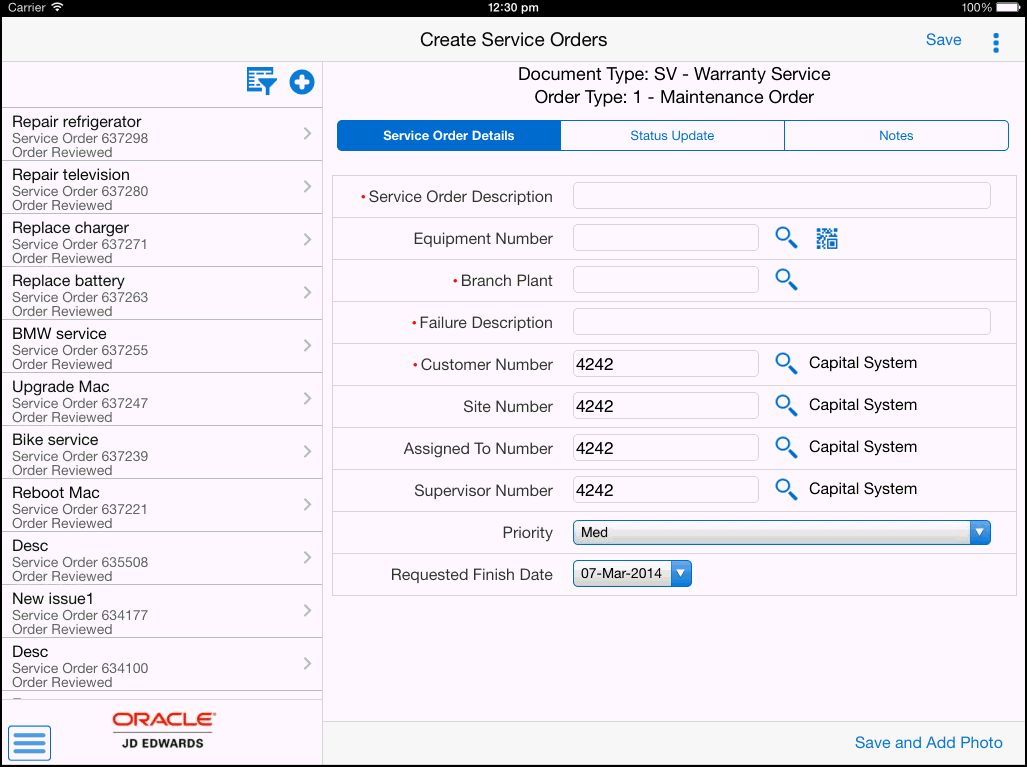
Tap the Add button on the top right hand side of your left pane. Based on the setting in the processing options, the device retrieves values in the Customer Number, Site Number, Assigned To Number, and Supervisor Number fields. You can add a service order using these values or you can clear these values and enter new values for your service order.
To clear the default values on the Service Order Details tab, tap the menu button on the top right hand side of the screen. This button gives tow options: Clear and Defaults. Tap the Clear button to clear the values or tap the Defaults button to restore default values.

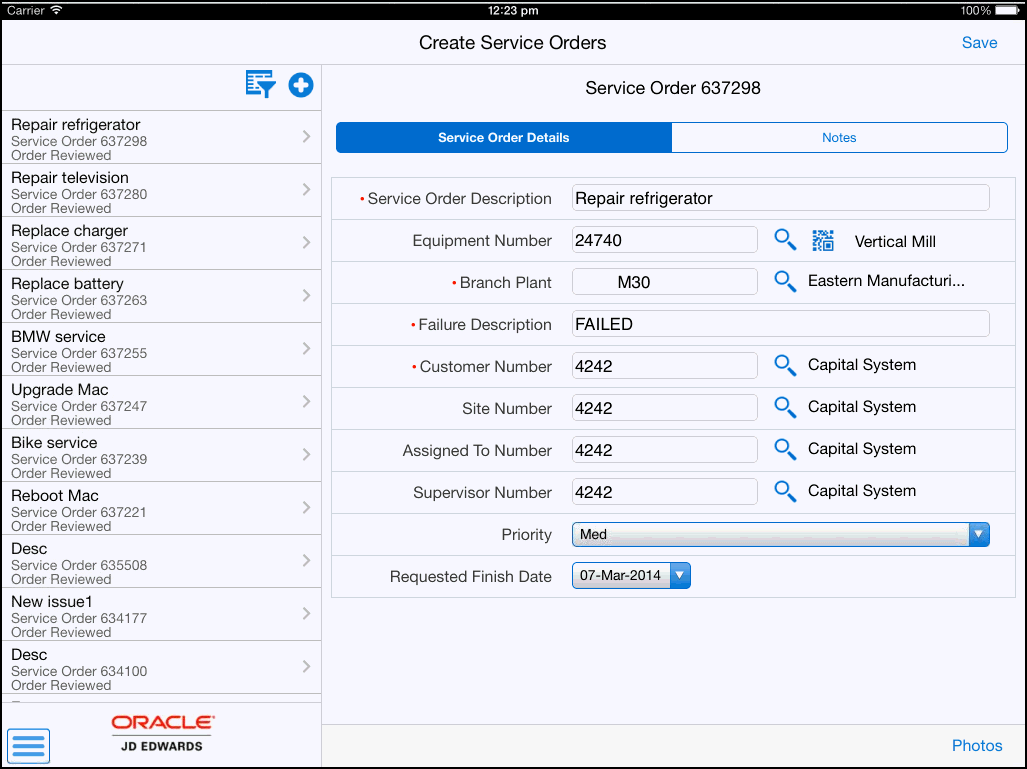
Enter values in these fields on the Service Order Details tab:
- Service Order Description
Specify the description for the service order. You must enter a value in this field.
- Equipment Number (Release 9.2 Update)
Enter data in the Equipment Number field using one of these options:
Use the keyboard on your mobile device to manually enter the data. Alternately, you can tap the search and select button to search and select a piece of equipment.
Use the camera application on your mobile device to scan the data.
To use this option, tap the QR Code button next to the Equipment Number field. The system launches the device camera and you can scan the barcode of the equipment.
Use a Bluetooth-enabled scanning device to scan the data.
To use this option, tap the Equipment Number field to activate the scanning device. Then, scan the barcode of the item using the scanning device.
See Setting Up the Bluetooth Option in the Mobile Device to Scan Barcodes..
- Branch Plant
Specify the branch plant for the service order.
Alternately, tap the Search button next to the Branch Plant field, and then tap the button on the Branch Plant window. You can also search by entering a description in the Description field.
The device displays branch plants based on your search. Tap the branch plant that you want to select.
- Failure Description
Specify the failure description for the service order.
- Customer Number
Specify the address book number for the customer for the service order. Based on the setting in the processing option, the device by default has this number. You can change the number by entering a different address book number in the Customer Number field.
Alternately, tap the Search button next to the Customer Number field, and then tap the Search button on the Address Book window. You can also search by entering a description in the Search Description field.
- Site Number
Specify the address book number for the site for the service order. Based on the setting in the processing option, the device by default has this number. You can change the number by entering a different address book number in the Site Number field.
Alternately, tap the Search button next to the Site Number field, and then tap the Search button on the Address Book window. You can also search by entering a description in the Search Description field.
- Assigned To Number
Specify the Assigned To value for the service order. Based on the setting in the processing option, the device by default has this number. You can change the number by entering a different address book number in the Assigned To field.
Alternately, tap the Search button next to the Assigned To field, and then tap the Search button on the Address Book window. You can also search by entering a description in the Search Description field.
- Supervisor Number
Specify the address book number for the supervisor for the service order. Based on the setting in the processing option, the device by default has this number. You can change the number by entering a different address book number in the Supervisor Number field.
Alternately, tap the Search button next to the Supervisor Number field, and then tap the Search button on the Address Book window. You can also search by entering a description in the Search Description field.
- Priority
Select a priority for the service order from the dropdown menu.
Note: The device defaults the Requested Finish Date to the system date. If required, you can change this date.Tap the Save button to save the service order.
To save the service order and add photos for the service order, tap the Save and Add Photo button. After you tap this button, the device takes you to Service Order Photos screen to add photos for the service order.
To add photos of the service order, tap the Add button.
The system displays two options: Album and Camera.
To attach an existing photo from your device's photo gallery to the service order, tap the Album option.
To take a new photo, tap the Camera option to use the device's camera feature.
You can add a description of the photo.
The system adds the photo to the Photos screen, and displays the number of photos available for the service order on the Photos button.
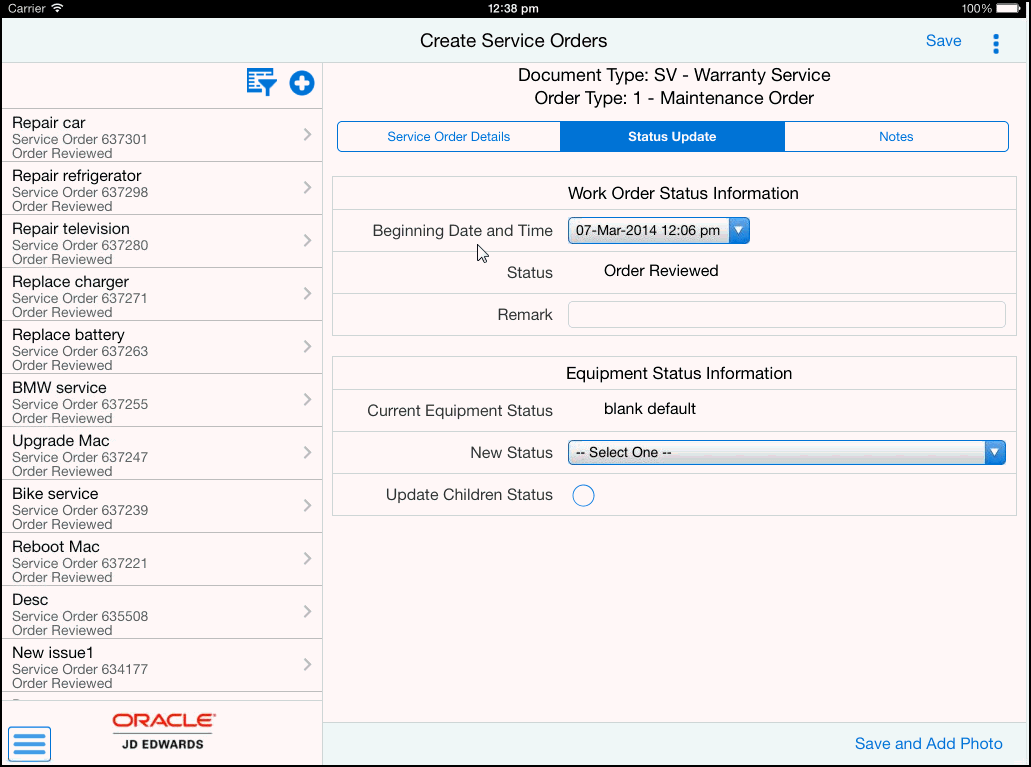
Tap the Status Update tab to update service order status information. You can update the date and time information and add a remark for the service order.
You can update the equipment status and children status for the equipment in the Equipment Status Information section of the Status Update tab.
Note: The device displays the Equipment Status Information section only if you enter a value in the Equipment Number field on the Service Order Details tab for the specific order.
To enter notes for the service order, tap the Notes tab. Tap the New Notes field to enter new notes.
To log out of the application, tap the menu button at the bottom left of the screen, and then tap Logout.