Entering a Sales Order with the Mobile Order Entry Tablet Application: Non-Scanning Method
To enter a sales order:
Open the application by tapping the icon on your device, and then log in. See Logging In to Mobile Enterprise Applications.
When the application opens, all of the available product catalogs are displayed at the top of the screen in tab format. You can scroll left or right through the tabs by swiping across your screen on the tabs. The tabs that are displayed when you log in are the catalog templates that are set up in the Customer Template Revisions program (P4015) for the default customer. The default customer is defined in the processing options of the mobile application.
To select a specific customer, and display only those catalogs associated with that customer, tap the customer button at the top right of the screen. Search for and select the customer. The application returns you to the home screen and displays the catalogs associated with the selected customer.
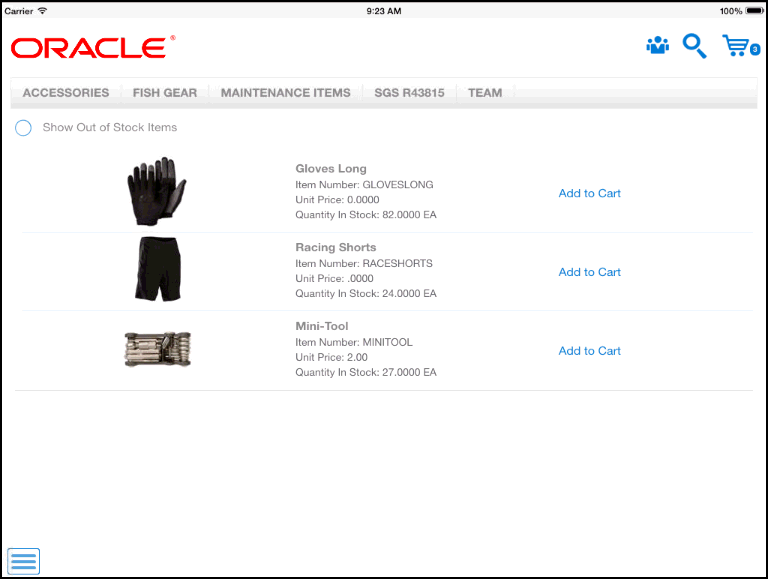
Tap one of the tabs to see the items in that catalog.
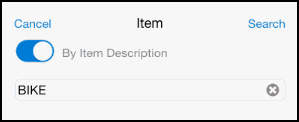
If you are not sure which tab contains the item you are searching for, tap the Search button at the top right of the screen to search for your item. Enter your search criteria, and then tap the Search button. Use the toggle button to determine whether you are searching by item number or by item description.
To view out of stock items, tap the Show Out of Stock Items option.
To view a larger image of the item, tap the image in the list.
To add an item to the shopping cart, tap the Add to Cart button.
For instructions on scanning items into the shopping cart, see Scanning Items Into a Sales Order Using the Order Entry Mobile Tablet Application.
On the Quantity window, specify the quantity and unit of measure, and then tap Add to Cart. Note that in order to select a unit of measure, you must have set up units of measure for that item using the Item Unit of Measure Conversions program (P41002). If no setup exists, you will not have unit of measure options in the drop down list. Also note that the Shopping Cart button at the top right of the screen displays the number of records in the shopping cart.
When you have finished adding items to the shopping cart, tap the Shopping Cart button at the top right of the screen.
On the Shopping Cart screen, you can:
Remove an item from the cart by tapping the Remove from Cart button.
Change the item quantity by tapping the Change Quantity button. On the Quantity window, enter the new quantity information and then tap Save.
Change the customer by tapping the Search button next to the Customer field. Search for and select a new customer. The application returns you to the Shopping Cart screen with the new customer information.
Change the contact person by tapping the Search button next to the Customer Contact field. The system displays a list of available contacts for the selected customer. Select the contact you want to associate with the order. The primary contact, as defined in the customer master, is displayed by default.
Cancel the order by tapping the Cancel Order button.
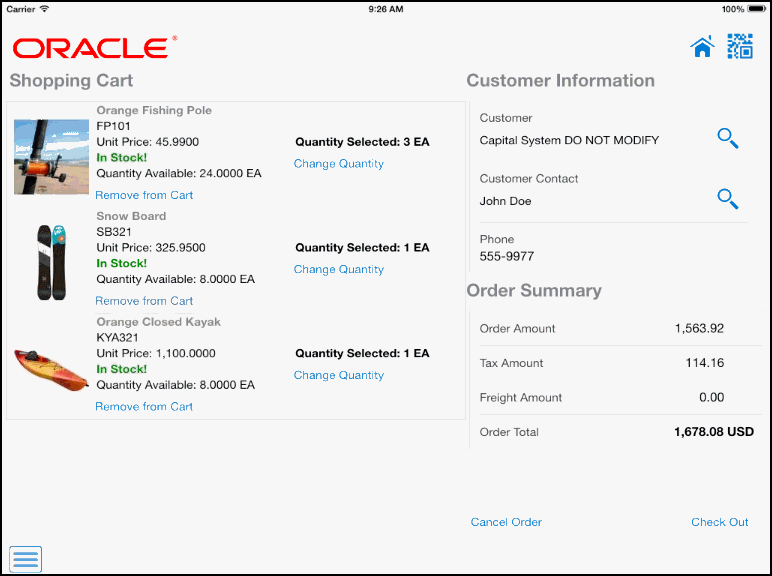
Review and update the information in the shopping cart, and then tap the Check Out button at the bottom right.
The system performs all pricing calculations for the selected customer.
On the check out screen, you can:
Update the customer. If you change the customer, the system recalculates the price based on the customer setup.
Update the contact email address.
Select a new Ship To address by tapping the Search button next to the Ship To Address section. Select one of the available addresses to update the order. You must select from the available options. You cannot manually enter a ship to address.

Select one of these options from the Payment Options drop down list:
Check
If you select this option, you must enter the customer's check number. This check number is updated to the Sales Order Prepayments table (F004201) and is used for post-authorization processing.
Note that your processing options must be set to enable prepayments to use this option.
Bill Later
If you select this option, you can optionally enter the customer's purchase order number in the Reference field, if available.
Credit Card
This payment option is available in the drop-down list only when a third-party credit card processing device is connected to the tablet.
To submit the order tap the Submit Order button at the bottom right of the screen.
The system displays the order confirmation number, and sends a confirmation email to the email address specified in the order. Click OK to close the confirmation window.
Note: When the payment mode is by credit card, the process that follows after you submit the order is different from other payment modes.When you tap the Submit Order button, the system transmits the sales order header information and the order totals to the third-party credit card plug-in. From this point, it is the responsibility of the third party to securely transmit the sales and credit card information to the customer's bank, and get the purchase authorized by the bank. If the credit card processing is successful:The third party plug-in returns an authorization message that is processed by the Order Entry tablet application.
The system updates the Prepayments Transaction table (F004201) with the authorization code, transaction date, and transaction amount.
The system creates the sales order and displays a confirmation message with the sales order number.
The system displays an error message stating the reason. This message is transmitted by the third party plug-in.
The system does not create a sales order.
To log out of the application, tap the Menu button at the bottom left of the screen, and then tap Logout.