Entering a Split Receipt Expense Using the Mobile Expense Entry Smartphone Application
You enter a split receipt expense when you want to charge a portion of a single expense item to multiple accounts. For example, if a project manager is traveling to visit two different job sites, she might want to split the cost of her travel expenses between the two jobs.
To enter a split receipt expense, you must first create a report header. See Entering a Basic Expense Report Using the Mobile Expense Entry Smartphone Application
After you have created your report header, tap the Next button.
Complete the required fields, as described in the previous task.
From the Charge To Type drop down menu, select one of the following options to split an expense:
Split to Multiple Work Orders
Split to Multiple Jobs
Split to Multiple Bus. Units
After you select one of these options, tap the Enter Split Details button.
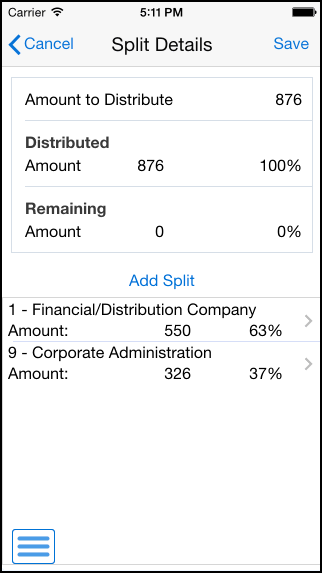
On the Split Details screen, tap the Add Split button.
On the Split Charges screen, select By Amount or By Percent. The fields in the Split Charges section of the screen are enabled based on your selection.
Specify the Business Unit, Work Order or Job, and then specify the corresponding amount or percent to charge to that entity.
Note: You can use the visual assist to search for a value for Business Unit and Work Order, or you can manually enter the value. However, if you select Job, you must use the visual assist to search for and select a valid value. To select a valid job value from the Job search and select screen, enter the Job number, Cost Code, or Job Type, tap the Search button, and then tap the record you want to use. The system returns you to the Split Charges screen with the selected job account details.Tap the Done button.
Review your entry in the Split Details screen. The system displays the remaining amount or percent that you must add before saving. The entire amount of the expense must be distributed before you can save the split details.
To add another split charge, tap the Add Split button again, and complete the steps to add a split charge. Complete these steps until you have fully distributed the expense, and then tap the Save button at the top right of the screen. On the Expense Detail screen, tap Save.
Note: Be aware that none of the split charge details are saved until you tap the Save button. Additionally, you must return to the Expense Detail screen and save the expense to add it to the report.To edit a split charge entry, select the record you want to edit from the Split Details screen, make any necessary changes on the Split Charges screen, and then click Done.
To delete a split charge entry, select the record you want to delete from the Split Details screen. On the Split Charges screen, tap the Delete button at the bottom of the screen.
Note that if you want to change the expense from being a split receipt expense to a regular expense item, you must delete the record, and then add it again as a non-split expense. You cannot change a split expense to a non-split expense once you have saved it.
When you have entered all of your expenses, tap the Back button at the top left of the screen to return to the main Expense Entry screen.
To log out of the application, tap the Menu button at the bottom left of the screen, and then tap Logout.