Entering Health and Safety Incidents Using a Mobile Smartphone Application
To enter health and safety incidents:
Open the application by tapping the Add Incident icon on your device, and then log in.
From the Report an Incident screen, review the incidents in the list. By default, the system displays 25 incidents that occurred one week prior to the system date. To refresh the data on the screen, swipe down on the screen. To view more incidents, tap the Load More Rows option at the bottom of the screen.
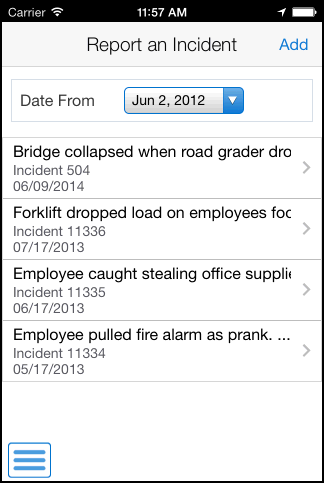
- Date From
This field uses the default date of one week prior to the system date. After you enter the smartphone application, the system displays incidents based on this date. You can change the date by tapping the date dropdown menu and selecting a different date. When you select a different date, the system automatically updates the incidents in the list.
To enter a new incident, tap the Add button. When you tap the Add button, the system displays a window asking if you want to turn on location services to determine your location. If you confirm that you want to enable location services for the application, the application displays the latitude and longitude values of the location for an incident.
See Setting Up the Report an Incident Mobile Applications
The system takes you to the New Incident screen that has two tabs: Details and People.
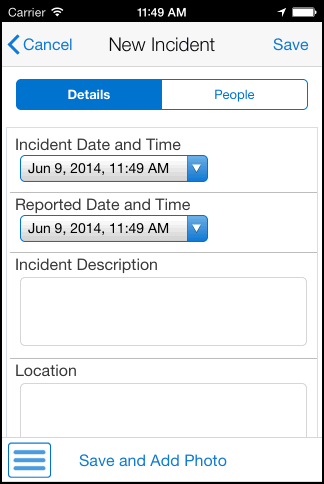
In the Details tab, you can:
Enter the date and time when the incident occurred, and the date and time when the incident was reported. The application uses the system date and time as the default date and time in the Incident Date and Time and Reported Date and Time fields. You can change the date and time by tapping the date dropdown menu and selecting a different date and time.
Enter a maximum of 100 characters to describe the incident, and enter the location of the incident.
Review or enter the latitude and longitude values of the location. If you have enabled the location services for the smartphone application, the system populates the Latitude and Longitude fields with the geo-coordinates from the device. You can edit the values in these fields.
If you have not enabled the location services for the smartphone application, the system does not populate the Latitude and Longitude fields. You can enter the Latitude and Longitude values manually.
Note: If the fields at the bottom of the screen are obscured by the keyboard, you can tap the Next Field button to move to the next fields.To add people associated with the incident, tap the People tab. In the People screen, tap the Add Person button located at the bottom of the screen. The system displays the Person screen.
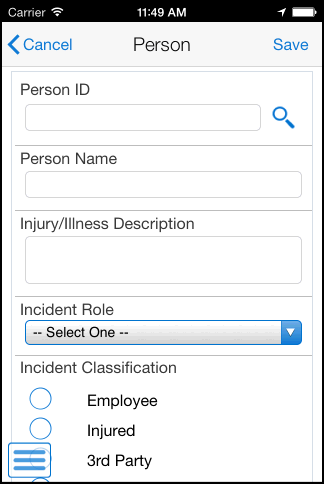
In the Person screen, you:
Enter the address book number or the name of the person. To attach a person to the incident record, you must complete either the Person ID or the Person Name field; otherwise, the system displays an error message that neither of the fields are complete and you cannot save the person record. Complete the Person ID field only if the person you are attaching to the incident has a valid address book number in the JD Edwards EnterpriseOne system.
If you enter a valid address book number in the Person ID field, the system populates the associated person's name in the Person Name field. If you enter an invalid address book number, the system displays an error message, and disables the Person Name field. To correct the error, you must tap the OK button in the error message. The system automatically clears the value in the Person ID field and you can either enter a valid address book number, or leave the field blank, and complete the Person Name field instead.
Enter a description of the injury and illness.
Tap the Incident Role dropdown menu and select a value that identifies the role of the person in the incident.
Select the options to indicate that the person is an employee, is injured, is a third party, was on the premises when the incident happened, or is a contractor.
To save the person record, tap the Save button. The system returns to the New Incident People screen that has the name of the person you attached to the incident. You can add more people to the incident by tapping the Add Person button and entering their details. You can also edit person detail and delete person record before saving the incident.
Note: The smartphone application does not handle privacy case, and a person's name is displayed even if the person is marked as a privacy case in the base EnterpriseOne system.To save the incident, tap the Save button. When you tap the Save button, the system takes you to the Report an Incident screen. Here, you can view the new incident that you entered at the top of the incident list.
To go back to the Report an Incident screen without saving your entry, tap the Cancel button. If you tap the Cancel button, the system does not save the people entries that you made.
To add a photo to the incident, tap the Save and Add Photo button. The system takes you to the New Photo screen. To access the Album and Camera feature of your device, tap the Add button. Tap the Album option to add a new photo to the incident from the device's photo gallery. Tap the Camera option to take a new photo by using the camera feature of your device and attach it to the incident. You can add a description of the photo.
The system saves the photos to the New Photo screen in a list.
To log out of the application, tap the menu button at the bottom left of the screen, and then tap Logout.