Entering Timecards Using the Mobile Tablet Application
To enter timecards:
Open the application by tapping the icon on your device, and then log in.
The Employee Time Entry home screen appears, and by default, it displays the current Pay Period on the left side as defined in the Time Entry Self-Service Director program (P051125). You can also tap the Search button to search and select a different pay period to enter your timecard.
The Pay Period is followed by Hours that displays the hours you have entered out of the total hours for the mentioned pay period.
Note that the hours are also graphically displayed with hours entered in the mentioned pay period by type. Tap on each bar to get more information as a pop-up box.
The graph is followed by a pie chart that displays the percentage of hours entered in the mentioned pay period by status. Tap on each section to get more information as a pop-up box.
The left side of the screen also displays a summarized list of hours you have entered in the mentioned pay period by each day. You can select any day to view the timecard.
You can enter a new timecard on the right side of the screen. The top of the screen displays each day of the mentioned pay period as a Calender. You can select any day from the Calender or you can tap Work Date and select any day from the drop-down menu to enter a new timecard.
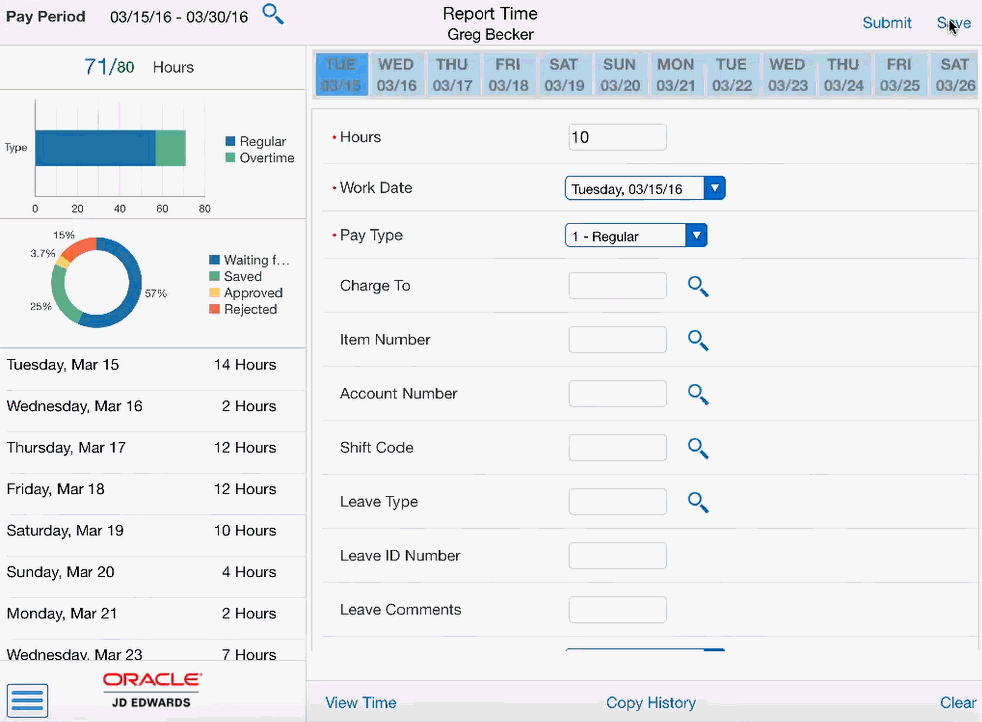
Complete the time entry fields on the timecard; the following time entry fields are mandatory to enter details:
Work Date
Hours
Pay Type
Note: The time entry fields displayed on the screen are set and sequenced in the Employee Self-Service Time Entry Setup program (P051123) by the system administrator.After you complete entering the data in the time entry fields on the timecard, tap one of these options:
Clear
Tap this option if you want to clear the values on the timecard without saving it.
Save
Tap this option if you want to save the timecard, but do not yet want to submit it.
Submit
Tap this option if you want to save and submit the timecard for approval.
To enter additional timecards for the pay period, repeat steps 2 through 4 in this task.
You can also add a timecard from the View Time screen:
Tap the View Time button at the bottom left of the Report Time screen to open it.
Tap the Add icon on the top right of the View Time screen.
Complete the time entry fields on the timecard.
Tap either the Save or the Submit button.