Reviewing and Updating Cost Code Details Using the Mobile Field Status Review Tablet Application
To review and update cost code details:
Open the application by tapping the Field Status icon on your device, and then log in.
From the Field Status Review home screen, enter the job number in the Enter Job Number field and then tap the Search button.
The system displays the list of job accounts based on your search criteria. The device displays the details of the first record in the right pane of the Field Status Review screen.
If you do not know the job number, or if you want to enter additional search criteria to narrow your search results, tap the filter button.
In the Filters pane, the values for Cost Code, Cost Type, and Level of Detail are populated based on the information that is set up in the versions of the programs specified in the processing options of the tablet application. You can leave these values as they are, or override them to meet your search needs. Tap the Apply button. When you tap the Apply button, the system:
Takes you to the list of cost codes that are displayed based on your filter values.
Saves the filter values that you entered. The system displays the saved filter values the next time you open the filter screen.
To discontinue the use of filter values in your search, tap the Cancel button. When you tap the Cancel button, the system:
Takes you to the Field Status Review home screen associated with the last saved filter values, if applicable.
Ignores the filter values that you entered, and restores the last saved filter values to the filter fields.
To delete all filter values you specified, and to enter new filter values, tap the Clear button.
The system returns you to the Field Status Review form with a list of cost code records that meet your search criteria. The first record is automatically selected, and details associated with that record are displayed on the right side of the screen.
Tap any record in the list to review the details for that record.

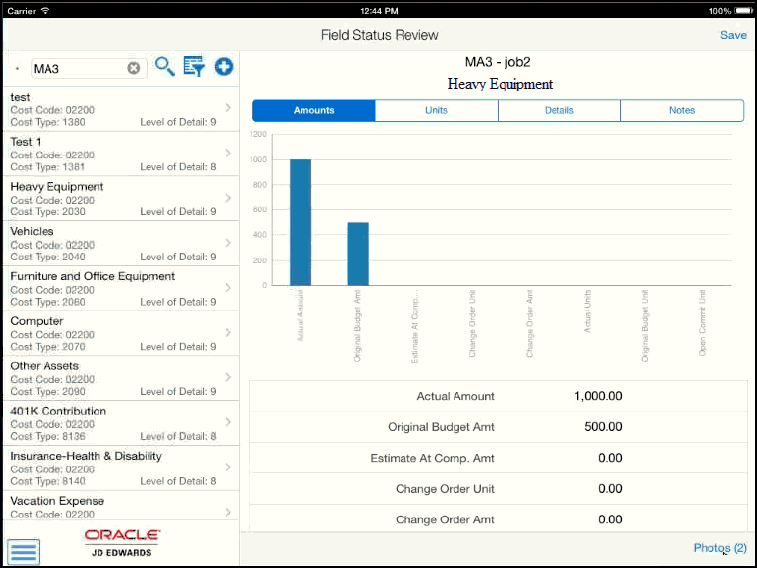
On the Amounts tab, review the amount information for the record. The fields that display on this tab are defined in the processing options of the mobile application. The amounts are displayed in a bar chart at the top of the screen, and also listed below the chart. This tab is read-only.
Tap the Units tab to review the unit information for the record. The fields that display on this tab are defined in the processing options of the mobile application. The unit values are displayed in a bar chart at the top of the screen, and also listed below the chart. This tab is read-only.
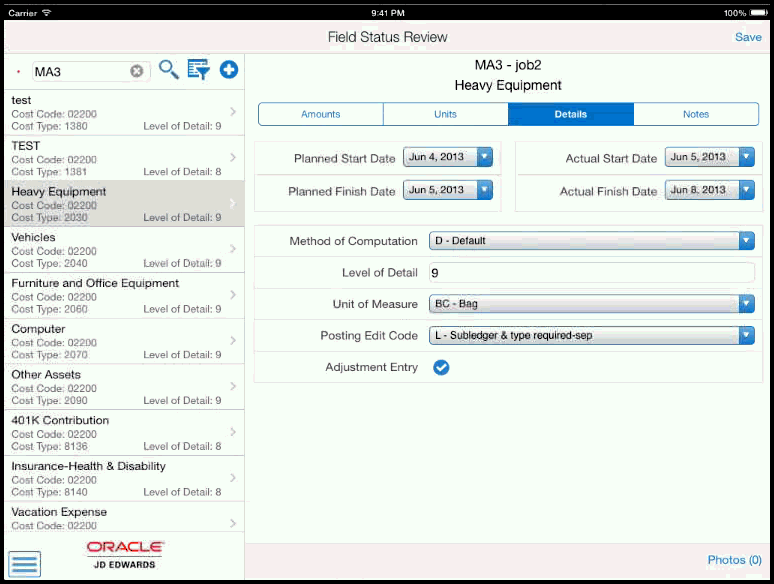
Tap the Details tab to review and modify cost code details. Tap the Save button at the top right to save any changes you make on this tab.
Note: The Save button on Details tab also saves changes made on the Notes tab because that is also part of the details information for the cost code record that you are working on. If you enter new notes on the Notes tab, do not tap Save on Notes. You must go to Details tab, and then tap Save. It will save information on both Details and Notes tabs. Note: The date fields at the top of the Details tab might be disabled to prohibit any changes to dates. These fields are enabled or disabled depending on whether the your organization's mobile applications are set up to use grid capability. Contact your system administrator for additional details.
To view photos for the selected cost code, tap the Photos (#) button at the bottom right. The number on the button represents the number of available photos. The application displays a list of available photos, with the first photo in the list displayed on the right of the screen. To view a different photo, tap the photo in the list.
To delete a photo, tap the photo you want to delete, and then tap the Delete button on the Account Photos screen.
To add photos, tap the Add button on the Account Photos screen, and then select Album or Camera.
To attach an existing photo from your device's photo gallery, tap the Album option and then select the photo you want to attach. To take a new photo, tap the Camera option, and then take a new photo using the device's camera feature. On the New Photo screen, enter a name for the photo and tap the Save button.
Tap the Back button on the Photos screen to return to the Field Status Review screen.
Tap the Notes tab to review notes, or add new notes to the record. To enter a new note, enter text in the New Notes section, then go to the Details tab and tap the Save button at the top right. The new note appears at the bottom of the Notes History section once it is saved.
To log out of the application, tap the Menu button at the bottom left of the screen, and then tap Logout.