Searching for Equipment within a User-Defined Proximity Using the Manage Customer Equipment Mobile Tablet Application (Release 9.2 Update)
This task outlines the steps to search for equipment within a user-defined proximity to your location or to a reference point by using the Manage Customer Equipment mobile tablet application.
To search for equipment within a user-defined proximity:
Open the application by tapping the Service Equip icon on your device, and then log in. See Logging In to Mobile Enterprise Applications.
To search for equipment within a user-defined proximity or a reference point, tap the Filter button at the top left of the screen.
To filter equipment records by site, customer, or equipment number, enter data in the Site and Equipment Number or Customer fields.
To turn on or turn off the Include Proximity in Search option, click the toggle button.
To refine your search, tap the Locate By drop-down button.
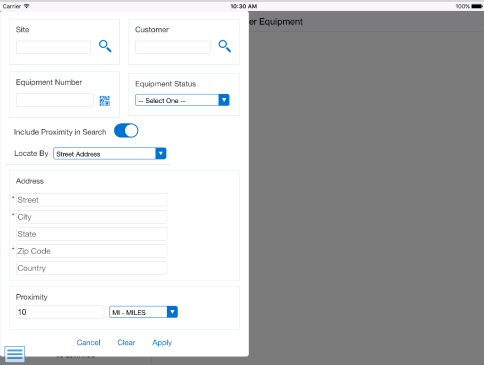
On the filters screen, the Locate By drop-down menu provides three options: My Location, Street Address, and Site. The system displays the My Location option by default and populates default values in these fields: Proximity, Latitude, and Longitude.
- My Location
Select this option from the Locate By drop-down menu to allow the mobile application to access the device's location.
- Street Address
Select this option from the Locate By drop-down menu to allow the mobile application to access the device's location based on the equipment's address.
- Proximity
The system populates these fields with the values that you have set up in the user preferences for the application. If you have not specified the default values in the preferences, the system populates the values from the processing options for the Equipment Proximity program (P1731P). The system filters equipment that is located within the radius specified in the Proximity field.
To search for equipment using a different radius, tap the Proximity field and enter a new value.
In the Filters screen, to continue the search using the specified filter values, tap the Apply button. When you tap the Apply button, the system:
Takes you to the list of equipment and the map that is displayed based on the updated proximity, latitude, and longitude filter values.
Saves the filter values that you entered. The system displays the saved filter values the next time you open the filter screen.
To discontinue the use of filter values in your search, tap the Cancel button. When you tap the Cancel button, the system takes you to the list of equipment associated with the last saved filter values, if applicable.
To delete all filter values you specified and to enter new filter values, tap the Clear button.
On the Manage Customer Equipment screen, the system displays a list of equipment and a map link on the top-left corner on the left pane.
On the Details screen, to view equipment locations on the map, click the Map link on the top-left corner of the screen.
On the Map screen, the system displays the list of equipment records in the left pane based on the filter values and a map with markers for each equipment location in the right pane.
The location of each piece of equipment on the left pane is indicated on the map by a red marker. This equipment is located within the radius that you have defined in the application preference, or in the Proximity processing option for the Equipment Proximity program (P1731P). The blue marker on the map indicates your location or the reference point.
You can zoom in and zoom out on the map. You can also view the street image of a location by tapping the street view icon (yellow man) on the top-left of the map.
To view the details of the equipment, you must select an Equipment record. You can select the equipment records either by tapping the equipment record from the list on the left pane, or by tapping the red marker for the equipment record on the map in the right pane.
When you select the equipment record on the map, the red marker for the equipment record turns to green.
The system displays a blue maker for your location or the reference point, and a red marker for each equipment within the specified filter range.
To view the details of the equipment, tap the green marker. The system displays a window that has basic information about the equipment (such as the equipment name and number, equipment location address and geocodes, and the phone number) and a Details link. To access the equipment details screen, tap the Details link.
To view the equipment details of a different equipment, tap the equipment record from the list on the left pane. You can also select a different equipment by going back to the home-screen map and selecting the equipment marker on the map.