Adding Steps to an Orchestration
Each component (service request, rule, cross reference, white list) that you add to an orchestration is an orchestration step. It is recommended that you create the component that you want to add to an orchestration before you add it as an orchestration step.
The following image shows an orchestration that contains multiple rule, cross reference, and service request steps:
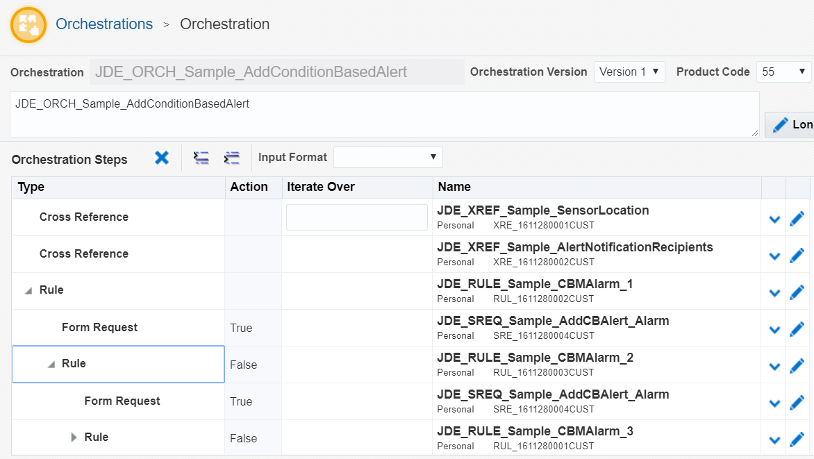
Each row in the Orchestration Steps grid represents a step in the orchestration. The grid displays the following information about each step:
Type. Displays the component type: Rule, Service Request, Cross Reference, or White List.
Action. Use this column to define which subsequent step is invoked based on the criteria in the preceding rule. See Defining the Actions Between a Rule and Dependent Components for details.
Iterate Over. Use this column to pass a data set retrieved from a form request or data request to a subsequent orchestration step. See Passing a Data Set to a Subsequent Orchestration Step for more information.
Name. Displays the name of the component.
Use the "Insert Step Before" and "Insert Step After" buttons to add a step before or after another step in the orchestration. For example, if you determine that you need to add a white list to an existing orchestration, you can insert the white list as an initial step before the other steps.
To add steps to an orchestration:
To add the initial step to an orchestration, click the Add Step button (+ symbol).
In the "Enter Type of Step" pop-up field, select one of the following steps to add to the orchestration, and then click the Ok button.
Cross Reference
Rule
Service Request
White List
The Orchestrator Studio displays the first step in the grid.
Define the component for the step:
To use an existing component for the new step, click the drop-down menu in the Name column and select a component.
To create a new component for the step, click the Edit button (pencil icon) at the end of the row to access the design page for creating the new component.
After creating the component, when you return to the Orchestration design page, you can select the component from the drop-down list in the orchestration steps grid to add it.
See the appropriate topics in this chapter on how to create each type of orchestration component.
In the Transformations area on the right side of the page, map the orchestration inputs to inputs in the orchestration steps. See Mapping Orchestration Inputs.
To add additional steps to an orchestration:
Select a step in the grid, and then click either the Insert Step Before or Insert Step After button to add an additional step before or after the selected step.
In the "Enter Type of Step" pop-up box, select the step that you want to add.
Click Ok.
To remove a step from an orchestration:
Select the step that you want to remove.
Above the grid with the steps, click the Remove Step button (the X button).
If you make a mistake when updating an orchestration, click the Restore All button in the upper-right corner of the design page to restore the orchestration to its last saved version, which erases any changes made since the last save.