Configuring a Form Request
After creating the form request as described in Creating a Service Request, perform these tasks:
Load the EnterpriseOne Application Form Fields and Controls
In the Available Actions area, complete the following fields:
Application
Form
Version
Click the Form Mode drop-down list and select the appropriate form mode: Add, Update, or Inquiry.
At runtime, the controls that appear on an EnterpriseOne form are dependent on the form mode as specified in Form Design Aid (FDA). The form mode ensures that you can see all of the form controls in the Orchestrator Studio that are available in the form at runtime.
(Optional) Click the Application Stack check box to enable application stack processing.
Use this option to create a form request that establishes a session for a specific application and maintains that session across calls. With application stack processing, the form request can invoke multiple forms in different applications to complete a business process. Without the application stack processing, each form in the form request is opened independently.
If you use the Application Stack option, the form request must include instructions for navigating between forms. Without the navigation, additional forms will not be called.
Click the Load Form button.
The Orchestrator Studio loads the controls and fields in the grid. The name of the form is displayed in the first row in the grid.
If a form request needs to invoke more than one application to complete the desired task, you can load controls and fields for additional application forms as needed.
Configure Form Request Actions
In the Available Actions area, shown in the following image, specify the application fields to which you want to map orchestration inputs, and specify the controls used to carry out the desired task or business process in EnterpriseOne.
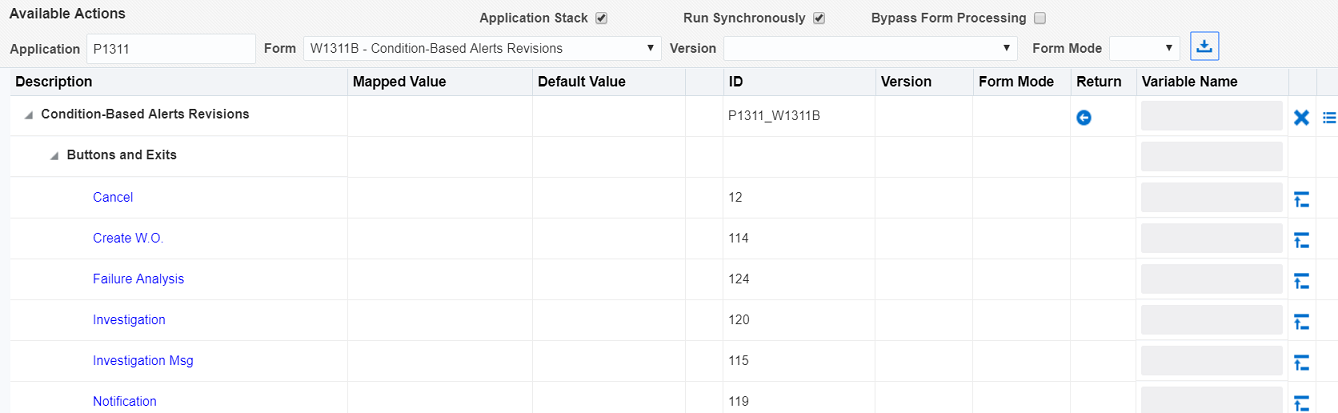
Use the following features in the Available Actions area to configure the fields and controls for a form request. After configuring each item, click the Add Action button at the end of each row to add it to the Order of Execution area.
Description (informational only)
This column displays the controls and fields for each form in a collapsible/expandable parent node named after the EnterpriseOne form. Child nodes categorize other items and include a Buttons and Exits node, a node for displaying the available Query by Example (QBE) fields in a grid (if applicable), and a node for displaying all available columns in a grid.
Mapped Value
Use this column to map inputs from the orchestration to fields in the EnterpriseOne form. In this column, enter a variable name for the input.
The only fields to which you can map inputs are EnterpriseOne editable fields. The variables names for the inputs in the form request should match the inputs defined in the orchestration to which you add the form request. If they do not match, you can use the "Transformations" feature to map input names after you add the form request to an orchestration. See Adding Inputs to an Orchestration and Mapping Inputs in the Transformations Area for more information.
Instead of a mapped value, you can enter a hard-coded value in the Default Value column or you can click the "Text substitution" check box to combine inputs into a text string.
This field is also available if you want to populate multiple rows in multiple grids. See Populating Multiple Grids with Repeating Inputs for more information.
Default Value
For an editable field to which you want to map an input, use this column to enter a hard-coded value. You can also add a hard-coded value to use if the mapped value returns a null.
For a check box or a radio button, you can select it to include it. If there are multiple radio buttons grouped together on a form, select only one. If you select more than one, only the last radio button in the Order of Execution list will be used.
For a combo box control (a list of items in a drop-down menu), the Studio displays a drop-down menu in the Default Value column in which you can select the appropriate item from the list.
Row Number for Update (row)
If the task requires updating a particular row in an input capable grid, then map the appropriate input value containing the row number to the "Row Number for Update" row, or specify the row number in the Default Value column.
"Text Substitution" check box column
Use text substitution to combine input values into a text string for an input into an EnterpriseOne field. For example, you can create a text string such as "Temp was {0} at {1}" that contains input values for temperature and time.
Note: If you use text substitution for the input, the field cannot contain a mapped value. The substituted text string becomes the default value for the field when you add it to the Order of Execution list.Click the Add Text Substitution button (plus symbol) in the row that contains the field for which you want to substitute the input with text.
In the Text Substitution field in the pop-up box, use a variable for the first input by entering
{0}(with brackets).In the Variable field, enter the input variable name.
Click the Add (plus symbol) to add the variable for the text substitution.
Add the next variable,
{1}, and then in the next blank row below the Variable field, enter the input variable name.Click Add to add it to the text substitution.
Click OK to save the variables.
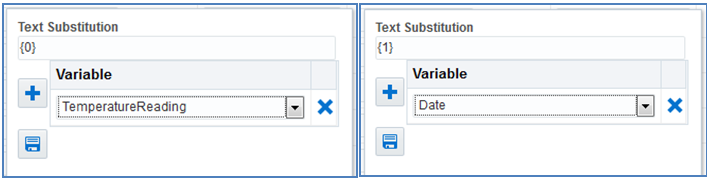
The following image shows an example of variables added for a temperature input value and a date input value:
ID (informational only)
This column displays the ID of the control or field in EnterpriseOne.
Form Mode (informational only)
If a form mode was selected, this column displays the form mode in the form row.
Return
Select the check box in this column for fields that contain values that you want returned in the orchestration response. If you do not specify any return values, all values on the form will be returned. Return values may be used by customized third-party gateway programs or devices to do further processing based on the values returned from EnterpriseOne applications.
Caution: If using the Application Stack option:Variable Name
Enabled after selecting the Return check box, use this field to enter a variable name for the return value. When you add the service request to an orchestration, this name appears in the orchestration inputs grid, which makes the returned value available for mapping to subsequent steps in the orchestration.
Return Hidden Fields (left arrow icon in the Return column)
Use this feature to return data from "hidden" fields or grid columns not displayed in the Available Actions area. Hidden fields are fields that appear only after performing a particular action in a form. In the EnterpriseOne web client, use the field-level help (Item Help or F1 key) to identify the control IDs for hidden fields and grid columns. The control ID is displayed in the Advanced Options section in the help pop-up window.
To return a hidden field:
In the Available Actions area, in the row of the form that contains the hidden fields, click the left arrow in the Return column.
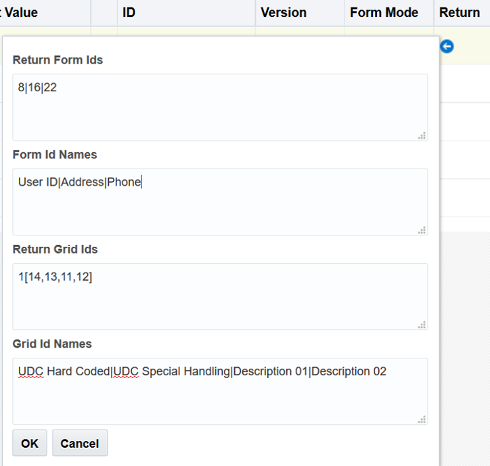
A dialog box appears displaying the control IDs and associated variable names of any return fields already selected in the Available Actions area.
For hidden fields, enter the control ID of the hidden field in the Return Form Ids field. Optionally, you can enter a variable name to represent the return value in the associated Name field.
For multiple controls, use a bar delimiter to separate the values in both fields, making sure the order of the values in each field match.
For hidden grid columns, enter the control ID for the grid column in the Return Grid Ids field. Optionally, you can enter a variable name to represent the return value in the associated Name field.
You must enter a variable name for the return value if you want it to appear in the orchestration inputs list in the orchestration.
An example of the notation for multiple grid columns in a grid is:
1[32, 34,
                                42]
Where 1 represents the first grid in the form (because some forms can have multiple grids), and 32, 34, 42 each represent a column in the grid.
Use a bar delimiter to separate the variable names, making sure the order of the variable names matches the order of the grid control IDs, as shown in the following example:
Select First Row
For forms that require selecting the first row in a grid to perform a particular action, the grid displays a row named "Select First Row." Add this row to the Order of Execution if required for the desired task.
(Optional) "Options" icon (at the end of the first row in the grid)
This option contains settings that determine how the AIS Server processes the form request. See Configuring Form Request and Data Request Processing for details.
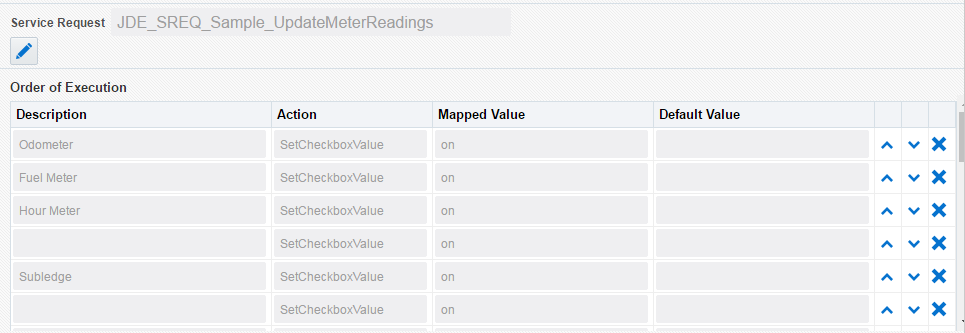
Configure the Order of Execution
After actions are added to the Order of Execution grid, you can reorder them using the up and down arrow buttons to the right of each row. You can also delete any actions using the Delete (X) button. The following image shows the Order of Execution area.