Configuring the Actions in the Service Request
In the Service Request design panel, use the Available Actions area to define actions that you want the service request to perform. After you define the actions, you can place the actions in the proper order in the Order of Execution area as described in Defining the Order of Execution in the Service Request.
To define the actions for the service request:
In the Available Actions area, complete the following fields to specify the EnterpriseOne form that contains the controls you want to load:
Application. Enter the ID of the EnterpriseOne application.
Form. Enter the form ID.
Version. Enter the version of the EnterpriseOne application.
Form Mode. (Available with Release 9.2.0.3) Click the drop-down menu and select the appropriate form mode: Add, Update, or Inquiry.
The form mode determines the controls that are displayed for the form. At runtime, the controls that appear on an EnterpriseOne form are dependent on the form mode as specified in Form Design Aid (FDA). This ensures that you can see all of the form controls in the Orchestrator Studio that are available in the form at runtime.
Application Stack. Click this check box if you want to use application stack processing. See Understanding the Application Stack Option for more information.
Click the Load Form button.
The Orchestrator Studio loads the controls and fields for the form in the grid.
If the action involves more than one form, you can search on another form and the Orchestrator Studio will load the controls for the form in a collapsible node at the end of the grid.
To map the inputs to fields:
Select the row with the field to be mapped.
Click the drop-down menu in the Mapped Value column and select the input to map to the field. You can also click and drag inputs defined in the Orchestration design panel to the field in the Mapped Value column.
If you have not already done so, you must first add orchestration inputs, or if necessary add cross references for the inputs, before you can map them. See Adding Inputs to an Orchestration for more information.
If the service request task involves selecting the first grid row in the EnterpriseOne form, in the "Select First Row" row, click the Add Action button to move it to the "Order of Execution" area.
If the service request task requires updating a particular row in an input capable grid, then map the appropriate input value containing the row number to the "Row Number for Update" row, or specify the row number in the Default Value column.
In the Default Value column, you can perform the following actions to configure the default values for the controls:
If the control is a check box or a radio button, you can select it to include it. If there are multiple radio buttons on a form, select only one. If you select more than one, only the last radio button in the Order of Execution list will be used.
If the control is a combo box (a list of items in a drop-down menu), then the Studio displays a drop-down menu in the Default Value column in which you can select the appropriate item from the list.
If the field is editable, you can enter a hard-coded value to map for the input. You can also enter a value to be used if the mapped value returns a null.
Fields that are grayed out in this column are not editable.
Select the Return check box next to the fields that contain values that you want returned in the orchestration response. If you do not specify any return values, all values on the form will be returned.
Important: If using the Application Stack option:To use text substitution, in the field that you want to substitute the input with text, click the Add Text Substitution button (plus symbol) and perform the following steps in the pop-up window:
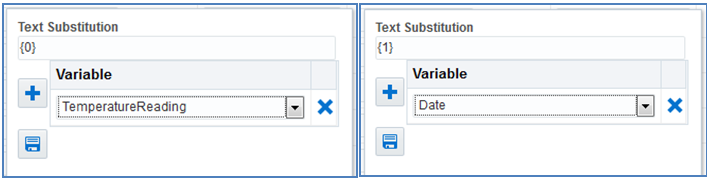
Text substitution enables you to combine input values into a text string for input into an EnterpriseOne field. For example, you might have a string with "Temp was {0} at {1}" that contains a temperature input value and a time input value.
In the Text Substitution field, enter the following variable to use for the first input:
{0}Below the variable, select the drop-down menu to select an input for the variable.
Click the Add button (plus symbol) to add the variable for the text substitution.
Add the next variable,
{1}, and then select the input for this variable, and click the Add button to add it to the text substitution.If you add a variable by mistake, click the Remove Variable button.
Click the OK button to save the variables for the text substitution.
The following image shows an example of variables added for a temperature input value and a date input value:
As you finish configuring the applicable rows in the Available Actions area, in the right-most column, click the Add Action button to move the configured rows to the "Order of Execution" area.
Next, order the actions as appropriate as described in Defining the Order of Execution in the Service Request.