Changing the ODBC Datasource for SQL Server
On the Enterprise Server, after the Platform Pack completes, you must use this procedure to change the ODBC data source that it created.
Failure to make this change will cause connection errors in the services.
Navigate to this directory on your Enterprise Server:
C:\Windows\SysWOW64To configure the 32-bit ODBC data source, run the
odbcad32.exeprogram.Go to the System DSN tab.
Find the ODBC data source for your SQL Server database. It will have the same name as your server if you are using the default instance. If you are using a named instance it will have the name <server>-<instance>.
Click on Configure and go to the second screen, which is shown below.
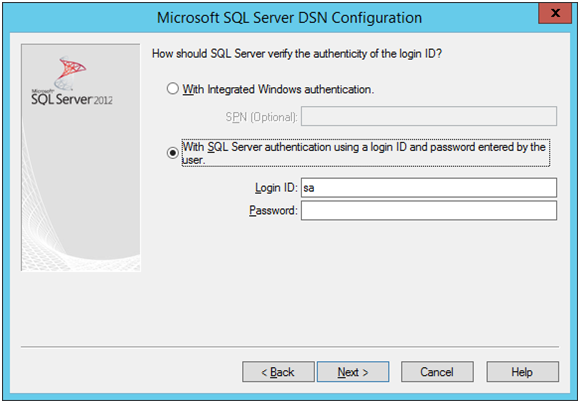
On Microsoft SQL Server DSN Configuration, How should SQL Server verify the authenticity of the login ID?, ensure this radio button is selected:
With SQL Server authentication using a login ID and password entered by the user.
For the Login ID field, enter sa.
For an install, click the Next button.
For an upgrade, enter the password for the sa user and then click the Next button.
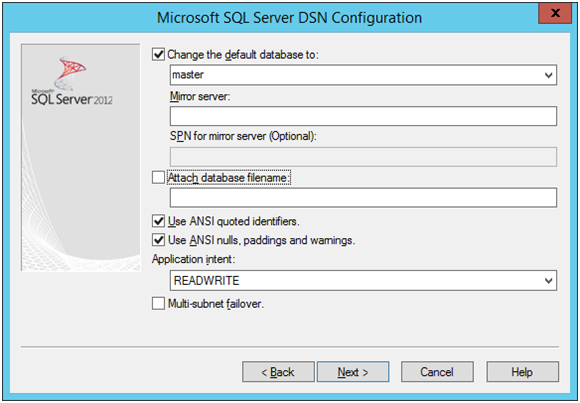
On SQL Server DSN Configuration, database information, ensure these checkboxes are selected:
Change the default database to:
Caution:You must change this value from whatever is displayed by default to this string:
master
Use ANSI quoted identifiers.
Use ANSI nulls, paddings and warnings.
Ensure the Application intent selection is READWRITE.
Click the Next button.
Click the Finish button to save the changes.
Click the OK button to exit the odbcad32.exe program.