Performing Common Setup for Linux Servers
This section describes the setup tasks that must be performed on each Linux-based server that will be deployed by JD Edwards EnterpriseOne One-Click Provisioning, excluding the One-Click Provisioning Server, which does not require manual setup. The remaining Linux servers used by JD Edwards EnterpriseOne may include a Compute Oracle Database Server. If you are using DB Systems instead of a Compute Oracle Database Server, you must perform the setup described in the Learning Path Deploying JD Edwards EnterpriseOne on Oracle Cloud Infrastructure on Linux with DBaaS (DB Systems).
Prerequisite
You must have created a Linux VM for each server that will be deployed by the JD Edwards EnterpriseOne One-Click Provisioning Server for the Oracle Cloud Infrastructure. At a minimum, this includes the Compute Database Server (except if you are using DBaaS - DB Systems), Enterprise Server, and WebLogic Server. Refer to the section "Creating Linux Instances as VMs on the Oracle Cloud Infrastructure" in this Learning Path.
General
Use the following general steps to confirm the completion of the common setup that is required for each VM instance that you created in Compute to support JD Edwards EnterpriseOne on the Oracle Cloud Infrastructure.
- Ensure that the
/u01mount point is created and mounted. This should have been done when you created Block Volume storage. Use this command to verify that the volume is mounted on/u01:
The returned results should be similar to this:df -h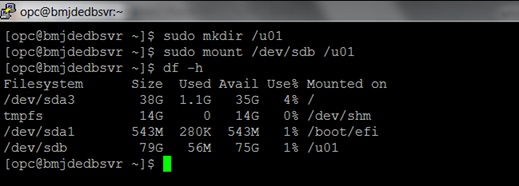
- Ensure that the proper permissions are set on the /u01 mount using this command:
sudo chmod 770 /u01 - Ensure that the host name for the server contains only alphanumeric values. Special characters are not allowed, with the exception of a hyphen “_”, which is allowed. Special characters are not allowed except a hyphen (-). Refer to Special Naming Restrictions in the section "Creating Linux Instances as VMs in Oracle Cloud Infrastructure" in this Learning Path.
- Edit the
sshd_configfile using this command:sudo vi /etc/ssh/sshd_config - Verify the following settings in the
/etc/ssh/sshd_configfile:- Contains this setting:
ClientAliveInterval
                            3600
Ensure that the setting exists, is set properly to 3600, and is not commented out.
- Has the SSH connection over IPv6 disabled by having this setting:
AddressFamily inetEnsure that the setting exists, is set properly to inet (not any), and is not commented out.
- Contains this setting:
- Edit the sudoers file using this command:
sudo vi /etc/sudoers - Verify that the
/etc/sudoersfile either does not contain this setting or this setting is disabled in the file:Defaults requiretty - You must disable IPv6 using the following command:
Ensure that thesudo vi /etc/sysctl.conf/etc/sysctl.conffile has these settings to disable IPv6 protocol:net.ipv6.conf.default.disable_ipv6=1net.ipv6.conf.all.disable_ipv6=1 - Optionally, you can choose to edit the bash.profile to set the user default language for
output to prevent unreadable characters from being inserted into messages and logs.
sudo vi /root/.bash_profileAdd this setting:
LANG="C"
Enable Inbound Ports in the Firewall for Compute Instances
You must enable inbound ports in the firewall service for the Compute instance of each Linux server to enable the functionality of the Provisioning Server to provision each Linux server.
- For each JD Edwards EnterpriseOne server, repeat this command as necessary to
specify open ports in the firewall:
sudo firewall-cmd --zone=public
                        --add-port=<PORT>/tcp --permanent
where <PORT> is the port number that must be open. These port numbers are listed in the following table.Linux Server Firewall Port List
Component
Inbound Ports to Open
Oracle Database 22
5150
<DB_PORT>
14502-14510
Enterprise Server 22
5150
6017-6022
14502-14510
Web Server 22
5150
<WLS_ADMIN_PORT> See Note: 1
<SSL_ACCESS_PORT> See Note 2 <SSL_ACCESS_PORT-1> See Note 3
14502-14520
Note: 1 This is the Admin Port on which the Admin Server is running. This value is set by the user while creating a WebLogic domain.Note: 2 This SSL port must be opened to enable the Server Manager Console to complete the tasks.Note: 3 This port number is equal to the value of the SSL port minus one. This port must be opened to enable the Server Manager to complete the provisioning tasks. For example, if you have specified the port value as 8081 in the One-Click Provisioning Console, you must open 8080 port (8081-1).Also, you must open a port for each of the WebLogic Servers on Oracle Cloud Infrastructure. For example, if you have the following environments and server combinations, you should open eight ports: four ports for SSL for the port numbers specified by using the Provisioning Console, and four ports for non-SSL. The value of the ports for non-SSL should be the value of the SSL port minus one.
- DV HTML
- PD HTML
- DV AIS
- PD AIS
- After all the ports are opened in the firewall for each server, use these commands
to reload the firewall:
sudo systemctl stop
                        firewalld
sudo systemctl start firewalld
Disable SELINUX and Reboot Machines
After you have configured the firewall, use this procedure to disable SELINUX and reboot the machine for the changes to take effect.
- Use this command to check the status of Security Enhanced Linux
(SELINUX):
sudo getenforceIf the returned status is either Enforcing or Permissive, you must temporarily disable the extra security restriction provided by SELINUX by modifying this file:
/etc/selinux/configEdit the
/etc/selinux/configfile using this command:sudo vi /etc/selinux/configEnsure that
SELINUX=is set to this value:SELINUX=disabled - When you change any security settings, for example if you disable SELINUX as
described in the preceding step, you must reboot the machine using this
command:
sudo shutdown -r now - If you reboot to enable the security settings, after the reboot is complete, run sudo getenforce to confirm that the status of SELINUX is Disabled.
SELINUX=Enforcing
SELINUX=Permissive
Set Up Users and Groups
By default, the Oracle Cloud Infrastructure has a predefined opc user and opc group. Perform these tasks to set up additional users and groups on each Linux server:
- Create the dba and oracle groups using these commands:
sudo groupadd -g
                nnnn dba
sudo groupadd -g nnnn oraclewhere nnnn is the ID value with which the group will be created. You must use a free value that ideally should be above 1000. You can determine used group IDs with the id command.
- Create the oracle user and add it to the to the oracle group using this command:
sudo useradd -d /home/oracle -m -s /bin/bash oracleNote: This step is not required for DB Systems because this database is already set up by default. - Add the opc user to the oracle group and the oracle user to the dba group and the
oracle group using these commands:
sudo usermod -a -G oracle
                    opc
sudo usermod -a -G oracle oraclesudo usermod -a -G dba oracle - Set
/u01as owned by the oracle group using this command:sudo chgrp oracle /u01
Install Requisite YUM Packages
You must install a specific set of packages from the YUM repository onto each Linux-based server (excluding the One-Click Provisioning Server) in the JD Edwards EnterpriseOne environment. The additional servers include:
- Compute Oracle Database Server
- Enterprise Server
- WebLogic Server
The following lists are the required packages sorted alphabetically. You can create a script to install the packages one at a time, or all at once. In either case, be sure to confirm that when each command executes, the command returns either of these results:
Complete
or
Nothing to do
sudo su
yum install -y
                        bind-utils
Compute Oracle Database Server
Ensure the VM instance for the Compute Oracle Database Server contains these YUM packages:
bind-utils
bc.x86_64
binutils.x86_64
compat-libcap1.x86_64
compat-libstdc++-33.x86_64
compat-openssl10.x86_64
gcc.x86_64
elfutils-libelf.x86_64
fontconfig.x86_64
gcc-c++.x86_64
glibc.i686
glibc.x86_64
glibc-devel.x86_64
ksh.x86_64
libaio.x86_64
libaio-devel.x86_64
libasan.x86_64
liblsan.x86_64
libgcc.x86_64
libnsl.x86_64
libstdc++.x86_64
libstdc++-devel.x86_64
libX11.x86_64
libXau.x86_64
libxcb.x86_64
libXext.x86_64
libXi.x86_64
libXtst.x86_64
libvirt-libs.x86_64
libXrender.x86_64
libxcrypt-compat.x86_64
libibverbs.x86_64
librdmacm.x86_64
make.x86_64
policycoreutils.x86_64
policycoreutils-python-utils.x86_64
sysstat.x86_64
smartmontools.x86_64
unzip.x86_64
zip.x86_64
Enterprise Server
Ensure that the VM instance for the Enterprise Server contains these YUM packages:
binutils.x86_64
compat-libcap1.x86_64
compat-libstdc++-33.i686
compat-libstdc++-33.x86_64
compat-openssl11.x86_64
elfutils-libelf-devel.x86_64
file
gcc.x86_64
gcc-c++.x86_64
glibc.i686
glibc.x86_64
glibc-devel.i686
glibc-devel.x86_64
ksh.x86_64
libaio.i686
libaio.x86_64
libaio-devel.i686
libaio-devel.x86_64
libasan.x86_64
liblsan.x86_64
libnsl2.x86_64
libnsl2-devel.x86_64
libgcc.i686
libgcc.x86_64
libnsl.x86_64
libstdc++.i686
libstdc++.x86_64
libstdc++-devel.x86_64
libX11.i686
libX11.x86_64
libXau.i686
libXau.x86_64
libxcb.i686
libxcb.x86_64
libXext.i686
libXext.x86_64
libXi.i686
libXi.x86_64
libXtst.i686
libXtst.x86_64
make.x86_64
ncompress
oracle-database-preinstall-19c.x86_64
sysstat.x86_64
unixODBC.x86_64
unixODBC-devel.x86_64
unzip.x86_64
zlib.i686
zlib.x86_64
zip.x86_64
zlib-devel.i686
zlib-devel.x86_64
nss-softokn-freebl.x86_64
nss-softokn-freebl.i686
WebLogic Server
Ensure that the VM instance for the WebLogic Server contains these YUM packages:
bind-utils
glibc.i686
glibc.x86_64
glibc-devel.x86_64
ksh.x86_64
libnsl.x86_64
net-tools
unzip.x86_64
zip.x86_64
zlib-devel.x86_64
Edit the resolv.conf File to Specify the DNS Domain Name
You must ensure that the search setting in the /etc/resolv.conf file
specifies the DNS domain name of the Availability Domain to which all JD Edwards
EnterpriseOne servers belong. While logged in as the root user (the owner of the
resolv.conf file), you must add a line with the following syntax to the resolv.conf
file:
$ vi /etc/resolv.conf
search <DNS_Domain_Name> <subnet1> <subnet2>
                    <subnet3>.<DNS_Domain_Name>
Generally each Availability Domain contains at least three subnets. You must include an exact search string for each of those subnets.
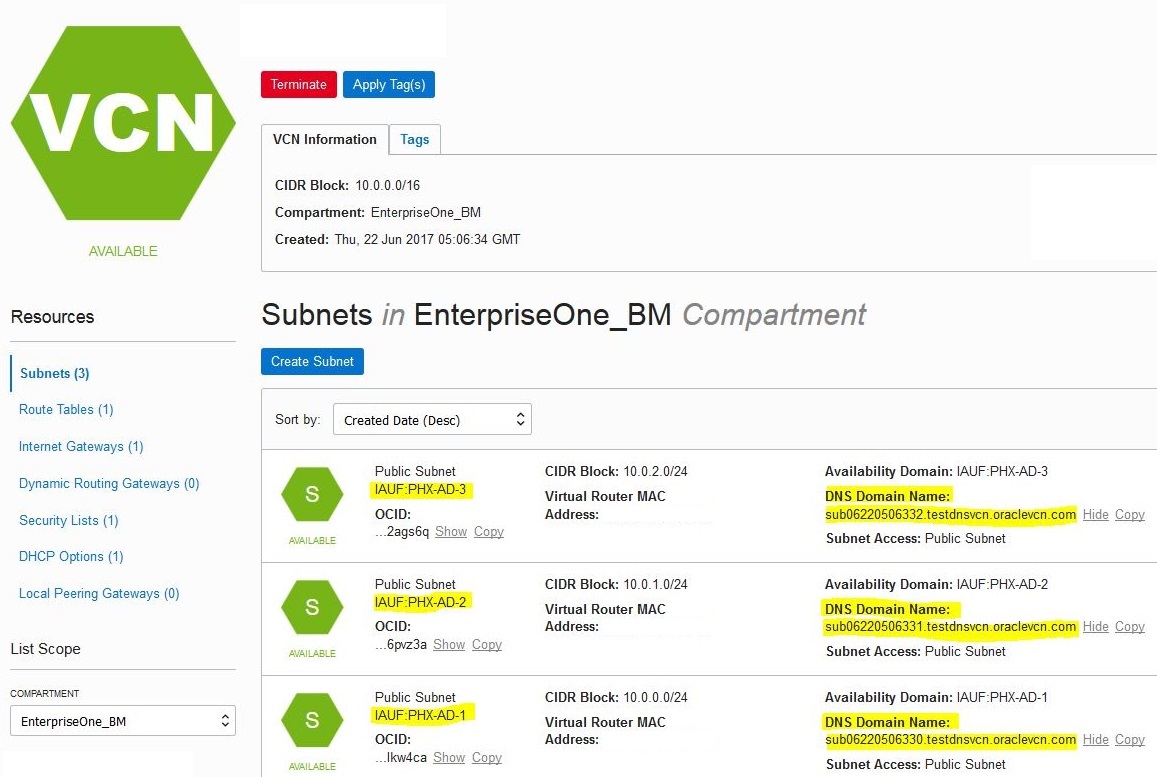
Using the above example, assuming that your JD Edwards EnterpriseOne Servers are
running in the Phoenix Availability Domain, you would edit your
/etc/resolve.conf file to add a line with a search setting
similar to the setting provided below to include all the three domains:
search testdnsvcn.oraclevcn.com sub06220506330.testdnsvcn.oraclevcn.com
                    sub06220506331.testdnsvcn.oraclevcn.com
                    sub06220506332.testdnsvcn.oraclevcn.com
Change the Maximum Transmission Unit (MTU) Setting
The recommended MTU setting is 1500. Use this procedure to check, and if necessary change, the current MTU setting.
- Run this command to check current value of
MTU:
Ifconfig - If the MTU is not set to 1500, then run below commands to set MTU
value:
sudo sed -i -e "\$a ifconfig ens3 mtu 1500 up"
                            /etc/rc.d/rc.local
sudo sed -i -e "\$a ifconfig ens3 mtu 1500 up" /etc/rc.localsudo chmod +x /etc/rc.d/rc.local - Reboot the machine to enable this change.