Completing Configuration in the JD Edwards Infrastructure Provisioning Console
This section shows you how to use the JD Edwards Infrastructure Provisioning Console to configure details for these functional components for JD Edwards EnterpriseOne as delivered by OpenTofu for Linux instances in Oracle Cloud Infrastructure:
- Network
- Bastion Server
- Provisioning Server
- Shared Database
- Deployment Server
- Production Environment
- Non-Production Environment
- Disaster Recovery Environments
Prerequisites
- Details for the Oracle Cloud Infrastructure User, Tenancy, Region, and Compartment – see "Gathering Essential OCI Information for Infrastructure Provisioning" in this Learning Path.
- Logged into the JD Edwards Infrastructure Provisioning Console. For more information, see "Logging into the JD Edwards Infrastructure Provisioning Console" in this Learning Path.
Completing Configuration in the JD Edwards Infrastructure Provisioning Console
Use this procedure to complete configuration in the JD Edwards Infrastructure Provisioning Console on the Staging Server, which you must access through VNC viewer:
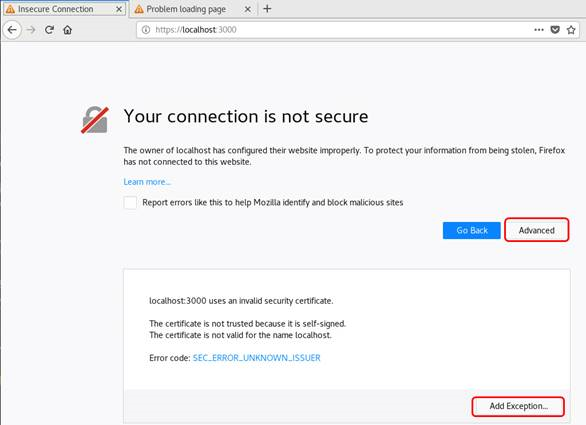
- Access the JD Edwards Infrastructure Provisioning Console using a browser and
the following URL:
https://localhost:3000Note: Because you are using localhost, the system prompts you to accept an insecure connection. On Insecure Connection, Your connection is not secure, click the Advanced button and then click the Add Exception button.
- On Add Security Exception, click the Confirm Security Exception button.
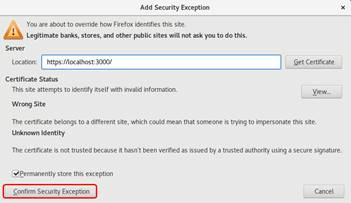 Note: After you add the Security Exception, the Infrastructure Provisioning Console is displayed.
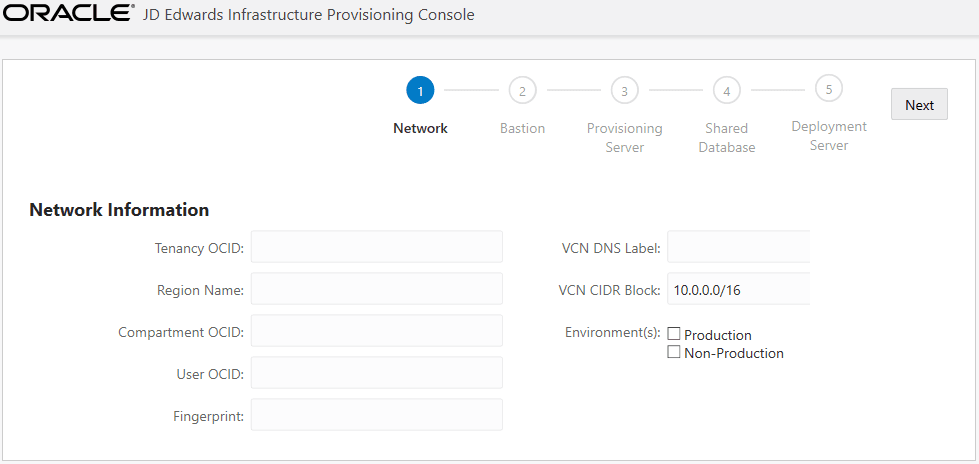
 On Network Information, enter valid values as illustrated in the following example:
-
Tenancy OCID
This is the Oracle-assigned unique ID called an Oracle Cloud Identifier (OCID). It is included as part of the resource's information in both the Console and the API. You can find your tenancy's OCID in the Console at the top right user icon. The tenancy OCID looks something like this (notice the word "tenancy" in it):
ocid1.tenancy.oc1..aaaaaaaaba3pv6wkcr4jqae5f44n2b2m2yt2j6rx32uzr4h25vqstifsfdsq -
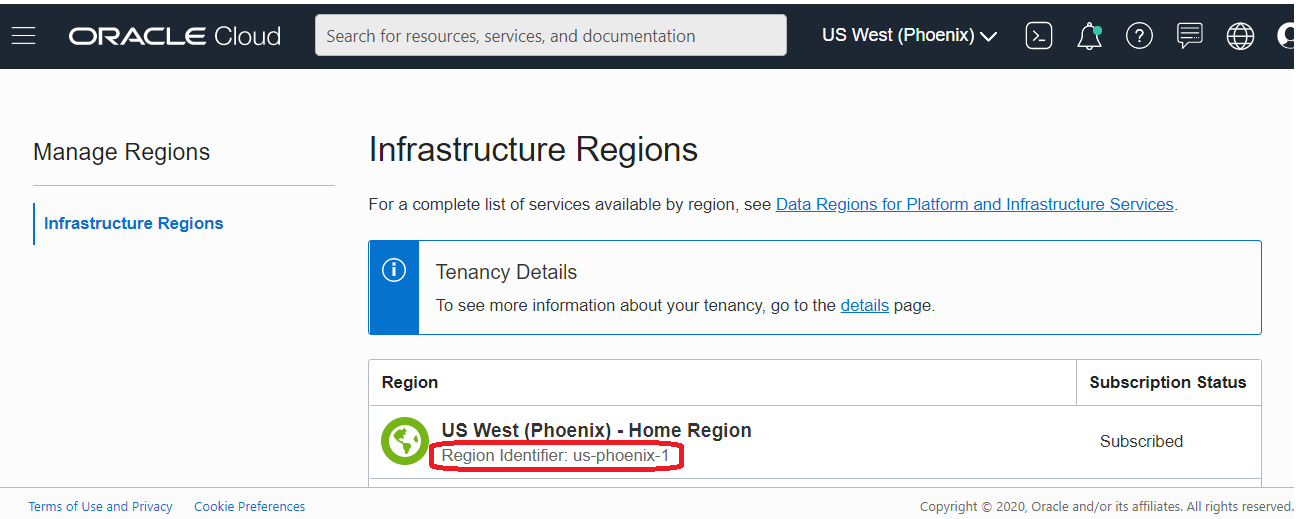
Region Name
Enter the Region Identifier of the Region Name where the resource is located. In the user interface this value is labeled as Region Identifier as shown below. For example, for the Region Name US West Phoenix, the Region Identifier that you would enter here would is us-phoenix-1.
-
Compartment OCID
Enter the OCID of the Compartment. On OCI, access the Identity tab, and then click Compartments to view the Compartment OCID.
-
User OCID
Enter the user OCID. This is the OCID in the User Information tab of the api.user window. See the section Oracle Cloud Identifiers (OCIDs) in this document.
-
Fingerprint
Enter the Fingerprint of the Infrastructure Provisioning user. See "Gathering Essential OCI Information for Infrastructure Provisioning" in this Learning Path.
-
VCN DNS Label
Enter the value of the DNS Label for your VCN.
Important: Length of the field cannot exceed 15 characters. The name must start with a letter and must contain only alphanumeric characters. The value should only specify the globally unique domain name; do not include the prefix "www" or "local".Note: You cannot specify duplicate VCN names. You should not use the same name that was given when creating the VCN previously described in this Learning Path in the task entitled "Performing Setup Tasks in Oracle Cloud Infrastructure: Creating a Virtual Cloud Network". -
VCN CIDR Block:
Enter the VCN CIDR address. The VCN CIDR blocks indicates the network addresses that can be allocated to the resources.
Note: Ensure that the CIDR block represents the correct private IP Address range. -
Environment for this Plan:
Select the environment for this plan. The available options are: Production with Disaster Recovery and Non-Production.
Important: Only the following scenarios are supported:Supported Scenarios:
- Production and Non-Production together in the same run
- Production alone, not followed by any other run
- Production on one run, followed by a second Non-Production run
- Non-Production alone, not followed by any other run
- Non-Production run, followed by a second Production run
- Production with Disaster Recovery together in the same run
Note: Non-Supported Scenarios:- Production in Single Run and Disaster Recovery in second Run
-
Tenancy OCID
- Click Next. Note: If a blank screen displays, it is because there might be a slight delay until the fields on this form are populated.
-
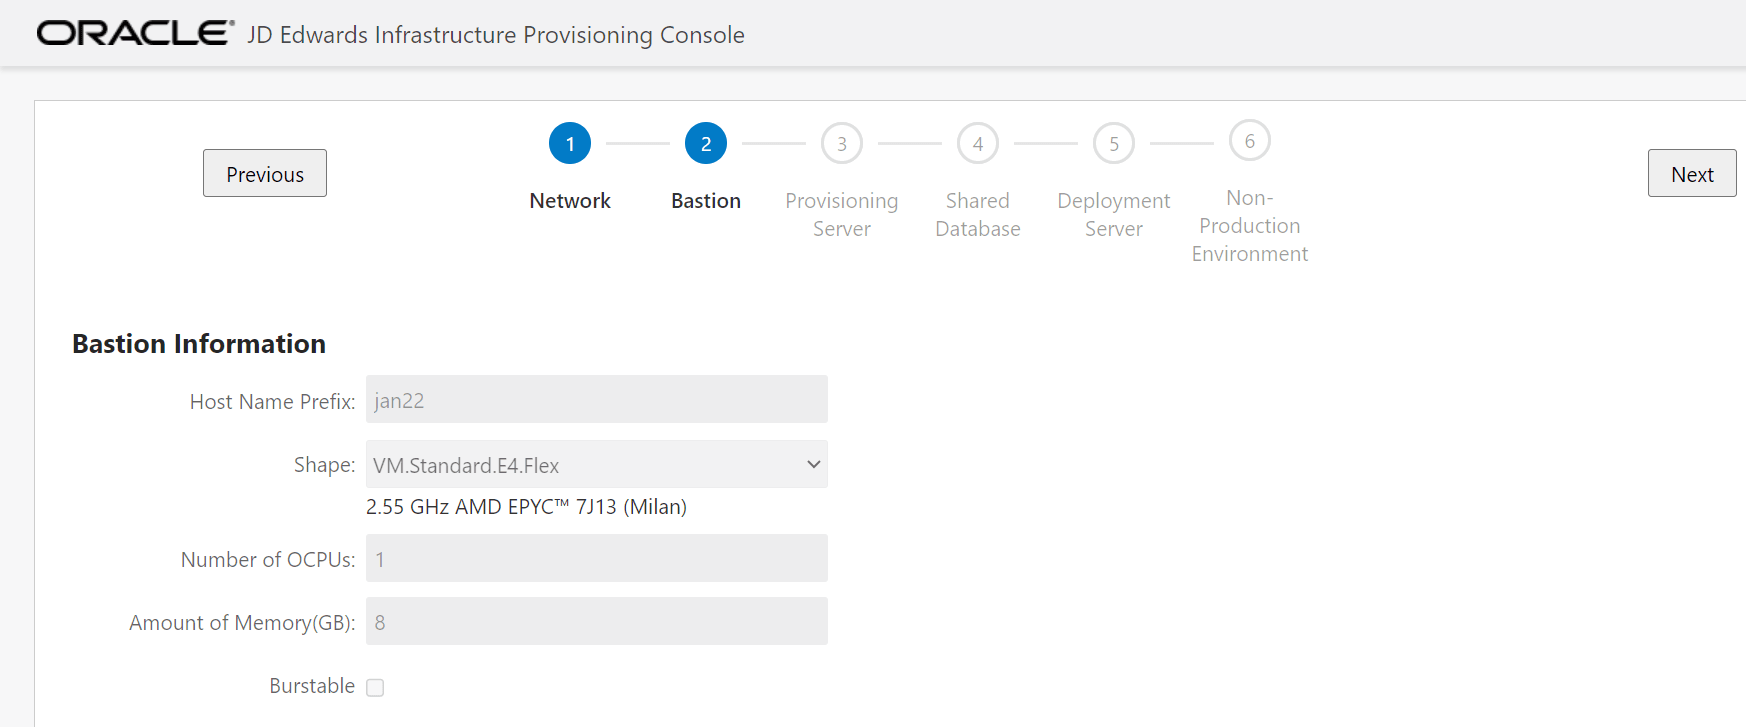
On Bastion Information, once the screen is populated, enter valid values as
illustrated in the following example:
-
Host Name Prefix
Enter the Bastion host name prefix.
The Bastion instance is created using the prefix value entered in this field. The length of the prefix must not exceed 6 characters.
For example, if the prefix value is entered as
pdjde, the server names will be created as follows:Bastion Host:
pdjdebas[first three character of domain][1-N]where [xxx] is the first three character of domain, and
where [N] is the number of servers, which can be 1-N.
Note: The value for this label cannot be the same as you have given on Bastion Details page. -
Shape
Select the Bastion instance shape. For use with Infrastructure Provisioning, the minimum recommended shape for the instance for the Bastion Server is any x86-compatible shape series that supports 1 OCPU and 30 GB of memory.
-
Number of OCPUs
Specify the number of OCPUs. For this Bastion server the recommended value is 1.
-
Amount of Memory (GB)
For each OCPU you can select from 1 to 64 GB of memory with a maximum of 1024 GB total. The minimum amount of memory allowed is either 1 GB or a value matching the number of OCPUs, whichever is greater.
-
Burstable
For Flex shapes, you can enable the checkbox if you want to specify a burstable instance.
If you enable a burstable instance, you can choose this option to provide a baseline level of CPU performance with the ability to burst to a higher level when required by your workload.
-
Burst Size
For Flex shapes, if you chose to create a burstable instance, you can also specify a Burst Size which you can adjust based on your requirements.
-
Host Name Prefix
- Click Next.
- On Provisioning Server Information, enter valid values as illustrated in the
following example:
-
Shape
The minimum recommended shape is any x86-compatible shape series that supports 2 OCPUs and 32 GB of memory.
-
Number of OCPUs
Specify the number of OCPUs. The minimum number of OCPUs recommended for the Provisioning Server is 2.
-
Amount of Memory (GB)
For each OCPU you can select from 1 to 64 GB of memory with a maximum of 1024 GB total. The minimum amount of memory recommended for Provisioning Server is 32 GB.
-
Burstable
For Flex shapes, you can enable the checkbox if you want to specify a burstable instance.
If you enable a burstable instance, you can choose this option to provide a baseline level of CPU performance with the ability to burst to a higher level when required by your workload.
-
Burst Size
For Flex shapes, if you chose to create a burstable instance, you can also specify a Burst Size which you can adjust based on your requirements.
-
Block Volume (GB)
Select the block storage size. It is recommended to use at least 80 GB of storage size.
Note: Additional block storage size is attached to the /u01 mount point.
-
Shape
- Click Next.
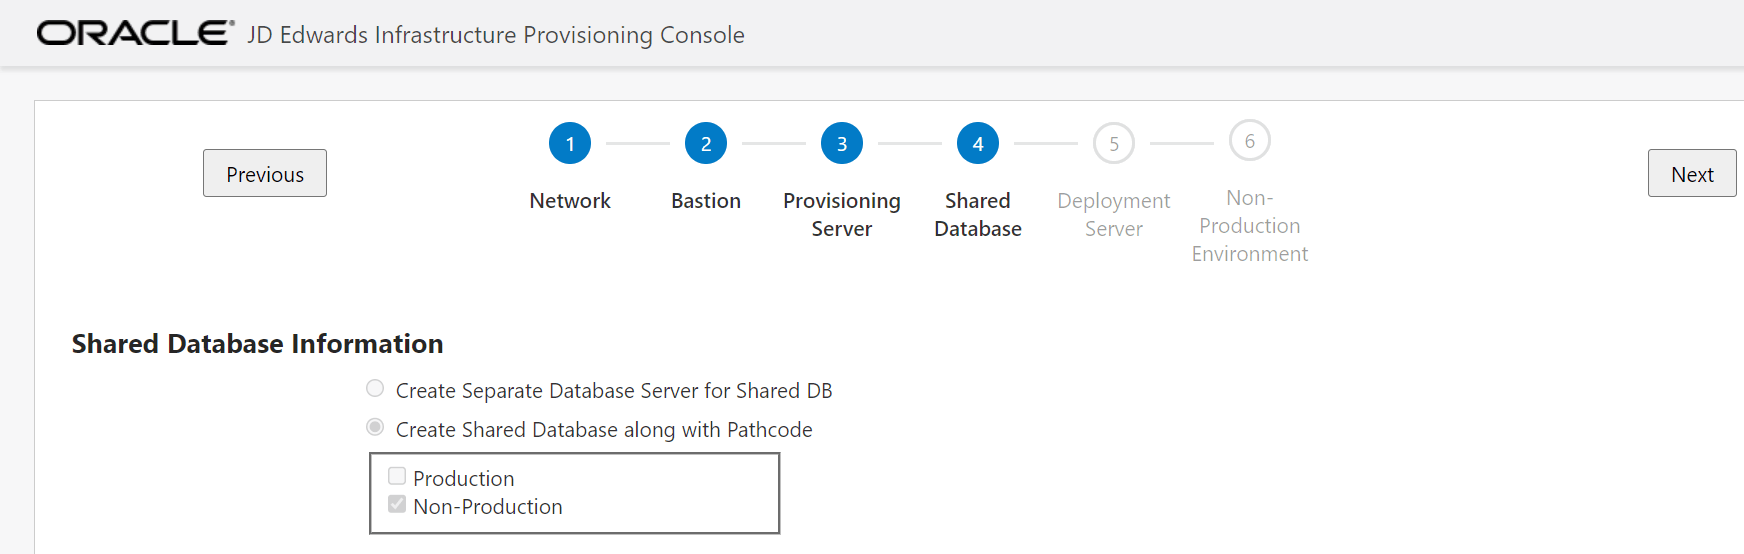
- On Shared Database Information, select valid values as illustrated in the
following example:
-
Create Separate Database Server for Shared DB
Select this option to create an additional Database Server for the Shared DB. The number of additional Database Server will be same as the number of Database Servers entered for the selected pathcode.
-
Create Shared Database along with Pathcode
If you select this option, an additional Database Server will not be created for the shared DB.
-
Create Separate Database Server for Shared DB
- Click Next.
- On Deployment Server Information, enter valid values as illustrated in the
following example:
-
Create Deployment Server
Choose from the options as required. The available options are: Yes and No.
-
Deployment Server Instance Shape List
The recommended shape is any 86x-compatible shape series that supports 2 OCPUs and 32 GB of memory.
-
Number of OCPUs
Specify the number of OCPUs. The minimum number of OCPUs recommended for Deployment Server is 2.
-
Amount of Memory (GB)
For each OCPU you can select from 1 to 64 GB of memory with a maximum of 1024 GB total. The minimum amount of memory recommended for the Deployment Server is 32 GB.
-
Burstable
For Flex shapes, you can enable the checkbox if you want to specify a burstable instance.
If you enable a burstable instance, you can choose this option to provide a baseline level of CPU performance with the ability to burst to a higher level when required by your workload.
-
Burst Size
For Flex shapes, if you chose to create a burstable instance, you can also specify a Burst Size which you can adjust based on your requirements.
-
Deployment Server Instance Password
Enter the Password for Deployment Server Instance.
The password value must contain a minimum of twelve (12) characters which must contain any three (3) of these characteristics:
- Upper case letters
- Lower case letters
- Numeric digits
- Special characters _ @ ~ ! # % * + ) ( } { ] [ . ?
Important: You should make a note of this password because this same password will be required in order to log into this Deployment Server instance. -
Size (DB)
Enter the size for the disk space for the Deployment Server. The minimum recommended value is 250 GB.

-
Create Deployment Server
- Click Next. Note: The following step is only applicable if you are provisioning a Production environment. Otherwise, you can skip this step.
- This step is only applicable if you are configuring a Production environment
(see Note above).
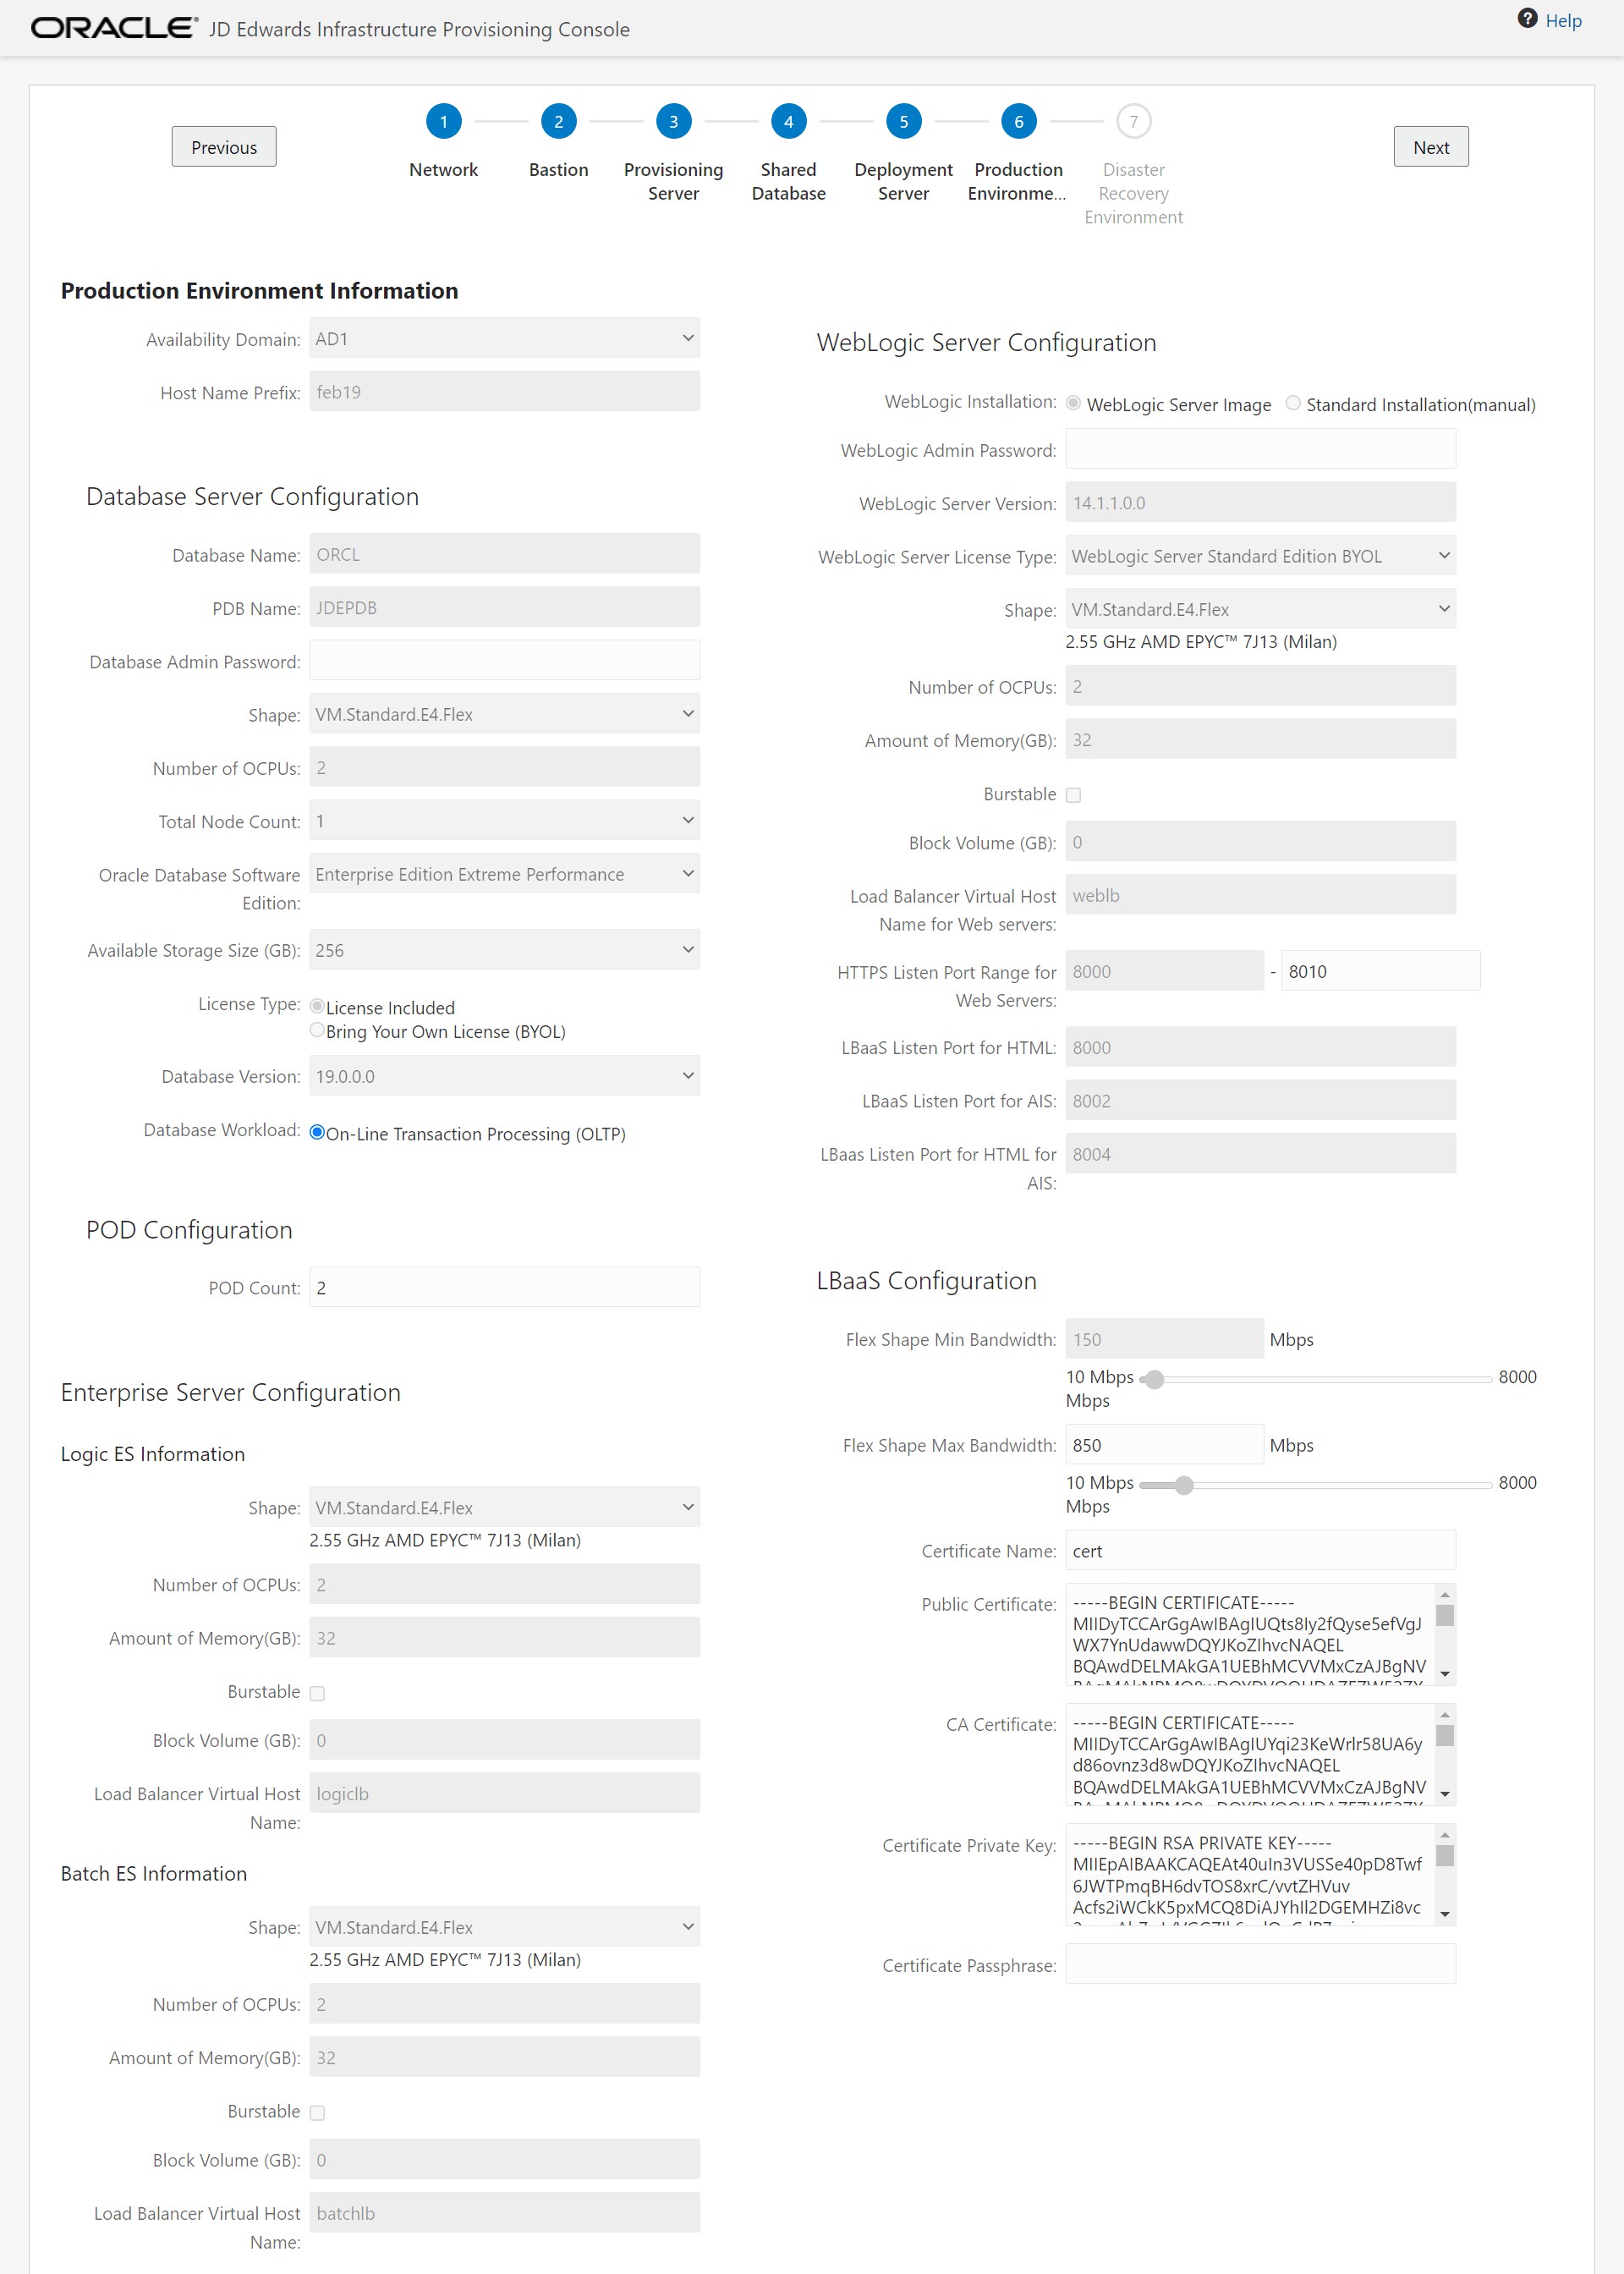
On Production Environment Information, enter valid values as illustrated in the following example:
-
Availability Domain
Select the required availability Domain for the production servers. The available domains are: AD1, AD2, and AD3.
-
Host Name Prefix
Enter the host name prefix for the production servers.
All the instances will be created with the prefix value entered in this field. The length of the prefix must not exceed 6 characters.
For example, if the Prefix value is entered as pdjde,the instances are created with the following names:
Database System: pdjdedb[1-N]Logic Server: pdjdelogic[1-N]
Batch Server: pdjdebatch[1-N]
Weblogic Server: pdjdewls[1-N]
Deployment Server: pdjdedep[1-N]
Database Server Configuration
-
Database Name
The value in this field is pre-populated.
-
PDB Name
The value in this field is pre-populated.
-
Database Admin Password
Enter the password for the Database Administrator. The password must be 9 to 30 characters long, must contain at least two upper case letters, two lower case letters, two numbers, and two special characters.
Note: You must remember to enter this same password if you want to edit the information on this page in case of an error during the provisioning. You can enter a new password or use this same password if you want edit the information or to increase the server count after the provisioning is successful. The new password will apply only to the newly added servers. -
Shape
Select a supported shape from the pull-down list.
Important: Do not select a non-supported shape, such as Exadata, or else you will experience downstream run-time errors. -
Number of OCPUs
Specify the number of OCPUs. The minimum number of OCPUs recommended for the Database Server is 2.
-
Total Node Count
Select the required DB node count from the drop-down list. The available options are 1 and 2.
-
Oracle Database Software Edition
Select the Database software edition from the drop-down list.
Your selection depends on the value you have entered for the field Total Node Count. If you have selected a value of Total Node Count=1, you can select any edition. However, for JD Edwards EnterpriseOne, the recommended value is Enterprise Edition Extreme Performance. If you selected a value for Total Node Count=2, the value Enterprise Edition Extreme Performance is automatically selected and other values are disabled.
-
Available Storage Size (GB)
Select the DB block storage size from the drop-down list.
-
License Type
This option is pre-selected. The available options are License Included and Bring your Own License (BYOL).
-
Database Version
Select the Database version from the drop-down list.
-
Database Workload
The value in this field is pre-populated.
-
POD Count
A single POD count includes one Logic Server instance, one Batch Server instance, and one WebLogic Server instance. The minimum value for POD count is 2.
Logic ES Information
-
Shape
Select the shape list for the instance.
-
Block Volume (GB)
Enter the logic block storage size.
Note: Additional storage is available at/u01. -
Number of OCPUs
Specify the number of OCPUs. The minimum number of OCPUs recommended for the Logic Enterprise Server is 2.
-
Amount of Memory (GB)
For each OCPU you can select from 1 to 64 GB of memory with a maximum of 1024 GB total. The minimum amount of memory recommended for the Logic Enterprise Server is 32 GB.
-
Burstable
For Flex shapes, you can enable the checkbox if you want to specify a burstable instance.
If you enable a burstable instance, you can choose this option to provide a baseline level of CPU performance with the ability to burst to a higher level when required by your workload.
-
Burst Size
For Flex shapes, if you chose to create a burstable instance, you can also specify a Burst Size which you can adjust based on your requirements.
-
Load Balancer Virtual Host Name
Enter the load balancer virtual host name for the logic Enterprise Server.
Note: The virtual host name must be same as the name entered while creating the LBaaS certificate. For example, logiclb.
-
Shape
Select the shape list for the instance.
-
Block Volume (GB)
Enter the batch storage size.
Note: Additional storage is available at/u01. -
Number of OCPUs
Specify the number of OCPUs. The minimum number of OCPU recommended for the Batch Enterprise Server is 2.
-
Amount of Memory (GB)
For each OCPU you can select from 1 to 64 GB of memory with a maximum of 1024 GB total. The minimum amount of memory recommended for the Batch Enterprise Server is 32 GB.
-
Burstable
For Flex shapes, you can enable the checkbox if you want to specify a burstable instance.
If you enable a burstable instance, you can choose this option to provide a baseline level of CPU performance with the ability to burst to a higher level when required by your workload.
-
Burst Size
For Flex shapes, if you chose to create a burstable instance, you can also specify a Burst Size which you can adjust based on your requirements.
-
Load Balancer Virtual Host Name
Enter the load balancer virtual host name for the Batch Enterprise Server.
Note: The virtual host name must be same as the name entered while creating the LBaaS certificate. For example, batchlb.
-
WebLogic Installation
Use the radio buttons to select the installation type for WebLogic Server. The options are:
-
WebLogic Server Image
This option deploys and configures sufficient volume storage for the supported version of WebLogic Server image from the Marketplace of Oracle Cloud Infrastructure.
Note: Based on the POD count, one WebLogic Server instance will be orchestrated to deploy one HTML server, one AIS server, and one HTML server for the AIS server. Theochestration.jsonwill be generated with these 3 sets of servers for one POD. -
Standard Installation (manual)
This option deploys and configures the supported version of WebLogic Server. Included in this deployment is the creation of the supported Linux Compute instance as well as the required minimum storage.
-
WebLogic Server Image
-
WebLogic Admin Password
Enter the password for the WebLogic Administrator.
The password must be 8 to 30 characters long, must contain at least one number, and optionally any number of either the Pound Sign (#) or Underscore (_) special characters.
Important: The password for any WebLogic Server user cannot contain these special characters:- Dollar Sign ($)
- Exclamation Mark (!)
- Ampersand
Note: You must remember to enter this same password if you want to edit the information on this page in case of an error during the provisioning.You can enter a new password or use this same password if you want edit the information or to increase the server count after the provisioning is successful.
The new password will apply only to the newly added servers.
-
WebLogic Server Version
The value in this field is pre-populated based on the WebLogic Server version that is supported by this release of Infrastructure Provisioning. This value is for informational purposes only; it cannot be changed.
-
WebLogic Server License Type
Use the pull-down menu to select your WebLogic Server license type.
-
Shape
Select the WebLogic Server instance shape list.
-
Number of OCPUs
Specify the number of OCPUs. The minimum number of OCPU recommended for the WebLogic Server is 2.
-
Amount of Memory (GB)
For each OCPU you can select from 1 to 64 GB of memory with a maximum of 1024 GB total. The minimum amount of memory recommended for the WebLogic Server is 32 GB.
-
Burstable
For Flex shapes, you can enable the checkbox if you want to specify a burstable instance.
If you enable a burstable instance, you can choose this option to provide a baseline level of CPU performance with the ability to burst to a higher level when required by your workload.
-
Burst Size
For Flex shapes, if you chose to create a burstable instance, you can also specify a Burst Size which you can adjust based on your requirements.
-
Block Volume (GB)
Enter the WebLogic Server block storage size.
-
Load Balancer Virtual Host Name for Web Servers
Enter the Load Balancer virtual host name for web servers (HTML and AIS).
Note: The virtual host name must be same as the name entered while creating the LBaaS certificate. For example, weblb. -
HTTPS Listen Port Range for Web Servers
Select the HTTPS listen port range for the Web Server.
This port range is used to orchestrate the HTML Server, AIS Server, and HTML for AIS Server in the generated
orchestration.jsonfile for the PD pathcode.Note: Both the http and the https ports will be assigned for this range. It is recommended to enter minimum of 6 ports need to be added for HTML, AIS and HTML for AIS server respectively for the http and https ports. There is no requirement to add any other ports. For example, if you enter 8000 to 8005 , then all these servers will use one port for each http and https ports of HTML, AIS, and HTML for AIS servers. -
LBaaS Listen Port for HTML
Enter the LBaaS https port number for the HTML Server.
Note: You can access the HTML Server through the Load Balancer using the IP address of the Load Balancer and this port number. -
LBaaS Listen Port for AIS
Enter the LBaaS https port number for the AIS Server.
Note: You can access the AIS Server through the Load Balancer using the IP address of the Load Balancer and this port number. -
LBaaS Listen Port for HTML for AIS
Enter the LBaaS listen port number for the HTML Server associated with the AIS Server.
Note: You can access the HTML Server associated with the AIS Server through the Load Balancer using the IP address of the Load Balancer and this port number.
-
Flex Shape Min Bandwidth
Use the numeric input field or the slider to specify the minimum bandwidth of the LBaaS Flex shape. In the range of allowable values, the lowest minimum value is 10 Mbps.
-
Flex Shape Max Bandwidth
Use the numeric input field or the slider to specify the maximum bandwidth of the LBaaS Flex shape. In the range of allowable values, the highest maximum value is 8000 Mbps.
-
Certificate Name
Enter the load balancer certificate name. This is the name of the Load Balancer Certificate created on OCI console.
-
Public Certificate
Enter the content in the Load Balancer Public Certificate. To enter the content, you should use an ASCII editor to cut and paste the value from the generated certificate into this field.
Note: To enter the content in this field, you should use an ASCII editor to cut and paste the value from the generated certificate. For example, device.crt that is created in the section entitled: Generating CA Certificates for Load Balancing as a Service (LBaaS). -
CA Certificate
Enter the content in the Load Balancer CA certificate.
Note: To enter the content in this field, you should use an ASCII editor to cut and paste the value from the generated certificate.Important: Be sure to include the BEGIN and END statements in the cut and paste content.For example, rootCA.pem that is created in the section entitled: Generating CA Certificates for Load Balancing as a Service (LBaaS).
-
Certificate Private Key
Enter the content in the Load Balancer Certificate Private Key.
Note: To enter the content in this field, you should use an ASCII editor to cut and paste the value from the generated key.Important: Be sure to include the BEGIN and END statements in the cut and paste content.For example, device.key that is created in the section entitled: Generating CA Certificates for Load Balancing as a Service (LBaaS).
-
Certificate Passphrase
This is an optional field. Enter the passphrase for the LBaaS certificate.
-
Availability Domain
-
Click Next.
If you have selected WebLogic Server Image option for the deployment of WLS, the following dialog for License Agreement is displayed:
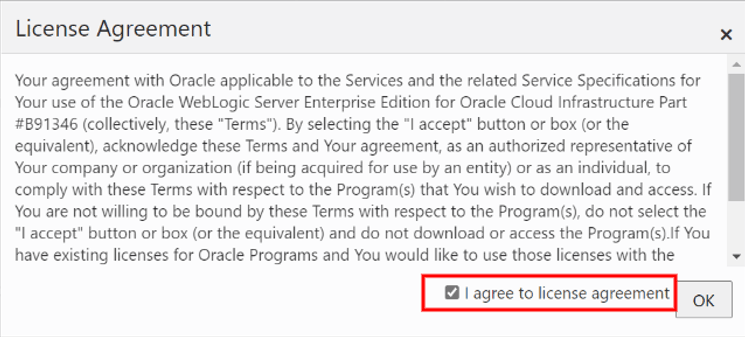 Important: You must review and agree to the terms of the License Agreement by clicking the "I agree to license agreement" checkbox before you can proceed with Infrastructure Provisioning. Click the OK button to proceed.Note: The following step is only applicable if you are provisioning a Non-Production environment. Otherwise, you can skip this step.
 - This step is only applicable if you are configuring a Non-Production
environment (see Note above).
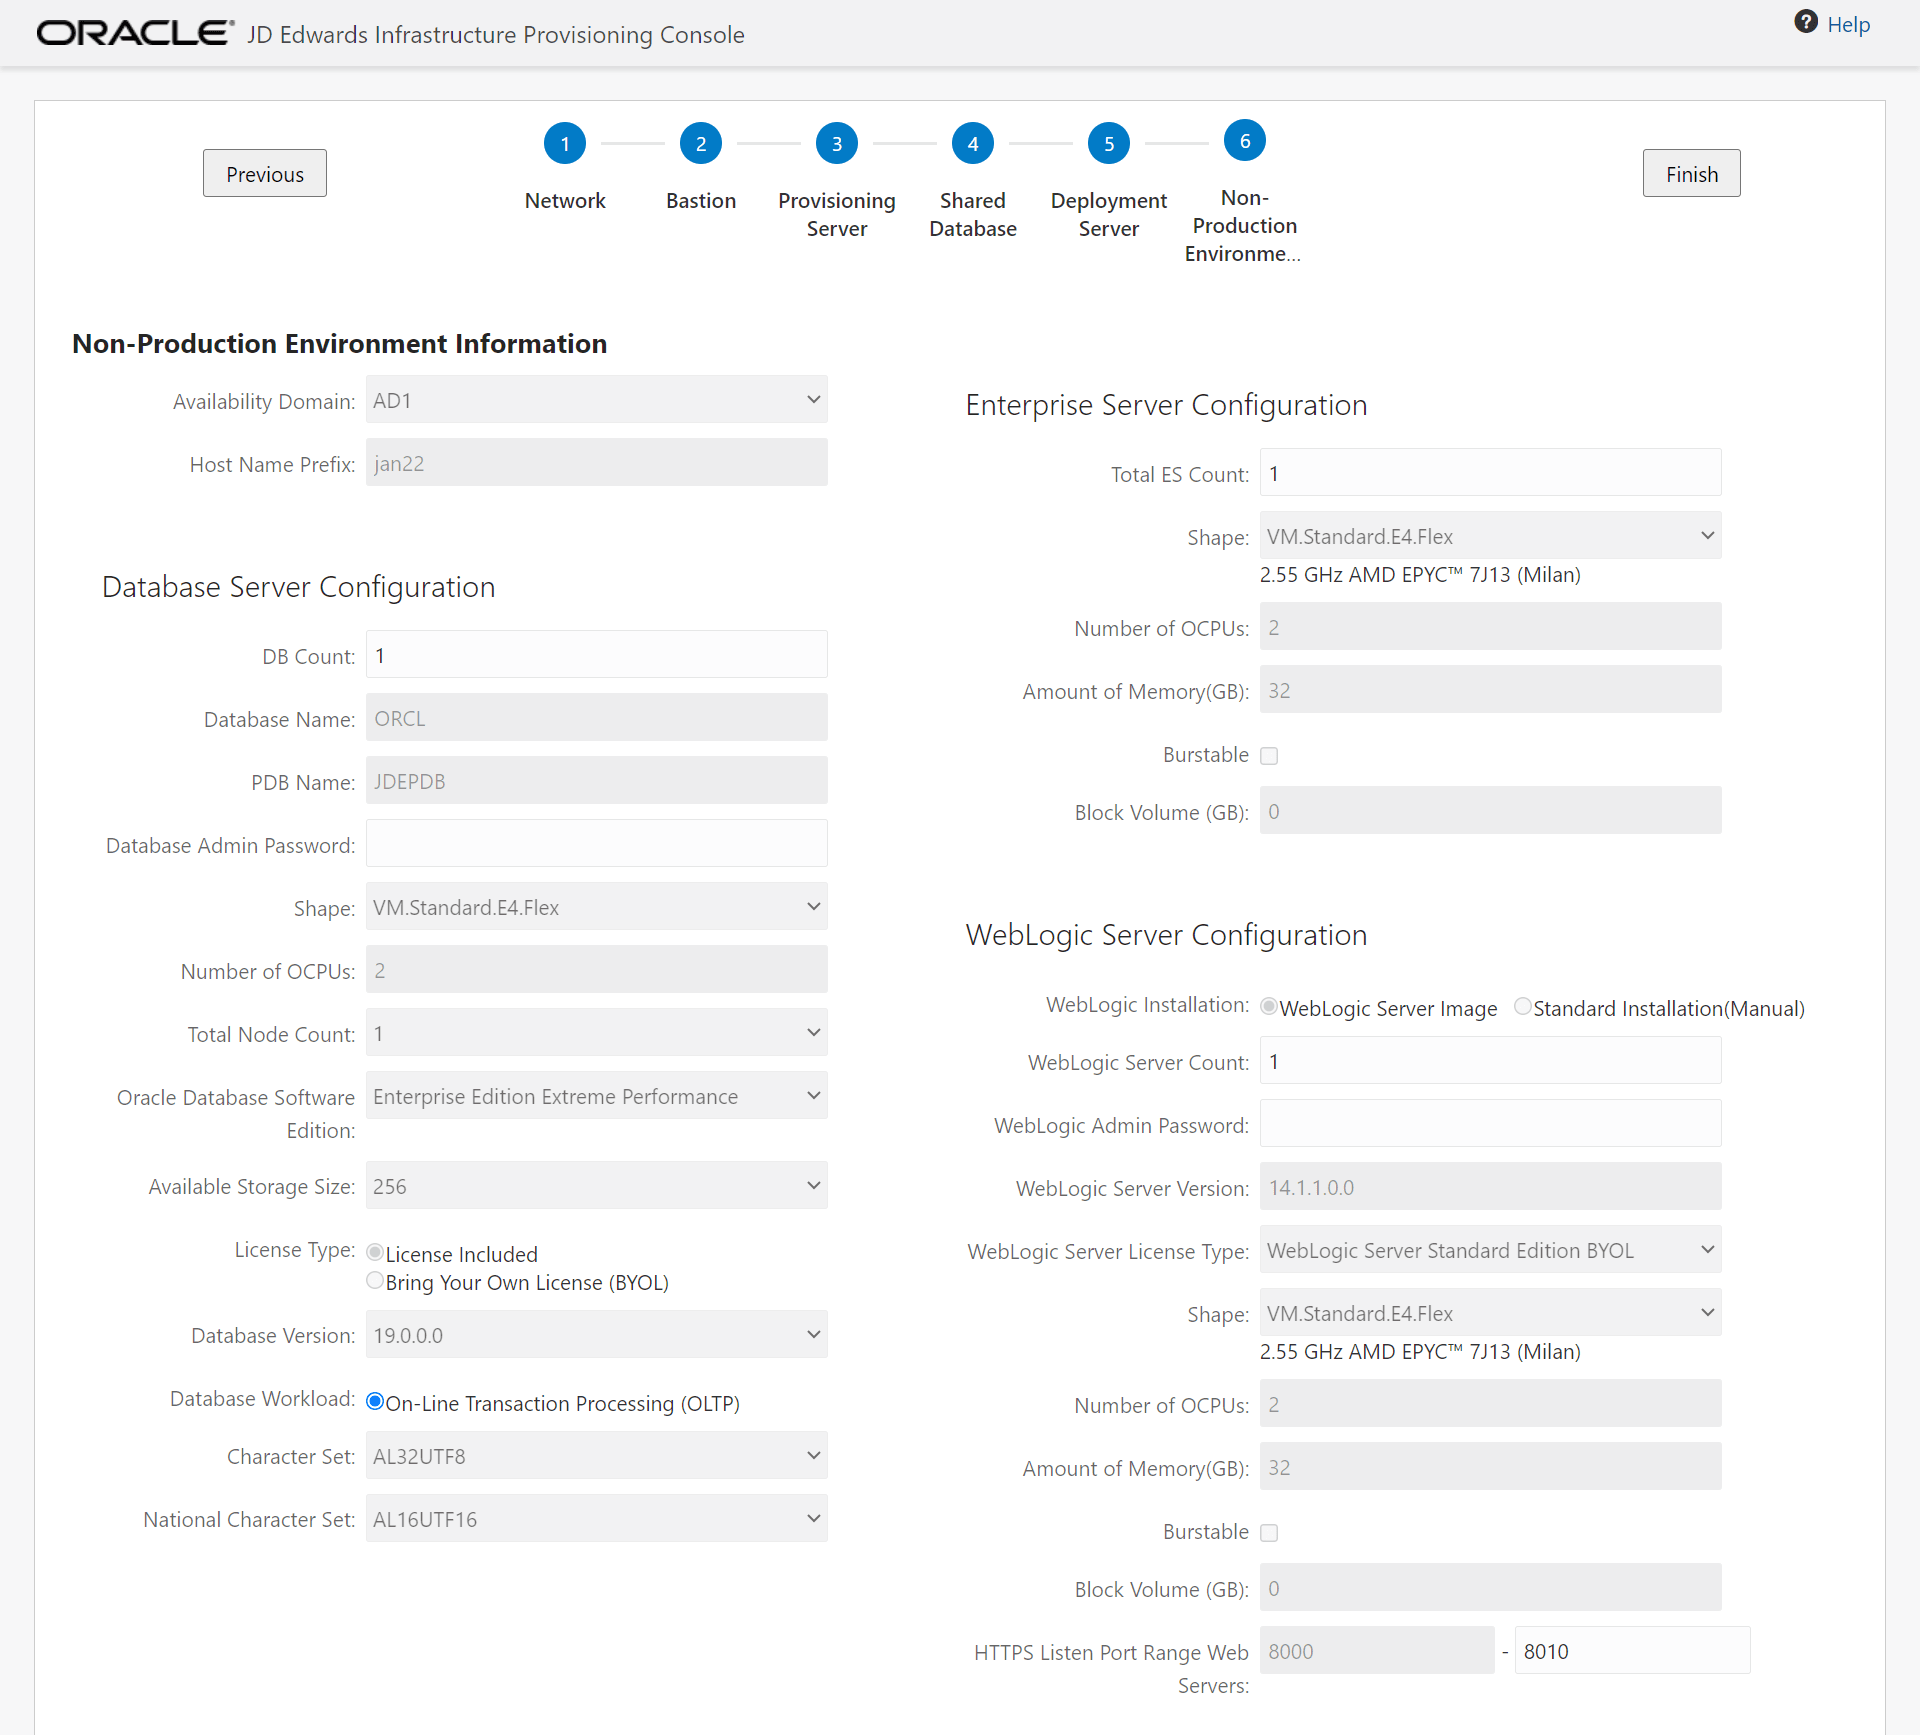
On Non-Production Environment Information, enter valid values as illustrated in the following example:
-
Availability Domain
Select the required availability Domain for the non- production servers. The available domains are: AD1, AD2, and AD3.
Note: Note: You can select only one availability domain for the non-production server. -
Host Name Prefix
Enter the host name prefix for the non-production servers.
Note: All of the non-production instances are created using the prefix value entered in this field.
-
Database Name
The value in this field is pre-populated.
-
Database Name
The value in this field is pre-populated.
-
DB Count
Select the DB count from the drop-down list.
-
PDB Name
The value in this field is pre-populated.
-
Database Admin Password
Enter the password for the Database Administrator. The password must be 9 to 30 characters long, must contain at least two upper case letters, two lower case letters, two numbers, and two special characters.
Note: You must remember to enter this same password if you want to edit the information on this page in case of an error during the provisioning. You can enter a new password or use this same password if you want to edit the information or to increase the server count after the provisioning is successful. The new password will apply only to the newly added servers. -
Shape
Select a supported shape from the pull-down list.
Important: Do not select a non-supported shape, such as Exadata, or else you will experience downstream run-time errors. -
Number of OCPUs
Specify the number of OCPUs. The minimum number of OCPUs recommended for the Database Server is 2.
-
Total Node Count
Select the required DB node count from the drop-down list.
-
Oracle Database Software Edition
Select the Database software edition from the drop-down list.
-
Available Storage Size
Select the DB block storage size from the drop-down list.
-
License Type
This option is pre-selected. The available options are License Included and Bring your Own License (BYOL).
-
Database Version
Select the Database version from the drop-down list.
-
Database Workload
This option is pre-selected.
-
Character Set
The value in this field is pre-populated.
-
National Character Set
The value in this field is pre-populated.
-
Total Logic ES Count
Enter the total number of Enterprise Server count for the non-production environment as required.
-
Shape
Select the Logic Instance shape list.
-
Number of OCPUs
Specify the number of OCPUs. The minimum number of OCPUs recommended for the Enterprise Server is 2.
-
Amount of Memory (GB)
For each OCPU you can select from 1 to 64 GB of memory with a maximum of 1024 GB total. The minimum amount of memory recommended for the Enterprise Server is 32 GB.
-
Burstable
For Flex shapes, you can enable the checkbox if you want to specify a burstable instance.
If you enable a burstable instance, you can choose this option to provide a baseline level of CPU performance with the ability to burst to a higher level when required by your workload.
-
Burst Size
For Flex shapes, if you chose to create a burstable instance, you can also specify a Burst Size which you can adjust based on your requirements.
-
Block Volume (GB)
Enter the Logic Block Storage size.
Note: Additional storage is available at /u01.
-
WebLogic Server Count
Enter the WebLogic Server count for Non-Production.
-
WebLogic Server Version
The value in this field is pre-populated based on the WebLogic Server version that is supported by this release of Infrastructure Provisioning. This value is for informational purposes only; it cannot be changed.
-
WebLogic Server License Type
Use the pull-down menu to select your WebLogic Server license type.
-
WebLogic Admin Password
Enter the password for the WebLogic Administrator.
The password must be 8 to 30 characters long, must contain at least one number or a special character.
Important: The password for any WebLogic Server user cannot contain these special characters:- Dollar Sign ($)
- Exclamation Mark (!)
- Ampersand
Note: You must remember to enter this same password if you want to edit the information on this page in case of an error during the provisioning. You can enter a new password or use this same password if you want edit the information or to increase the server count after the provisioning is successful. The new password will apply only to the newly added servers. -
Shape
Enter the WebLogic Server Instance shape list.
-
Number of OCPUs
Specify the number of OCPUs. The minimum number of OCPUs recommended for the WebLogic Server is 2.
-
Amount of Memory (GB)
For each OCPU you can select from 1 to 64 GB of memory with a maximum of 1024 GB total. The minimum amount of memory recommended for the WebLogic Server is 32 GB.
-
Burstable
For Flex shapes, you can enable the checkbox if you want to specify a burstable instance.
If you enable a burstable instance, you can choose this option to provide a baseline level of CPU performance with the ability to burst to a higher level when required by your workload.
-
Burst Size
For Flex shapes, if you chose to create a burstable instance, you can also specify a Burst Size which you can adjust based on your requirements.
-
Block Volume (GB)
Enter the WebLogic Server Block storage size.
Note: Additional storage is available at /u01. -
HTTPS Listen Port Range for Web Servers
Select the HTTPS listen port range required for all Non-Production HTML and AIS Servers.
This port range is used to orchestrate the HTML Servers and the AIS Servers for the non-production pathcode.
Note: Both the http and the https ports will be assigned for this range. It is recommended to enter long ranges. For example, if you enter 8030 to 8050 (range of 20 ports), a maximum number of 15 HTML Servers or AIS Servers can be provisioned.
-
Availability Domain
- Click Next.
If you have selected WebLogic Server Image option for the deployment of WLS, the following dialog for License Agreement is displayed:
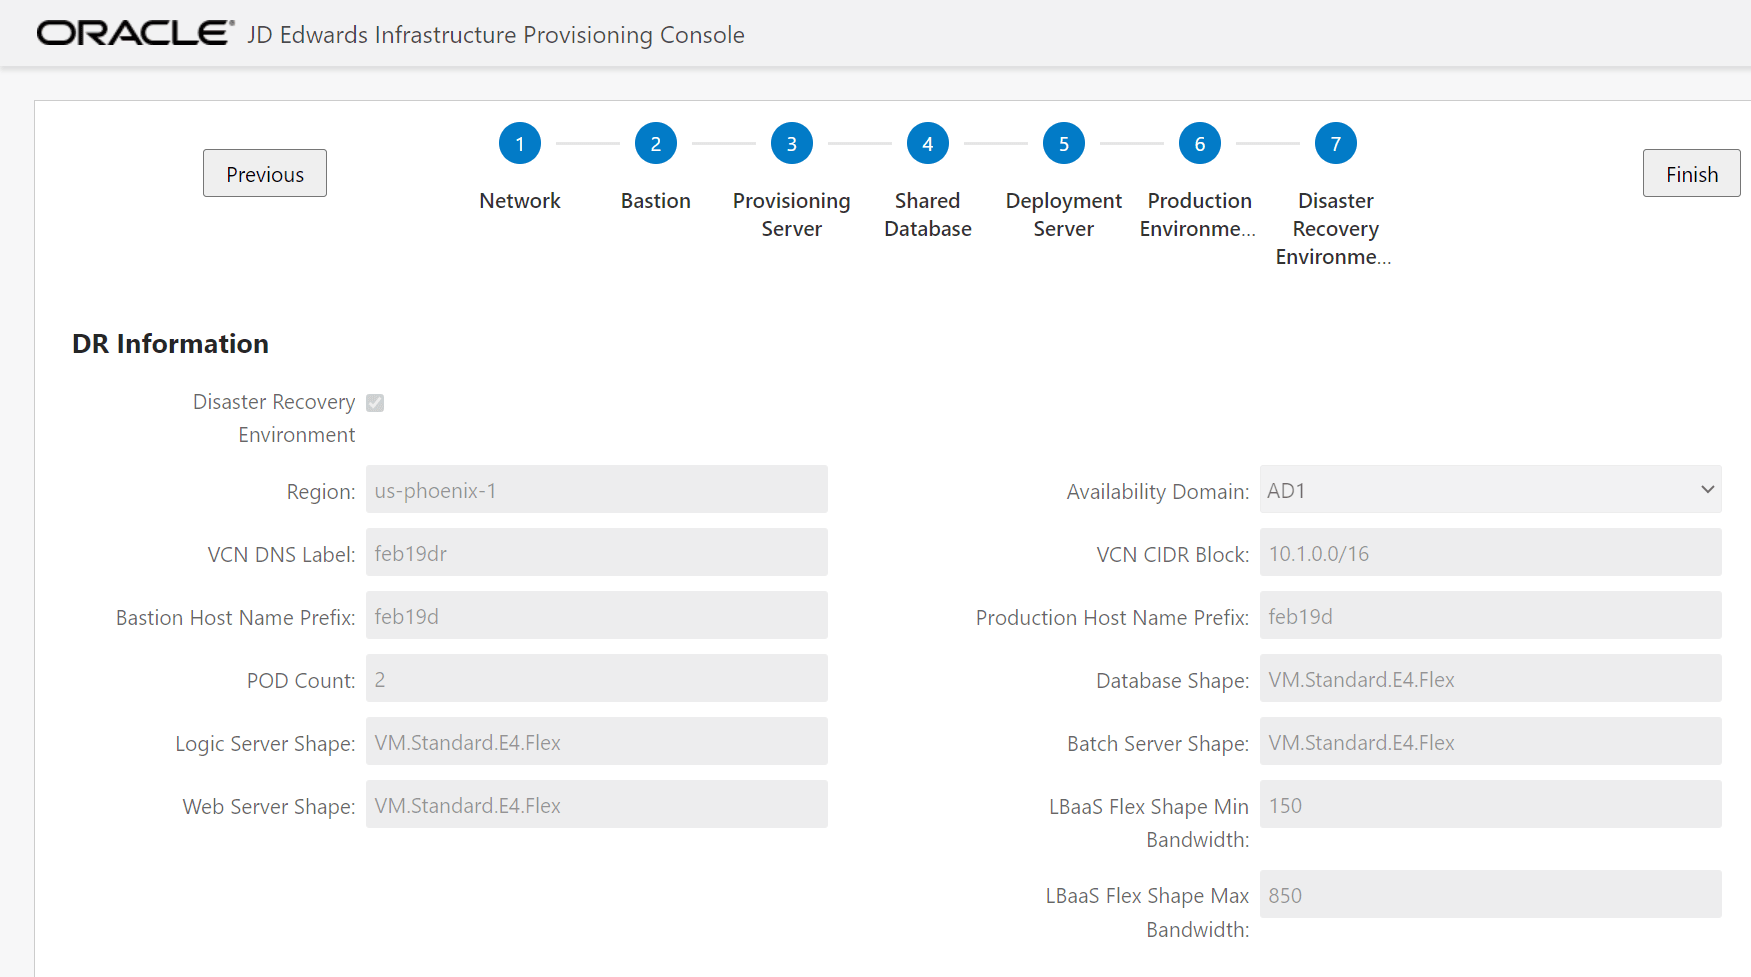
Important: You must review and agree to the terms of the License Agreement by clicking the "I agree to license agreement" checkbox before you can proceed with Infrastructure Provisioning. Click the OK button to proceed.Note: The next step for Disaster Recovery is only applicable and supported for Production environments that are created with a single run (Production Environment + Disaster Recovery). This functionality is not supported in a separate run to only implement Disaster Recovery. Further, Disaster Recovery is not supported for non-Production environments. If none of these scenarios apply to your run of One-Click Infrastructure Provisioning, you can skip this step. This step is only applicable if you want to implement Disaster Recovery (see Note above). On Disaster Recovery Environment Information, enter valid values as illustrated in the following example:
-
Region
Enter the Region Identifier of the region where disaster recovery resources need to be created.
For example, for the Region Name US West Phoenix, the Region Identifier is us-phoenix-1.
Note:Oracle recommends the Disaster Recovery Region Identifier should not be same as the Region specified in the Network section (step 4 above). Therefore, in this example, if you specified the region as us-phoenix-1 in the network section in step 4, you should specified a different region here for Disaster Recovery.
-
VCN DNS Label
Enter the value of the DNS Label for your VCN of Disaster Recovery environment.
Important:The length of the field cannot exceed 15 characters. The name must start with a letter and must contain only alphanumeric characters. The value should only specify the globally unique domain name; do not include the prefix "www" or "local".
Note:The value for this label cannot be the same as you have given on Network Details page.
-
Bastion Host Name Prefix
Enter the Bastion host name prefix for Disaster Recovery environment. The Bastion instance is created using the prefix value entered in this field. The length of the prefix must not exceed 6 characters. For example, if the prefix value is entered as pdDR, the server names will be created as follows:
Bastion Host: pdDRbas[xxx][N]
where [xxx] is the first three character of domain, and
where [N] is the number of servers, which can be 1-N.
Note:The value for this label cannot be the same as you have given on Bastion Details page.
-
POD Count
The system populates this field with the value you have provided when you configured the Production Environment. You cannot update this field on this screen.
Note:A single POD count includes one Logic Server instance, one Batch Server instance, and one WebLogic Server instance. The minimum value for POD count is 2.
-
Logic Server Shape
The system populates this field with the shape of the Logic Server instance that you defined for the Disaster Recovery environment for the Production Environment. You cannot update this field on this screen.
-
Web Server Shape
The system populates this field with the shape of the Web Server instance that you defined for the Disaster Recovery environment for the Production Environment. You cannot update this field on this screen.
-
Availability Domain
Select the required availability domain for the Disaster Recovery environment. For most regions, the available domains are: AD1, AD2, and AD3.
-
VCN CIDR Block
The value for the VCN CIDR blocks indicates the network addresses that can be allocated to the resources of Disaster Recovery environment. The system calculates this value based on the VCN CIDR of the Production Environment. You cannot manually adjust this value.
-
Production Host Name Prefix
You should specify the host name prefix for the Disaster Recovery environment that you defined for the Production Environment.
Note: The value for this label cannot be the same as you have given for the production environment. -
Database Server Shape
The system populates this field with the shape of the Database Server instance that you defined for the Disaster Recovery environment for the Production Environment. You cannot update this field on this screen.
-
Batch Server Shape
The system populates this field with the shape of the Batch Server instance that you defined for the Disaster Recovery environment for the Production Environment. You cannot update this field on this screen.
-
LBaaS Shape
The system populates this field with the shape of the LBaaS that you defined for the Disaster Recovery environment for the Production Environment. You cannot update this field on this screen.
-
- Click Finish.
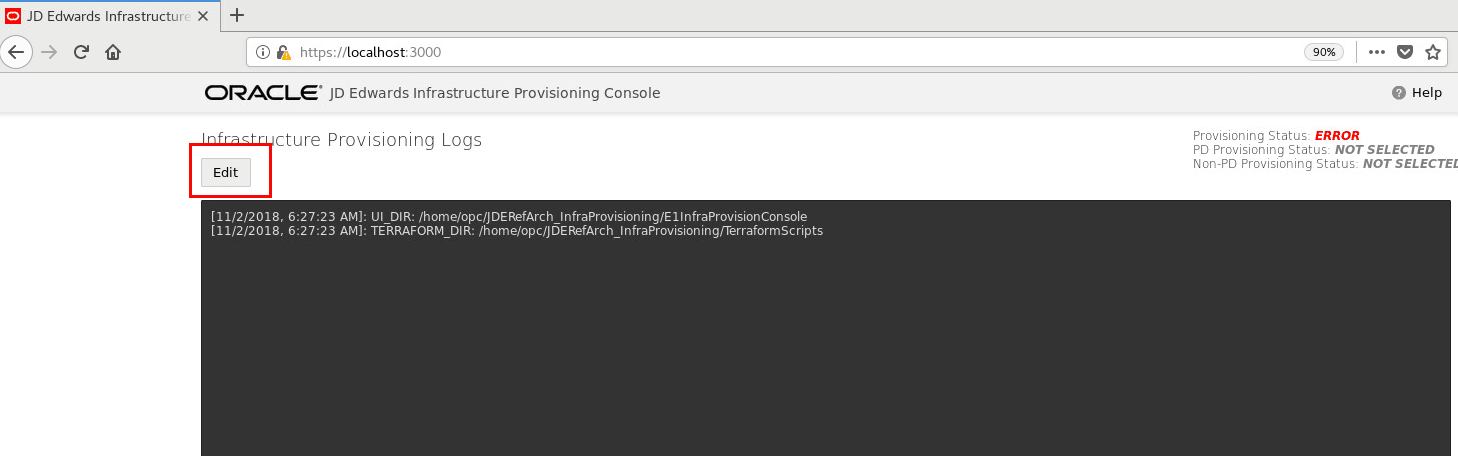
The OpenTofu scripts are automatically initiated. The following message is displayed if the provisioning is successful.
Note: You can click Edit to go back and increase the server count.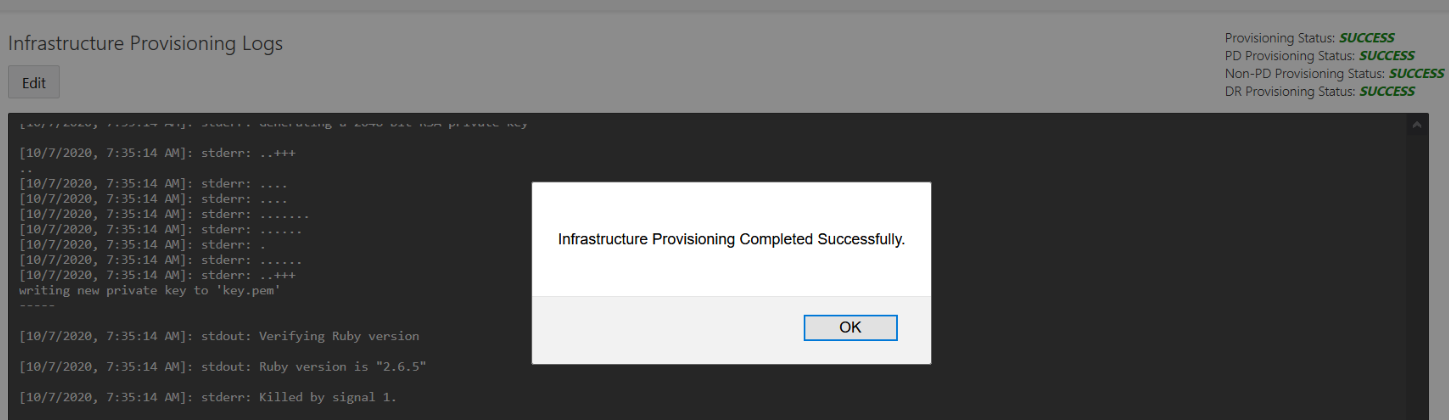
- Verify that the files pdOrch.json, nonpdOrch.json and
infraOutput.json are created in this path:
JDERefArch_InfraProvisioning/E1InfraProvisionConsole/outputJson-
infraOutput.jsoncontains details about the production and non-production pathcodes, as well as the disaster recovery environment, if it was selected during Infrastructure Provisioning. This file also contains information such as the host name and Private IP of Logic Server Load Balancer, Batch Server Load Balancer, and WebLogic Server Load Balancer. -
pdOrch.jsoncontains details of all the instances in the production environment, as well as the disaster recovery environment, if it was selected during Infrastructure Provisioning. -
nonpdOrch.jsoncontains details of all the instances in the non-production environment. It is not possible to import this json file into the JD Edwards One-Click Provisioning Console. You can use the details in this file to orchestrate the components manually in the JD Edwards One-Click Provisioning Console.
Note: You can review the log messages on the Infrastructure Provisioning Logs window. You can also find the log files in the following location.JDERefArch_InfraProvisioning\\E1InfraProvisionConsole\logs -
- Click the Edit button on the Infrastructure Provisioning Log window to
correct the information provided in case of an error.