Troubleshooting Your Infrastructure Provisioning Deployment
This section lists the troubleshooting topics and resolutions.
Finding the Infrastructure Provisioning Logs
The infrastructure provisioning log files on the OpenTofu staging server are located in this directory:/home/opc/JDERefArch_InfraProvisioning/E1InfraProvisionConsole/logs
Viewing the One-Click Provisioning Console Logs
To view the logs for the One-Click Provisioning Console:
- You must use a private IP address to connect to the Provisioning Console running on the One-Click provisioning server.
- To connect to the provisioning server, use the procedure explained in the section “Connecting to a Linux Host in a Private Network Through the Bastion Host” which is located in the OBE "Connecting to a Host in a Private Network Through the Bastion Host."
- After a connection is established with the provisioning server, run the
following command in the shell to view the logs for the One-Click Provisioning
Console:
$ sudo journalctl -u E1CloudConsole
- Press Page-Down to scroll through the logs.
- Enter Shift + G to scroll to the end of the log.
Finding the One-Click Provisioning Deployment Logs
Use this procedure to create a secure FTP (SFTP) connection from your Microsoft Windows workstation to the JD Edwards EnterpriseOne Reference Architecture OpenTofu Staging Server.
This example in this procedure uses a program for Microsoft Windows called WinSCP. However, you can use any SFTP program to make the connection.
- Start your SFTP program, such as WinSCP.
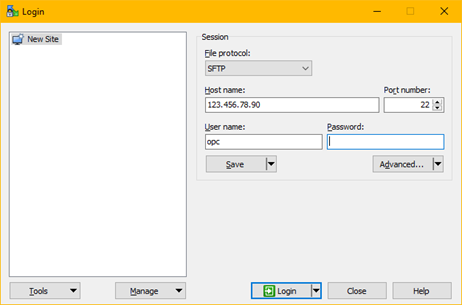
- On the Login window, complete these fields:
-
File protocol
SFTP
-
Host name
Enter the private IP address of the provisioning server.
-
Port
Enter the value 22.
-
User name
Enter the value opc.
Password
At this point you cannot enter a password in the FTP program to complete the connection. Instead you must use the Advanced option and wait until prompted to enter a private key password as described in Step 3 below.
-
Advanced
No changes are required in this section for this purpose.
-
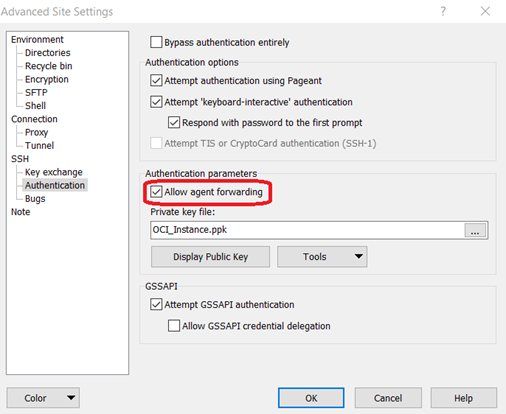
- In the tree structure in the left pane, navigate to SSH and then Authentication.
-
In the Private key file field, use the browse button to locate the private key file. If you followed the recommendation in the OBE "Connecting to a Host in a Private Network Through the Bastion Host", this file is named OCI_Instance.ppk.
Note:Ensure that you have checked the option Allow agent forwarding under Authentication parameters.
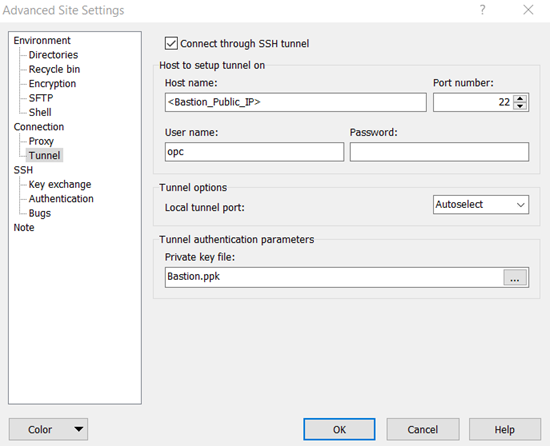
- In the tree structure in the left pane, navigate to Connection and then Tunnel.
- Complete the following fields:
-
Host name
Enter the Public IP address of the Bastion Host.<Enter the public IP address of the Bastion host.>
-
User name
Enter the value opc.
-
Private key file
Use the Browse button to locate the Private <private> key file. If you followed the recommendation in the OBE "Connecting to a Host in a Private Network Through the Bastion Host", this file is named Bastion.ppk.
-
- Click the OK button to save the setting and return to the Login screen.
- On the Login screen with all the above fields completed, click the Login button.
After the SFTP program establishes a connection to the OpenTofu staging server,
the following warning is displayed:
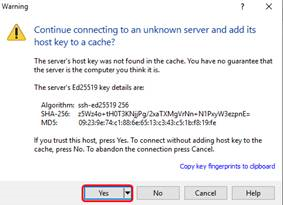
- On the Warning dialog box, click the Yes button to accept the connection to the “unknown server” to add the host key of this server to the cache.
- After the connection is made, the SFTP program is ready to be used for file
transfers from your workstation to the JD Edwards EnterpriseOne Reference
Architecture OpenTofu Staging Server. For example:

-
You can locate logs in this directory:
/u01/E1ProvisionPrime/log - To inspect the logs, you can copy the directory to your local workstation.
Orchestrating JD Edwards EnterpriseOne Servers Returns IPV6 Is Not Disabled
Use this procedure if One-Click Provisioning returns this message for any Linux server that you are provisioning:
- IPV6 Is Not Disabled
- Ensure that
/etc/sysctl.conffile contains below list of entries:net.ipv6.conf.default.disable_ipv6 = 1net.ipv6.conf.all.disable_ipv6 = 1 -
If the above settings do not exist, you must update the /etc/sysctl.conf file to include the above settings.
Important: A mandatory reboot is necessary in order for the settings to take affect. and reboot the machine. -
Verify the output of below command to ensure there is no entry for the string "
inet6"sudo ifconfig | grep inet6 -
If the string "
inet6" continues to occur in the output of the above command output, verify your settings and ensure that the machine has been rebooted.
- Ensure that