Creating Job Forecasts
To create a job forecast:
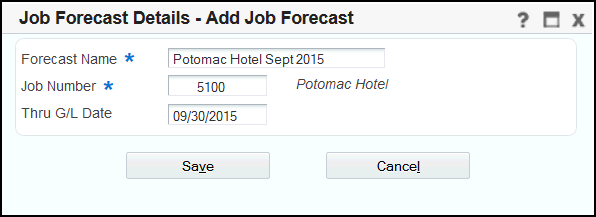
Access the Work With Job Forecasts form and click Add.
On the Add Job Forecast form, complete these fields and then click Save:
Forecast Name (Required)
Job Number (Required)
Thru G/L Date
The date determines the date through which general ledger data is included in the forecast. The forecast will include all data in the current period, up to and including the date in this field. If you leave this field blank, the system date is used.
The system searches for forecasts associated with the specified job in the prior period. If an approved forecast for the specified job exists in the prior period, the system automatically selects that forecast. If multiple open forecasts exist for the specified job in the prior period, the system displays the Select Prior Forecast window. You can select a forecast and then click OK, or click Close if you do not want to select a prior forecast.
The system uses the prior period forecasts to load remaining work data from the prior period into the current forecast. Note that remaining work data will be loaded from a prior period only if the cost code had a MOC of Z in the prior period, and on the current period forecast.
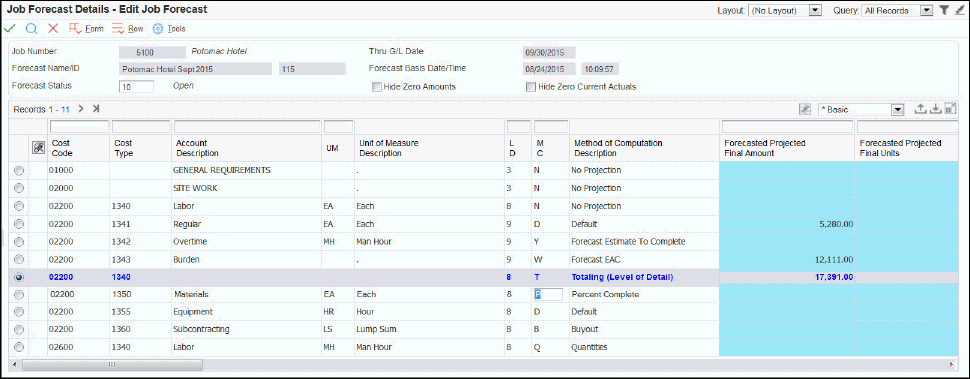
The system returns you to the Work With Job Forecasts form, and displays only the newly created forecast. Click Select to open the forecast.
On the Edit Job Forecast form, you can select one or more of these optional items to filter the accounts that are displayed in the forecast:
Hide Zero Amounts
Select this option to hide all rows that do not have any actual amounts posted to them since the account was created. Typically, you would select this option to hide the rows representing accounts for which work has not yet started.
Hide Zero Current Amounts
Select this option to hide all rows that do not have any actual amounts posted during the current period, up to and including the date in the Thru G/L Date specified in the forecast. Typically, you would select this option to display only those accounts that currently have work in progress.
Note that you can also use the QBE line to enter additional filter criteria.
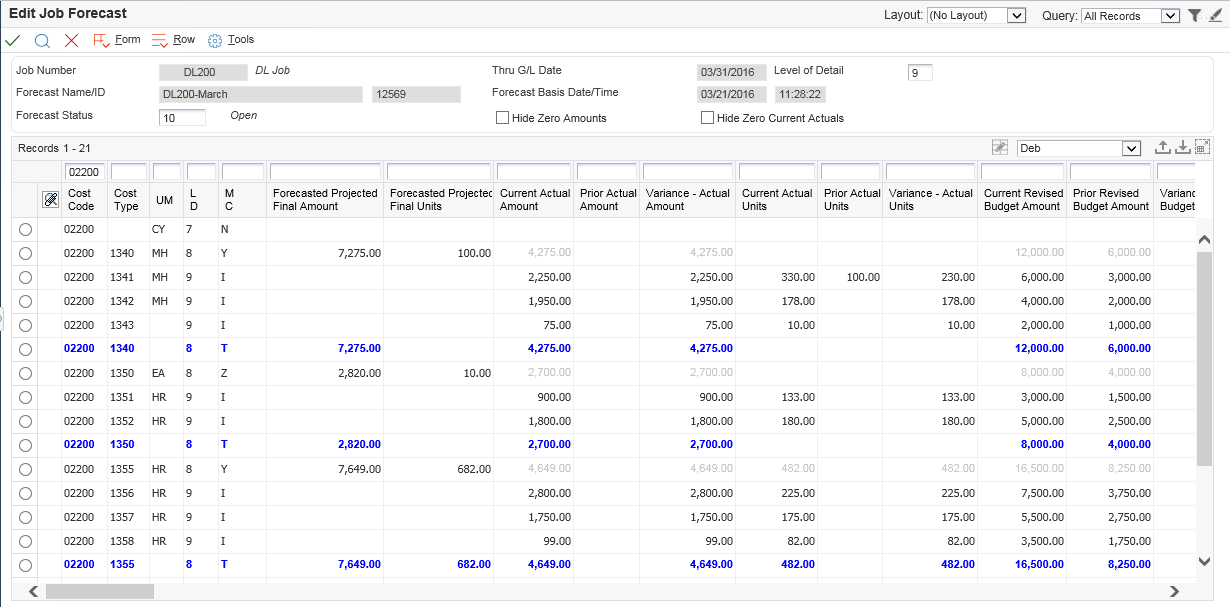
To enter forecast data for an account, select the account (row) and scroll right on the form to display the fields you want to update. Note that the fields that are enabled for input are determined by the value in the MC (Method of Computation) field. You can change the value in the MC field to one of these Advanced Job Forecasting methods to enter forecasting data:
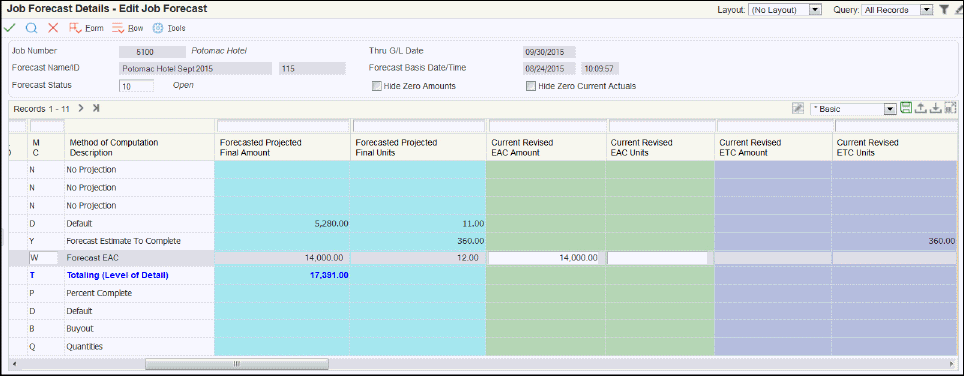
Accounts with MC = W
You can enter forecast data in the Current Revised EAC Amount and Current Revised EAC Units fields.
Accounts with MC = Y
You can enter forecast data in the Current Revised ETC Amount and Current Revised ETC Units fields.
Accounts with MC = Z
You can enter remaining work data for the forecast. See Entering Remaining Work Data on a Job Forecast.
You can also enter user-defined methods of computation. To enter a user-defined MOC value, you must first activate system 51F.
Additionally, you can update the Remark, To-Be-Committed Amount and To-Be-Committed Units fields for all accounts, regardless of the value in the MC field.
 Note: If you change the method of computation for a row, and then decide you want to change the value back to the original value, select the row, and then select Revert MOC from the Row menu.
(Release 9.2 Update) You can also set up detailed accounts to be summarized under their associated lower-level accounts. The level of summarization that you can set up is determined by the processing option settings.
Note that the rollup account must use a method of computation of W, Y, or Z. You then change the method of computation for all of the detailed accounts that you want included in the rollup to I (inclusion). See Understanding Level of Rollup (Release 9.2 Update) for additional details.
After you have entered forecast data, click OK. The system updates the Forecasted Projected Final Amount and the Forecasted Projected Final Units based on the existing data, and the forecast data that you entered.
Review the data, updating and saving as needed. Notice that the form displays totaling and sub-totaling lines, based on the level of detail for each account. Each time you save the data, the system updates the F51F110 table.
When the forecast is ready for review, change the value in the Forecast Status field to In Review.