 Creating
an Instance in Oracle Cloud Infrastructure Compute Classic
Creating
an Instance in Oracle Cloud Infrastructure Compute Classic Before You Begin
This 60-minute tutorial shows you how to create an instance in Oracle Cloud Infrastructure Compute Classic for Trial Edition of J.D. Edwards EnterpriseOne.
Background
This section covers how to obtain the JD Edwards Trial Edition application from the Oracle Cloud Marketplace, and creating an instance on your OCI Compute Classic domain.
What Do You Need?
- A subscription to OCI Compute Classic. You must be a user
with the Compute_Operations role. For more information, see:
How to Begin with Compute Classic Subscriptions in Using Oracle Cloud Infrastructure Compute Classic
 Obtaining
the Trial Edition Image
Obtaining
the Trial Edition Image
- From the Oracle
Cloud Marketplace go to the listing for Trial Edition
that is labeled:
JDE 9.2 Trial Edition
- On the listing page, select the Get App button.
- Log in with your Oracle Single Sign-On. This allows Oracle to discover Oracle Compute Classic Services associated with your user. If there are none, you will not be allowed to continue. If you have not already done so, you will be asked to give permissions to validate your Cloud Compute Classic Services account and instructions are provided.
- Accept the Oracle Cloud Marketplace Terms of Service and select your domain for installation. A notification appears indicating that the JD Edwards EnterpriseOne Trial Edition image is now available in your account. The system also sends an email with a link that allows you to continue the application installation.
- Verify you received the Application Successfully Installed message (shown below) but do not click the Start Compute Console button. Instead you should manually launch the Cloud Console in a separate session and proceed to the next task in this Learning Path.

 Creating
Storage and an Instance
Creating
Storage and an Instance
Before you can create an instance for Trial Edition, you must first create a storage volume for the instance.
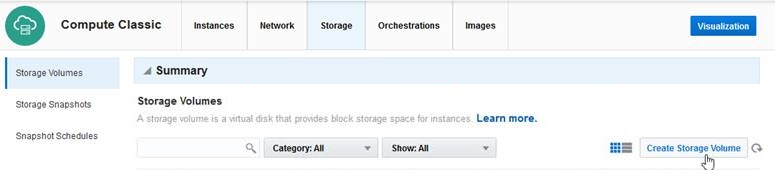
- On Compute Classic select the Storage tab.
- With the Storage tab selected, click the Create Storage Volume button.
- On Storage Volume Details, complete the following fields:
- Name: Enter your choice of Storage Volume Name. This identifies your storage volume in the Storage Volume tile once the instance is started.
- Boot Image: Use the pulldown list to
select the Trial Edition image that you downloaded.
Important: If your domain contains multiple images with the same name, you must ensure you specifically correlate that image with both the storage that you are creating now, and the instance you will create next. A downloaded image is uniquely identified by an email address. You can determine the associated email address by hovering over the image.
The image will have a name similar to this:
JDE_TEnnnn_OLvvv_yyxxx_zzzGB
where nnnn is the version of EnterpriseOne with which Trial Edition is built. For example, TE9230 indicates EnterpriseOne Tools Release 9.2.3.0.
where vvv is the version and edition of Linux. For example, 7u5 means Linux 7.5.
where xxyyy is a unique date-driven value with xx being the last two digits of the year and yyy being the sequential calendar day in the year. For example, the following value of 18113 would indicate the image was created in the year 2018 on the 113th calendar day of the year.
where zzz is the size of the image.
- Size: Change the
Size to to match the value for zzz in the image name. For
example, if the value is 125GB, then select 125.
Note: The storage volume should be 15% larger than the image it holds. For example, if the image inside the JD Edwards EnterpriseOne Release 9.2 Trial Edition storage volume is 110 GB. The storage volume will show a size of 125 GB in this step, but the instance will only show 110 GB of disk space upon logging onto the server. - Storage Property: Use the pulldown to select the default storage property: storage/default.
- Description: Enter your choice of description.
- Click the Create button to accept the detail values you entered and continue. The system notifies you that the storage volume has been created and it begins to initialize.
- In the Storage tab, click the refresh button (located immediately to the right of the Create Storage Volume button) until the status changes from Initializing to Online. This may take a while to complete.
- Once the Storage Volume reaches the Online status, select the Instances tab.
- Select Create Instance to start defining the instance you want to create.
- On Compute Classic, Create Instances, Quick Starts, click the link for Show All Images.
- On the Image page, search and select the Trial Edition image that was copied from the Marketplace.
- Select Private Images on the left hand tree.
- Populate the search window with text such as TE922
to filter and find the Trial Edition image.
Important: If you have multiple images with the same name, you may not be able to differentiate them by name from the pull-down list. However, the system will not function properly unless the exact same image associated with the Storage here is subsequently associated for the instance you will create. Therefore it is recommended to not have multiple identically named images available, which may have been downloaded by different users. - Once you find the desired image, click the Select button on the image line; the button text changes to Selected.
- Once the image is selected, click the arrow button in the upper right to continue through the workflow and move to the next page.
- On the Shape page, you must pick (click on) a shape with a minimum of 4 OCPUs and 30 GB of memory. For example, the oc5 shape includes 4 OCPUs and 30 GB memory.
- Once you have clicked on your selection it will become highlighted and you can click the arrow button in the upper right to continue to the next page.
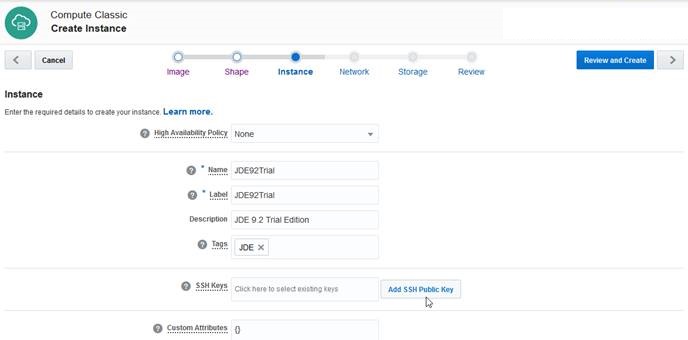
- On the Instance page, complete the following fields:
- Persistent
For Trial Edition, it is recommended that you select True. - Placement
Specify if you want this instance to be create in the same domain or a different domain as any existing instances.
The default value is AUTO in which case the instance will automatically be created in the same domain into which you are currently logged in.
If you want to specify a specific domain use the pulldown to choose the value Specific Domain. The user interface will display another dropdown for Domain, which is a required field if you choose Specific Domain. If multiple domains are available, use the pulldown to choose the specific domain. - Name
Enter a name for your instance.
Note: As shown in the example below, the system automatically populates the Name and Label fields with the name of your image. You should change this name to a value you might more easily recognize.

Create Instance - Default Name and Label - Label
Enter a label for your instance. For example: JDE92Trial
Note: As shown in the example above, the system automatically populates the Name and Label fields with the name of your image. You should change this name to a value you might more easily recognize. - Description
Provide a meaningful description for your instance. - Tags
Enter common tag values that will be the same for all of the JD Edwards EnterpriseOne instances. This is used to quickly identify a group. For example: JDE - SSH Keys
Click in the box to display the available SSH keys which you previously uploaded. Select the keys you want to use. Perform this same function for each key that you would like to attach to the instance. - Custom Attributes
Leave this section blank. - Click the right arrow button to accept the values and continue.
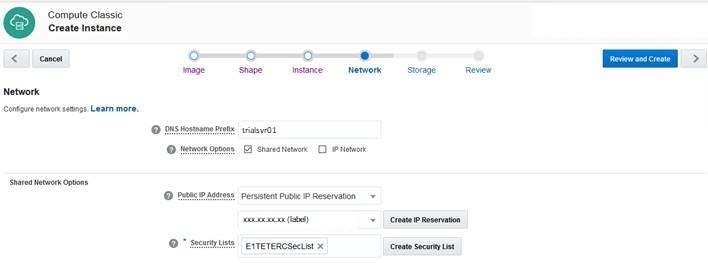
- On the Network page, complete the following fields:
- DNS Hostname Prefix
Important: This value MUST match the name that you previously entered using the VM Configuration Tool for your primary Enterprise Server (on the Servers tab).
A hostname is required in the DNS Hostname Prefix field when creating a Trial Edition Release 9.2 instance. This will be the hostname, or machine name, of the instance. The hostname can be a maximum of a 15 character mixed case alphanumeric with hyphens. Special characters are not allowed. Upper case letters are converted to lower case. - Network Options
Uncheck the IP Network option and keep the Shared Network checked. - Public IP Address
Use the dropdown arrow to select: Persistent Public IP Reservation. In the second drop down list, find and select the IP reservation you previously created for this particular instance. - Security Lists
Click in the box and select the security list that you imported the security list orchestration. This was created by the OrchestrationTE.json file that was described in a previous Learning Path entitled: Creating Required Security and Configuration Files. This Orchestration must be in the Online state.
Important: Once you have added your security list, you should delete the default security list.
Network - Review and Create - DNS Hostname Prefix
- Click the right arrow button to accept the values and continue.
- On the Storage page, remove the storage with the *_storage
suffix that is checked as the Boot Drive by
clicking the action icon on the line of the storage volume and
selecting Remove.
Note: Even if this name matches the name of the storage volume you want to use, it is a default storage volume and is not the specific storage volume you created for use with this instance.
- After removing the default storage, click the Attach
Existing Volume button.
- Click the drop down list in the Attach Storage Volume and find your previously created storage volume for this instance of Trial Edition.
- Leave the value for Attach as Disk # 1.
- Click the check box to designate this as the Boot Drive.
- Click the Add button.
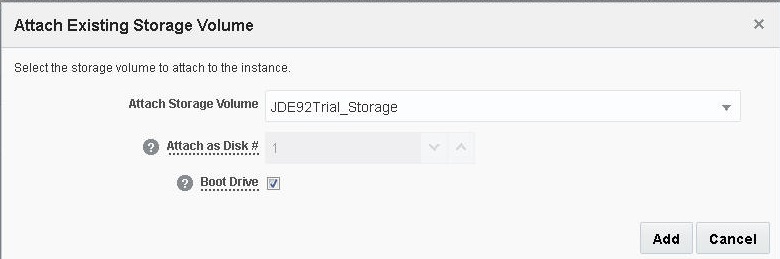
Attach Existing Storage Volume - Verify that your storage volume has been properly attached and click the right arrow to continue.
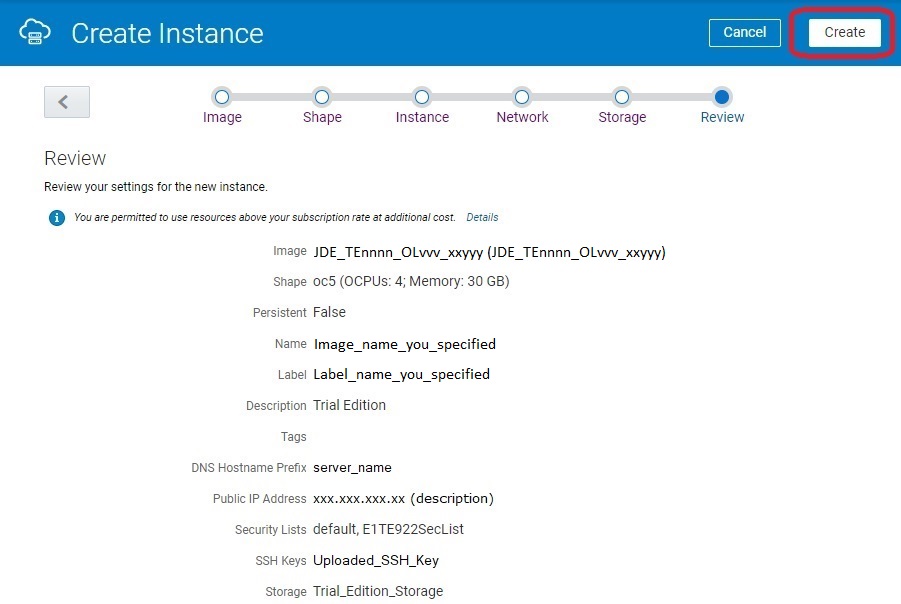
- On the Review page, verify all values are correct and click the Create button to create the new instance.


 Reviewing
the Instance that You Created
Reviewing
the Instance that You Created
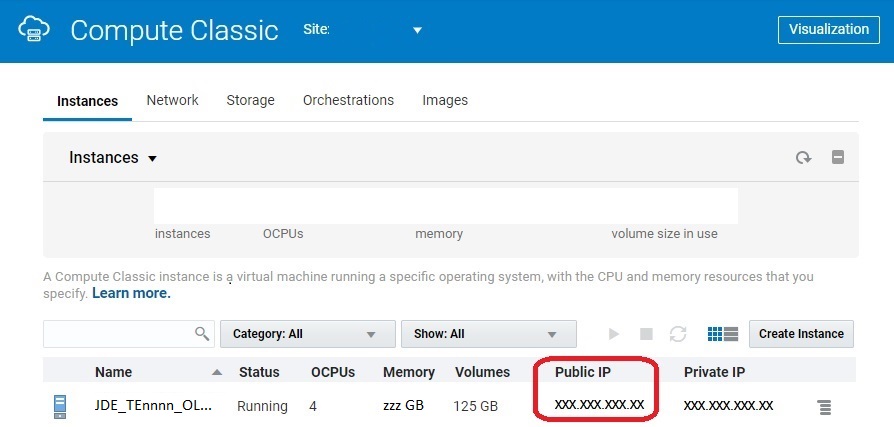
- On the My Services console, select the Instances tab.
- As the instance is being create it will be displayed with Status: Initializing.
- When the instance has finished being created, it will show up with Status: Running. Refresh the screen until it reaches this status.
- Go to the instance that you just created, and from the
action tab
 , directly to the right of the instance,
and select View.
, directly to the right of the instance,
and select View. - Note the Public IP Address. This is the
address that will be used to connect to the instance
externally, through both ssh and web browsers.
Create Instance - Running