Adding a New Printer
Release 9.2 provides a Printer Setup director to help you add printers. Instructions appear on each form of the director to guide you through the printer addition process. This procedure is used in conjunction with the steps that appear on the forms of the Printer Setup director.
To install your first printer:
On the Printers menu (GH9013), select Printers (P98616).
The Printers form appears.
On the Printers form, click Add Printer.
The welcome page for the Printer Setup director appears. This page describes the tasks that the director helps you perform.
Review the welcome page and click Next.
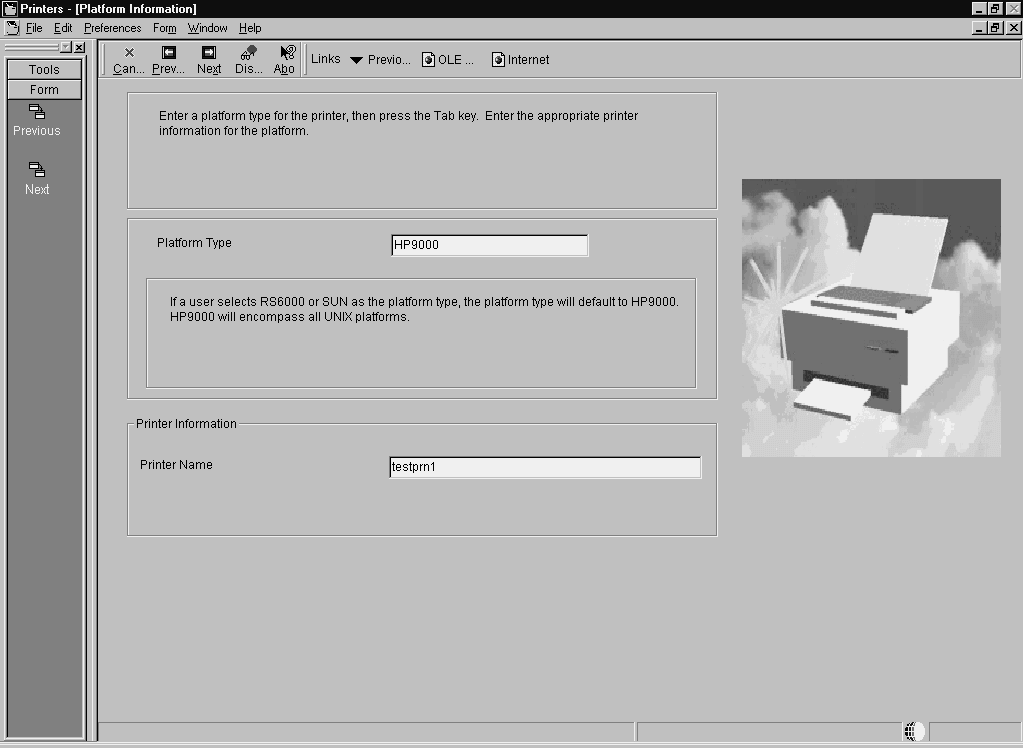
The Platform Information form appears. The platform type may appear by default, depending on the operating system on which Release 9.2 is running.

On Platform Information, complete these fields:
Field
Description
Platform Type
Enter the platform type on which you are installing or use the visual assist button to select a platform type.
Platform Type
This value is displayed by default as a result of the Platform Type you selected.
Printer Name
Enter the name of the printer. Valid characters are all alpha (A-z), numeric (0-9), and underscore ( _ ).
After you complete the requisite fields, click Next to access the Printer Setup form.
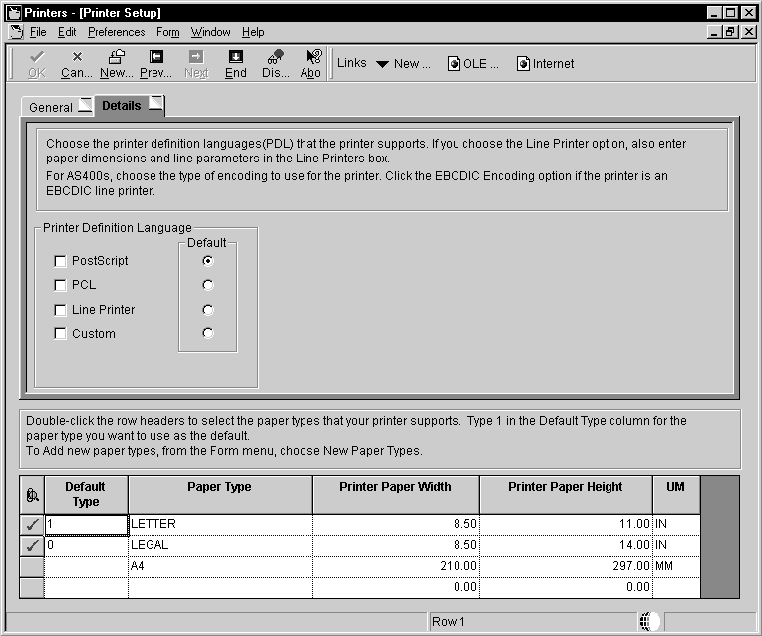
Use this form to set information for the printer such as the printer model, physical location of the printer, printer definition language (PDL), and paper types.
On the General tab, complete these fields:
Printer Model
Printer Location
On the Details tab, in the box labeled Printer Definition Language, select one of these options:
PostScript
PCL
Line Printer
Custom
In the Default box, specify one of the Printer Definition Language options as the default value.
You can select multiple PDLs, but only one default PDL. A user can override this default PDL at the time a batch process is submitted.
Choosing PostScript or Printer Command Language (PCL), Release 9.2 disables the Line Printer option. Choosing Line Printer, Release 9.2 disables the PostScript and PCL options.
When choosing the Line Printer option, this logic occurs:
Release 9.2 disables the grid at the bottom of the form and any paper types you have chosen are cleared.
JD Edwards EnterpriseOne automatically provides a printer type of *JDE LINE PAPER for the printer.
The Fields in the box labeled Line Printers are used to set the paper dimensions and line parameters.
This procedure is explained in later steps in this section.
The custom option uses advanced features of the printers application, which are explained in the later steps in this procedure.
On the Details tab, when choosing the PostScript option, the Paper Source box appears and you can change these options:
Field
Description
Max Number of Paper Sources
Enter a numeric value in this field to indicate the number of paper trays this printer has available.
Default Paper Source
Enter a numeric value in this field to indicate which tray number you want Release 9.2 to draw paper from as the default tray.
On the Details tab, when choosing the Line Printer option, fields appear in a box labeled Line Printers, which you use to set the paper dimensions and line parameters.
Complete these fields:
Field
Description
Characters Per Inch
Enter a value to specify the number of characters in one horizontal inch.
Columns Per Page
Enter a value to specify the number of characters in one line of text in the specified report.
Lines Per Inch
Enter a value to specify the number of lines of text in one vertical inch.
Lines Per Page
Enter a value to specify the number of lines of text on one printed page.
Printer Paper Width
Displays a value that is calculated automatically based on the values entered in the Line Printers box.
Printer Paper Height
Displays a value that is calculated automatically based on the values entered in the Line Printers box.
On the Details tab, the Custom option lets you specify a conversion filter to use.
When choosing the Custom option, a field appears beneath the Custom checkbox. Enter the name of the conversion filter you want to use or use the visual assist to select a filter from the Conversion Program Search and Select form.
If you do not want to change or add a conversion filter, skip to Step 16 in this task.
To change or add a conversion filter, from the Form menu, select Advanced, and continue with the steps in this procedure. The Advanced option is enabled only when Custom has been chosen.
The Work With Conversion Programs form appears.
Either click Add, or highlight one of the filters and click Copy or Select.
The Advanced Conversion Program form appears.
Change one or both of these fields:
Field
Description
Conversion Program
If you clicked Add or Copy on the previous form, the Conversion Program field is enabled. Enter the name of the conversion program that you want to add or copy. When making a copy, the Parameter String field is populated with the string that you highlighted on the previous form.
Parameter String
The JD Edwards EnterpriseOne system automatically enters the parameter string in native commands based on the host type from which you are printing and the type of printer (PostScript, PCL, or line).
Click OK.
The Work with Conversion Programs form appears.
Click Close.
The Printer Setup form appears.
In the grid at the bottom of the Printer Setup form, double-click the row header for each paper type that your printer supports. A checkmark appears in the row header for each paper type that you select.
Note:You can add new paper types as necessary. Instructions are included later in this task.
In the Default Type column, enter the numeral 1 in the row for the paper type you want to use as the default.
select only one paper type as the default. A user can override the default paper type when a batch process is submitted.

To add a new paper type, continue with these steps:
From the Form menu, select New Paper Type.
The Work With Paper Types form appears.
Click Add.
The Paper Type Revisions form appears.
Complete these fields:
Paper Type
Paper Height
Paper Width
Unit of Measure
The software saves the new paper type.
Click OK to return to the Work With Paper Types form, and then click Close to return to Printer Setup.
The new paper type is available in the grid on the Printer Setup form. All previous paper type selections are cleared and must be reselected if you want to use them again.
When finished entering information for the printer on the Printer Setup form, click End.
Release 9.2 saves the new printer setting and returns you to the first form in the Printers application.
Field
Description
Platform Type
Define the type of physical hardware on which the database resides.
Server Name
Define the computer that receives documents from clients.
Printer Name
Enter a name that refers to a shared resource on a server. Each shared directory on a server has a share name, which is used by clients to refer to the directory.
Printer Model
Define these attributes for your printer:
Printer Model
Printer Location
Designates the physical location of the printer
Paper Type
Enter a user defined code (H98\PT) to define the type of printer paper, such as letter or legal. For example, LETTER, LEGAL, and A4.
Paper Width
Define the width of the paper for this paper type. This value is in the unit of measure specified by Unit of Measure.
Paper Height
Define the height of the paper for this paper type. This value is in the unit of measure specified by Unit of Measure.
Unit of Measure
Enter a user defined code (00\UM) to define the quantity in which to express an inventory item. For example, CS (case) or BX (box). Form-specific information indicates the unit of measure in which the paper height and width are entered. For example, IN = Inches and MM = Millimeters.
Columns Per Page
Define the number of columns per page. For example, 80 or 132.
Characters Per Inch (CPI)
Define the horizontal printing density in characters per inch.
You should only define values that are supported by your printer.
Line Per Page
Define the number of lines per page. For example, 60 or 66.
Line Per Inch (LPI)
Define the line spacing in lines per inch.
You should only define values that are supported by your printer.
Values are:
4 - IBM 5219, 5224, 5225, and 3287 printers only
6 - IBM 5224 printer only
8 - IBM 5224 printer only
9 - IBM 5225 printer only
Note: The standard computer print is 6 LPI and 10 CPI. If you are printing on 8 1-2-inch x 11-inch paper, typically you would specify 8 LPI and 15 CPI.
Maximum Number of Output Tray
Define the maximum number of paper trays available on the printer you are setting up.
Output Tray Name
Define the output tray for a given batch print job.