Printing Year-End Forms
After you build the year-end workfile, you can print year-end forms. You print year-end forms to supply your employees and the government with wage and earnings statements for the year.
If you use window envelopes to mail T4 forms, you can set the Cheque Route Code field on the Employee Entry program (P070101) to display the employee name and address in a window envelope. You must also set the Cheque Route Code processing option to 1 for the T4 Print Special Forms program (P077321). Ensure that you set up UDC 07/CR for the Cheque Route Code field.
After you print year-end forms, you can print an individual T4, T4A, Relevé 1, Relevé 2, or NR4 form. You might print an individual year-end form to replace one that an employee has lost.
You can only print laser forms.
If the employer is in the United States, the word Canada is in the employee's address on printed forms.
Printing year-end forms includes the following tasks:
Printing multiple year-end forms
Resetting laser forms
Adjusting laser forms
Printing individual year-end forms
Printing Multiple Year-End Forms
After you build the year-end workfile, you can print year-end forms. You print year-end forms to supply your employees and the government with wage and earnings statements for the year.
The system requires you to print T4 forms, but allows you to bypass other forms. To archive and save year-end information to history, you must either print or bypass printing of each form type.
Depending on which form type you print, the form print program executes one of the following DREAM Writer programs:
Form |
Description |
|---|---|
T4 Print Special Forms |
Uses the T4 Workfile (T07730) and T4 Adjustments Workfile (T07740). |
T4A Print Special Forms |
Uses the T4A Workfile (T07732) and T4A Adjustment Workfile (T07742). |
Relevé 1 Print Special Forms |
Uses the Relevé 1 Workfile (T07731 and Relevé 1 Adjustment Workfile (T07741). |
Relevé 2 Print Special Forms |
Uses the Relevé 2 Workfile (T07733) and Relevé 2 Adjustment Workfile (T07743). |
NR4 Print Special Forms |
Uses the NR4 Workfile (T07734) and NR4 Adjustment Workfile (T07744). |
The print procedure for year-end forms generates the spool files interactively. You can reprint any of the form types, if necessary.
To avoid wasting forms, print returns on plain paper and verify that the data is correct before you use the preprinted forms that are required by the government. Make corrections if necessary, and then print the returns on form paper.
The system prints only the first three lines from the employee's address book record on year-end forms. Also, the system prints one line of the company name and two lines of the company address.
For T4 forms, system parameters are preset to calculate a subtotal after 200 forms to comply with government regulations. The system also calculates a subtotal when the company or tax ID changes. The system also generates a grand total.
The program prints up to six special handling codes on the first T4 form in the Other Information boxes. The program prints the remaining special handling codes on additional T4 forms in the Other Information boxes.
What You Should Know About
Topic |
Discussion |
|---|---|
Reprinting forms |
You should only use this method of reprinting forms while you are in the process of printing year-end forms. Once you print all forms and indicate that all forms have printed correctly, do not access the Print Laser Forms screen to reprint forms. To reprint forms, enter 8 in the Option field on a Summary Review screen. When you need to reprint forms, pay attention to the Serial Number fields so that you reprint only the forms in error and the system calculates the serial numbers correctly, especially for RL-1 and RL-2 forms. Locate the serial numbers of the forms that you need to reprint. The system stores these numbers in the T4CN field of all the various workfiles as follows:
Although T4, T4A, and NR4 forms do not require or use a serial number, the system creates and assigns new serial numbers, using the next numbers function, for reprinting forms. For Relevé 1 and Relevé 2 forms, you must enter the new serial number for the first form that you reprint. There is no default for this number. Do not enter the last digit of the serial number. This is a check digit and the system calculates this. When reprinting forms, make sure you enter a serial number greater than the largest serial number that already exists in the file or the system creates duplicate serial numbers. Note: On Year End Forms, when you enter 0 to bypass printing T4A, Relevé 1, Relevé 2, or NR4 forms, the system removes the option. The type you bypassed is no longer available to print. If you bypass printing a form type in error, you can remove the print status value for the form type that you need to print by using the Version Reset Control program. If you choose not to print T4A, Relevé 1, Relevé 2, or NR4 forms, you cannot select those forms again unless you clear their status flags on Version Reset Control. |
To print multiple year-end forms
Navigation
From Print Year End Forms (G772477), choose Print Laser Forms
Read the informational message and press F6 to continue.
On the first Print Laser Forms screen, complete the T4/Relevé ID field and click Enter twice:
On the second Print Laser Forms screen, review the following fields:
Laser T4
Laser T4A
Laser Relevé 1
Laser Relevé 2
Laser NR4 Form
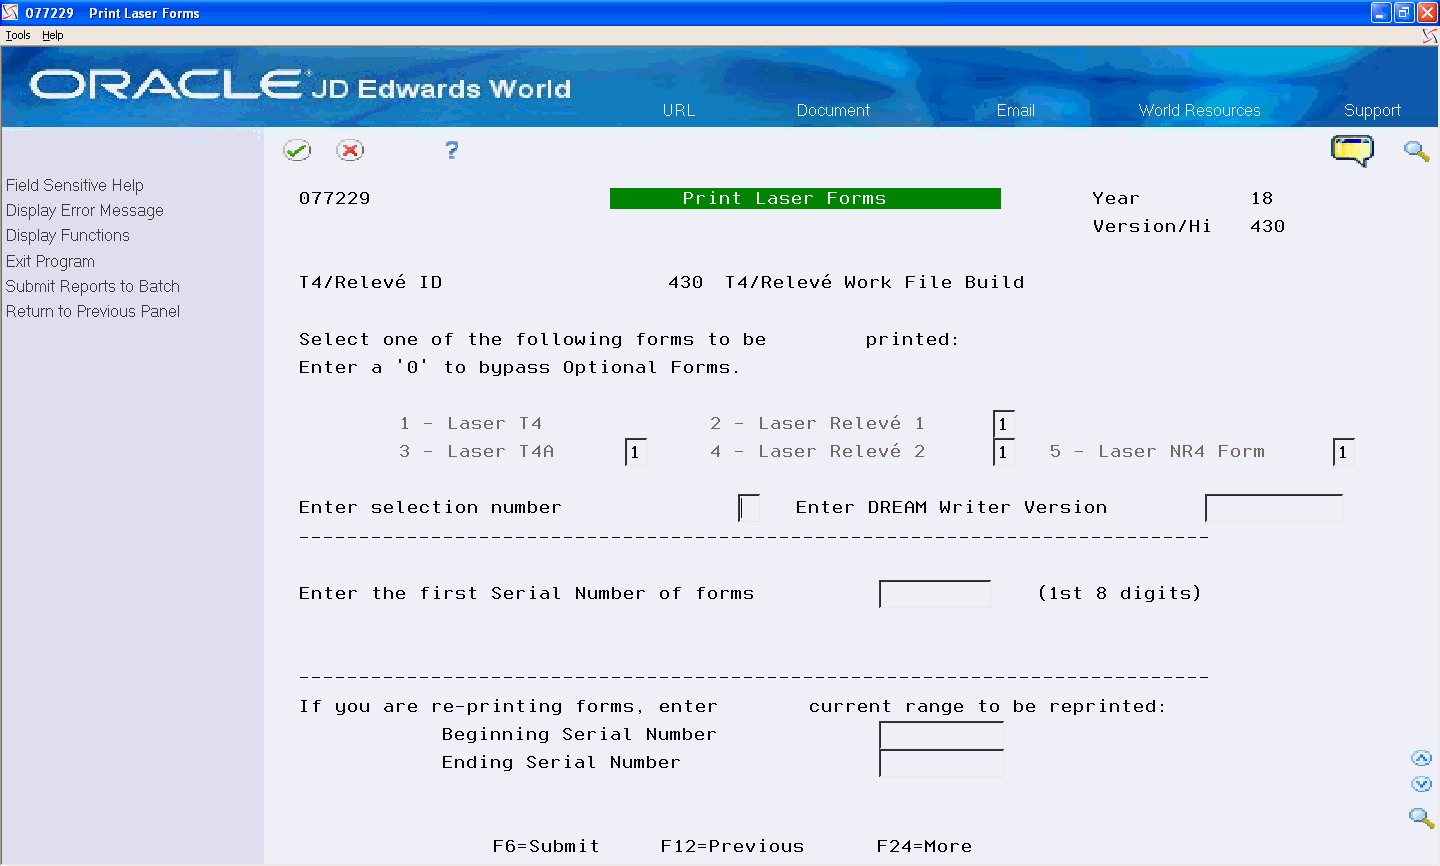
Complete the following fields:
Enter Selection Number
Enter DREAM Writer Version
If you do not enter a DREAM Writer version, the system enters the default version XJDE0001.
Complete the Enter the First Serial Number of Forms field.
You do not need to enter a serial number for T4, T4A, and NR forms. If you do not enter a serial number, the system automatically assigns a number using the next numbers feature.
Choose Submit Reports to Batch (F6).
The program asks you to verify reports submission.
Choose Submit Job (F6).
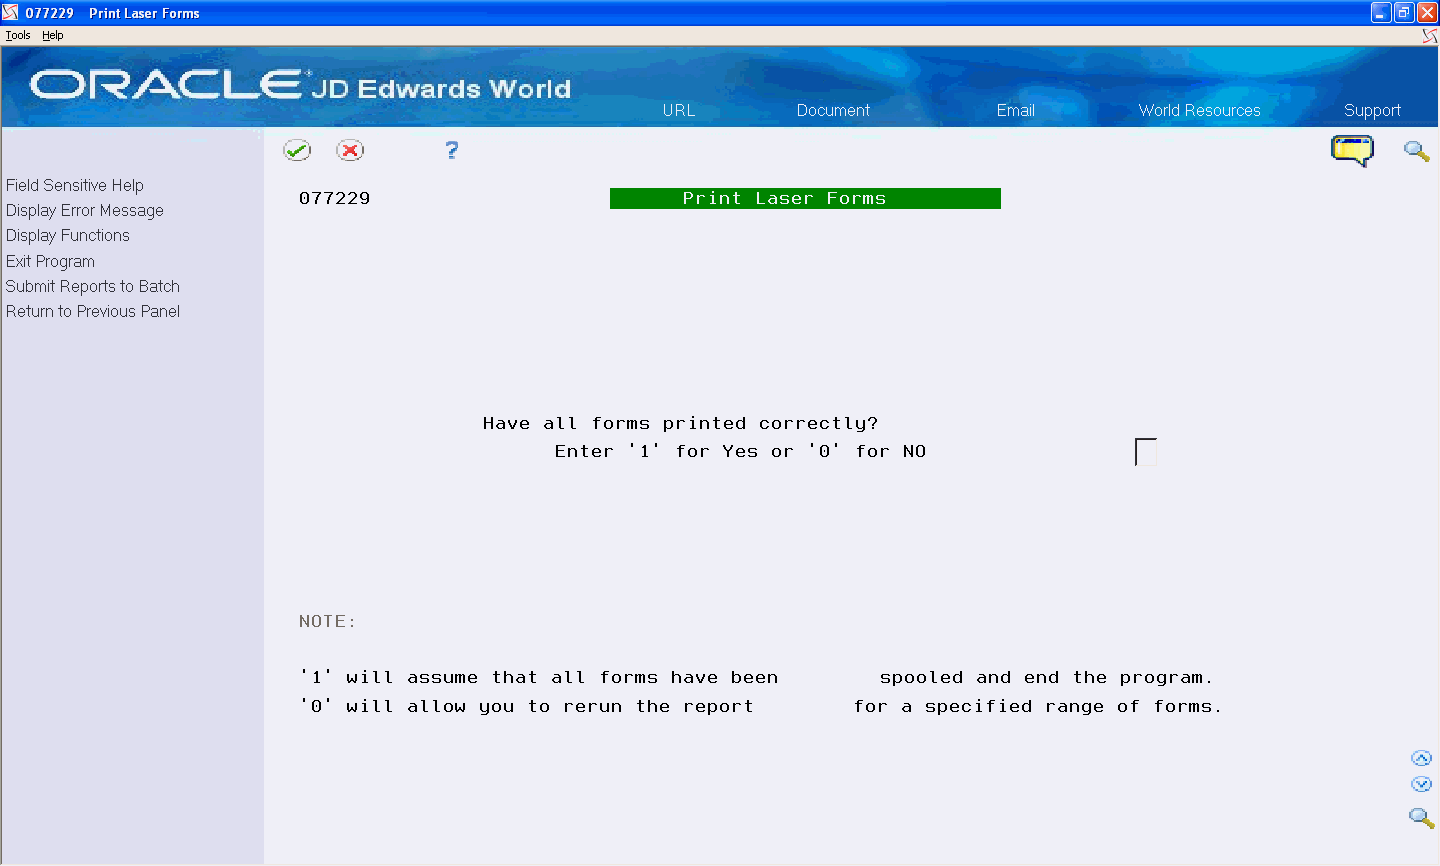
On the third Print Laser Forms screen, complete the Enter 1 for Yes or 0 for No field and click Enter.
If you enter 0 (No), the previous screen displays for you to make your selections again before rerunning the print procedure.
Field |
Explanation |
|---|---|
2 - Relevé 1 |
A code that specifies whether the system prints optional forms. Valid values are: 1 – Yes, this version includes Relevé 1 forms. 0 – No, this version does not include Relevé 1 forms. Do not show this option again. |
3 - T4A |
A code that specifies whether the system prints optional forms. Valid values are: 1 – Yes, this version includes T4A forms. 0 – No, this version does not include T4A forms. Do not show this option again. |
4 - Relevé 2 |
A code that specifies whether the system prints optional forms. Valid values are: 1 – Yes, this version includes Relevé 2 forms. 0 – No, this version does not include Relevé 2 forms. Do not show this option again. |
5 - NR4 Form |
A code that specifies whether the system prints optional forms. Valid values are: 1 – Yes, this version includes NR4 forms. 0 – No, this version does not include NR4 forms. Do not show this option again. |
Enter selection number |
A return value entered by the user. Screen-specific information A value that specifies the type of form to print. Valid values are: 1 – T4 forms 2 – Relevé 1 forms 3 – T4A forms 4 – Relevé 2 forms 5 – NR4 forms |
Enter the first Serial Number of forms |
The serial number of the first form on which you will print. The serial number is required for Relevé 1, Relevé 2 forms. Beginning in 1998, T4 forms do not include serial numbers. Screen-specific information Enter only the first 8 digits; the system calculates the check digit. |
Enter Beginning Serial Number |
The serial number of the first form to be reprinted. Screen-specific information If you are reprinting forms, enter the first serial number that you want to re-print. This must be a number greater than zero and represents the beginning of the range of forms the user wants to reprint. You must enter all 9 digits of the serial number, including the check digit. |
Enter Ending Serial Number |
The serial number on the last form to be reprinted. Screen-specific information If you are reprinting forms, enter the last serial number that you want to reprint. This must be a number greater than zero, it can be the same as the beginning serial number (if you want to reprint only one form), and represents the end of the range of forms to reprint. You must enter all 9 digits of the serial number, including the check digit. |
Resetting Laser Forms
If you print laser forms and then need to reprint the forms, you must first reset the laser forms. For example, if you discover an error with the current forms, you need to reset laser forms and then reprint the forms.
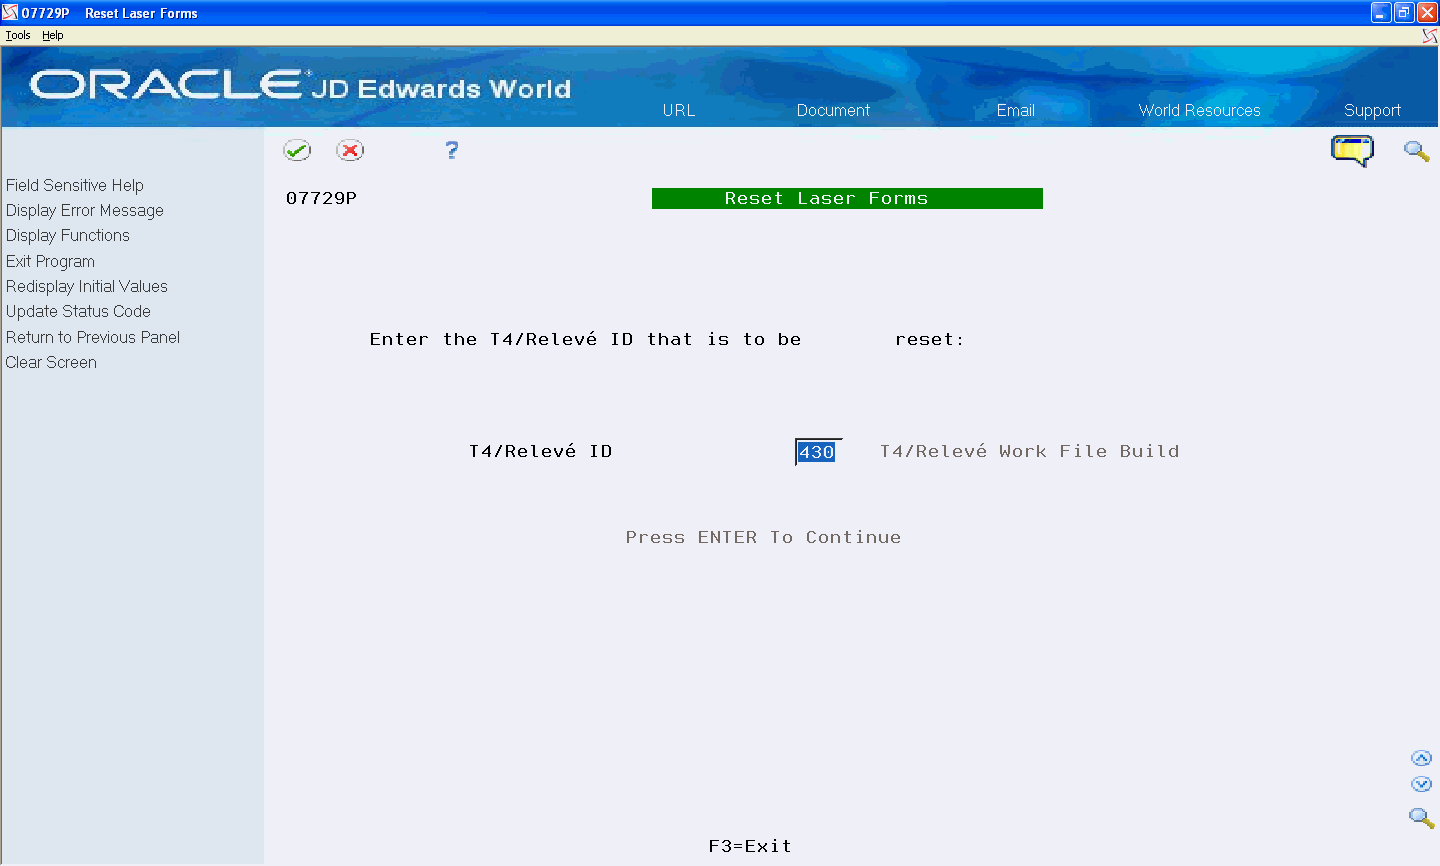
To reset laser forms
Navigation
From Print Year End Forms (G772477), choose Reset Laser Forms
On the first Reset Laser Forms screen, complete the T4/Relevé ID field and click Enter twice.
On the second Reset Laser Forms screen, reset the print status for the forms that you want to print by removing the value in any of the following fields:
T4 Print Status
Relevé 1 Print Status
T4A Print Status
Relevé 2 Print Status
NR4 Print Status
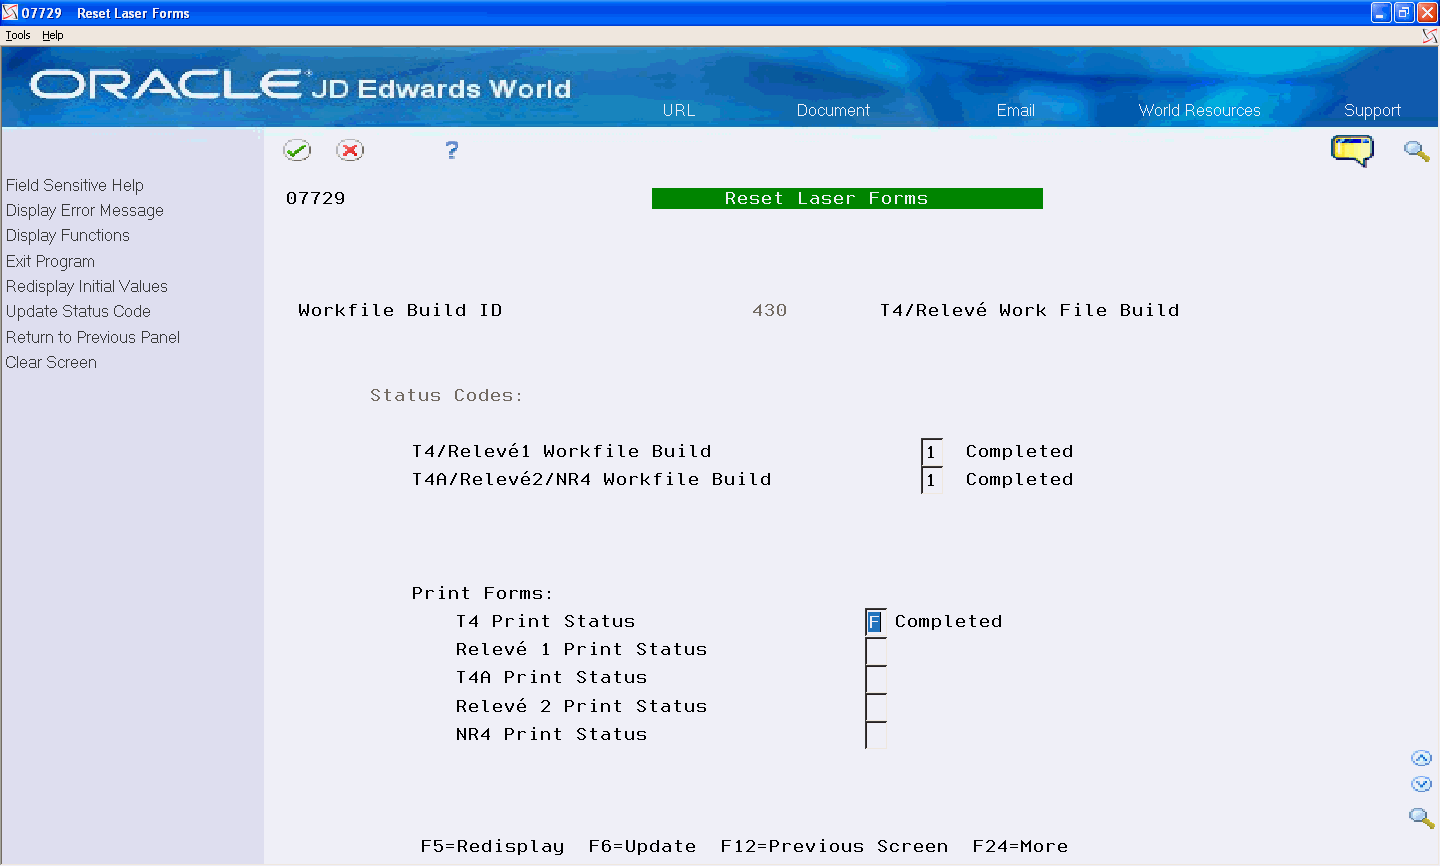
Choose Update (F6).
The program prompts you to verify the status code update.
Choose Submit Job (F6) from the Functions menu.
Adjusting Laser Forms
The system allows you to adjust the printing of laser forms if the text is not lining up correctly on the forms. You can adjust employee or employer forms. The system administrator most commonly performs this task.
Before You Begin
JD Edwards World strongly recommends that you create a source library and a custom object library.
When you create a custom object library, you must include the source physical table JDESRC. If you do not have authority to add a new library to your library list, contact your system administrator. If you use a custom object library, it must appear at the top of the library list.
If you are using the JDFSRC library, the system adds each change to the last change because you are altering the original source.
Navigation
From Print Year End Forms (G772477), choose Align Employee Copy or Align Employer Copy
Processing Options
Printing Individual Year-End Forms
After you print multiple year-end forms, you can print an individual T4, T4A, Relevé 1, Relevé 2, or NR4 form. You might print an individual year-end form to replace one that an employee has lost.
You must print multiple forms from the Print Year End Forms menu (G772477), choosing the appropriate Print Laser Forms program before you print individual forms.
This program prints information from the workfile build for the form that you choose.
You can print individual forms, per government regulations, for prior years, but the system prints the information using the current format.
To print individual year-end forms
Navigation
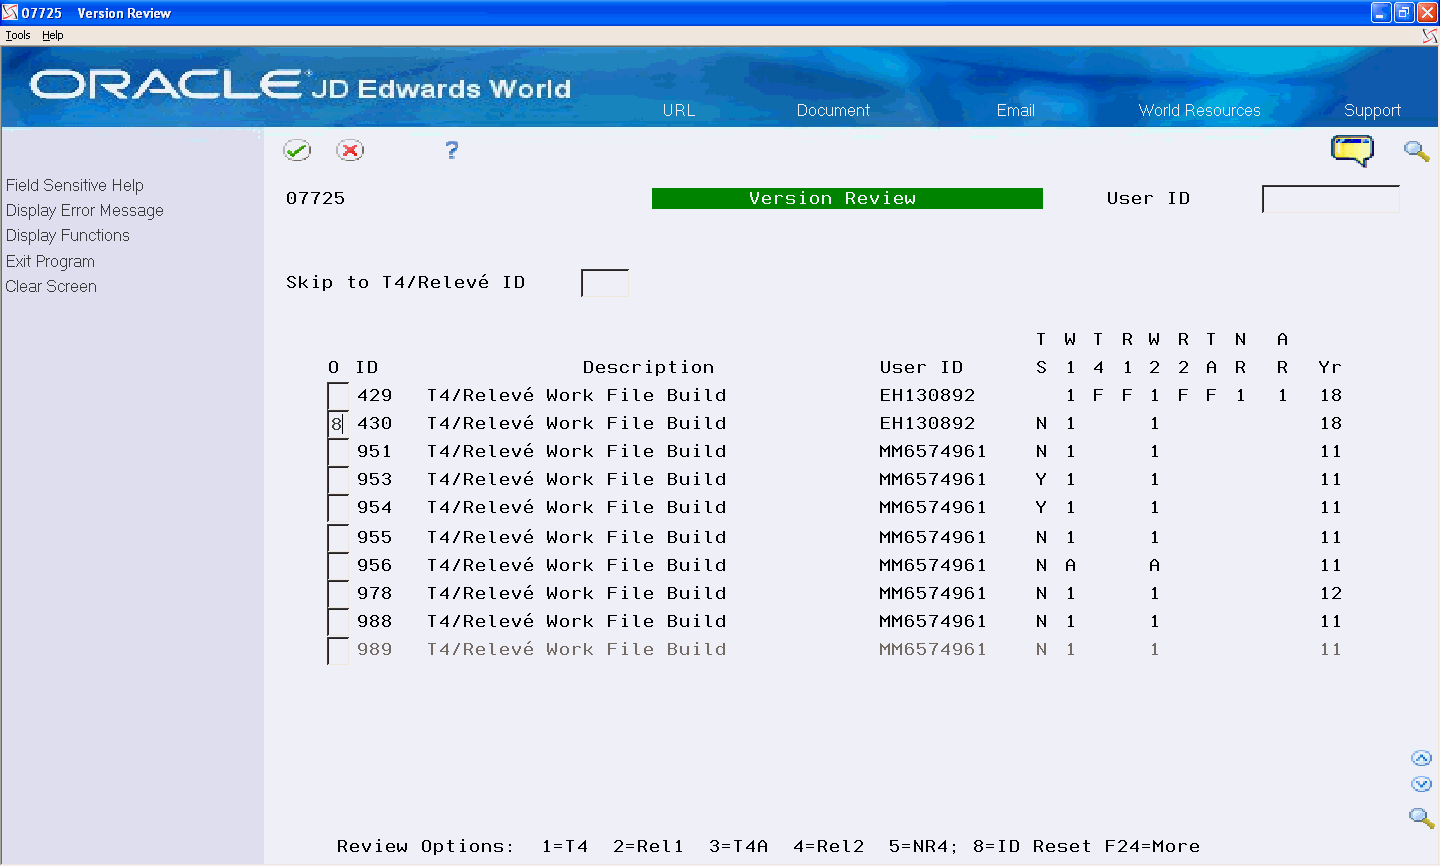
From Canadian Year End Processing (G77247), choose Version Review
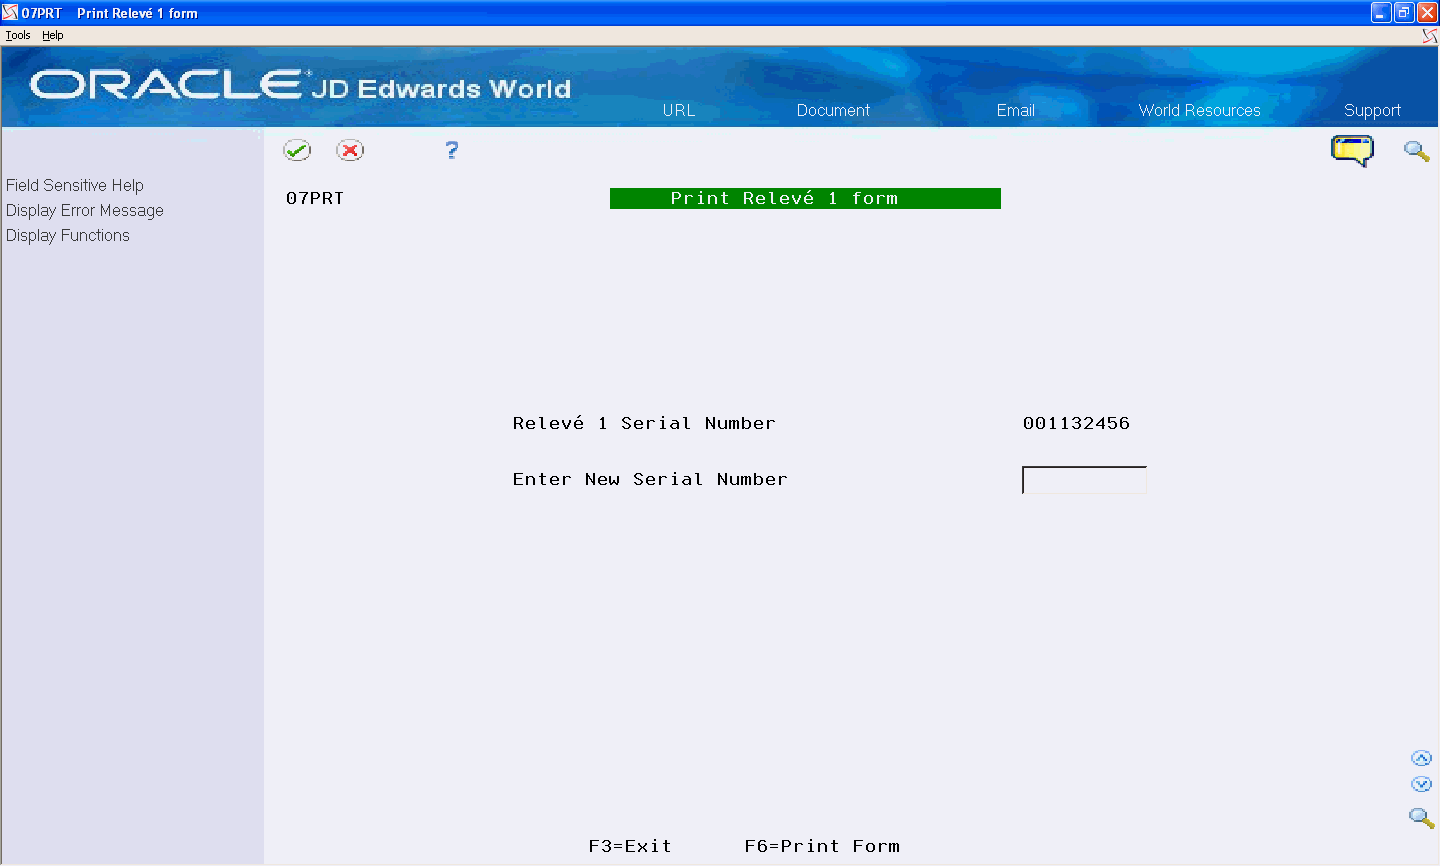
The following is an example using Relevé 1 forms, to print other forms, use the same steps but choose the corresponding options. The system does not require a serial number for T4, T4A, and NR forms.
On Version Review, enter 2 in the Option field next to the workfile build that you want to review, and click Enter.
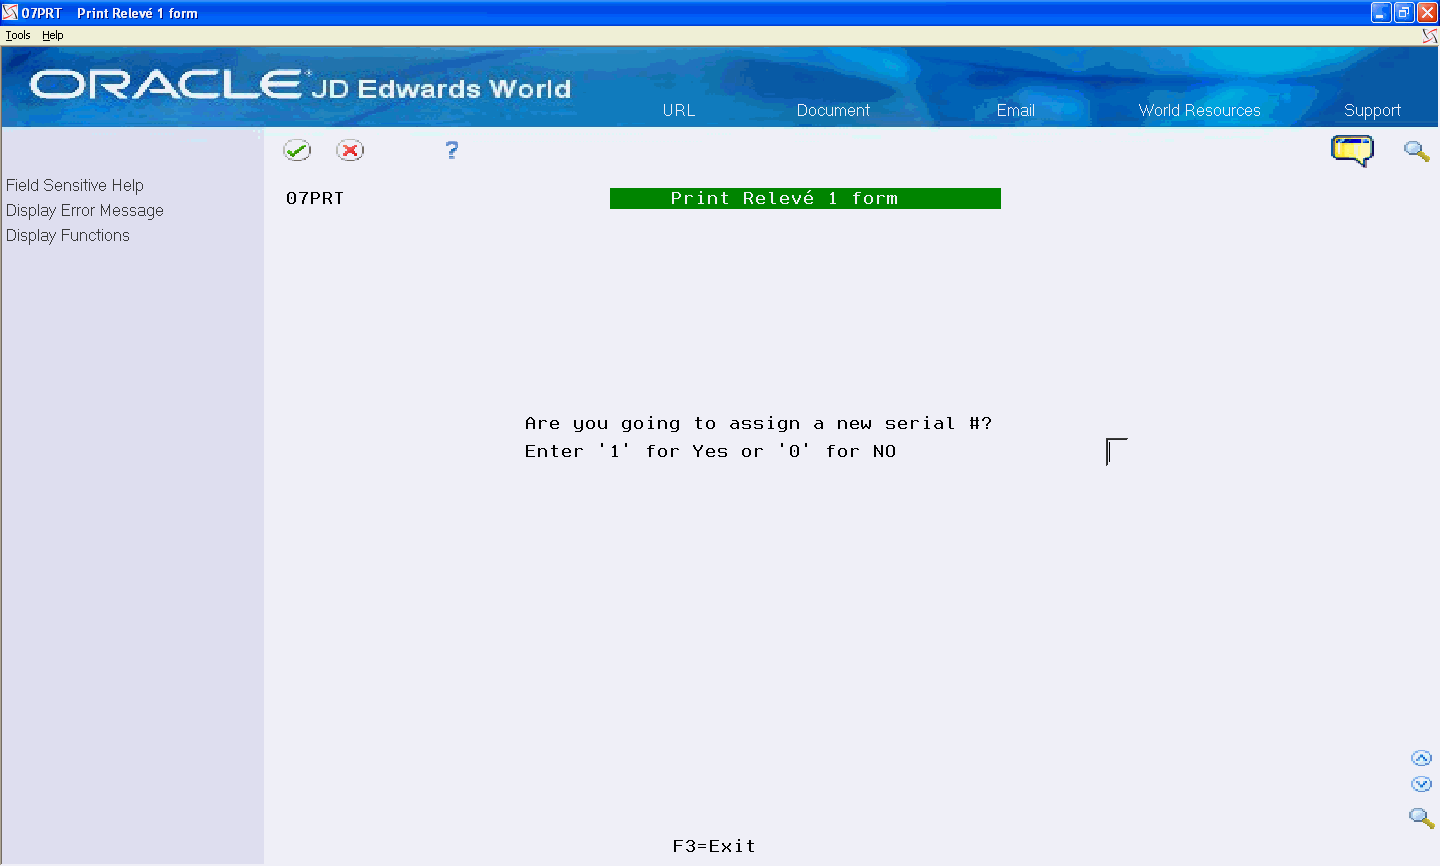
On Employee Relevé 1 Summary Rev., enter 8 in the Option field for the employee for whom you want to print the form, and click Enter.

On Print Relevé 1 form, complete the Are you going to assign a new serial #? Enter 1 for Yes or 0 for NO field.
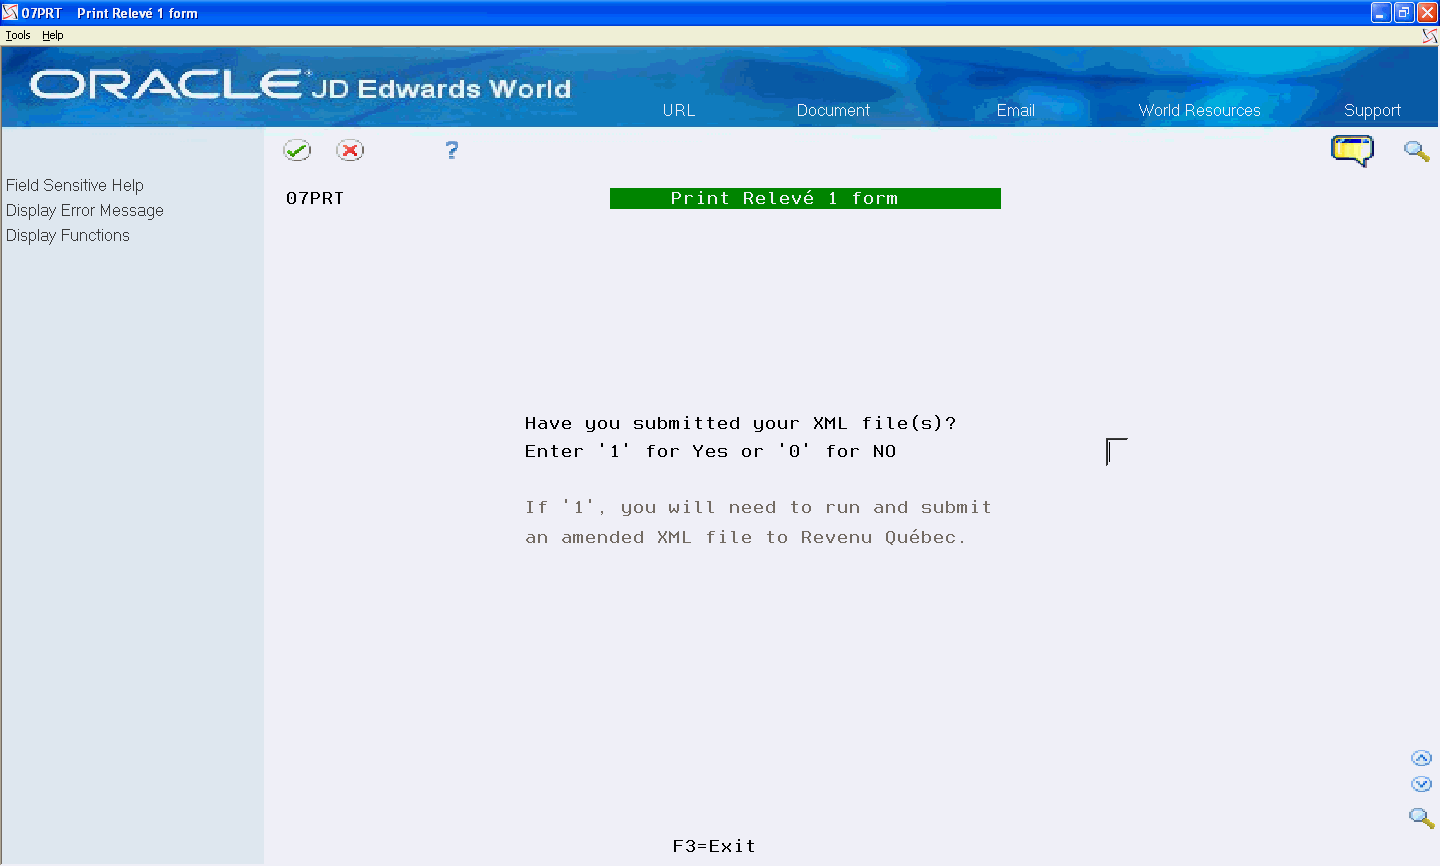
On Print Relevé 1 form screen, complete the Have you submitted your XML file(s)? field.
On Print Relevé 1 Form, complete the Enter replacement serial number field.
Choose Print Form (F6).
Field |
Explanation |
|---|---|
Are you going to assign a new serial #? |
The Yes or No Entry field is a common single character entry field for simple yes or no responses on prompt screens. For International purposes, No = '0' and Yes = '1'. Screen-specific information Enter 1 for Yes or 0 for No. If you enter 0 (No), the form reprints using the existing serial number the system assigns to that record. You can return to the menu when you enter 0. If you enter 1 (Yes), the next Print Relevé 1 form screen displays. |
Have you submitted your XML file(s)? |
The Yes or No Entry field is a common single character entry field for simple yes or no responses on prompt screens. For International purposes, No = '0' and Yes = '1'. Screen-specific information Enter 1 for Yes or 0 for No. If you enter 0 (No), you replace the existing serial number in the record by entering a new serial number. If you enter 1 (Yes), the system saves the existing serial number and the new serial number you enter. Entering 1 indicates you have already submitted your files to Revenue Québec and you need to run an XML build for the amended slips and submit the file to Revenu Québec. Revenu Québec requires both serial numbers in the XML file. |
Enter replacement serial number |
The T4 number assigned to this amended record. Screen-specific information Enter all 9 digits of the new serial number that you want to assign to the form, including the check digit. |