Before You Begin
This tutorial shows you how to create a load balancer in Oracle Cloud Infrastructure for use with environments created in PeopleSoft Cloud Manager. This tutorial takes approximately 30 minutes to complete.
The Oracle Cloud Infrastructure Load Balancing service provides automated traffic distribution from one entry point to multiple backend servers reachable from your virtual cloud network (VCN).
See Load Balancer in the Oracle Cloud Infrastructure documentation.
Background
This is the sixteenth tutorial in the Install PeopleSoft Cloud Manager series. Read the tutorials in the order listed. The optional tutorials offer alternate methods for setup.
- Prepare to Install PeopleSoft Cloud Manager
- Verify Oracle Cloud Account Information for PeopleSoft Cloud Manager
- Plan the Virtual Cloud Network for PeopleSoft Cloud Manager (Optional)
- Create a Virtual Cloud Network for PeopleSoft Cloud Manager in the Oracle Cloud Infrastructure Console (Optional)
- Use Custom or Private Network Resources with PeopleSoft Cloud Manager (Optional)
- Create a Custom Linux Image for PeopleSoft Cloud Manager (Optional)
- Create a Custom Windows Image for PeopleSoft Cloud Manager in Oracle Cloud Infrastructure (Optional)
- Create Vault Resources for Password Management for PeopleSoft Cloud Manager
- Generate API Signing Keys for PeopleSoft Cloud Manager
- Install the PeopleSoft Cloud Manager Stack with Resource Manager
- Log in to the Cloud Manager Instance
- Specify Cloud Manager Settings
- Use File Storage Service for PeopleSoft Cloud Manager Repository
- Manage Cloud Manager Users, Roles, and Permission Lists
- Configure a Web Proxy for PeopleSoft Cloud Manager (Optional)
- Create a Load Balancer in Oracle Cloud Infrastructure for PeopleSoft Cloud Manager Environments (Optional)
- Create Defined Tags in Oracle Cloud Infrastructure for PeopleSoft Cloud Manager (Optional)
- Create Data Science Resources for Auto Scaling in PeopleSoft Cloud Manager (Optional)
Step 1: Plan the Load Balancer Configuration
To create and configure a load balancer for a PeopleSoft environment:
- Create the load balancer in the Oracle Cloud Infrastructure
Compute console.
See Load Balancer Management in the Oracle Cloud Infrastructure documentation.
- Choose a public or private load balancer. With public access, the load balancer accepts traffic from the internet. With private access it connects to internal ports.
- Choose a VCN, subnets, and security rules.
- Choose how the load balancer will distribute traffic.
- Specify names for backend sets, but do not specify the backends.
- Specify names, ports, and protocol for the listener.
- In PeopleSoft Cloud Manager, associate the environment
components with the load balancer.
See the section Configuring Load Balancer Settings in the PeopleSoft Cloud Manager documentation. Select the PeopleSoft Cloud Manager page on the Oracle Help Center.
- Choose a load balancer.
- Choose a backend set and add web server domains or Kibana domains as backends.
- Choose a listener.
- Choose whether to use the listener for Kibana, PIA, or Integration Broker (IB) and Report Nodes.
The Oracle Cloud Infrastructure Load Balancer documentation refers to backend servers as Compute instances. When you create a load balancer to use with PeopleSoft Cloud Manager, the term refers to instances created for mid-tiers with web server (PIA) domains or Kibana domains. Kibana is part of the Elasticsearch, Logstash, and Kibana setup (the ELK stack).
You can use a load balancer for:
- Full-tier environments with or without Kibana
- Middle tiers with Appserver, Process Scheduler, and web server
- Middle tiers with Appserver, Process Scheduler, web server, and Kibana
- ELK stack tiers with Kibana
A backend set is comprised of a group of identical backends, such as a set of web server domains. When you associate the domains with the load balancer, the Kibana domains must be in separate backend sets from the web server (PIA) and IB/Report Node domains.
Step 2: Set Up a Virtual Cloud Network for a Load Balancer
Before creating the load balancer, create a virtual cloud network (VCN).
The VCN that is created as part of the Resource Manager stack for Cloud Manager does not include a subnet or security rules for the load balancer. If you prefer, you can add a subnet for the load balancer in the VCN created by the Resource Manager stack, and add extra security rules. If you prefer to create a VCN, or use an existing one, you can add the necessary security rules there.
Create a separate VCN, or update an existing one to use with the load balancer.
- Use the same VCN for the load balancer and the PeopleSoft provisioned environments.
- The subnet where the load balancer resides must allow incoming requests to the load balancer listening port. You specify the port for the listener when creating the load balancer.
- The subnets where the web server domains and Kibana domains reside must allow incoming requests from the load balancer to the listener ports of the web server and Kibana nodes.
- You can use either security rules on the subnets, or Network Security Groups (NSGs), to satisfy the networking requirements.
- The firewall rules must allow the load balancer to connect to the required ports for the PeopleSoft environment components, and the environment components must be able to connect to load balancer ports.
- Depending upon the environment setup, the required connections are:
- Public or private load balancers need connection from the load balancer to the PIA or IB port.
- Public or private load balancers need connection from the load balancer to the Kibana port.
- Private load balancers need connection from the IB VM to the load balancer listener port (for private internal access to the load balancer).
- Private load balancers need connection from the application server VM to the load balancer listener port (for private internal IB access to the load balancer).
- Private load balancers need connection from the ELK/Kibana VM to the load balancer listener port (for private internal IB access through the load balancer).
- Private load balancers need connection from Process Scheduler VM to the load balancer listener port (for private internal access for posting reports through the load balancer URL).
For sample subnets, and a list of the PeopleSoft component ports see the tutorial Plan the Virtual Cloud Network for PeopleSoft Cloud Manager (Optional).
Step 3: Create a Load Balancer in Oracle Cloud Infrastructure Console
To create a load balancer:
- Sign in to Oracle Cloud Infrastructure, and select Networking,
then Load Balancers from the menu (
 ) at the top left of the window.
 - Select a compartment.
- Click Create Load Balancer.

Description of this illustration (create_load_balancer.png) - Select Load Balancer as the type and click Create
Load Balancer.
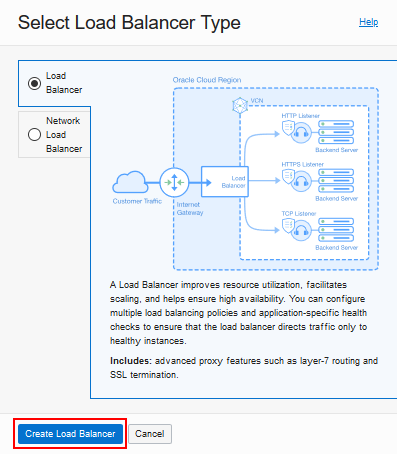
Description of this illustration (create_load_balancer_type.png) - Enter a descriptive name. Make a note of the name you enter for
use in Cloud Manager.

Description of this illustration (create_ldbal_name.png) - Select a visibility type.
- Click Public if you want the load balancer to use a public IP address, which is open to the Internet, for incoming traffic.
- Click Private if you want to use a private IP address for internal incoming VCN traffic.

Description of this illustration (create_ldbal_pub_priv.png) - If you select a public IP address, choose one of these options:
- Select Ephemeral IP Address to generate an IP address for the load balancer.
- Select Reserved IP Address to create a new reserved IP address or select an existing reserved IP address.
- Select a shape from these options:
- Select Flexible Shapes and specify the desired minimum and maximum bandwidth.
- Select Dynamic Shapes and choose one of
the available predefined shape sizes.

Description of this illustration (create_ldbal_shape.png) - Choose a compartment, and select an existing VCN and subnet.

Description of this illustration (create_ldbal_networking.png) - (Optional) Select the option Use network security groups to control traffic, and select one or more existing network security groups.
- Select one of these load balancing policies to determine how
traffic is distributed among the backend servers.
- Weighted Round Robin — distribute incoming traffic sequentially to each server in the backend set list. This is the recommended policy.
- IP Hash — always direct requests from a particular client to the same backend server.
- Least Connections — route incoming request traffic to the backend server with the fewest active connections.

Description of this illustration (create_ldbal_policy.png) - Do not select backend servers at this point. You will select the backend servers in Cloud Manager.
- Select a health check policy. Accept the defaults or change
according to your preference.
- Protocol
- Port — Enter 0 (zero) to support multiple web server domain ports.
- Interval in milliseconds (Optional)
- Timeout in milliseconds (Optional)
- Number of Retries (Optional)
- Status Code (Optional) — If you are defining a load balancer for an ELK node with Kibana, enter 400 for the Status Code.
- URL Path (URI)
- Response Body RegEx (Optional)

Description of this illustration (create_ldbal_healthcheck.png) - Select the Show Advanced Settings link and enter a descriptive
name for the backend set, such as pia_backendset.
Make a note of the name you enter for use in Cloud Manager.

Description of this illustration (create_ldbal_backendset_name.png) - Select the Session Persistence tab, and the Enable application cookie persistence option.
- Enter a cookie name.
When you configure the Load Balancer for your provisioned environment, the configuration process uses this cookie name to update the web server (PIA) domain configuration.

Description of this illustration (create_ldbal_appl_cookie.png) - Click Next.
- To configure the listener, enter a name. Make a note of the name you enter for use in Cloud Manager.
- Select one of these types of traffic that the listener handles:
- HTTPS
- HTTP
- HTTP/2
- TCP

Description of this illustration (create_ldbal_listener.png) - If you select HTTPS, HTTP/2, or TCP, supply an SSL certificate,
Certificate Authority (CA) certificate, and private key. Browse to
find the file on your computer, or copy and paste the contents.
See SSL Certificates for Load Balancers in the Oracle Cloud Infrastructure documentation.
Enabling SSL is recommended. If you do not add the certificate at this point, you can add it to the listener after creating the load balancer, as mentioned in the following section.

Description of this illustration (create_ldbal_sslcert.png) - Enter a port for the listener to monitor for ingress traffic.
- Click Next.
- On the logging page, accept the defaults and click Submit.
Add an SSL Certificate to a Listener in an Existing Load Balancer (Optional)
You can add an SSL certificate after you complete the load balancer creation. Add the certificate before you configure the environment in Cloud Manager.
- If necessary, sign in to Oracle Cloud Infrastructure, and select Networking, then Load Balancers from the menu at the top left of the window.
- Locate the load balancer and select View Details from the actions menu.
- On the details page for the load balancer, select Certificates from the Resources links on the left.
- Click Add Certificate.
- Enter a name for the certificate.

Description of this illustration (addcert_existing_ldbal.png) - Supply an SSL certificate, Certificate Authority (CA)
certificate, and private key. Browse to find the file on your
computer, or copy and paste the contents.
See SSL Certificates for Load Balancers in the Oracle Cloud Infrastructure documentation.
- Click Add Certificate.
- On the details page for the load balancer, select Listeners from the Resources links on the left.
- From the action menu for the listener, select Edit.
- Choose the Protocol.
If you select HTTPS or HTTP/2, the Use SSL option is selected. If you select TCP, the option is enabled, and you must select it.

Description of this illustration (addcert_edit_listener.png) - Select the certificate and backend set.
- Click Save Changes.
Step 4: Configure the PeopleSoft Environment to Use the Load Balancer
Sign in to Cloud Manager to configure a PeopleSoft environment to use the load balancer. You complete the configuration on the Load Balancer Setting page for the environment.

See the section Configuring Load Balancer Settings in the PeopleSoft Cloud Manager documentation for complete instructions on configuring the PeopleSoft environment. Select the PeopleSoft Cloud Manager page on the Oracle Help Center.
Next Steps
Create Defined Tags in Oracle Cloud Infrastructure for PeopleSoft Cloud Manager (Optional)
Learn More
- PeopleSoft Cloud Manager Home Page, (My Oracle Support, Article ID KA594)
- Cumulative Feature Overview Tool (Click Generate a CFO report and select PeopleSoft Cloud Manager at the top.)
- Oracle Cloud Documentation in Oracle Help Center
Create a Load Balancer in Oracle Cloud Infrastructure for PeopleSoft Cloud Manager Environments
F49343-07
February 2026
Copyright © 2026, Oracle and/or its affiliates.
Create a load balancer in Oracle Cloud Infrastructure to use with PeopleSoft Cloud Manager environments.
This software and related documentation are provided under a license agreement containing restrictions on use and disclosure and are protected by intellectual property laws. Except as expressly permitted in your license agreement or allowed by law, you may not use, copy, reproduce, translate, broadcast, modify, license, transmit, distribute, exhibit, perform, publish, or display any part, in any form, or by any means. Reverse engineering, disassembly, or decompilation of this software, unless required by law for interoperability, is prohibited.
If this is software or related documentation that is delivered to the U.S. Government or anyone licensing it on behalf of the U.S. Government, then the following notice is applicable:
U.S. GOVERNMENT END USERS: Oracle programs (including any operating system, integrated software, any programs embedded, installed or activated on delivered hardware, and modifications of such programs) and Oracle computer documentation or other Oracle data delivered to or accessed by U.S. Government end users are "commercial computer software" or "commercial computer software documentation" pursuant to the applicable Federal Acquisition Regulation and agency-specific supplemental regulations. As such, the use, reproduction, duplication, release, display, disclosure, modification, preparation of derivative works, and/or adaptation of i) Oracle programs (including any operating system, integrated software, any programs embedded, installed or activated on delivered hardware, and modifications of such programs), ii) Oracle computer documentation and/or iii) other Oracle data, is subject to the rights and limitations specified in the license contained in the applicable contract. The terms governing the U.S. Government's use of Oracle cloud services are defined by the applicable contract for such services. No other rights are granted to the U.S. Government.
This software or hardware is developed for general use in a variety of information management applications. It is not developed or intended for use in any inherently dangerous applications, including applications that may create a risk of personal injury. If you use this software or hardware in dangerous applications, then you shall be responsible to take all appropriate fail-safe, backup, redundancy, and other measures to ensure its safe use. Oracle Corporation and its affiliates disclaim any liability for any damages caused by use of this software or hardware in dangerous applications.
Oracle and Java are registered trademarks of Oracle and/or its affiliates. Other names may be trademarks of their respective owners.
Intel and Intel Inside are trademarks or registered trademarks of Intel Corporation. All SPARC trademarks are used under license and are trademarks or registered trademarks of SPARC International, Inc. AMD, Epyc, and the AMD logo are trademarks or registered trademarks of Advanced Micro Devices. UNIX is a registered trademark of The Open Group.
This software or hardware and documentation may provide access to or information about content, products, and services from third parties. Oracle Corporation and its affiliates are not responsible for and expressly disclaim all warranties of any kind with respect to third-party content, products, and services unless otherwise set forth in an applicable agreement between you and Oracle. Oracle Corporation and its affiliates will not be responsible for any loss, costs, or damages incurred due to your access to or use of third-party content, products, or services, except as set forth in an applicable agreement between you and Oracle.