Administering Time and Labor Integration with Clairvia
These topics provide an overview of the Time and Labor integration with Clairvia, and discuss how to:
-
Publish reported punch time and reported leave time to Clairvia.
-
Publish leave balances to Clairvia.
-
Receive schedule and leave information from Clairvia.
Pages Used to Administer Time and Labor Integration with Clairvia
| Page Name | Definition Name | Usage |
|---|---|---|
|
TL_TIME_DATA |
Send reported punch and approved time to Clairvia. Run the TL_PUB_TLDAT process. |
|
|
TL_TIME_DATA |
Send the Base Benefits leave balances for subscribed employees to Clairvia. |
Understanding Time and Labor Integration with Clairvia
In order for Time and Labor to send and receive information from Clairvia, your system must meet the following criteria:
-
PeopleSoft Human Resources and PeopleSoft Time and Labor are installed.
-
Clairvia is installed.
-
Time reporting codes and leave plans are manually entered in Clairvia.
In addition, employees must meet the following criteria:
-
The employee must be enrolled in Clairvia.
-
The PeopleSoft employee must exist in Clairvia – using the messages from PeopleSoft HR.
-
The employee must be enrolled in Time and Labor.
Publish Time and Labor Data Page
Use the Publish Time and Labor Data page (TL_TIME_DATA) to send reported punch and approved time to Clairvia.
Run the TL_PUB_TLDAT process.
Navigation:
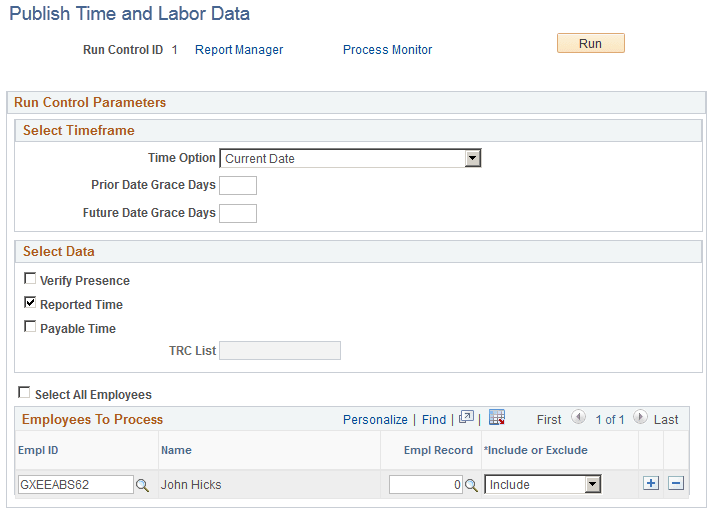
This example illustrates the fields and controls on the Publish Time and Labor Data page (showing Current Date time option). You can find definitions for the fields and controls later on this page.
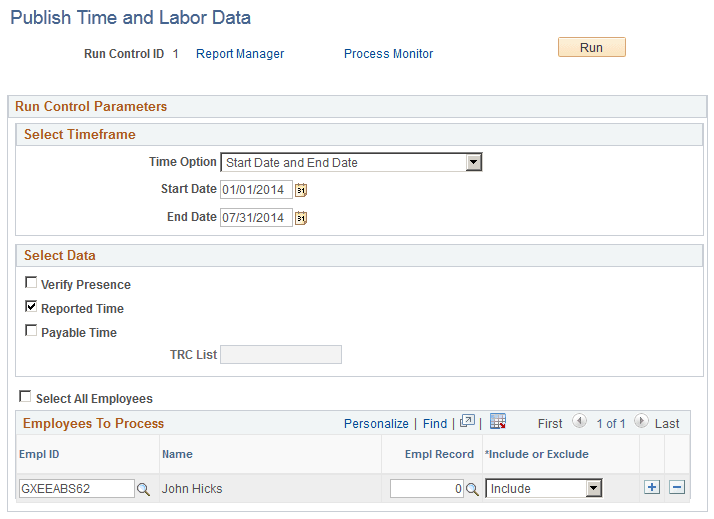
This example illustrates the fields and controls on the Publish Time and Labor Data page (showing Start Date and End Date time option). You can find definitions for the fields and controls later on this page.
| Field or Control | Description |
|---|---|
|
Time Option |
Select the time frame for the published data. The values are: Current Date and Start Date and End Date. Select Current Date to use the system date as the reporting period to collect the data for publishing. Select Start Date and End Date to specify a reporting period. |
|
Start Date and End Date |
Enter the range of dates to process. These fields are available if you select Start Date and End Date in the Time Option field. |
|
Prior Date Grace Days |
Enter the number of days before the current date you want to include in the data published to Clairvia. The system uses a reporting period start date equal to the system date minus the value in this field. This field is only available if you select Current Date in the Time Option field. |
|
Future Date Grace Days |
Enter the number of days in the future you want to include in the data published to Clairvia. The system uses a reporting period end date equal to the system date plus the value in this field. This field is only available if you select Current Date in the Time Option field. |
|
Verify Presence |
Select to publish the punch time for all employees, or any employees specified in the Employees to Process grid. For employees that have punch time when the process initiates, the system publishes the punch time so that Clairvia can track employees that are present at work. The system publishes any punch times that are available at publishing time, with a status of SV- Saved, NA - Needs Approval, AP – Approved, and SB – Submitted. Leave data is not included when you select this option. |
|
Reported Time |
Select to publish reported punch time, reported leave, and leave balances to Clairvia. Only reported time with a status of SB-Submitted, or AP-Approved, is published. |
|
Payable Time |
Select to publish employee payable time to Clairvia. The system publishes payable time with any status other than DN, CL, IG, OE, NP, PB, and RV. In addition, payable time with a negative quantity that is not offset, is published to Clairvia. If you specify a TRC List, the system only publishes payable time with those TRC’s in the TRC List to Clairvia. Note: Payable Offsets are not published to Clairvia. The system identifies offset rows where the ORIG_SEQ_NBR is not zero. |
|
TRC List |
Select which TRCs the system uses when publishing payable time within the reported period to Clairvia. Leave this field empty to publish all payable time within the reported period. This field is only available when you select the Payable Time option. |
|
Select All Employees |
Select to publish the leave balance for all enrolled employees for the selected date range. Deselect this field to specify employees to include or exclude from processing. |
Publishing Payable Time Scenarios
The following examples illustrate the payable time published to Clairvia by Time and Labor in different situations:
-
Scenario 1: For EMPLID KU0015, EMPL_RCD=0, the original and offset rows of payable time result in a zero quantity for the DUR.
DUR SEQ_NBR TRC TL_QUANTITY PAYABLE_STATUS RECORD_ONLY_ADJ ORIG_SEQ_NBR 10/10/2010 0:00
543210001
KUREG
7.5
RP
N
543210001
10/10/2010 0:00
543210002
KUREG
-7.5
RP
N
543210001
Time and Labor publishes the following information to Clairvia:
DUR SEQ_NBR TRC TL_QUANTITY PAYABLE_STATUS RECORD_ONLY_ADJ ORIG_SEQ_NBR 10/10/2010 0:00
543210001
KUREG
0
RP
N
543210001
-
Scenario 2: For EMPLID KU0015, EMPL_RCD=0, the original, offset, and new rows of payable time result in a positive quantity for the DUR.
DUR SEQ_NBR TRC TL_QUANTITY PAYABLE_STATUS RECORD_ONLY_ADJ ORIG_SEQ_NBR 10/10/2010 0:00
543210001
KUREG
6
TP
N
543210001
10/10/2010 0:00
543210002
KUREG
2
TP
N
543210002
10/10/2010 0:00
543210011
KUREG
-6
ES
N
543210001
10/10/2010 0:00
543210012
KUREG
–2
ES
N
543210002
10/10/2010 0:00
543210013
KUREG
3
ES
N
0
10/10/2010 0:00
543210014
KUREG
1
ES
N
0
Note:
There are two KUREG for the same DUR in this scenario because there is a split in the task. For example, the system allocates 80% to Department A and 20% to Department B.
Time and Labor publishes the following information to Clairvia:
DUR SEQ_NBR TRC TL_QUANTITY PAYABLE_STATUS RECORD_ONLY_ADJ ORIG_SEQ_NBR 10/10/2010 0:00
543210013
KUREG
3
ES
N
0
10/10/2010 0:00
543210014
KUREG
1
ES
N
0
-
Scenario 3: For EMPLID KU0015, EMPL_RCD=0, the user reports a negative quantity for regular time (KUREG).
DUR SEQ_NBR TRC TL_QUANTITY PAYABLE_STATUS RECORD_ONLY_ADJ ORIG_SEQ_NBR 10/10/2010 0:00
543210001
KUREG
–3.75
ES
N
0
10/10/2010 0:00
543210002
KUREG
–1.25
ES
N
0
Time and Labor publishes the following information to Clairvia:
DUR SEQ_NBR TRC TL_QUANTITY PAYABLE_STATUS RECORD_ONLY_ADJ ORIG_SEQ_NBR 10/10/2010 0:00
543210001
KUREG
–3.75
ES
N
0
10/10/2010 0:00
543210002
KUREG
–1.25
ES
N
0
-
Scenario 4: For EMPLID KU0015, EMPL_RCD=0, the original row has a status of Ignored. The payable time row never made it to payroll. This can be because the time reporting code is not mapped to an earning or the time rejected by payroll is intentionally closed out and is never paid.
DUR SEQ_NBR TRC TL_QUANTITY PAYABLE_STATUS TL_PYBL_ REASON_CD ORIG_SEQ_NBR 10/10/2010 0:00
543210001
KUREG
6
IG
MRJ
0
10/10/2010 0:00
543210002
KUREG
2
RP
PNP
543210002
10/10/2010 0:00
543210011
KUREG
-2
ES
543210002
10/10/2010 0:00
543210012
KUREG
6
ES
0
10/10/2010 0:00
543210013
KUREG
2
ES
0
10/10/2010 0:00
543210014
KUOVT
1.9125
ES
0
10/10/2010 0:00
543210015
KUOVT
.6375
ES
0
For this scenario, SEQ_NBR 543210001 is rejected by payroll, and then closed by the user. The user intentionally did not want this row paid. SEQ_NBR 5643210002 (TL_QUANTITY=2) is in rejected status, but this row could still be picked up for payroll. Then there is a change in reported time that causes the system to create offsets. The offset row is SEQ_NBR 543210011, and new time is generated for 543210012 through 543210015.
Time and Labor publishes the following information to Clairvia:
DUR SEQ_NBR TRC TL_QUANTITY PAYABLE_STATUS TL_PYBL_ REASON_CD ORIG_SEQ_NBR 10/10/2010 0:00
543210012
KUREG
6
ES
0
10/10/2010 0:00
543210013
KUREG
2
ES
0
10/10/2010 0:00
543210014
KUOVT
1.9125
ES
0
10/10/2010 0:00
543210015
KUOVT
.6375
ES
0
-
Scenario 5: For EMPLID KU0015, EMPL_RCD=0, Adjust Paid Time added a row (SEQ_NBR starts with ‘99999’ and RECORD_ONLY_ADJ = Y).
DUR SEQ_NBR TRC TL_QUANTITY PAYABLE_STATUS RECORD_ONLY_ADJ ORIG_SEQ_NBR 10/10/2010 0:00
999990001
KUMLO
1.5
CL
Y
0
10/10/2010 0:00
999990002
KDSAD
–1.75
CL
Y
0
For this scenario, Time and Labor does not publish any information to Clairvia.
-
Scenario 6: For EMPLID KU0015, EMPL_RCD=0, the employee has been paid and a check reversal has been created.
DUR SEQ_NBR TRC TL_QUANTITY PAYABLE_STATUS ORIG_SEQ_NBR TL_PYBL_ REASON_CD INITIAL_SEQ_NBR 10/10/2010 0:00
543210001
KUREG
8
DL
0
543210001
10/10/2010 0:00
543210002
KUOVT
2
DL
0
543210002
10/10/2010 0:00
543210011
KUREG
-8
RV
543210001
CRV
543210001
10/10/2010 0:00
543210012
KUOVT
–2
RV
543210002
CRV
543210002
For this scenario, Time and Labor publishes the following information to Clairvia:
DUR SEQ_NBR TRC TL_QUANTITY PAYABLE_STATUS ORIG_SEQ_NBR TL_PYBL_ REASON_CD ORIG_SEQ_NBR 10/10/2010 0:00
543210011
KUREG
0
RV
543210001
CRV
543210001
10/10/2010 0:00
543210012
KUOVT
0
RV
543210002
CRV
543210002
-
Scenario 7: For EMPLID KU0015, EMPL_RCD=0, the employee has been paid and a check reversal has been created. However, the user wants the new estimated rows to be generated for future payment.
DUR SEQ_NBR TRC TL_QUANTITY PAYABLE_STATUS ORIG_SEQ_NBR TL_PYBL_ REASON_CD INITIAL_SEQ_NBR 10/10/2010 0:00
543210001
KUREG
8.5
RV
543210001
CRV
543210001
10/10/2010 0:00
543210010
KUREG
-8.5
RV
543210001
CRV
543210001
10/10/2010 0:00
543210011
KUREG
8.5
ES
0
543210001
For this scenario, Time and Labor publishes the following information to Clairvia:
DUR SEQ_NBR TRC TL_QUANTITY PAYABLE_STATUS ORIG_SEQ_NBR TL_PYBL_ REASON_CD INITIAL_SEQ_NBR 10/10/2010 0:00
543210011
KUREG
8.5
ES
0
543210001
Message Definition
When you run the TL_PUB_TLDAT process from the Publish Time and Labor Data page, the system publishes the TL_TIME_DATA Integration Broker message to Clairvia.
This example illustrates the fields and controls on the Message Definition page, showing the parts of the TL_TIME_DATA message. You can find definitions for the fields and controls later on this page.
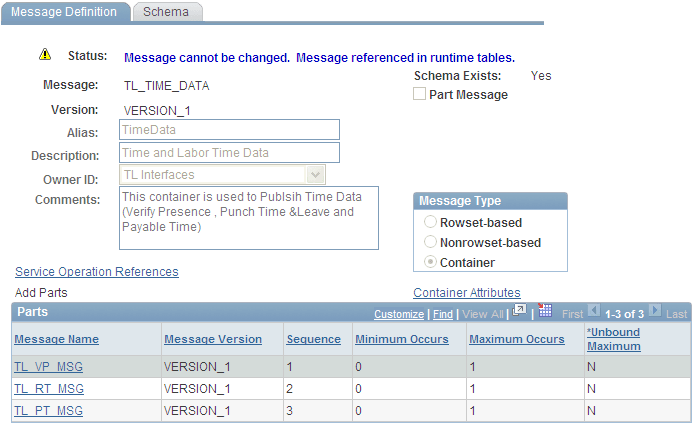
The TL_TIME_DATA message is a container with 3 parts:
-
TL_VP_MSG contains punch time data only. This is the information specified by the Verify Presence option on the Publish Time and Labor Data page.
-
TL_RT_MSG contains reported time data including all punch time, reported leave, and leave balances. This is the information specified by the Reported Time option on the Publish Time and Labor Data page.
-
TL_PT_MSG contains the payable time data. This is the information specified by the Payable Time option on the Publish Time and Labor Data page.
Publish Leave Balances Page
Use the Publish Leave Balances page (TL_TIME_DATA) to send the Base Benefits leave balances for subscribed employees to Clairvia.
Navigation:
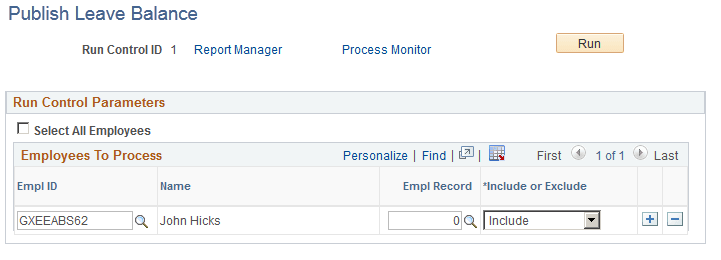
After integrating Time and Labor and Clairvia for the first time, send all of the leave balances for the subscribed employees to Clairvia using the Publish Leave Balances process (TL_PUB_LVBL.)
This example illustrates the fields and controls on the Publish Leave Balances page. You can find definitions for the fields and controls later on this page.
| Field or Control | Description |
|---|---|
|
Select All Employees |
Select to publish the leave balance, as of the current date, for all enrolled employees. Deselecting this field enables you to specify employees to include or exclude from processing. |
Message Definition
When you run the TL_PUB_LVBL process from the Publish Leave Balance page, the system publishes the TL_LB_MSGC Integration Broker message to Clairvia.
This example illustrates the fields and controls on the Message Definition page, showing the parts of the TL_LB_MSGC message. You can find definitions for the fields and controls later on this page.
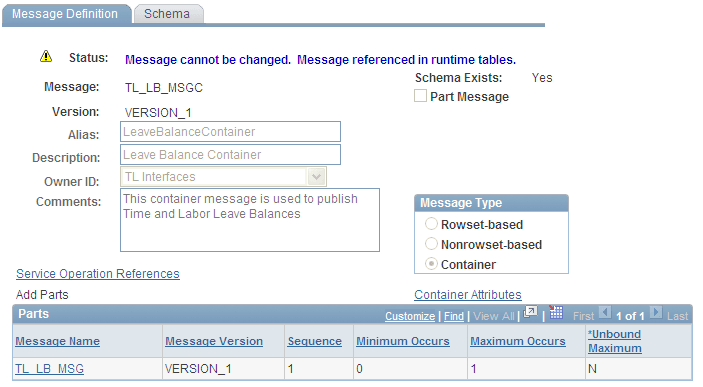
The TL_LB_MSGC message is a container with one part. The message, TL_LB_MSG, contains data from the TL_OWSSR_RUNCTL, TL_RUN_CTRL_GRP, TL_COMPLEAV_TBL, and JOB tables.
Review and Submit Page
Use this Review and Submit page (HR_MSS_CT_SBM_AGFL or HR_MSS_CT_SUBMT_FL) to review transaction information, to add comments, and to submit a request.
Navigation:
Select the Next button from the previous page, or select this step in the graphical representation of the transaction steps.
This example illustrates the fields and controls on the Review and Submit page for an employee transaction.
This example partially illustrates the Review and Submit page for the Clone Position transaction. The Comments and Attachments sections are not shown, but they are the same for the Clone Position transaction as for employee transactions.
Note:
Guided Self Service will not update Job Data with blank field values.
| Field or Control | Description |
|---|---|
|
Submit |
Select this button to finalize the transaction and, if approvals are required, to begin the approval process. If no errors are encountered, the system displays a confirmation page that shows the approval chain. If errors are encountered, the HR administrator is notified. If approvals are not required, the confirmation page appears after the system makes the related database updates. For the Update Job Details for Group transaction, processing time increases with the number of employee records that are being updated. |
Note:
Oracle PeopleSoft delivers Notification Composer Framework to manage the setup and administration of all notifications in one central location.
Once you have adopted the Notification Composer feature, you must use it to create new notifications and manage your existing notifications.
Notifications delivered with HCM Image 47 or later must use Notification Composer.
For more information about Notification Composer Framework, see Enterprise Components: Understanding Notification Composer.
Transaction Details for Employee Transactions
Transactions other than the Clone Position include a Review and Submit area that displays transaction information. The transaction date appears at the top of the page.
| Field or Control | Description |
|---|---|
|
Reason |
Employee data changes are associated with an action and an action reason. This field displays the action reason for that transaction. The action is never visible, but the transaction configuration determines whether the Reason field is visible. |
|
New Information |
This column displays the data that will take effect when the transaction is approved. A yellow dot between the field name and the field value indicates data that is changing. To change a value, return to the appropriate page in the transaction to make the changes. |
|
Current Information |
This column displays the employee’s current data so that you can easily see the changes that are being requested. |
|
Selected Employees |
For the Update Job Details for Group transaction, this section lists the employees whose data is being updated. |
Transaction Details for Clone Position
The same sections and fields that appeared on the Clone Transaction page appear on the Review and Submit page for the transaction. The transaction date appears at the top of the page.
Comments
| Field or Control | Description |
|---|---|
|
Comments |
Enter additional comments for the transaction’s approvers and reviewers. Comments entered here are visible throughout the approval process. |
Attachments
Use the Attachments section of this page to attach supporting documents for a transaction. This section is visible only if the transaction is configured to allow attachments.
The attachments that you add here will appear in all transaction detail pages, including pages for approvers, administrators, and reviewers. The file itself is never duplicated, there are just multiple pointers to the file.
The list of transactions on the fluid Pending Approvals page includes a count of attachments for transactions that have attachments.
Approval-related notifications do not include information about attachments.
After you add an attachment to the transaction, a grid appears in the Attachments area of the page.
This example illustrates the Attachments grid on the Review and Submit page.
| Field or Control | Description |
|---|---|
|
|
Click to open a dialog box where you can select and upload a file. Your device and browser determine the appearance and behavior of this dialog box. Allowable file types depend on your configuration and can be further restricted by the type of device you use. For example, iOS phones allow you to attach photos or videos, but they do not provide access to a full file system where you can select other types of attachments. This button has a text label when no attachments have been added yet. If attachments exist, an icon button appears instead. |
|
File Name |
Displays the original file name of the attachment. Click the link to open the attachment. |
|
Description |
The default description is the file name, but you can modify this to provide more descriptive text. |
|
DateTime Attached |
Displays the date and time that the file was uploaded. |
|
|
Click to remove the attachment. |