Setting Up and Working with the Card Traverser
The Card Traverser tool enables managers to navigate between a list of employees while performing transactions, such as managing team time or absences. The traverser displays information, like employee images and job titles, allowing managers to select the next employee based on those details.
To setup and use the card traverser for system pages, use the Configure Traverser (HCSC_TR_CONF_FLU) and Traverser Component Mapping (HCSC_TR_PNLCFG_FLU) components.
This topic provides an overview of the card traverser, lists supported components, and discusses pages used to set up card traverser.
Pages Used to Set Up Card Traverser
| Page Name | Definition Name | Usage |
|---|---|---|
|
HCSC_TR_CONF_FLU |
Set up card traverser configuration IDs. |
|
|
HCSC_TR_PNLCFG_FLU |
Map card traverser IDs to components in the system. |
Understanding Card Traverser
Card Traverser provides a simple way for managers to easily traverse between lists, like employee's, while working on a transaction page. The traverser cards can be configured to show details to help identify the data so manager's know to select the item to take further action.
When you first open a transactional page that is configured to show the card traversal, the card carousel appears collapsed in the upper right-hand corner of the sub header.
This example illustrates the Card Traverser feature on the Team Time dashboard.

Select the Traverser to expand the carousel.
This example illustrates the Card Traverser feature on the Team Time dashboard.

Use the > (Previous) and > (Next) arrows to navigation through the list of employees.
Note:
Available cards are based on the search results. If your search results returned only one item, the traverser will not appear on the transaction page.
Based on the configuration settings, each card can display a photo and up to three rows of key information to help identify the appropriate person. One row is designated to show up to three action icons per card. If you set up the traverser to display an employee photo and it isn't available, the card will display the employee's first and last name initials. Oracle provides a sample application class that displays the employees photo, name, job title, and action required icons that can show a reported time requiring approvals icon as well as an exceptions icon. With this configuration, selecting an employee card dynamically updates the page or dashboard to reflect that employee’s information.
Select the Close (X) icon in the right-hand corner to collapse the traverser.
Setting Up Traversal
To enable user's to access the traversal feature on a transaction page:
- Set up data sources for the Traverser.
For information on configuring the Traverser and data sources, see the “Traverser Implementation” technical brief, knowledge article KB883417 on My Oracle Support.
- Set up card traverser configurations on the Traverser Configuration Page.
- Map the configuration IDs to component pages using the Traverser Component Mapping - Component Mapping Page.
- Users access the component to which the traverser has been added.
Note:
Traverser requires PeopleTools 8.56 or higher and is currently supported only in large form factor.
Traverser Supported Components
In order to add the traverser to a Fluid page, an area for the traverser should be enabled in the header.
| Product | Configuration ID | Component |
|---|---|---|
|
Absence Management |
MANAGE _ABS |
HGA_SS_BAL_FLU HGA_SS_REQCAN_FLU HGA_SS_REQHIST_FLU HGA_SS_REQ_FLU |
|
Time & Labor |
TEAM_TIME |
TL_COMPLEAVBAL_FLU TL_DSHBD_HDR_FL TL_ENTER_TIME_FLU TL_PAYBTIME_FLU TL_PRE_POP_ELP_FL TL_RPT_TIME_FLU TL_TIME_SUM_FLU |
Traverser Configuration Page
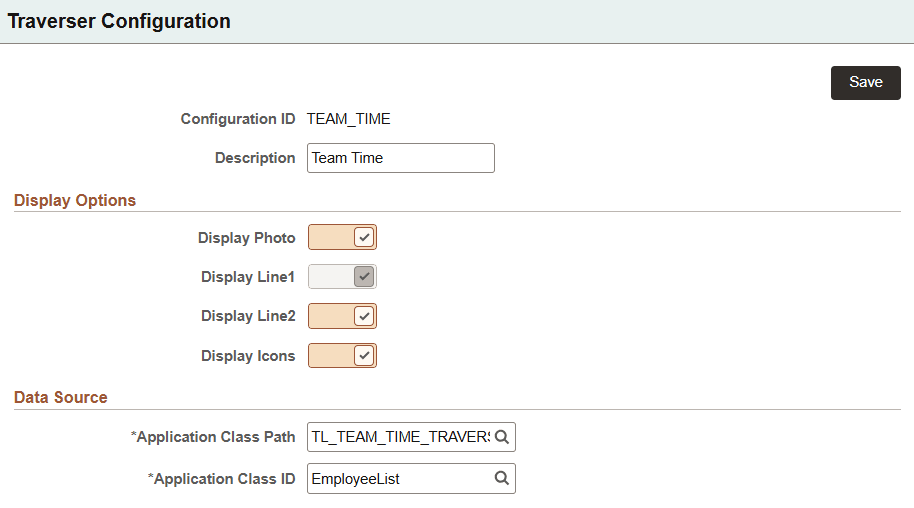
Use the Traverser Configuration page (HCSC_TR_CONF_FLU) to set up card traverser configuration IDs.
Navigation:
This example illustrates the fields and controls on the Traverser Configuration page.
| Field or Control | Description |
|---|---|
|
Display Photo |
Select to display a photo. The photo you use is defined in the data source. If using a photo and one does not exist, such as an employee photo, you can have the card display the first and last initials of the employee's name. |
|
Display Line1 |
This option is always selected and shows information based on the what is provided by the data source. For example, it can be set to always show the employee's name. |
|
Display Line2 |
Select this option to display the next line of information as defined in your data source. |
|
Display Icons |
Select this option to show icons when actions are needed for something, such as an employee. If no actions are needed, icons will not appear on a card. Note. You can display up to three icons per card at a time. |
Data Source
| Field or Control | Description |
|---|---|
|
Application Class Path |
Enter a path that uses the specific class and application package that retrieves the employee data that should appear on the card, like name and job title. |
|
Application Class ID |
Select the class ID. |
Traverser Component Mapping - Component Mapping Page
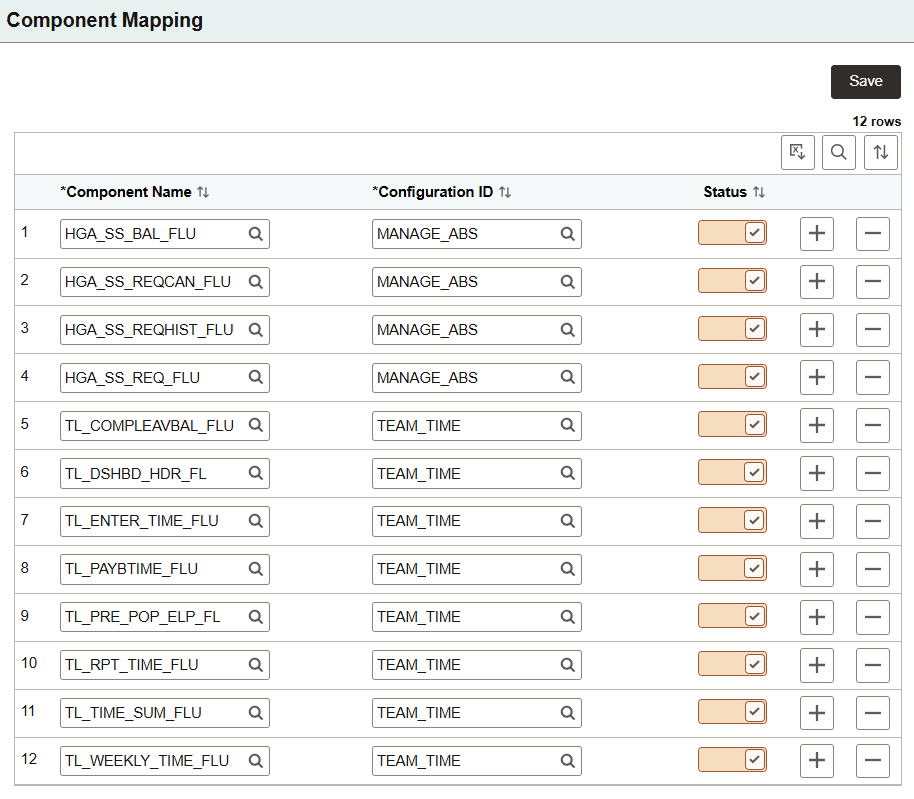
Use the Component Mapping page (HCSC_TR_PNLCFG_FLU) to map card traverser IDs to components in the system.
Navigation:
This example illustrates the fields and controls on the Traverser Component Mapping - Component Mapping page.
| Field or Control | Description |
|---|---|
|
Component Name |
Select the component where the traverser carousel should appear. Note. Components should have an area for the traverser enabled to add the traverser to the header of a page. PeopleSoft HCM currently delivers and supports the Fluid Absence and Time & Labor components. |
|
Configuration ID |
Select the traverser configuration ID that determines what will be shown on the card. Configuration IDs are defined on the Traverser Configuration Page. |
|
Status |
Select to enable the traverser for the component.When deselected, the traverser does not appear on the transactional page. |